


Radio Control Helicopters
Ray Stacy [[email protected]]
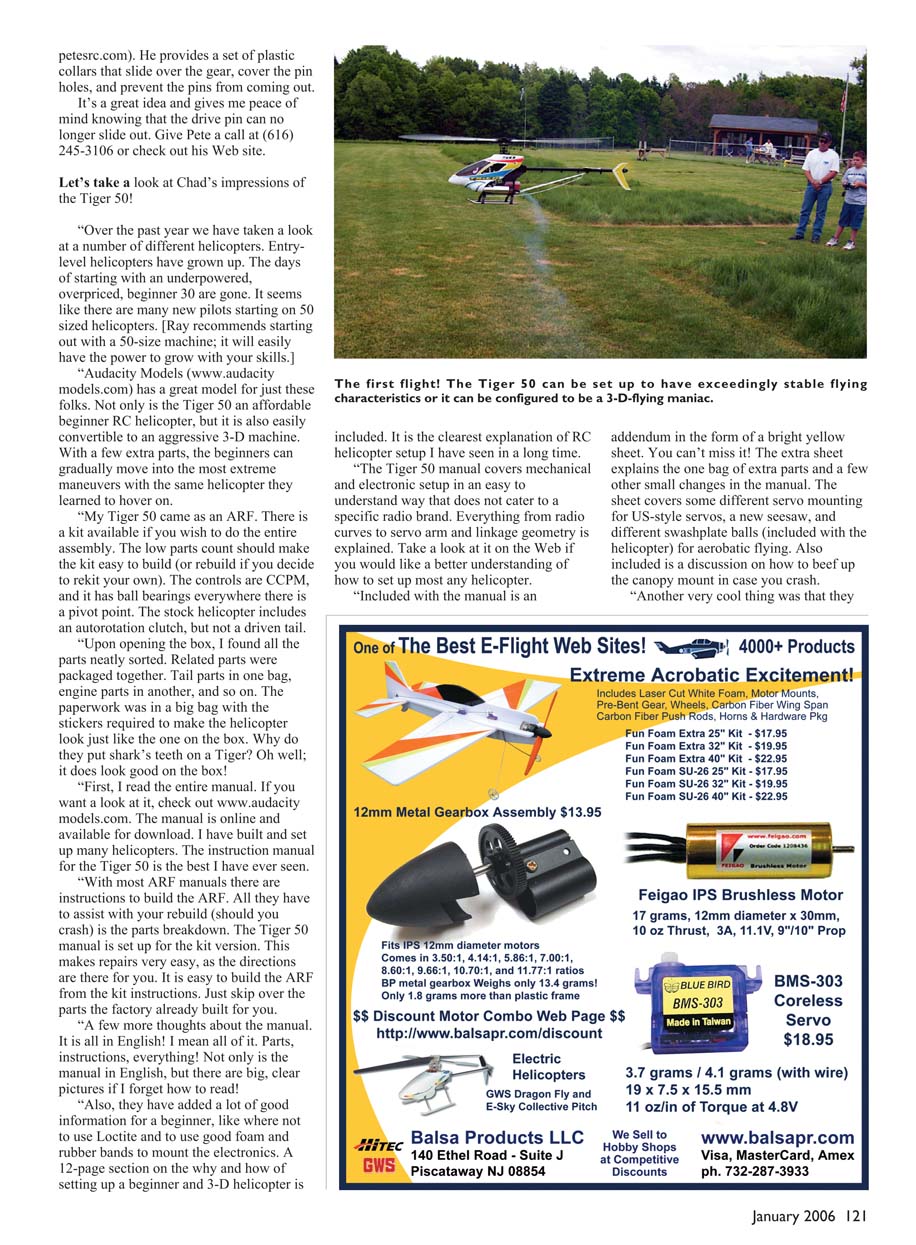
Chad Middlebrook reports on the Audacity Models Tiger 50
This month we get to take a look at the new Tiger 50 from Audacity Models. My flying buddy Chad Middlebrook is always ready to take on a new project; stick around as he shares his thoughts with us on this new helicopter. Chad was even nice enough to let me be the first guy to crash the model!
According to John Beech of Audacity Models, I have the distinct honor of being the first person to break the frames in a crash. Hey, it's always nice to be the first at something!
Also included in this column:
- Pete Schmitt's plastic collars
In the Tiger's defense, I did make it hit the ground at full throttle. I am amazed by how well it survived the accident and equally impressed with the support that Audacity Models provides for the customer.
Before we get to the Tiger 50, I want to show you a cool product I picked up. In a previous column I wrote about my Raptor 90 experiencing tail-rotor failure because one of the drive pins came out of the pinion gear. This could also happen to the bevel gears. In that column I showed one solution that involved putting heat-shrink tubing around the shaft of the gear to help retain the pin.
At the IRCHA (International Radio Controlled Helicopter Association) Jamboree I found a neat new product from Pete Schmitt of Pete's Hobbies (www.petesrc.com). He provides a set of plastic collars that slide over the gear, cover the pin holes, and prevent the pins from coming out. It's a great idea and gives me peace of mind knowing that the drive pin can no longer slide out. Give Pete a call at (616) 245-3106 or check out his website.
Let's take a look at Chad's impressions of the Tiger 50!
Chad Middlebrook: Tiger 50 Impressions
"Over the past year we have taken a look at a number of different helicopters. Entry-level helicopters have grown up. The days of starting with an underpowered, overpriced, beginner 30 are gone. It seems like there are many new pilots starting on 50-sized helicopters. (Ray recommends starting out with a 50-size machine; it will easily have the power to grow with your skills.)
"Audacity Models (www.audacitymodels.com) has a great model for just these folks. Not only is the Tiger 50 an affordable beginner RC helicopter, but it is also easily convertible to an aggressive 3-D machine. With a few extra parts, the beginners can gradually move into the most extreme maneuvers with the same helicopter they learned to hover on.
"My Tiger 50 came as an ARF. There is a kit available if you wish to do the entire assembly. The low parts count should make the kit easy to build (or rebuild if you decide to rekit your own). The controls are CCPM, and it has ball bearings everywhere there is a pivot point. The stock helicopter includes an autorotation clutch, but not a driven tail.
"Upon opening the box, I found all the parts neatly sorted. Related parts were packaged together: tail parts in one bag, engine parts in another, and so on. The paperwork was in a big bag with the stickers required to make the helicopter look just like the one on the box. Why do they put shark's teeth on a Tiger? Oh well; it does look good on the box!
"First, I read the entire manual. If you want a look at it, check out www.audacitymodels.com. The manual is online and available for download. I have built and set up many helicopters. The instruction manual for the Tiger 50 is the best I have ever seen.
"With most ARF manuals there are instructions to build the ARF. All they have to assist with your rebuild (should you crash) is the parts breakdown. The Tiger 50 manual is set up for the kit version. This makes repairs very easy, as the directions are there for you. It is easy to build the ARF from the kit instructions—just skip over the parts the factory already built for you.
"A few more thoughts about the manual. It is all in English! I mean all of it. Parts, instructions, everything! Not only is the manual in English, but there are big, clear pictures if I forget how to read!
"Also, they have added a lot of good information for a beginner, like where not to use Loctite and to use good foam and rubber bands to mount the electronics. A 12-page section on the why and how of setting up a beginner and 3-D helicopter is included. It is the clearest explanation of RC helicopter setup I have seen in a long time.
"The Tiger 50 manual covers mechanical and electronic setup in an easy to understand way that does not cater to a specific radio brand. Everything from radio curves to servo arm and linkage geometry is explained. Take a look at it on the web if you would like a better understanding of how to set up most any helicopter.
"Included with the manual is an addendum in the form of a bright yellow sheet. You can't miss it! The extra sheet explains the one bag of extra parts and a few other small changes in the manual. The sheet covers some different servo mounting for US-style servos, a new seesaw, and different swashplate balls (included with the helicopter) for aerobatic flying. Also included is a discussion on how to beef up the canopy mount in case you crash.
"The finishing setup took a little thought, and a call to Audacity Models. I found when I moved the collective, the back of the swashplate moved more than the front. Audacity said they know about this and are working on a change for the instructions. They explained that the elevator linkage for the CCPM has a 15% bias, reducing the throw at the front of the swashplate.
"To fix the problem, I moved the balls on the two other swashplate servos (aileron and pitch) in one hole on the heavy-duty JR servo arms. Now the swashplate stays level with collective movement. The CCPM mixing was adjusted to give maximum throw with no binding. Problem solved; let's fly!
"My Tiger 50 has the following equipment:
- JR DS8231 servos
- JR R700 receiver
- 2,700 mAh NiMH battery
- Futaba GY401 gyro
- Futaba S9254 tail servo
- O.S. .50 engine running Wildcat high-viscosity 30% nitro
- Curtis Youngblood Muscle Pipe II exhaust
"Yes, this is a little overkill for a beginner setup, but I needed to be prepared for the thrashing it would get when converted to 3-D mode and flown by my 3-D expert.
"The first flights were done with the suggested beginner setup. Slow, stable, and predictable describe the Tiger 50 with this setup. The supplied wood blades took a little tape to balance but worked fine. With some work, the Tiger 50 looped and rolled in this configuration, but it was a very slow roll, and a big loop. It made a great platform for a beginner.
"I greatly enjoyed the relaxed flying I did with the Tiger 50 in the beginner mode. I get enough excitement flying a Falcon 90 EX business jet around the world, skirting thunderstorms, over large bodies of water, with the boss in the back drinking expensive wine, eating $300 seafood platters while smoking a cigar asking, 'How long till we get there?' I fly more to relax! The beginner setup was a great way to relax and just fly.
"With the supplied swash ball extensions, and the weights removed from the paddles, I took her up for some precision maneuvers. The Tiger 50 tracked almost as well as my Bergen gasser—a machine that costs four times as much!
"(No, it didn't have the simplicity of pull start, the cool sound of a gas engine, and the feel of a great big helicopter, but it felt much better than any 30 I have flown and almost as nice as a 90.) I did some loops, rolls, and stall turns. It flew beautifully but the cyclic was a little slow.
"The conversion to 3-D mode took about an hour. All the parts are available through Audacity Models. 3-D swash ball extensions (longer than the included aerobatic ones) increased the throw to the bell input. Hard dampers stiffened the head. Light thin paddles screwed in the aft hole, on a different flybar, reduce stability.
"The seesaw was replaced with the supplied extra one listed in the manual addendum. This allowed the seesaw arms to be moved to increase bell mixing and decrease stability.
"Finally, I installed the limited slip drive for a little tail authority during autorotations. Subsequent flights showed that the Tiger 50 can be set up to be a respectable 3-D helicopter capable of performing crisp, snappy maneuvers.
"If you are looking for a solid helicopter that is adaptable to your flying style, check out the Tiger 50. It is a well-designed, well-built machine that will give you many hours of satisfaction. If you do require support, it is only a phone call away. Audacity Models: (407) 302-3361."
— MA
Transcribed from original scans by AI. Minor OCR errors may remain.

