

Optimizing the Empire Hobby-distributed Align electric-powered T-Rex
Radio Control Helicopters — Ray Stacy [[email protected]]
THIS IS USUALLY the time of year when we sit indoors, watch the snow fall, and yearn for warmer weather. Not anymore! With the advancement of Li-Poly batteries, brushless motors, and mini/micro helicopters, indoor flying has never been this much fun. Gymnasiums, field houses, and armories are great places to hold indoor fun-fly events.
The Align T-Rex distributed by Empire Hobby (www.empirerc.com) has been my helicopter of choice for this type of activity. I started flying this model a few years ago when it was first introduced.
Models and versions
The original T-Rex looked much like a miniature Thunder Tiger Raptor. Align continued to respond to customer feedback and made many changes and improvements, eventually producing the Align T-Rex 450 XL HDE, T-Rex 450 XL CDE, and T-Rex 450 CDE SE.
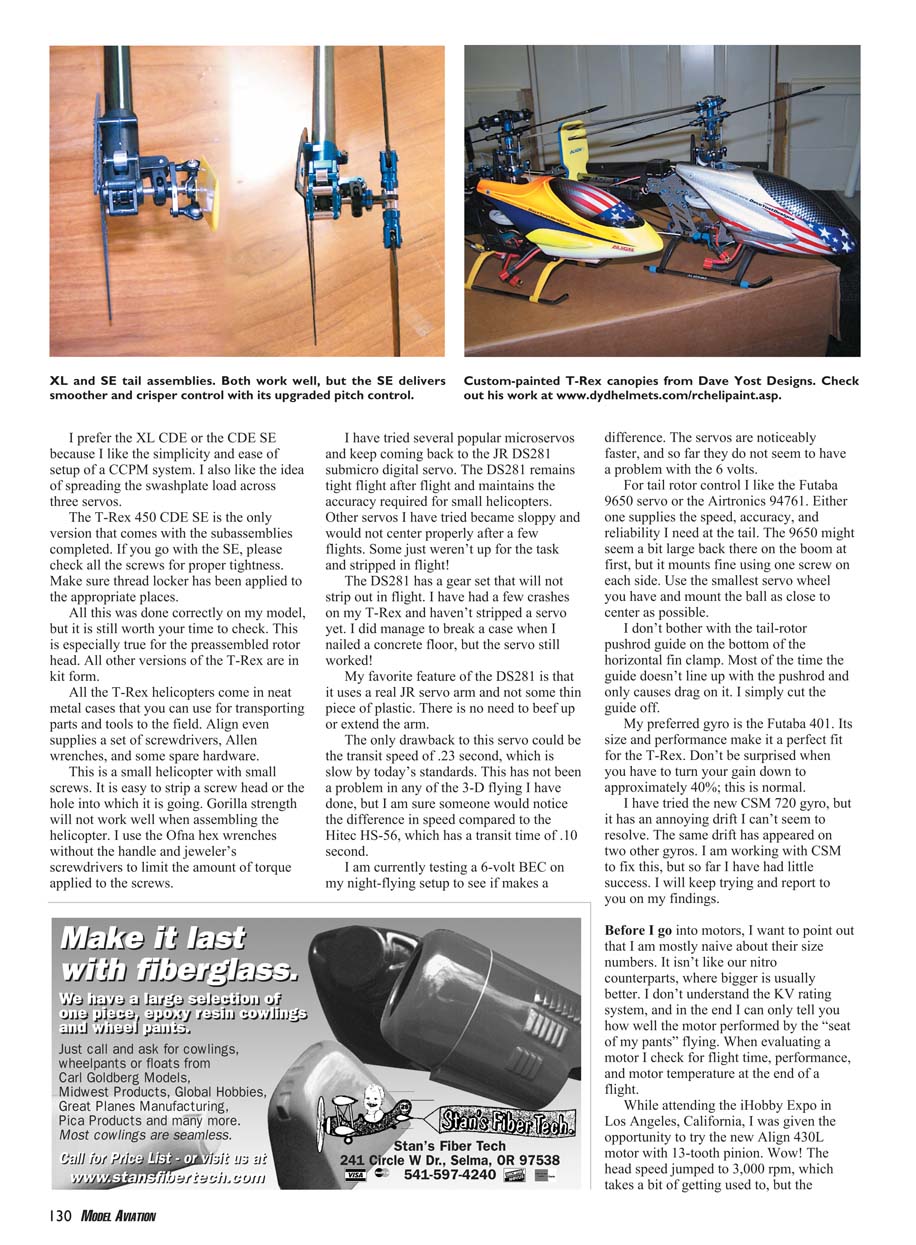
The T-Rex 450 CDE SE is in a league of its own. It is a fully upgraded version that includes every metal improvement available from Align and carbon-fiber-type side frames. The new 430L motor and Align speed controller are included. I like the servo layout on the SE because the servos connect directly to the swashplate.
The T-Rex 450 XL HDE utilizes Raptor-like mechanical mixing for swashplate movement and is a good choice if you don’t have a helicopter transmitter capable of doing Collective Cyclic Pitch Mixing (CCPM). The 450 XL CDE is identical to the HDE for the most part; the difference is that the XL CDE comes with the CCPM retrofitting components.
I prefer the XL CDE or the CDE SE because I like the simplicity and ease of setup of a CCPM system. I also like spreading the swashplate load across three servos. The T-Rex 450 CDE SE is the only version that comes with the subassemblies completed. If you go with the SE, please check all the screws for proper tightness and make sure thread locker has been applied to the appropriate places. All this was done correctly on my model, but it is still worth your time to check—especially the preassembled rotor head. All other versions of the T-Rex are in kit form.
All the T-Rex helicopters come in neat metal cases that you can use for transporting parts and tools to the field. Align even supplies a set of screwdrivers, Allen wrenches, and some spare hardware. This is a small helicopter with small screws. It is easy to strip a screw head or the hole into which it is going. Gorilla strength will not work well when assembling the helicopter. I use the Ofna hex wrenches without the handle and jeweler’s screwdrivers to limit the amount of torque applied to the screws.
Servos and tail
I have tried several popular microservos and keep coming back to the JR DS281 submicro digital servo. The DS281 remains tight, flight after flight, and maintains the accuracy required for small helicopters. Other servos I tried became sloppy and would not center properly after a few flights. Some just weren’t up for the task and stripped in flight. The DS281 has a gear set that will not strip out in flight. I have had a few crashes on my T-Rex and haven’t stripped a servo yet. I did manage to break a case when I nailed a concrete floor, but the servo still worked. My favorite feature of the DS281 is that it uses a real JR servo arm and not some thin piece of plastic. There is no need to beef up or extend the arm.
The only drawback to this servo could be the transit speed of 0.23 second, which is slow by today's standards. This has not been a problem in any of the 3-D flying I have done, but some will notice the difference compared to the Hitec HS-56, which has a transit time of 0.10 second.
I am currently testing a 6-volt BEC on my night-flying setup to see if it makes a difference. The servos are noticeably faster, and so far they do not seem to have a problem with 6 volts.
For tail rotor control I like the Futaba 9650 servo or the Airtronics 94761. Either supplies the speed, accuracy, and reliability I need at the tail. The 9650 might seem a bit large back there on the boom at first, but it mounts fine using one screw on each side. Use the smallest servo wheel you have and mount the ball as close to center as possible.
I don't bother with the tail-rotor pushrod guide on the bottom of the horizontal fin clamp. Most of the time the guide doesn't line up with the pushrod and only causes drag on it. I simply cut the guide off.
My preferred gyro is the Futaba 401. Its size and performance make it a perfect fit for the T-Rex. Don't be surprised when you have to turn your gain down to approximately 40%; this is normal.
I have tried the new CSM 720 gyro, but it has an annoying drift I can't seem to resolve. The same drift has appeared on two other gyros. I am working with CSM to fix this, but so far I have had little success. I will keep trying and report my findings.
Motors and speed controllers
Before I go into motors, I want to point out that I am mostly naive about their size numbers. It isn't like our nitro counterparts, where bigger is usually better. I don't fully understand the KV rating system, and in the end I can only tell you how well the motor performed by the seat of my pants. When evaluating a motor I check for flight time, performance, and motor temperature at the end of a flight.
While attending the iHobby Expo in Los Angeles, I was given the opportunity to try the new Align 430L motor with a 13-tooth pinion. Wow! The head speed jumped to 3,000 rpm, which takes a bit of getting used to, but the increased response is worth it.
My flight time dropped from about 13 minutes to eight to ten minutes, but it was well worth the tradeoff. I have since installed the 430L in all my T-Rex helicopters. The motor continues to run well for me.
I recently tried the 450TH motor from JustGoFly.com. The 450TH is lighter and smaller than the 430L, but it performs just as well. Using a 13-tooth pinion, the head speed dropped to roughly 2,600 rpm, but the helicopter’s performance did not suffer in any way I could notice. In fact, it is difficult to bog this motor down. I was amazed by how cool the motor was after a flight. I hope to try a 15-tooth pinion and make it work a little harder.
There are a number of motor controllers available. I have tried Align, Castle Creations, Hyperion, and Quark types, all of which have worked very well. I have always picked a 30-amp or larger controller.
The Quark controller from Sky & Technology (www.sky-technology.net) has a smooth transition and appears to provide extra power and run time, which I found interesting from actual flying experience—not detailed bench testing.
I have read on online forums that some people try to use the speed controller’s governor mode. Some have had success and some have not. I have never taken the time to do this.
I run the controller in normal mode with soft start enabled and the brake disabled. This configuration and a simple throttle curve have worked exceptionally well. My stunt throttle curve consists of three points: 100%, 80%, and 100%. It can’t get much simpler than that.
Batteries and chargers
For power I use the Thunder Power (www.thunderpower-batteries.com) ProLite 2100 mAh 3S pack or the Hyperion (www.empirerc.com) Velocity Lite 2100 mAh pack. The Thunder Power pack has a rating of 15C and the Hyperion pack has a rating of 18C. The C rating refers to the discharge capacity of your battery. To calculate the actual discharge rate, multiply the C rating by the capacity of the battery. Examples:
- 2100 mAh battery, 10C = 2,100 x 10 = 21,000 milliamps, or 21.0 amps
- 2100 mAh battery, 18C = 2,100 x 18 = 37,800 milliamps, or 37.8 amps
In testing I found that the Thunder Power and Hyperion packs perform identically.
At the time of this writing I received a Cellpro Slimline 2100 mAh 3S pack from Greg Covey at FMA Direct (www.fmadirect.com). The pack doesn’t have a C rating on it and I couldn't find this exact pack on the FMA Direct Web site, but I would guess that it is comparable to the Hyperion and Thunder Power packs I am running.
I decided to take a break from writing this column to do a quick comparison of the three battery packs. I found that each pack will give me a solid 10 minutes of good 3-D performance before the head speed starts to drop. During this quick test I had my first swashplate failure, which I will detail later.
I use two chargers to keep my battery packs ready at all times. The first is the ElectriFly Triton from Great Planes. This universal charger does a nice job of letting me know exactly how much charge I used during a flight.
After the 10-minute flight with the Cellpro Slimline, I recharged the pack on my Triton and found that it accepted 1,810 milliamps. This tells me I depleted most of the usable energy on the 2100 mAh pack and it was time to land.
If I am uninterested in evaluating a battery pack and simply want to bring everything back to full charge, I use the ElectriFly PolyCharge4 from Great Planes. It has four independent outputs capable of charging one- to four-cell Li-Poly batteries. This is a nice charger to have at fun-fly events when you want to go through batteries faster than you can recharge them.
Blades
The T-Rex comes with a set of wood blades and a set of carbon-fiber blades. Both do well for most flying, but for serious, hard-banging 3-D I prefer a stiffer carbon-fiber blade. It provides the crisp response required for that type of flight.
I have tested two brands of blades: SAB and Hyperion. Both deliver superior quality and performance while reducing drag, therefore placing less load on the drive train and motor. The result is a smoother-running helicopter and longer run times.
Assembly and setup tips
- Use a ball-link reamer on all links. A small amount of drag will quickly destroy your helicopter’s performance.
- If links feel tight after assembly, loosen them slightly—you may be chasing control problems caused by binding.
- Don’t run the tail-rotor belt too tight. I didn’t know this at first and could not understand why I was tearing up belts and pulleys every six or seven flights. Either the belt would short or it would get jammed in the tail rotor housing and melt a pulley. After loosening the belt I have not destroyed a belt or pulley. The belt may look loose, but it never slips.
- Check your swashplate! It can separate and most certainly will before a crash. Either the metal or plastic swashplate can separate.
- When attaching ball links to the tail-rotor pitch plate, make sure not to overtighten the screws. If there is no play in this area, there will be binding as the slider passes over midpoint. This can cause a tail wag and lead you to chase gyro and tail-rotor servo settings.
I recently test-flew a friend’s new T-Rex that had not had its ball-links reamed during assembly. Even though the links felt good, I was always chasing the machine for control. Loosen the links and you will be fine.
While attending the World Heli Micro Cup in Los Angeles (www.rcuniverse.com/magazine/) I mentioned belt tension to Jason Krause. His first comment was that the belt was too tight. I looked at Jason’s T-Rex, and there was no twang tension on the belt.
Go easy on the screws! I know I mentioned this earlier, but I am repeating it: they will strip without warning.
I found a handy cheat sheet for making the T-Rex links on www.rcgroups.com. Craig Harvey of Canada found the T-Rex manual could be confusing when assembling the many required links. He created a PDF that lays out the exact lengths for all the links, and it is extremely helpful during assembly. According to Craig, print the page using "None" for the Page Scaling option and you'll be able to quickly and easily adjust any XL linkage to the correct lengths. You can download the PDF at www.rcgroups.com/forums/showthread.php?t=440578.
Swashplate repair (my method)
Following are my tips and how I repaired my swashplate after it came apart mid-flight:
- Don't take a chance with any Align swashplate. When you remove it from the package, do some work on it.
- Sometimes heat and pressure are not even necessary to "pop" these swashplates apart. If heat is needed, I used a soldering iron—the same one I use to solder Deans plugs and wires—and heated the inside of the swashplate from underneath. Then I placed the swashplate on top of a 7/16 socket (it fits the underside perfectly). I pushed down a few times on the outer swashplate balls, and "pop!" it came right off. I tried using my thumb underneath and it didn't get the job done. The secret was the 7/16 socket.
- Scrape away the old glue; it might be tough to see because it's pretty much clear, but it's there. I used a small flathead screwdriver to get the job done.
- Get some decent Loctite. Opinions vary about what to use, but I employed the same stuff Hacker technicians told me to use on my metal-to-metal Hacker motor: green Loctite (Permatex brand). Place one drop on a scrap piece of plastic. Using a toothpick (or a very small flathead micro screwdriver) spread the adhesive on the inner swashplate surface as a very thin layer. You will discard most of the drop. If you use too much you risk gumming up the bearing.
- Let the Loctite dry overnight, and then do a quick thumb test. Don't use a socket this time because you don't want to get it back off—just test it.
Note: Neither Loctite nor its competitors are recommended for swashplates that are all plastic or plastic/metal combos; they can make the plastic brittle. In that case cyanoacrylate may be the best choice, although I have heard of people using JB Weld.
Upgrades and accessories
For those who love bling, Align and many aftermarket companies sell numerous upgrades for the T-Rex. I was amazed by how affordable the upgrades are. You could go crazy buying blue-anodized metal parts for your model, and eventually you would end up with the T-Rex 450 CDE SE. I held back on installing upgrades unless they offered enhanced performance.
The only upgrades I feel are necessary for the T-Rex XL are the metal head block with mixer base and the metal swashplate. Once you start looping and rolling, the plastic head block will quickly loosen on the main shaft and the plastic mixer base gets sloppy on the guide pins. Align's new tail-rotor pitch plate (part HS1138T) is a nice addition; it removes any binding in the tail-rotor control system.
If you get the new pitch-plate assembly, also get the upgraded tail-rotor hub (part HS1105). Make sure this tail-rotor hub assembly has hardened 2mm Allen-head screws to attach the blade grips. The original soft screws may break and throw a tail-rotor blade. If you already have this assembly and did not receive the new screws, email Align or your distributor and they will get you the screws.
Most other upgrades are nice-to-have rather than required. I tend to stay away from metal blade grips—I like the blade breaking off in a crash and taking its energy with it. Remember the crash I mentioned earlier? One of the blade grips broke, but the Hyperion carbon-fiber blades did not.
Align has a nice carrying case that will hold the T-Rex when your helicopter is complete. There is room in the case for your transmitter, batteries, and assorted tools. This is a great accessory if you plan on traveling with your model.
Final thoughts
With the right setup and attention to maintenance, any T-Rex configuration is capable of many hours of serious 3-D performance. I have found that it does well indoors and outdoors; I have flown mine in a light breeze with no problem. Drop the head speed and you have a nice helicopter to learn on.
Crashing a T-Rex won't break your bank account—Align has made sure spare parts are reasonably priced. If you have been looking to get into electric-powered helicopters but were concerned about performance or fragility, check out the T-Rex. At less than $200 for the kit, the T-Rex XL will give you real helicopter performance at a price that won't make you afraid to fly it.
Transcribed from original scans by AI. Minor OCR errors may remain.

