

Radio Control Helicopters
Ray Stacy [[email protected]]
A guest helicopter review by Gordie Meade
One of the things I love about this hobby is the variety. From electric to gas power, there are many models available. One of my goals for this column is to share as much information as possible about as many different helicopters as possible.
There is no way I can fly every machine, so I rely on friends I have made throughout the years to share their knowledge with us. Gordie Meade is one of those people. He is a longtime FAI F3C pilot, but, more important, he is a straight shooter with an honest opinion.
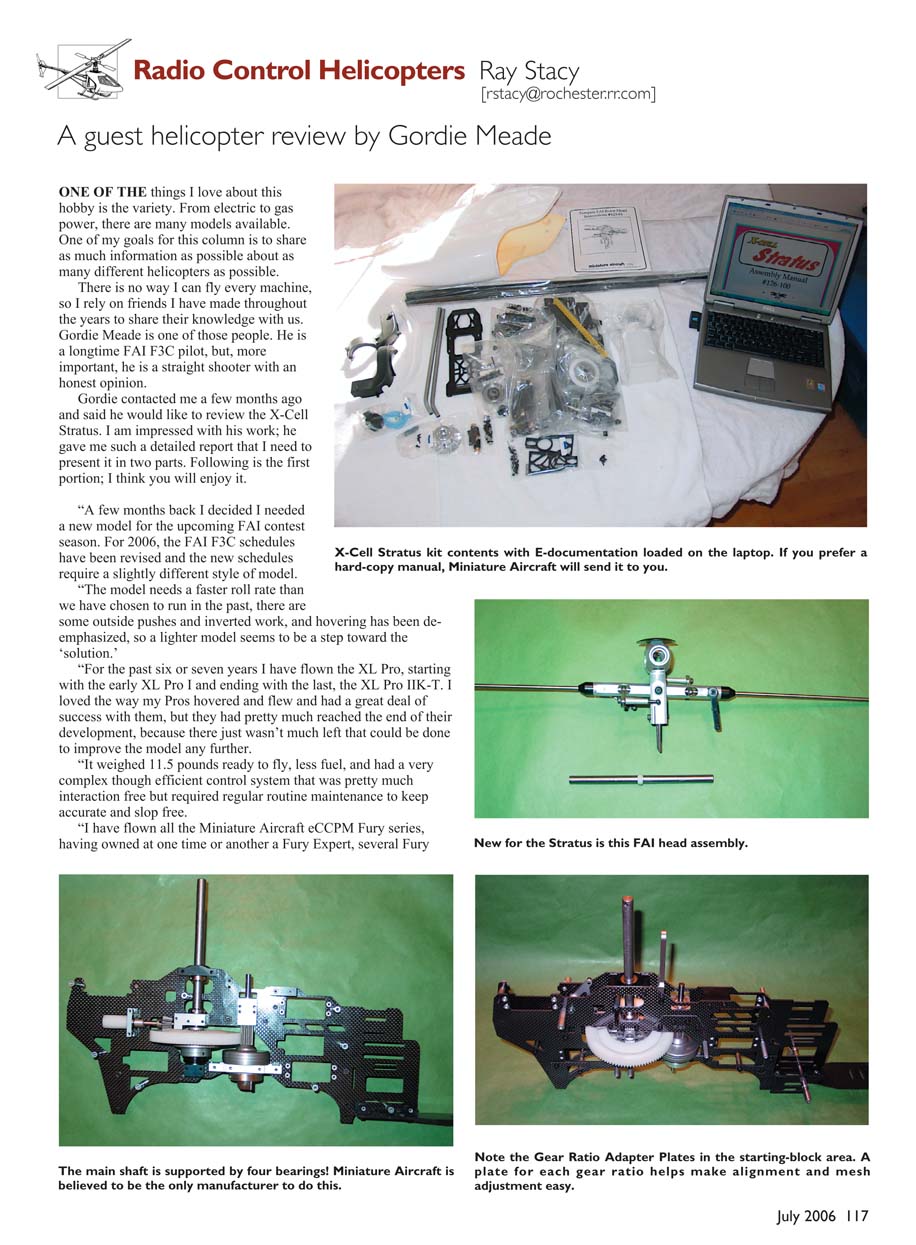
Gordie contacted me a few months ago and said he would like to review the X-Cell Stratus. I am impressed with his work; he gave me such a detailed report that I need to present it in two parts. Following is the first portion; I think you will enjoy it.
A few months back I decided I needed a new model for the upcoming FAI contest season. For 2006, the FAI F3C schedules have been revised and the new schedules require a slightly different style of model.
The model needs a faster roll rate than we have chosen to run in the past, there are some outside pushes and inverted work, and hovering has been deemphasized, so a lighter model seems to be a step toward the solution.
For the past six or seven years I have flown the XL Pro, starting with the early XL Pro I and ending with the last, the XL Pro IIK-T. I loved the way my Pros hovered and flew and had a great deal of success with them, but they had pretty much reached the end of their development, because there just wasn’t much left that could be done to improve the model any further.
It weighed 11.5 pounds ready to fly, less fuel, and had a very complex though efficient control system that was pretty much interaction free but required regular routine maintenance to keep accurate and slop free.
I have flown the Miniature Aircraft eCCPM Fury series and owned a Fury at one time or another.
I got in touch with Miniature Aircraft and ordered a Stratus conversion for my Tempest FAI. Since the change in the model was basically just a frame change, I had the Stratus conversion ready to fly in a comparatively short time.
The model, ready to fly with the Tempest FAI rotor head, the open tail-rotor gearbox, 45-gram flybar paddles, YS .91 with Hatori SB16FH muffler, and 205-gram symmetrical 720mm blades, weighed in at 10 pounds, 2 ounces—a stunning loss of a pound and a half off my Nats FAI XL Pro IIK-T. And as a bonus, the tank is rear mounted on the Stratus versus front mounted on the Fury and Tempest for a more consistent center of gravity as the fuel burns off.
Most of the seriously competitive fliers I know will tell you that in order to be ready to seriously compete in FAI F3C, you need to have two identical models ready to fly so that if you run into a minor problem and need to go to your back-up model, it’s very similar in performance to your primary model. It also means you can split practice time among two or three models and not put so much wear on a single model, so it will last much longer before needing a rebuild.
Since I had already decided to go with the Stratus for the 2006 season, I needed a second model. I placed a call to the Stratus designer, Tim Schoonard, at Miniature Aircraft USA in Sorrento, Florida, discussed my specific needs, and placed my order for a full Stratus FAI kit. The Stratus kit comes in four varieties based on the style of flying you want and the engine you opt to use:
- Stratus 3D kit (for 3-D fliers):
- O.S. .91 version comes with an 8:18 gear ratio.
- YS .91 version comes with an 8:45 gear ratio.
- Stratus FAI kit (for F3C):
- O.S. .91 version comes with a 7:75 gear ratio.
- YS .91 version comes with a 7:91 gear ratio.
I have used the YS .91 with the 7:91 gear ratio in my competition XL Pro IIs for several years and found the combination to be smooth and fuel efficient in hover and to have excellent straight-line speed in forward flight.
From that experience, I selected the #1026-4 FAI Stratus with the 7:91 gear ratio for the YS .91 and a short time later the “Little Brown Helicopter Truck” pulled up in front of the house and the driver brought me a great big box. Upon opening the big shipping box, I found inside a nicely packed kit box.
The kit box is factory sealed, so the buyer can tell if the kit has been opened, and each kit has its own unique serial number. If you register the model with Miniature Aircraft, you will be kept informed of updates and new information about the model as it becomes available.
I found the contents to be well protected and all machined and plastic parts to be shrink-wrapped in plastic. The fiberglass canopy is in a separate area of the box, protected from shifting contents. It is currently the same canopy the Tempest uses. My kit still has the interim fuel tank, which will eventually be replaced by a custom molded tank.
The assembly instructions come on a CD as an Adobe PDF file and require the use of Adobe Reader, which is a free download on the Internet. Since there is no printed main manual, assembly requires a little creative thinking.
The construction manual is lengthy at 186 pages, plus there is a separate printed manual for the Tempest FAI rotor head. You can take the CD to a print/copy place like Kinko’s and have a hard copy made if you want to have it available for bench reference. Since I have a laptop computer, I can place the laptop on my building table and look at the pictures, read the instructions, and build at the same time.
The manual is full of pictures and each part has its own identification picture; the model is then shown in stages of assembly. Adobe Reader has a built-in magnifier so you can blow the pictures up to 200% if you want to see details. Every bolt is identified by its size and length and is shown both separately and installed in the assembly.
As with all the Miniature Aircraft models, the Stratus goes together in subassemblies: the lower main frames, the upper main frames, the head, the tail rotor, and so on. Each subassembly comes in a bag, and within the main bag are smaller bags with identification labels, which are in alphabetical order of their use. Start with Bag 1A, 1B, etc., follow the assembly instructions until you run out of bags, and you have a finished model.
The Stratus differs from most current model designs in one major way: the way the engine is mounted to the lower main frames. Most models, including the other Miniature Aircraft glow designs, have a machined aluminum engine mount that bolts to the main frames and the mounting lugs on the engine. The Stratus uses the engine as an integral part of the frame.
The same bolts that hold the backplate on the engine are now extended through a carbon-fiber baseplate as the primary engine mount. There are smaller stabilizer mounts that bolt to the engine’s normal mounting lugs, and the whole subassembly bolts to the baseplate of the model and is adjustable for engine-to-clutch alignment. The net result is a very open, uncluttered engine area with good access to all engine components and needles.
Since I am using the YS .91, I borrowed an idea from F3C pilot Dennis Purduski and drilled and tapped two holes for long ball links into the lower main baseplate. Instead of plugging and unplugging fuel lines every flight, I use a T fitting in both the fuel and pressure lines and use these ball links as plugs.
This makes for a very nice, neat fuel system, and you can vent the fuel tank after a flight by pulling the vent line easily off the ball link using only one hand, which prevents the engine from flooding between flights, and it keeps the fuel system neatly out of the way. It’s really easy to do while the model is in construction and saves a lot of effort when preparing for a contest flight.
Also I use different color fuel line for different applications. On all my models, fuel line is green, pressure line is yellow, so I never get confused and pull the wrong one and spray myself with fuel while trying to vent the tank.
You will also notice that I use very short landing gear skids. The kit comes with the standard X-Cell Tuff Struts, which are very good, but for several years I have been using the standard white Tuff Struts with the X-Cell 30 skids. They are the same outside diameter and fit the struts perfectly but are shorter and lighter in weight.
Since an FAI model is required to land in a 1-meter circle, the smaller footprint of the shorter skids gives just a little more margin for error. Plus I think they look nicer, smaller, and more compact. I cannot tell any trim difference in forward flight performance, but I like the profile of the smaller skids when in hover.
I spent quite a bit of time getting the cooling fan balanced and aligned on the engine. The Stratus FAI comes with the X-Cell machined aluminum fan which comes pretty well balanced, but I always put a CV-1 magnet in the fan even if I don't plan on using a governor since I may change my mind and it's a pain to install the magnet later.
When everything is new and clean, installing the magnet is easy but does require that you rebalance the fan. I have been using the Top Flite magnetic prop balancer for quite awhile to balance my fans and have had a lot of success. It took me about 15 minutes of testing the fan, drilling a dimple to remove weight from the heavy side, retesting, redrilling, until the fan would stop randomly and would stay in any position it was placed.
If you are planning on using an optical sensor, I'd suggest painting the bottom of the fan flat black except for a 1/2-inch strip which is left natural aluminum color and again rebalance the fan after painting by drilling a dimple or two on the top of the fan between the fins on the heavy side.
After flying F3C for a lot of years now, I always want my fans aligned on the crankshaft of the motor with a runout of less than .001 inch. I have over the years tried about 40 methods of doing this and find some ways are better than others, but none I have ever tried is fool-proof.
For the Stratus, I used a method I got from Ben Minor that requires tapping the fan with a plastic hammer while supporting the back of the crankshaft with a large wooden dowel to keep load off the bearings and engine case and gradually tightening the fan.
It's pretty easy to do if there are two people but a lot tougher when you are working alone, and it took me about an hour and a half to get the fan aligned within +/- .0005 inch, which makes the total runout less than .001 inch, which should be good.
The instructions say to put oil on the collets and spread it around to keep the fans from binding to the collets while tightening. I found a Permatex product called Antiseize Lubricant in a little squeeze tube at the local auto parts store that works even better and makes the fan more easily removable if you need to pull it to do engine work or something. It works great.
If you ever get a fan balanced and on an engine with a zero runout, the model achieves a state of “creaminess” in flight that has to be felt to be appreciated. Creaminess is a term I picked up from Wayne Mann to describe a model that is mechanically really good. The engine drones smoothly, the mechanics are smooth and quiet, and the model just sits in a hover and hums. It's hard to describe in words, but once you see and hear it, there is no doubt in your mind when a model is doing it.
If you elect to use one of the new O.S. .91 SZ engines, it has a slightly different dimension than either the YS .91 or the O.S. .91-C spec, and it does require a different collet set, mounting screws, and baseplate. Miniature has those parts in stock and can supply them to you.
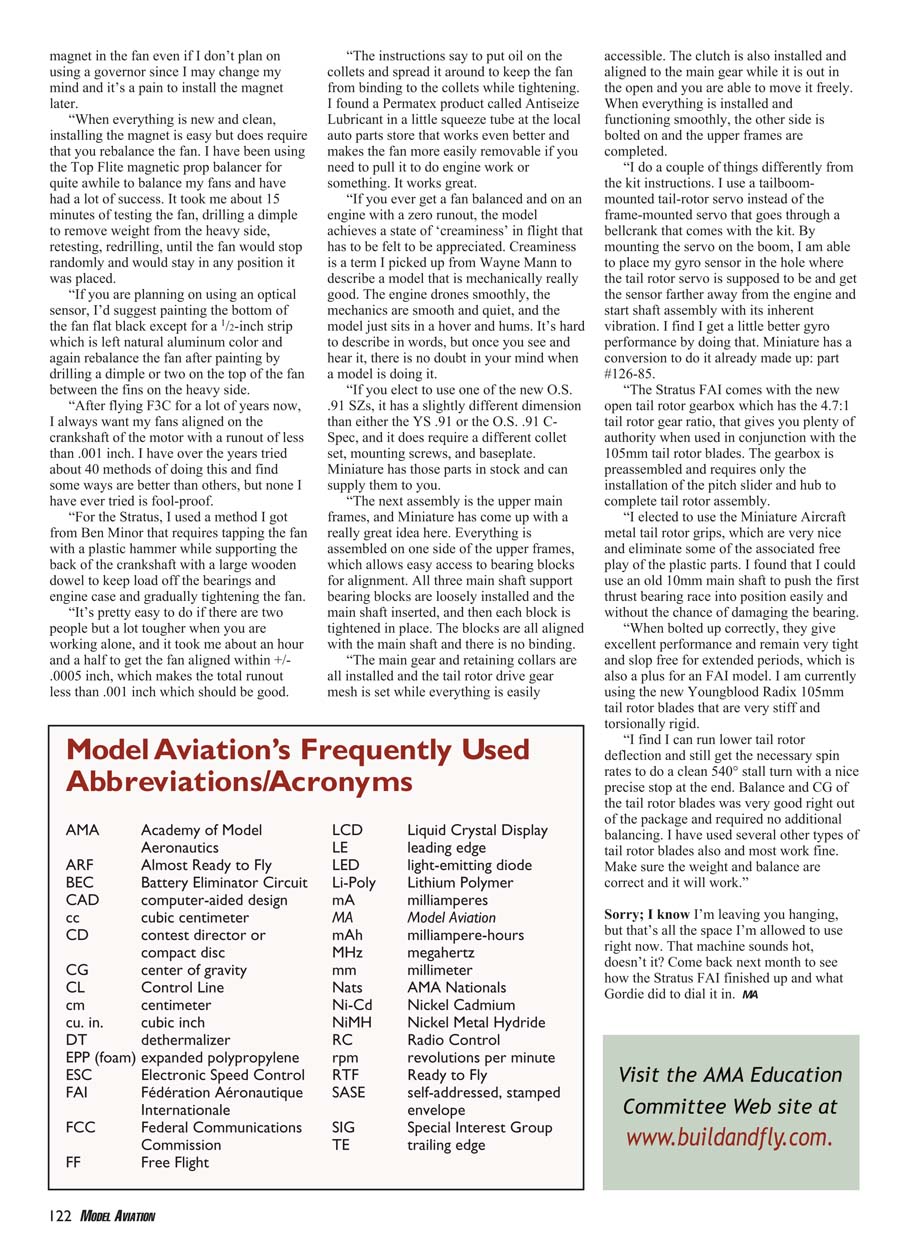
The next assembly is the upper main frames, and Miniature has come up with a great idea here. Everything is assembled on one side of the upper frames, which allows easy access to bearing blocks for alignment. All three main shaft support bearing blocks are loosely installed and the main shaft inserted, and then each block is tightened in place. The blocks are all aligned with the main shaft and there is no binding.
The main gear and retaining collars are all installed and the tail rotor drive gear mesh is set while everything is easily accessible. The clutch is also installed and aligned to the main gear while it is out in the open and you are able to move it freely. When everything is installed and functioning smoothly, the other side is bolted on and the upper frames are completed.
I do a couple of things differently from the kit instructions. I use a tailboom-mounted tail-rotor servo instead of the frame-mounted servo that goes through a bellcrank that comes with the kit. By mounting the servo on the boom, I am able to place my gyro sensor in the hole where the tail rotor servo is supposed to be and get the sensor farther away from the engine and start shaft assembly with its inherent vibration. I find I get a little better gyro performance by doing that. Miniature has a conversion to do it already made up: part #126-85.
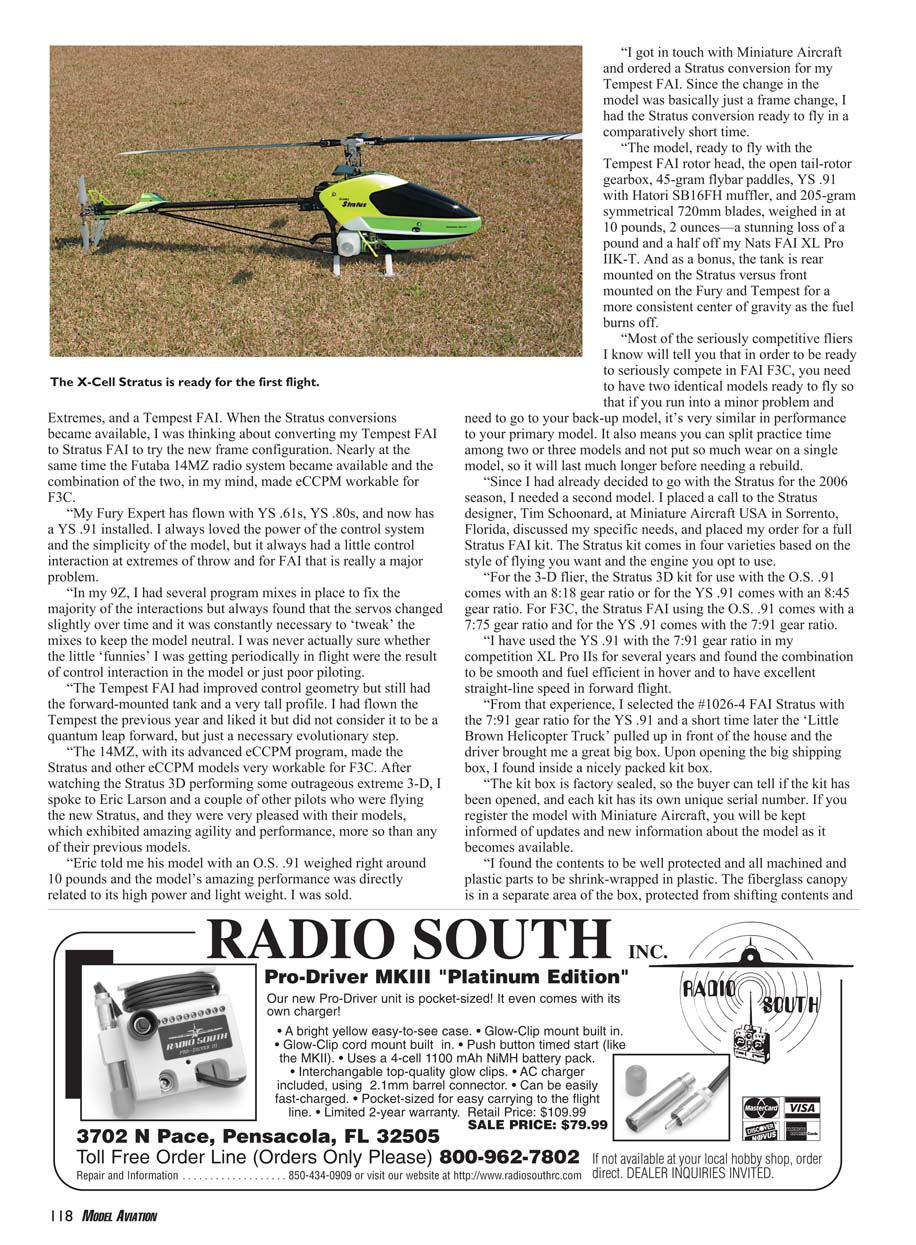
The Stratus FAI comes with the new open tail rotor gearbox which has the 4.7:1 tail rotor gear ratio, which gives you plenty of authority when used in conjunction with the 105mm tail rotor blades. The gearbox is preassembled and requires only the installation of the pitch slider and hub to complete tail rotor assembly.
I elected to use the Miniature Aircraft metal tail rotor grips, which are very nice and eliminate some of the associated free play of the plastic parts. I found that I could use an old 10mm main shaft to push the first thrust bearing race into position easily and without the chance of damaging the bearing.
When bolted up correctly, they give excellent performance and remain very tight and slop free for extended periods, which is also a plus for an FAI model. I am currently using the new Youngblood Radix 105mm tail rotor blades that are very stiff and torsionally rigid.
I find I can run lower tail rotor deflection and still get the necessary spin rates to do a clean 540° stall turn with a nice precise stop at the end. Balance and CG of the tail rotor blades was very good right out of the package and required no additional balancing. I have used several other types of tail rotor blades also and most work fine. Make sure the weight and balance are correct and it will work.
Sorry; I know I'm leaving you hanging, but that's all the space I'm allowed to use right now. That machine sounds hot, doesn't it? Come back next month to see how the Stratus FAI finished up and what Gordie did to dial it in.
MA
Transcribed from original scans by AI. Minor OCR errors may remain.

