
RADIO CONTROL PYLON RACING
Duane Gall, 1267 S. Beeler Ct., Denver CO 80231; E-mail: [email protected]
RITES OF SPRING:
Here it is, May already. How time flies when you're down in the basement inhaling fumes! Before we head out to enjoy the sunshine, I'd like to touch on some preseason maintenance issues and flight-trimming tips.
Batteries — Ni-Cd cycling
- This applies only to nickel-cadmium (Ni-Cd or "Nicad") packs. If you're using lithium-ion or nickel-metal-hydride (NiMH) batteries, cycling isn't required and they have different issues.
- Fully discharge Ni-Cd packs to about 1.1 volts per cell (about 4.4 V for the airborne pack or 8.8 V for the transmitter) under a 200–300 mA load, then charge overnight. Repeat this two or three times.
- Commercial gadgets can measure and control this process, but if you don't have one: place the airplane on the living-room floor, turn on the radio, and wiggle the servos randomly while you watch TV. Extend the transmitter antenna at least halfway so you don't overheat the output transistor. Continue until the servos get sluggish, then charge overnight.
- Cycling often restores capacity. New radio packs sometimes hold only 60–70% of rated capacity until cycled, which can cause "new radio quit on third flight" incidents.
Engines — preseason maintenance
- High-quality fuels (PowerMaster, Red Max) contain castor oil, which can stiffen bearings after a few weeks. To loosen and protect:
- Put a few drops of lacquer thinner down the carburetor barrel and hand-flip the engine several times.
- Follow with a few drops of Marvel Mystery Oil or your preferred lubricant to coat internal parts and prevent rust.
- Flush the fuel tank and lines with rubbing alcohol to remove crud. Chase out the alcohol (it contains about 30% water) with a small amount of fresh fuel.
- Replace all flexible tubing as a precaution.
- If the fuel tank is more than a year old and uses brass tubing, replace it — prolonged fuel exposure can cause hairline cracks in brass.
Airframe checks
- Inspect the entire airframe for stress cracks, loose hinges, enlarged holes in control horns, worn-out clevis threads, sloppy servo gears, etc. It's easy to skip these checks during the season, so do them now.
V-tail considerations (Quickie 500 and similar)
- Since Jim Allen's Quik-V designs appeared, many Quickie 500-style racers use shoulder wings and V-tails. Newcomers often assume a V-tail is required, but many pilots find setting up and trimming a V-tail baffling.
- ARF V-tail models remove the building step but do not remove the need for careful checking and correct rigging. You must dial in the correct control-surface throw and directions.
Mixing and control setup
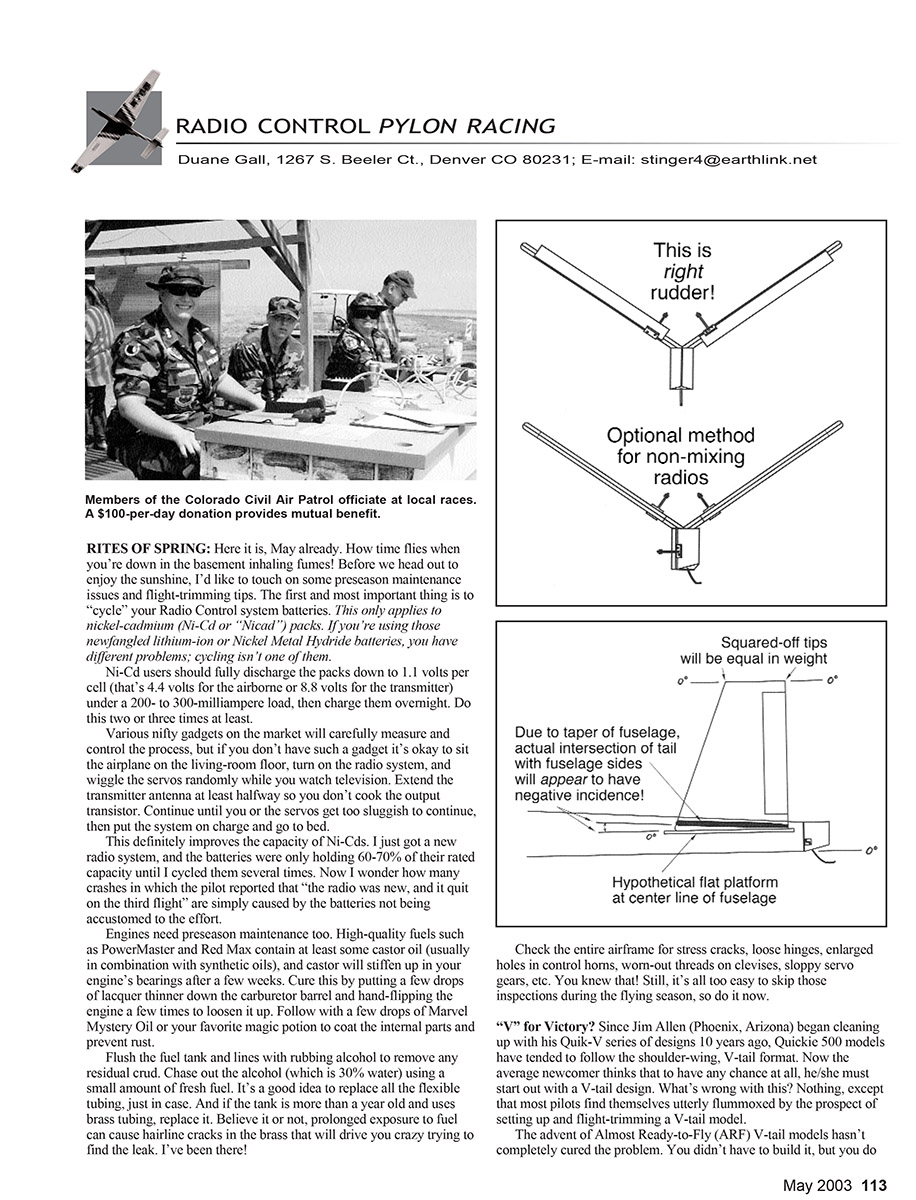
- You do not need a radio with electronic V-tail mixing. If yours lacks V-tail mixing, connect both movable tail surfaces to your elevator servo with a double-ended (Y-shaped) pushrod so each elevator half is driven together. This gives full V-tail benefit in racing flight.
- If you do use mixing, avoid rigging the movable surfaces as though they were ailerons (i.e., right flipper up and left flipper down in response to a right rudder command). That configuration produces left rudder.
Rudder-direction visualization
- A helpful mental image: hold your hands out at your sides, palms up. Raise them over your head and clap. To get correct rudder direction for a V-tail, imagine your hands are the flippers. For a right rudder command, the right flipper should move down and the left flipper move up.
Ground steering for takeoff
- Racing rules require ground steering for takeoff. A simple method: hinge the aft two inches of the fuselage, attach a small skid or tailwheel to the movable section, and use it like a rudder. It won't affect in-flight behavior much, but on the ground it prevents the airplane from slewing sideways from engine torque until ailerons are effective.
Nonmovable surface alignment (the tricky part)
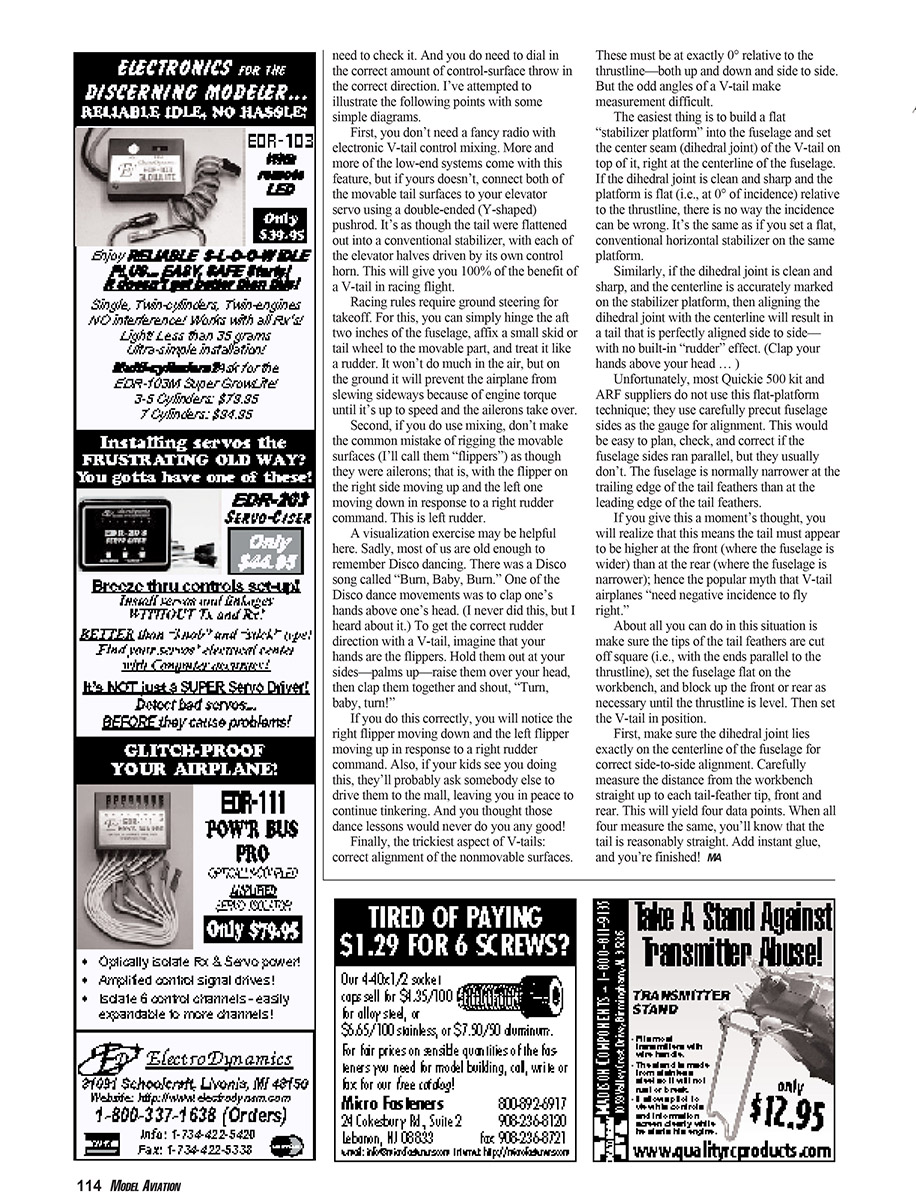
- The fixed (nonmovable) tail surfaces must be at exactly 0° incidence relative to the thrustline — both up/down and side/side. The V-tail angles make this hard to measure directly.
- Best method: build a flat "stabilizer platform" into the fuselage and seat the V-tail's center seam (dihedral joint) on that platform at the fuselage centerline. If the platform is flat (0° incidence) relative to the thrustline and the dihedral joint is clean and centered, the V-tail incidence will be correct — same as placing a flat conventional stabilizer on the platform.
- Align the dihedral joint with the fuselage centerline for correct side-to-side alignment and to avoid built-in rudder effect.
Common kit/ARF alignment issue
- Many Quickie 500 kits and ARFs use pre-cut fuselage sides as the alignment gauge instead of a flat platform. Because fuselage sides are often not parallel (the fuselage narrows toward the tail), this method can make the tail look higher at the front than the rear and leads to the myth that V-tails need negative incidence to fly correctly.
- To work around this:
- Make sure tail-feather tips are cut off square (ends parallel to the thrustline).
- Set the fuselage flat on the bench and block up the front or rear as needed until the thrustline is level.
- Ensure the dihedral joint lies exactly on the centerline for side-to-side alignment.
- Carefully measure from the bench straight up to each tail-feather tip (front and rear) — four measurements. When all four are equal, the tail is reasonably straight.
- Add instant glue (CA) and you're finished.
Finally, check throws, control directions, and everything again before your first flight of the season — enjoy the racing!
MA
Transcribed from original scans by AI. Minor OCR errors may remain.

