
RADIO CONTROL PYLON RACING
Duane Gall, 1267 S. Beeler Ct., Denver CO 80231; E-mail: [email protected]
DESIGNING THE SEEKER
This month I'm going to do something different and go behind the scenes with an airplane designer.
One of the joys of aeromodeling, for me, has always been the challenge of coming up with a "better mousetrap." There are many good mousetraps out there, of course, and with enough ready cash you need never lack for one. But if you do buy one of those, you're accepting all the same limits, compromises, prejudices, and pitfalls that somebody else had when he or she sat down to design and produce it. The result may not suit you. It's like borrowing somebody else's tuxedo.
Quickie 500 and Sport Quickie (AMA events 428 and 424 respectively) allow a surprising range of variation within a few simple parameters. They are perfect for the custom craftsman, and the continuing success of garage-shop innovators using plain old balsa, plywood, and expanded-polystyrene foam shows that the only real limit is human ingenuity.
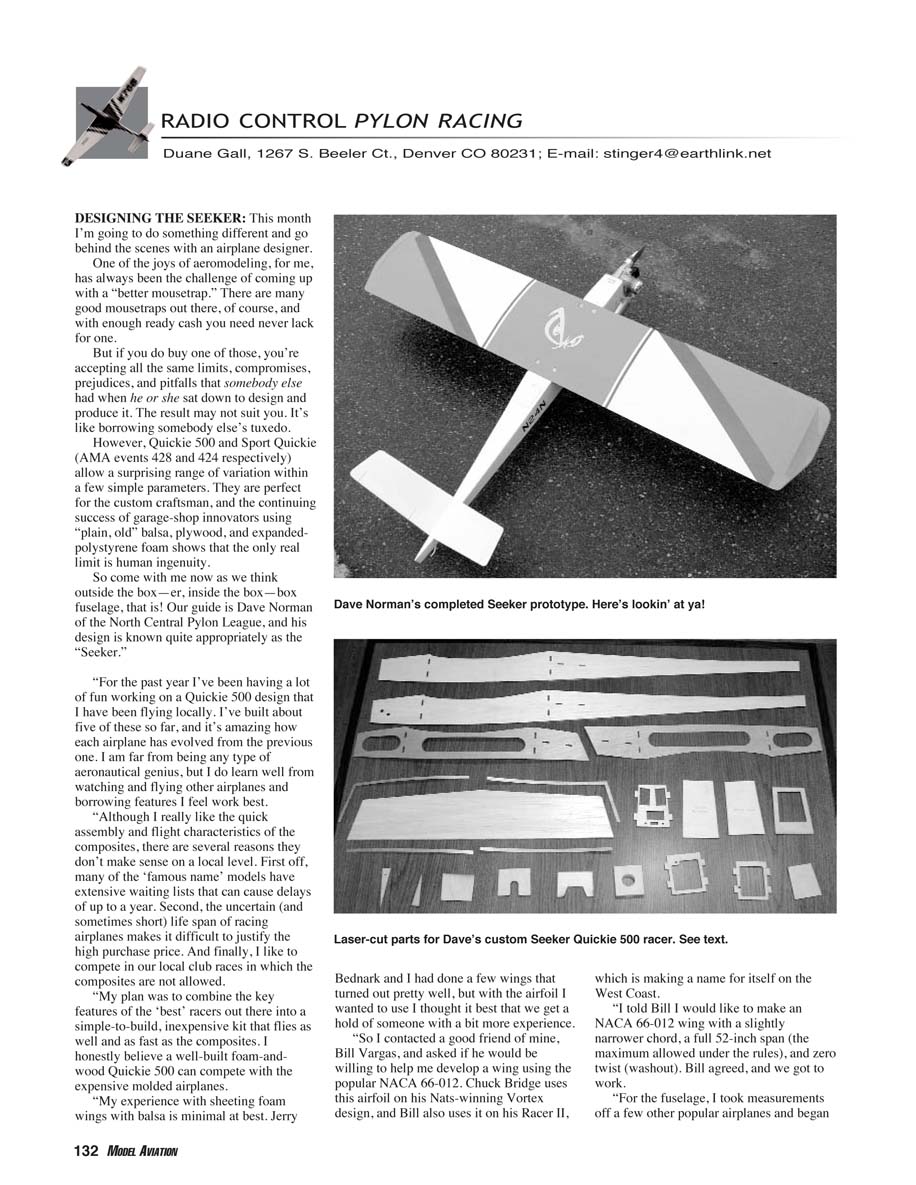
So come with me now as we think outside the box—er, inside the box—box fuselage, that is! Our guide is Dave Norman of the North Central Pylon League, and his design is known quite appropriately as the Seeker.
"For the past year I've been having a lot of fun working on a Quickie 500 design that I have been flying locally. I've built about five of these so far, and it's amazing how each airplane has evolved from the previous one. I am far from being any type of aeronautical genius, but I do learn well from watching and flying other airplanes and borrowing features I feel work best.
"Although I really like the quick assembly and flight characteristics of the composites, there are several reasons they don't make sense on a local level:
- First, many of the 'famous name' models have extensive waiting lists that can cause delays of up to a year.
- Second, the uncertain (and sometimes short) life span of racing airplanes makes it difficult to justify the high purchase price.
- Finally, I like to compete in our local club races in which the composites are not allowed.
"My plan was to combine the key features of the best racers out there into a simple-to-build, inexpensive kit that flies as well and as fast as the composites. I honestly believe a well-built foam-and-wood Quickie 500 can compete with the expensive molded airplanes.
"My experience with sheeting foam wings with balsa is minimal at best. Jerry Bednark and I had done a few wings that turned out pretty well, but with the airfoil I wanted to use I thought it best that we get a hold of someone with a bit more experience.
"So I contacted a good friend of mine, Bill Vargas, and asked if he would be willing to help me develop a wing using the popular NACA 66-012. Chuck Bridge uses this airfoil on his Nats-winning Vortex design, and Bill also uses it on his Racer II, which is making a name for itself on the West Coast.
"I told Bill I would like to make an NACA 66-012 wing with a slightly narrower chord, a full 52-inch span (the maximum allowed under the rules), and zero twist (washout). Bill agreed, and we got to work.
"For the fuselage, I took measurements off a few other popular airplanes and began drawing a side view on a large piece of paper. I used a cross-section of the airfoil to trace the wing saddle, then drew a line through the center of the airfoil and extended this line fore and aft — to the firewall at the front and to the tail at the back. I drew the firewall line in by making it perpendicular to the wing centerline, and I drew in the tail-saddle area by making it parallel to the wing centerline. The idea was to try to get this perfectly at 0/0/0 incidence (tail/wing/firewall).
"I really wanted to keep the fuselage dimensions very close to the minimum sizes allowed. For example, when trying to keep the fuselage height right at the minimum 3½ inches, you have to consider the thickness of the wing, the basic height of the fuselage side, the thickness of the bottom sheeting, plus any fiberglass you may put on the wing center-section and/or epoxy putty to 'pot' the wing saddle for a perfect fit, and any sanding you may want to do to clean things up. These are a lot of variables that individually are quite small, but add up in thickness collectively.
"Once I had the fuselage sides drawn to my liking, I started on the firewall, formers, wing hold-downs, and landing-gear blocks. Basically, I made the part that I planned to use and made sure it fit properly, and then I drew the part out on the large sheet of paper with the proper measurements noted next to the part.
"Most people draw the plans first and then cut the parts, but to me that seemed backward. With this process, I was basically building an airplane and the plans at the same time, and they matched each other.
"For the tail, I settled on a combination of the Neme-Q and the Racer II. For some reason, all of the V-tailed airplanes I have built with a tall, narrow tail seem more stable in the air than those with smaller tails. I also like having the elevator surfaces a bit higher up, out of the wing turbulence, because they seem to need less elevator throw that way. I can't point to any formulas or wind-tunnel tests to back this up; it just seems to work well for me."
By the time the airplane was finished, I had a crude but usable plan of what I had built. I test-flew the first Seeker in early 2003 and was extremely happy with how it flew. In fact, in its first local 428 race, it took first place flying against several composite models piloted by capable pilots. I had several small issues with the first airplane, but the only major concern I had was how I was going to cut down the 4 ounces by which it was overweight.
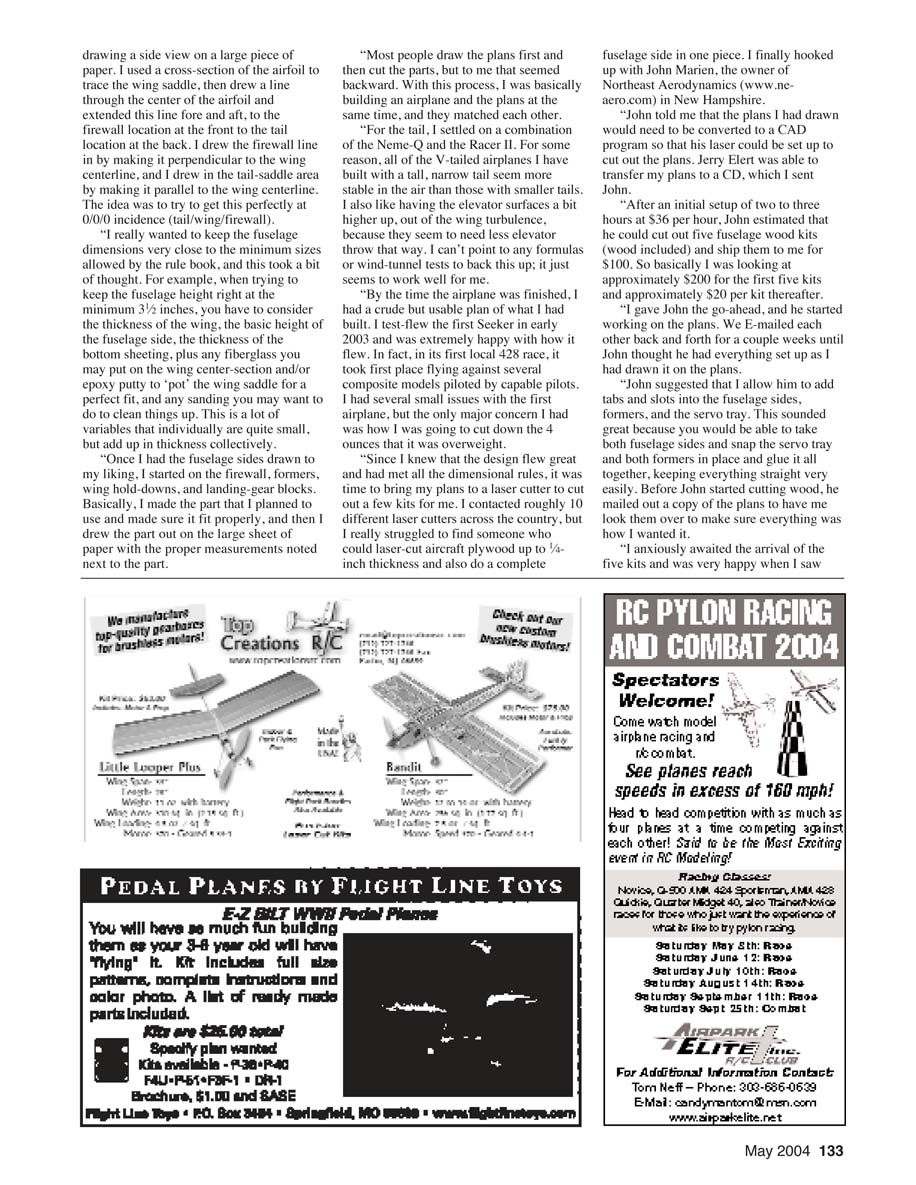
"Since I knew that the design flew great and had met all the dimensional rules, it was time to bring my plans to a laser cutter to cut out a few kits for me. I contacted roughly 10 different laser cutters across the country, but I really struggled to find someone who could laser-cut aircraft plywood up to 1/4-inch thickness and also do a complete fuselage side in one piece. I finally hooked up with John Marien, the owner of Northeast Aerodynamics (www.ne-aero.com) in New Hampshire.
"John told me that the plans I had drawn would need to be converted to a CAD program so that his laser could be set up to cut out the plans. Jerry Elert was able to transfer my plans to a CD, which I sent John.
"After an initial setup of two to three hours at $36 per hour, John estimated that he could cut out five fuselage wood kits (wood included) and ship them to me for $100. So basically I was looking at approximately $200 for the first five kits and approximately $20 per kit thereafter.
"I gave John the go-ahead, and he started working on the plans. We e-mailed each other back and forth for a couple weeks until John thought he had everything set up as I had drawn it on the plans.
"John suggested that I allow him to add tabs and slots into the fuselage sides, formers, and the servo tray. This sounded great because you would be able to take both fuselage sides and snap the servo tray and both formers in place and glue it together, keeping everything straight very easily. Before John started cutting wood, he mailed out a copy of the plans to have me look them over to make sure everything was how I wanted it.
"I anxiously awaited the arrival of the five kits and was very happy when I saw them. The wood that John used was very good but slightly on the heavy side. I was amazed at the precision of how everything fit and the complex angles that were perfectly cut out on the firewall.
"I was warned by local legend Al Schwartz that glue does not stick well to the charred edges of laser cutting. I thanked him for the advice but decided to test it myself, as I did not want to sand all the edges. I glued and clamped the wing-holding dowel blocks with 30-minute epoxy and let them sit overnight before removing the clamps.
"Sure enough, with slight pressure I was able to pop one of the glue joints loose. The charred edge was still stuck to the glue, but the glue did not penetrate into the wood. Forgive me, Al; I'll listen next time!"
The kits went together fairly well, but, as you might expect, I had made a couple errors in measurement. As I built the first four kits, I sanded here and there and kept notes of what to revise on the next run.
Each Seeker I built got progressively lighter, and I now have a pretty good idea of what I need to do to keep it right at the minimum 3 pounds, 8 ounces. I've just recently put in several new modifications and am anxiously awaiting the next batch of kits.
Some of my changes and additional parts have raised my price slightly, but I am still very happy with the value. The time it takes me to cut a perfect firewall and servo tray is well worth the cost of one of these kits to me.
I never really intended to sell a kit, but I have been asked by several people to do so. I would like to build a few more, work out any remaining bugs, and compose a set of simple yet comprehensive building instructions before I go down that road.
Considering my initial plan of a simple-building, inexpensive, and competitive airframe, I believe I have succeeded in all three areas. None of this project would have been possible without all the help I received locally, nationally, and across the Internet. All in all, it has been an extremely gratifying project, and I can't wait to start building more of the airplanes!
—MA
Transcribed from original scans by AI. Minor OCR errors may remain.

