
RADIO CONTROL PYLON RACING
Kurt Bozarth, 18699 E. Ida Ave., Aurora CO 80015
Composite Kits
There are numerous composite Quarter 500 (Q-500) and Quarter 40 (Q-40) pylon kits available in various stages of completion. Some of these kits are ARFs with painted-in-the-mold finishes; others (available for a lower price) require some level of final finishing. For the die-hard builders, balsa-and-foam kits are also available.
I will not debate which is better (balsa/foam or composite). Feel free to do your own Internet research to review the many opinions about composite versus balsa/foam.
A modern painted-in-the-mold airplane is a beautiful thing: the finish is smooth and without paint lines. In most cases, assembling a Q-40 or Q-500 composite kit is easier than assembling a trainer ARF.
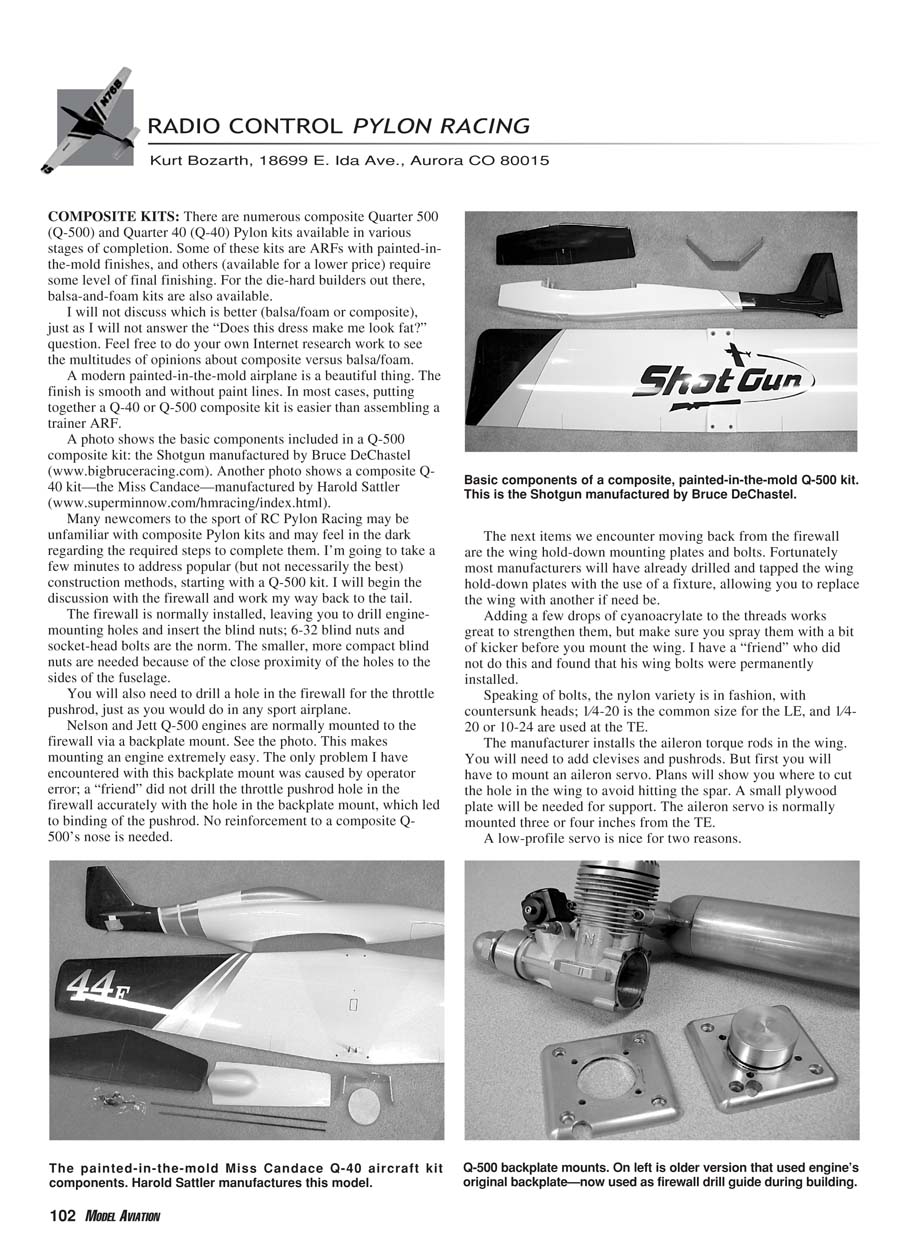
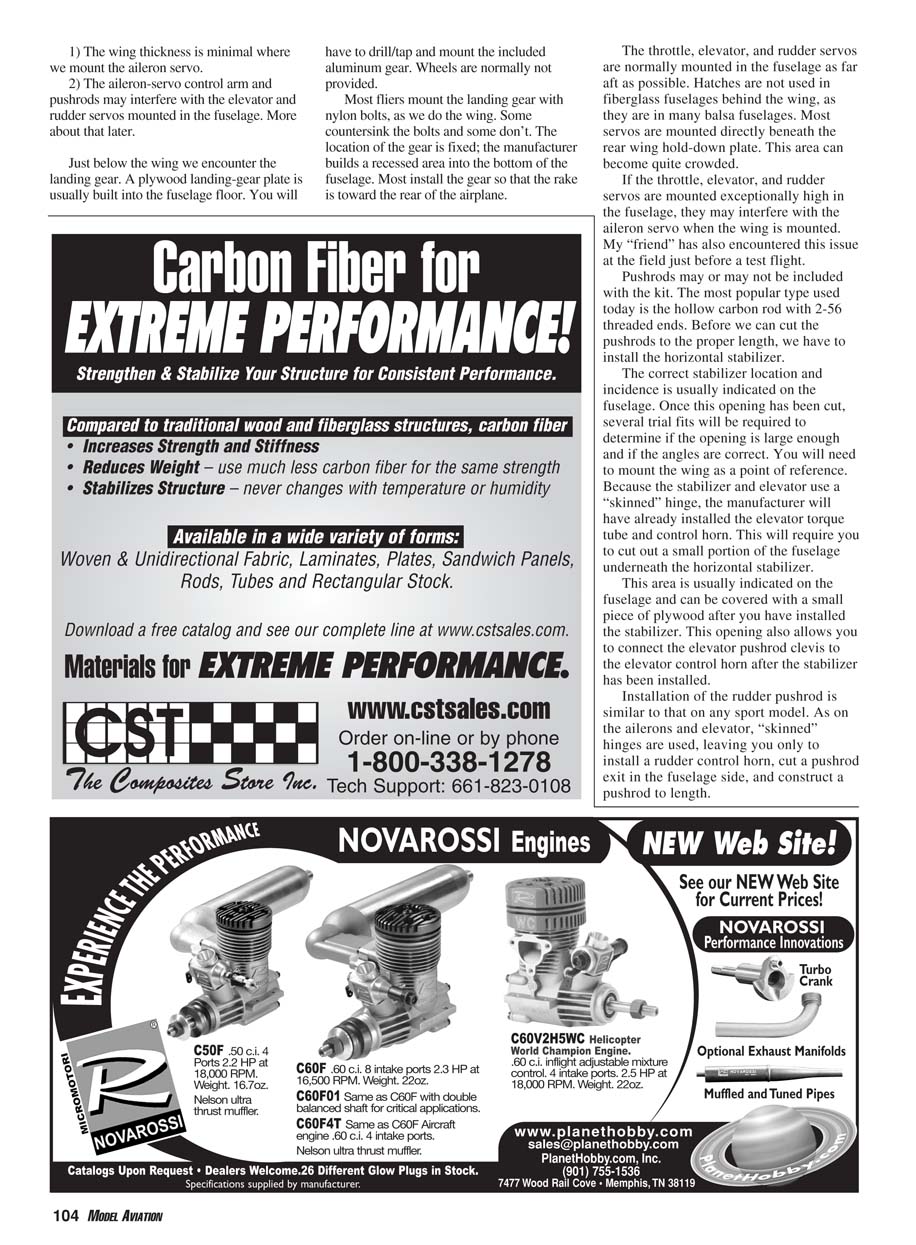
Photos show the basic components included in a Q-500 composite kit: the Shotgun manufactured by Bruce DeChastel (www.bigbruceracing.com). Another photo shows a composite Q-40 kit—the Miss Candace—manufactured by Harold Sattler (www.superminnow.com/hmracing/index.html).
Many newcomers to RC pylon racing may be unfamiliar with composite kits and unsure of the steps needed to complete them. The following discusses popular (but not necessarily best) construction methods, starting with a Q-500 kit and working from the firewall back to the tail.
Firewall and Engine Mount
- The firewall is normally installed, leaving you to drill engine-mounting holes and insert the blind nuts; 6-32 blind nuts and socket-head bolts are the norm. The smaller, more compact blind nuts are needed because of the close proximity of the holes to the sides of the fuselage.
- You will also need to drill a hole in the firewall for the throttle pushrod, just as you would on any sport airplane.
Nelson and Jett Q-500 engines are normally mounted to the firewall via a backplate mount. This makes mounting an engine very easy. The only problem I have encountered with this backplate mount was operator error: a "friend" did not drill the throttle pushrod hole in the firewall to align with the hole in the backplate, which led to binding of the pushrod. No reinforcement to a composite Q-500's nose is needed.
Wing and Ailerons
- The next items moving back from the firewall are the wing hold-down mounting plates and bolts. Most manufacturers will have already drilled and tapped the wing hold-down plates with a fixture, allowing you to replace the wing if needed.
- Adding a few drops of cyanoacrylate to the threads works great to strengthen them, but make sure you spray them with a bit of kicker before you mount the wing. I have a "friend" who did not do this and found his wing bolts permanently installed.
- Nylon bolts with countersunk heads are common; 1/4-20 is the common size for the leading edge (LE), and 1/4-20 or 10-24 are used at the trailing edge (TE).
The manufacturer installs the aileron torque rods in the wing. You will need to add clevises and pushrods, but first you must mount an aileron servo. Plans will show where to cut the hole in the wing to avoid hitting the spar. A small plywood plate will be needed for support. The aileron servo is normally mounted three or four inches from the TE.
A low-profile servo is preferable for two reasons: the aileron-servo control arm and pushrods may interfere with the elevator and rudder servos mounted in the fuselage (more about that below).
Landing Gear
Just below the wing we encounter the landing gear. A plywood landing-gear plate is usually built into the fuselage floor. You will have to drill/tap and mount the included aluminum gear. Wheels are normally not provided.
Most fliers mount the landing gear with nylon bolts, as with the wing. Some countersink the bolts and some do not. The location of the gear is fixed; the manufacturer builds a recessed area into the bottom of the fuselage. Most install the gear so that the rake is toward the rear of the airplane.
Servos and Radio Installation
- The throttle, elevator, and rudder servos are normally mounted in the fuselage as far aft as possible. Hatches are not used in fiberglass fuselages behind the wing, as they often are in balsa fuselages.
- Most servos are mounted directly beneath the rear wing hold-down plate. This area can become quite crowded.
- If the throttle, elevator, and rudder servos are mounted exceptionally high in the fuselage, they may interfere with the aileron servo when the wing is mounted. My "friend" has also encountered this issue at the field just before a test flight.
Pushrods may or may not be included with the kit. The most popular type used today is the hollow carbon rod with 2-56 threaded ends. Before we cut the pushrods to proper length, we have to install the horizontal stabilizer.
Stabilizer, Elevator and Rudder
- The correct stabilizer location and incidence is usually indicated on the fuselage. Once this opening has been cut, several trial fits will be required to ensure the opening is large enough and the angles are correct.
- You will need to mount the wing as a reference point. Because the stabilizer and elevator use a "skinned" hinge, the manufacturer will have already installed the elevator torque tube and control horn. This requires cutting out a small portion of the fuselage underneath the horizontal stabilizer.
- This area is usually indicated on the fuselage and can be covered with a small piece of plywood after installing the stabilizer. The opening also allows you to connect the elevator pushrod clevis to the elevator control horn after the stabilizer has been installed.
- Installation of the rudder pushrod is similar to that on any sport model. Skinned hinges are used on the ailerons, elevator, and rudder, leaving you only to install the rudder control horn, cut a pushrod exit in the fuselage side, and construct a pushrod to length.
Fuel Tank, Battery and Antenna
In most cases, a bubbleless 5- or 6-ounce fuel tank is installed just above the landing-gear plate. The battery pack is often squeezed in behind the servos in the fuselage. Most run the receiver antenna through a plastic tube mounted inside the fuselage; make sure that the tube does not interfere with the elevator pushrod and control horn at the tail.
Q-40 Differences
Completion of a Q-40 painted-in-the-mold composite kit does not differ much from that of a Q-500 kit. The biggest difference is that the manufacturer does not install the Q-40 firewall. A plywood firewall that is cut to size is normally included, but you will have to install it. This is probably the most difficult part. Once the firewall is installed, the rest follows the Q-500 composite kit procedures.
Balsa-and-Foam Kits
For those who fly Sport Quickie (AMA event 424) in regions where composite airframes are not allowed and/or who favor traditional materials, balsa-and-foam Q-500 kits are still available.
Several balsa-and-foam Q-500 models were successful at last year's Nats and the Winterfest Q-500 race in Phoenix, Arizona.
One of the most popular balsa-and-foam Q-500 kits has been Mike Del Ponte's ReVultion. He has reportedly been manufacturing the model since the late 1930s, when balsa was first introduced to the United States, but this is unconfirmed. I have only been able to trace the design back to 1979.
The ReVultion began winning races and setting fast times across the country during the 1980s. Top racers such as Travis Flynn, Dub Jett, Richard Verano, Dave Shadel, and Chip Hyde had great success with this model. Mike has continued to improve the design and currently offers a semi-ARF kit with a one-piece, balsa-sheeted, carbon-reinforced wing and framed-up fuselage for $180, significantly lower than many composite kits.
Notable Composite Designs and Manufacturers
- Chuck Bridge's Vortex
- First version was balsa-and-foam in 1997; a composite-wing version debuted in 1999.
- Immediately set fast times and took first place at the 1999 Nats.
- Has set fast time at the Nats every year since its introduction.
- Travis Flynn set an Open National record with a Vortex; Matthew Van Baren set a Senior national record with one.
- Bruce DeChastel's Shotgun (Q-500)
- A fully composite, painted-in-the-mold kit.
- In its debut at the 2004 Winterfest race, Bruce placed third out of 52 competitors.
- Has set local club records and finished top three at a competitive race in Medford, Oregon.
- Bruce has been racing FAI since 1977 and competing with his own designs since 1978. He has seen six FAI World Champions compete with his models and has sold more than 300 FAI aircraft to racers in 12 countries. Bruce also manufactures the successful Q-40 Polecat.
Contact
As a new member of the MA team of columnists, I welcome your comments and suggestions. Please e-mail me at [email protected]. Thanks, and I look forward to seeing you at some of this year's events. MA
Transcribed from original scans by AI. Minor OCR errors may remain.

