
Sound and Aerobatics
As I write this, the 2010 flying season is coming to an end for those of us in the Northeast and building season is fast approaching.
Each year it amazes me to see the increased interest in giant scale aerobatic models. However, as more pilots fly these large aircraft, more airfields face sound issues that were nonexistent in previous years. This column is devoted to sound and what can be done to comply with and enforce regulations at the local flying field. Even if you are not interested in aerobatics, this is for you if you are a giant scale enthusiast.
IMAC rules and the Ground Sound Level Test
- In IMAC competition, every model flown in a contest must pass the Ground Sound Level Test. If an airplane fails, its pilot can be disqualified.
- If you are a newcomer, exceptions sometimes can be made by speaking with the Contest Director (CD). Before attending your first competition, check the sound level of your aircraft and speak to the CD in advance if you think you might have an issue. It’s better to be safe than sorry—especially if you are traveling several hours to attend a contest!
- Maximum sound levels:
- 96 dBA measured on soft surfaces
- 98 dBA measured on hard surfaces
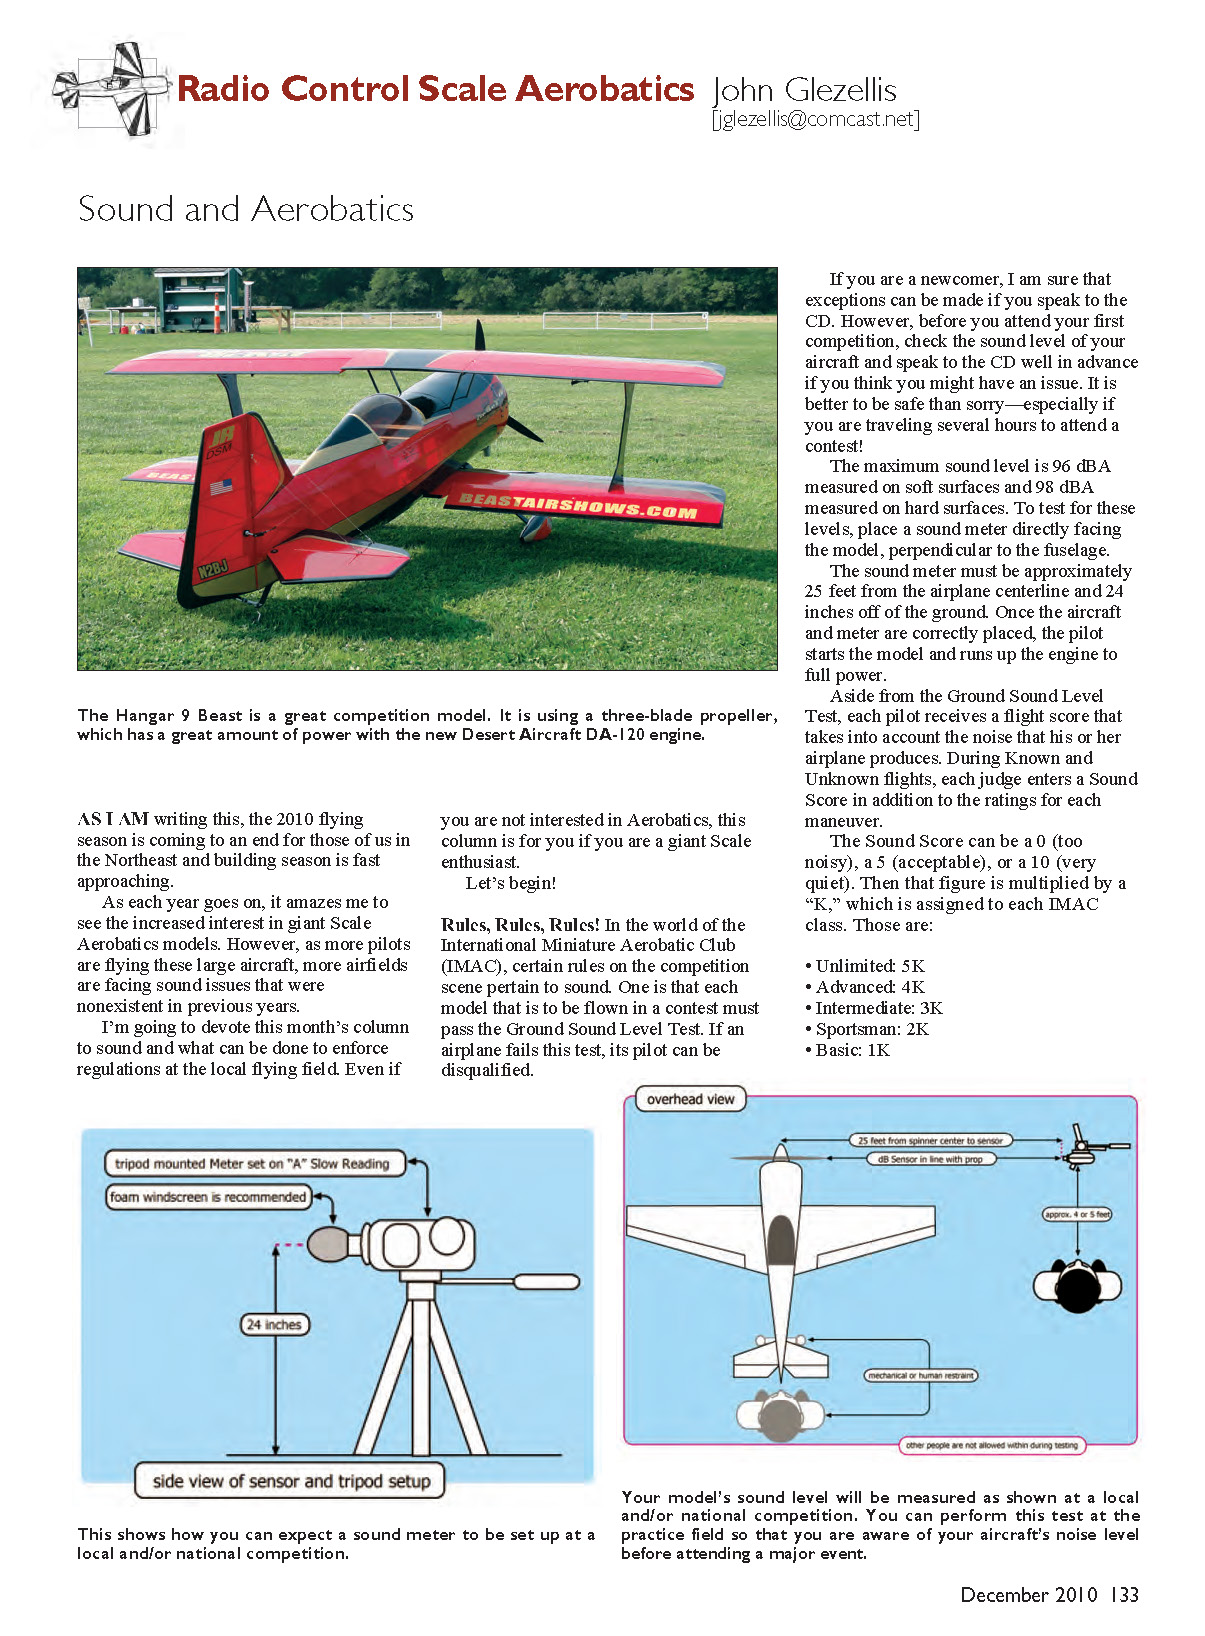
- To perform the test: place a sound meter directly facing the model, perpendicular to the fuselage, approximately 25 feet from the airplane centerline and 24 inches off the ground. Start the engine and run it to full power while measuring.
Sound scoring during flights
- Apart from the ground test, judges enter a Sound Score for Known and Unknown flights:
- 0 = too noisy
- 5 = acceptable
- 10 = very quiet
- That figure is multiplied by a "K" value assigned to each IMAC class:
- Unlimited: 5K
- Advanced: 4K
- Intermediate: 3K
- Sportsman: 2K
- Basic: 1K
You shouldn’t decrease the sound of your model only for competition. Many flying sites face opposition from neighboring homes, parks, etc., and preserving those sites often depends on pilots taking sound-reduction seriously.
How to reduce sound
- Sound varies greatly depending on exhaust type and propeller. A two-blade prop is generally louder than a three-blade prop.
- Canister-type exhausts can be expensive. If you don’t want to spend that much, try installing a three-blade propeller to see if it makes the sound acceptable at your field.
- If a three-blade prop doesn’t solve the issue, consider buying a used exhaust system from sites such as RC Universe or Flying Giants, or a new system from companies such as Desert Aircraft or Aircraft International.
- When choosing a three-blade propeller, contact your engine manufacturer to confirm suitability. From my testing:
- I prefer smaller-diameter three-blades on heavier airplanes and larger-diameter three-blades on lighter models.
- Example recommendations:
- On a 41-pound giant you might like a 28 x 12 three-blade propeller.
- On a 38-pound aircraft you might prefer a 28.5 x 12 or 29 x 12 three-blade on a typical 150cc–170cc engine.
Following are propeller choices that have worked for me with Desert Aircraft engines (note: exhaust systems on the models differed; some used stock mufflers and others used canisters, which affects prop choice):
- DA-100: 25 x 12 three-blade on the Hangar 9 35% Extra 260
- DA-120: 25 x 12 three-blade on the Hangar 9 Beast
- DA-150: 29 x 12 three-blade on a Composite-ARF Extra 330 (35 lb dry) and 28 x 12 three-blade on a Krill Katana (41 lb)
- DA-170: 28.5 x 12 three-blade on a Thunder Tiger Extra 260 (38 lb dry)
- DA-200: 29 x 12 three-blade on a Thunder Tiger Extra 260 (42 lb dry)
Installing a canister system will add weight to your airplane. If you need advice, talk to fellow modelers or feel free to contact me with questions about your setup.
Talking Exhaust
- Some ARFs have canister tunnels and brackets already installed. If yours does, installation will be quicker.
- If the canister tunnel is present, you typically only need to install a bracket to secure the canisters.
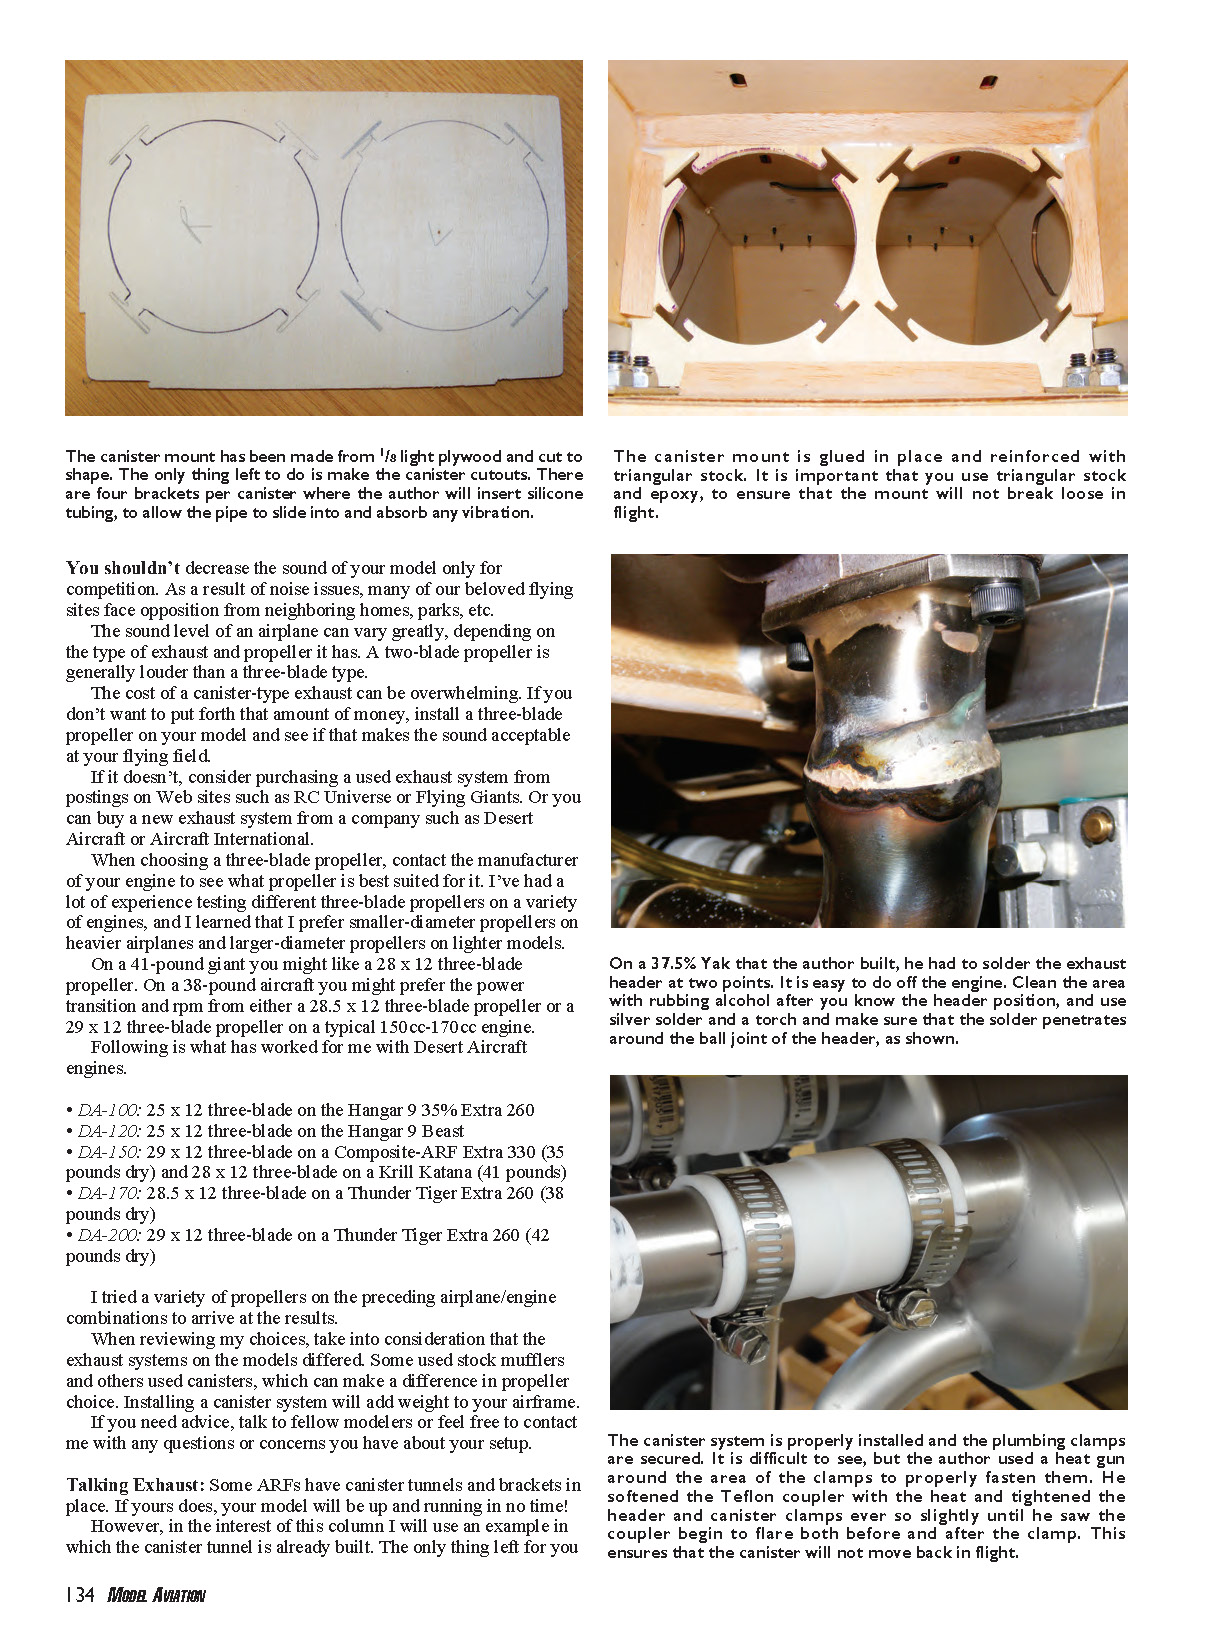
Measuring and fitting headers:
- Determine the type of header and the "drop" needed. After the engine is secured, measure from where the exhaust header contacts the cylinder head to the center of the canister inlet — that distance is the drop you need when ordering headers.
- If no manufacturer makes the drop you need, consider an adjustable header. Example: I built a 37.5% Yak-54 that needed a drop of about 30 mm. I purchased an adjustable header from Desert Aircraft with two ball joints, adjusted the headers so they were parallel to the canister entry, then removed the headers, cleaned them with rubbing alcohol, and silver-soldered the ball joints to secure the header.
Mounting canisters:
- I recommend making a rectangular plate from 1/8" or 1/4" light plywood sized to fit inside your canister tunnel (e.g., if the tunnel interior is 8" x 6", cut a plate to those dimensions).
- Cut a hole (or holes) in the plate matching the diameter and shape of the canister(s). Center the hole(s) for a single-cylinder or make two cutouts for a two-cylinder engine.
- Recess four areas around each circular hole and insert fuel tubing (or similar) into these recesses so the canister is soft-mounted and does not contact the plywood directly.
- Glue the mount in place with epoxy and reinforce areas where the plate contacts the canister tunnel with 1/4" triangular stock or similar.
Tips for Success
- The exhaust header connects to a Teflon coupler that joins the header to the canister or tuned-pipe exhaust.
- The first few flights on a canister-equipped model are critical — they determine whether your installation “seats” properly. If installed improperly, the canister can back away from the Teflon coupler because that area heats up significantly.
- Clamps are available to fasten the coupler to both the header and the canister. Before the first flight, I apply heat (with a high-temperature heat gun) over the two clamps. The Teflon coupler will change shape slightly; when a slight recessed spot forms where the clamp is, turn off the heat gun. This helps secure the joint.
- With a properly installed system you shouldn’t worry about exhaust function at the field and can focus on flying.
Now you know the importance of sound at an aerobatics contest, ways to make your model quieter, and how to install a canister system on your giant scale aircraft. Even if you do not intend to compete, I strongly urge you to “go the extra mile” on sound reduction. Many flying fields across the U.S. face noise issues, and it would be a shame to lose a field over a preventable problem.
Until next time, fly hard! JG
Sources:
- International Miniature Aerobatic Club — www.mini-iac.com
- RC Universe — www.rcuniverse.com
- Flying Giants — www.flyinggiants.com
- Desert Aircraft — (520) 722-0607, www.desertaircraft.com
- Aircraft International — (732) 761-0997, www.aircraftinternational.com
- Hangar 9 — (800) 338-4639, www.hangar-9.com
- Composite-ARF — www.carf-models.com
- Krill Model — www.krill-model.com
- Thunder Tiger / Ace Hobby — (949) 900-3300, www.acehobby.com
- JR — (800) 338-4639, www.jrradios.com
Transcribed from original scans by AI. Minor OCR errors may remain.

