
Radio Control Soaring - 2006/09
Darwin Barrie [[email protected]]
The author tackles the subject of approaches to landing.
Introduction
The quality and timing of the approach to landing will make the difference between landing points and no landing points. Many factors come into play during the approach, including model setup, discipline to do a "set" approach, and efficient use of flaps. I enlisted one of the top sailplane pilots—Tom Keisling—to give his approach to approaches. I include his thoughts later.
Model setup
A good approach is not going to happen if your model does not maintain a consistent glide slope. If your aircraft's flaps and elevator are not properly coupled, a good glide slope is impossible.
Initial setup involves ensuring that the flaps are mechanically consistent with each other:
- The servo horns must be at the same starting point.
- The flap horns must be the same distance from the hinge line.
- The servos must be the same distance from the hinge line.
- If all these are the same, the pushrod lengths should match.
With the radio on, check that the flaps track together. I have encountered circumstances in which the servos do not travel at the same speed. Now I match the servos before installation.
At the bottom of the stick, are the flaps at the same point? Do you have close to 90°? I don't require exactly 90° as long as I'm close; if not, adjust with subtrim. Go to half stick and see if they are the same. The top stick to half stick region is the most important since most of your approach will be done in this area.
Flap/elevator mix
All modern control systems have a flap/elevator mix. Many have multi-point curves that allow extreme fine-tuning of the mix. For those new to competition six-function sailplanes: down-elevator is added when flaps are lowered to prevent the nose from ballooning. This is a simplistic explanation, but it becomes clearer with practice.
My Futaba 14MZ system has a 14-point curve available. I use five to seven points for the flap/elevator mix. My process:
- Set the flap stick to half travel and add an arbitrary amount of down-elevator to the mix.
- Many will copy approximate points from another model as a baseline. That works if the models are similar, but I prefer to start fresh with a new model since modern systems make this quick.
I try to do all setup flights in the early morning in calm conditions. Before launching I bring up the mix screen so I can make adjustments to elevator compensation. Launch and fly relatively high and out in front with a good profile view.
Lower the flap stick to half and observe. Adjust elevator up or down to get the glide slope you want. Then activate the flaps a couple times to check the glide slope. Move to the first point down from the top of the stick and repeat the process, then the next point. I use half stick for the first point because it is easy to find on the transmitter and represents a substantial amount of flap. If anything goes wrong, I know I can go to half stick and slow the sailplane predictably. Repeat for the lower half of the flap travel.
Once all points are set, fine-tune them. The goal is to be able to move the flap stick through full travel and have only the airspeed change—not the attitude. You can usually get close to a functional mix in a flight or two.
Approach technique (Darwin's method)
As a 3,000+-hour full-scale pilot, I can attest that the quality of the approach directly affects the quality of the landing. That is hammered into every student pilot from day one, and success in soaring is no different.
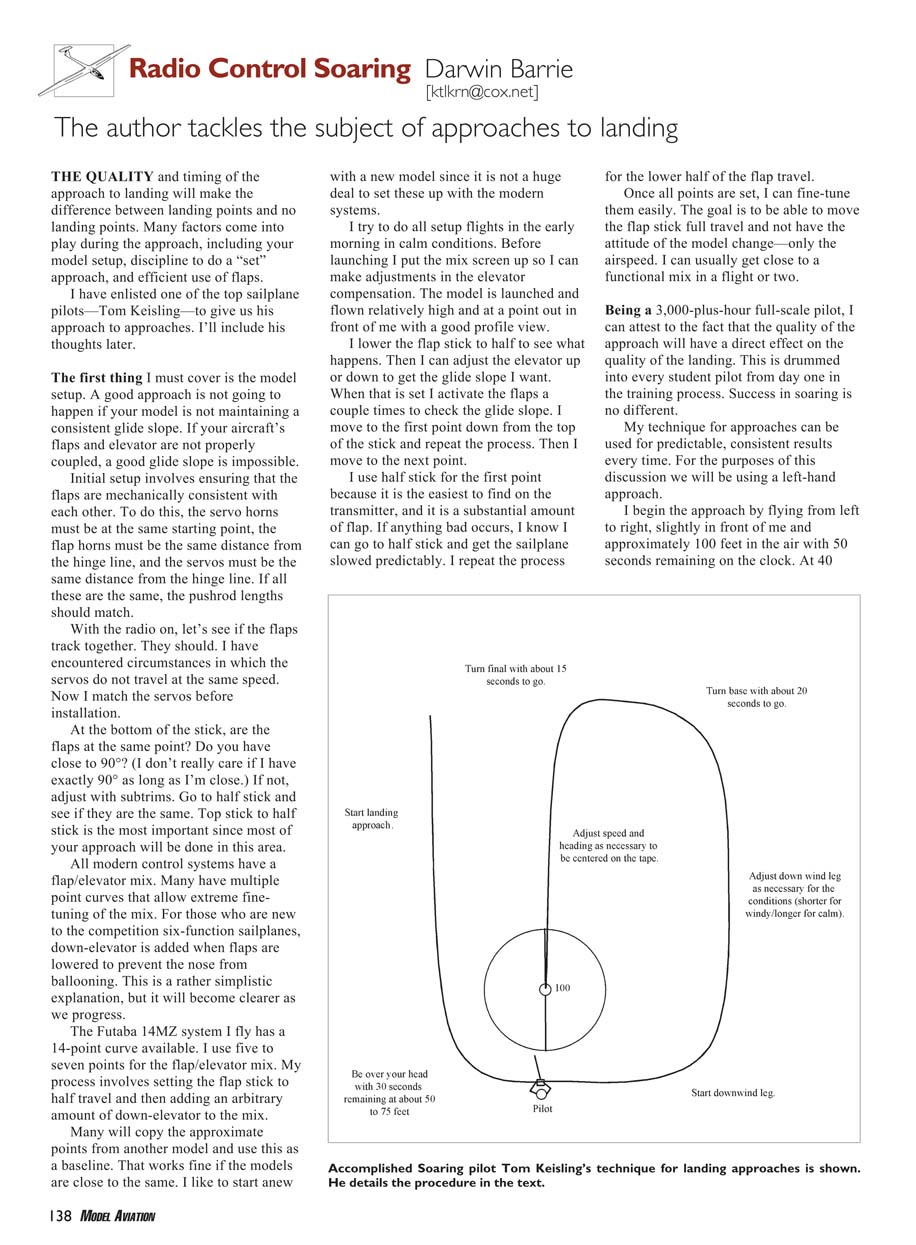
My technique produces predictable, consistent results. For this discussion we use a left-hand approach:
- Begin by flying left to right, slightly in front of you, about 100 feet in the air with 50 seconds remaining on the clock.
- At 40 seconds make a left turn to the downwind leg and fly this leg for about 10 seconds. Begin to slow the model with flaps and adjust as necessary to get a good approach speed—experiment for your specific model.
- At 30 seconds turn the base leg. I estimate the sailplane is about 25 feet in the air at this point.
- Turn final at 20 seconds. Depending on wind conditions, adjust flaps to gauge for landing on time.
- Fly the last 30 feet to landing low to the ground, guiding the model to the proper spot.
You will have to adapt this system to your model and wind conditions. In downwind conditions I shorten the final leg to 15 seconds or less. If the field is unfamiliar, get some practice in using this system so you can gather visual cues as well.
Tom Keisling's approach to approaches
"The key to landing accurately for contests is to practice. To increase the effectiveness of your practice sessions you should try and exercise the following suggestions.
- Set up an approach pattern. A good pattern to start with is fly over your head with approximately 30 seconds to go into the wind. By doing this you can determine the speed of your airplane and appropriately adjust it.
After you acquaint yourself with the status of your model, do a 180° turn downwind. The model should be offset from the landing spot by approximately 100 feet. At roughly 20 seconds to go, turn 90° toward the spot and fly straight. With approximately 15 seconds to go, turn final and shoot the landing.
- Learn how to use your flaps. A proper approach will have subtle control inputs (unless it is very turbulent). During final you should probably not have much more than 25° of flap if you managed your energy properly during the downwind and base leg. This will give you some flexibility during final. You can use more or less flap as necessary as you get closer to the spot.
- I find it is best to fly straight up the tape (good end toward you and bad end downwind). You should be flying with minimal airspeed at this point—just enough to maintain positive control. If you do it right, you should be approximately 2 feet off the ground at the bad end of the tape. By flying straight up the tape, you have a reference to where the model is with respect to the good landing points and the bad ones. It makes the need for great depth perception less critical.
As you get closer to the mark, adjust your model's speed as necessary with the flaps. Just before the mark, simultaneously raise the flaps and pop some down-elevator. If all went well, your model should gently tap the 100 and stay there. If you had too much speed, it may pound the 100 and cause some damage and/or bounce past. If you had too little speed, the pop of down-elevator may be ineffective and your model may go over."
Final notes
The accompanying drawing in the original article summarizes the preceding technique. Remember to practice both right- and left-hand patterns.
There are variations on this method; the key is to have a plan for your landing and not go about it haphazardly.
Another practice that helps me is to glance down at the tape periodically while performing the approach pattern and visualize what the landing will look like. This mental picture helps place the model correctly as it nears the tape.
Tom's technique differs in detail, but the concepts are the same: use your glider's flaps and control your speed. Thanks for the input, Tom.
Next time I will discuss several aspects of hand-launched sailplanes and their benefits to making you an overall better thermal pilot.
MA
Transcribed from original scans by AI. Minor OCR errors may remain.

