

RC Aerobatics
Wing Bags
The most vulnerable part of a Pattern airplane tends to be the removable wings. They are built using light, and therefore soft, balsa skins and do not store or stand alone very well. They will not lay on top of each other without damaging themselves, fall over if stored upright, and generally slide around in the back of your vehicle.
A good solution is to use protective covers, often referred to as wing bags. A new set that is working well for me is appropriately called Wingbags by Wingbags.com. These come with light aluminum, quick-release, mountaineering-type clips to retain the straps. You can use them in several configurations. The bags have shoulder-type carrying straps and give you the capability of clipping them together.
Features:
- Open ends of the nylon/foam-skinned bags are closed and opened using Velcro™ strips.
- The continuous seam of Velcro™ allows you to put the wings away with the wing tube still in one wing.
- It is good practice to put the servo and aileron horn sides of the wings away from each other; the Velcro™ seam allows you to put the wing and attached tube in either bag.
- The bag also has an integral sleeve for holding the wing tube if you take it out of both wings.
The Flying Scotsman
In previous columns I have suggested more economical airplanes that can be used to fly Pattern. On the opposite end of the savings spectrum is my latest model.
It is actually a hybrid of two airplanes. The fuselage is formed from fiberglass/foam/Kevlar™ and is part of a kit from France that Dave Guerin of ProBuilt Workshop built to ARF (Almost Ready to Fly) status. This airplane is not a true Hydeaway because it consists of a Hydeaway fuselage and Temptation wings.
The model is called the "Flying Scotsman" because I could not bring myself to call it a "Temptaway" or some other melodiously merged name. The new name comes from my own Scottish/English lineage and the famous British steam locomotive that ran from London to Edinburgh at a record-setting 100 mph. As a wee boy, I used to hang over the nearby railway-line fence just to feel the blast of the pressure wave as this beautiful behemoth thundered through my village crossing. The dank smell of condensed steam and burnt coal/sulfur still lingers in my memory bank.
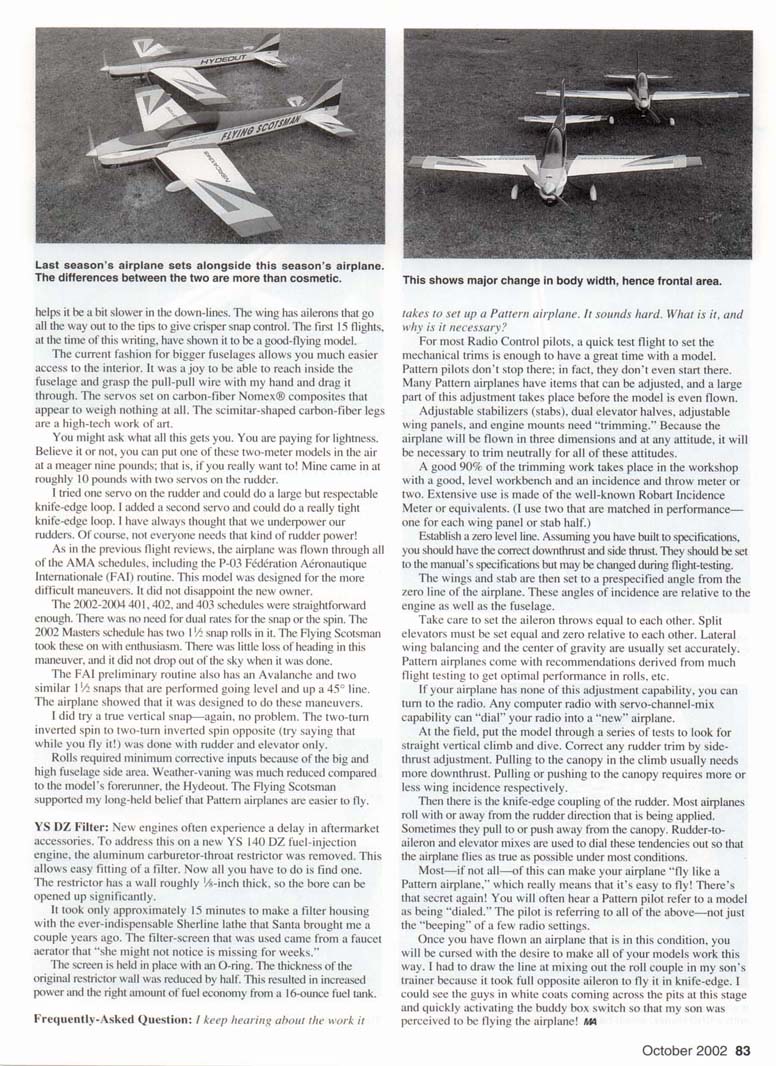
The airplane clearly shows its Hydeaway lineage, but the fatter fuselage helps it be a bit slower in the down-lines. The wing has ailerons that go all the way out to the tips to give crisper snap control. The first 15 flights, at the time of this writing, have shown it to be a good-flying model.
The current fashion for bigger fuselages allows much easier access to the interior. It was a joy to be able to reach inside the fuselage and grasp the pull‑pull wire with my hand and drag it through. The servos set on carbon-fiber Nomex® composites that appear to weigh nothing at all. The scimitar-shaped carbon-fiber legs are a high‑tech work of art.
What does all this get you? You are paying for lightness. Believe it or not, you can put one of these two‑meter models in the air at a meager nine pounds — that is, if you really want to. Mine came in at roughly 10 pounds with two servos on the rudder. I tried one servo on the rudder and could do a large but respectable knife-edge loop. I added a second servo and could do a really tight knife-edge loop. I have always thought that we underpower our rudders. Of course, not everyone needs that kind of rudder power!
As in previous flight reviews, the airplane was flown through all of the AMA schedules, including the P‑03 Fédération Aéronautique Internationale (FAI) routine. This model was designed for the more difficult maneuvers and did not disappoint the new owner. The 2002–2004 401, 402, and 403 schedules were straightforward enough. There was no need for dual rates for the snap or the spin. The 2002 Masters schedule has two 1/2 snap rolls in it; the Flying Scotsman took these on with enthusiasm. There was little loss of heading in the maneuver, and it did not drop out of the sky when it was done.
The FAI preliminary routine also has an Avalanche and two similar 1/2 snaps performed level and up a 45° line. The airplane showed that it was designed to do these maneuvers.
I did try the vertical snap — again, no problem. The two‑turn inverted spin to two‑turn inverted spin opposite (try saying that while you fly it!) was done with rudder and elevator only.
Rolls required minimum corrective inputs because of the big and high fuselage side area. Weather‑vaning was much reduced compared to the model's forerunner, the Hydeout. The Flying Scotsman supported my long‑held belief that Pattern airplanes are easier to fly.
YS 140 DZ Filter
New engines often experience a delay in aftermarket accessories. To address this on a new YS 140 DZ fuel‑injection engine, the aluminum carburetor‑throat restrictor was removed. This allows easy fitting of a filter. Now all you have to do is find one. The restrictor has a wall roughly 1/16‑inch thick, so the bore can be opened up significantly.
It took only approximately 15 minutes to make a filter housing with the ever‑indispensable Sherline lathe that Santa brought me a couple of years ago. The filter screen that was used came from a faucet aerator that I thought would not be noticed missing for weeks.
The screen is held in place with an O‑ring. The thickness of the original restrictor wall was reduced by half. This resulted in increased power and the right amount of fuel economy from a 16‑ounce fuel tank.
Frequently-Asked Question
Q: I keep hearing about the work it takes to set up a Pattern airplane. It sounds hard. What is it, and why is it necessary?
A: For most radio control pilots, a quick test flight to set the mechanical trims is enough to have a great time with a model. Pattern pilots don't stop there; in fact, they don't even start there. Many Pattern airplanes have items that can be adjusted, and a large part of this adjustment takes place before the model is even flown.
Adjustable stabilizers (stabs), dual elevator halves, adjustable wing panels, and engine mounts need "trimming." Because the airplane will be flown in three dimensions and at any attitude, it will be necessary to trim neutrally for all of these attitudes.
A good 90% of the trimming work takes place in the workshop with a good, level workbench and an incidence and throw meter or two. Extensive use is made of the well‑known Robart Incidence Meter or equivalents. (I use two that are matched in performance — one for each wing panel or stab half.)
Steps and recommendations:
- Establish a zero level line. Assuming you have built to specifications, you should have the correct downthrust and side thrust. They should be set to the manual's specifications but may be changed during flight testing.
- Set the wings and stabs to a prespecified angle from the zero line of the airplane. These angles of incidence are relative to the engine as well as the fuselage.
- Take care to set the aileron throws equal to each other. Split elevator throws must be set equal and zero relative to each other.
- Lateral wing balancing and the center of gravity are usually set accurately. Pattern airplanes come with recommendations derived from much flight testing to get optimal performance in rolls, etc.
- If your airplane has none of this adjustment capability, you can turn to the radio. Any computer radio with servo‑channel‑mix capability can "dial" your radio into a "new" airplane.
At the field, put the model through a series of tests to look for straight vertical climb and dive. Correct any rudder trim by sideslip adjustment. Pulling to the canopy in the climb usually needs more downthrust. Pulling or pushing to the canopy requires more or less wing incidence respectively.
Then there is the knife‑edge coupling of the rudder. Most airplanes roll with or away from the rudder direction that is being applied. Sometimes they pull to or push away from the canopy. Rudder‑to‑aileron and elevator mixes are used to dial these tendencies out so that the airplane flies as true as possible under most conditions.
Most — if not all — of this can make your airplane "fly like a Pattern airplane," which really means that it's easy to fly. You'll often hear a Pattern pilot refer to a model as being "dialed." The pilot is referring to all of the above — not just the "beep" of a few radio settings.
Once you have flown an airplane that is in this condition, you will be cursed with the desire to make all of your models work this way. I had to draw the line at mixing out the roll couple in my son's trainer because it took away opposite aileron to fly it in knife‑edge. I could see the guys in white coats coming across the pits at this stage and quickly activating the buddy‑box switch so that my son was perceived to be flying the airplane!
Transcribed from original scans by AI. Minor OCR errors may remain.

