
Time to squirt some paint
by Mike Riggs [email protected]
After a failed first painting attempt, I decided to finish the fuselage with what I know—Klass Kote epoxy paint, a product I cannot say enough good things about. It’s moderately priced and comes in many colors, including those of popular film coverings. Similar to the old K&B epoxy paints, Klass Kote hardener is compatible with any K&B color you may have.
Klass Kote paint’s best attribute is Nate Dickerson, the man on the other end of the telephone. Nate knows more about paint than anyone I know. Better yet, he’s available after hours when hobbyists are using his products.
In the interest of full disclosure, I buy Klass Kote products the same way anybody else does, receiving no compensation or discounts. I wouldn’t know Nate if he walked up to me. He’s the voice of Klass Kote.
First you need a good, solid substrate on which to apply paint. Without going into too much detail, the following is my fiberglass method. There is no right or wrong way. It’s simply whatever works for you.
Many years ago, my dad taught me how to cover airplanes with silkspan and dope. To this day, I still “raise the grain” with a coat or two of dope. Evaporation limits any significant weight gain. I use dope because of my abundant inventory. Others have had good results using lacquer sanding sealer, Balsarite, or even hairspray. Whatever is used, the idea is to seal the wood, preventing excessive (heavy) finishing epoxy from being soaked up by the contest-grade balsa wood typically used in built-up Pattern airframes.
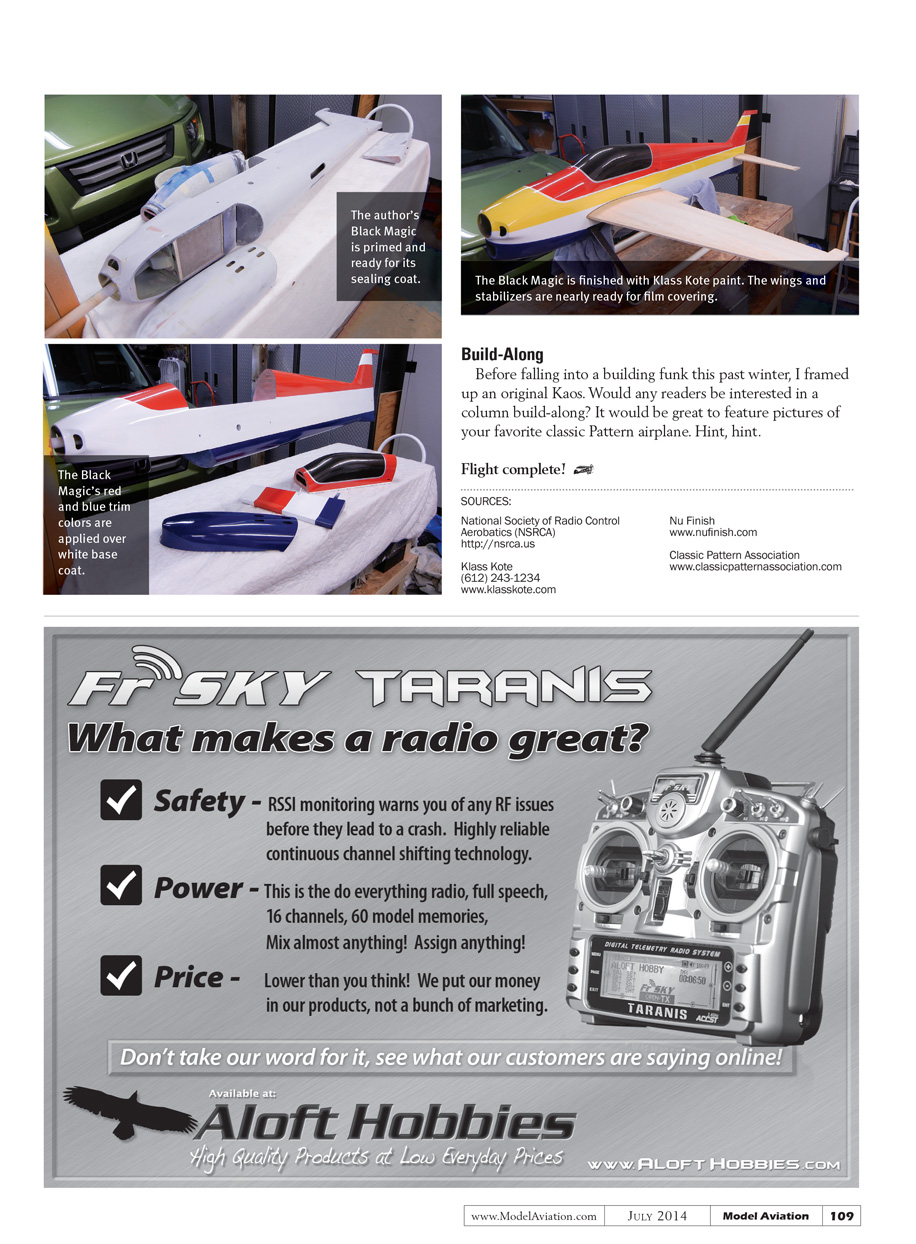
After dry sanding everything smooth with 220-grit paper, glass the fuselage using two pieces—left and right sides. A light spritz of 3M 77 spray adhesive helps hold the dry fiberglass in place, especially over compound curves. Two coats of finishing epoxy are applied—one to glue down the glass and a second after sanding to fill in the weave. The second coat usually requires less than an ounce of epoxy by weight. After finishing resin is applied, glassed surfaces are wiped down with isopropyl alcohol to remove residual paraffin.
Next, a heavy coat of Klass Kote primer is sprayed on. Brushing works, but it’s easier to get an even coat spraying. This first coat is sanded almost completely off using an “X” sanding pattern. Guide coating and spot filling as necessary, the prime/spot/guide/sand cycle is repeated until the desired results are achieved.
Shortly after realizing that I couldn’t see imperfections in primer, I achieved better results by shooting a primer sealer coat. The sealer coat is simply a sacrificial coat of color. White or silver seem to show the most imperfections. Using a bright light and spot putty, I wet sand the sealer coat almost completely off with 400-grit sandpaper.
Now the airplane is ready for color coats. I like to lay down a white base coat to ensure vivid trim colors and make masking pin stripes easy. After the base coat dries, the first trim color is masked off and sprayed. The masking/spraying cycle repeats for each trim color.
Masked edges lie down fairly flat if the tape is pulled almost immediately after spraying, before becoming tack free. Typically a 1/4-inch base coat pin stripe is masked between trim colors, leaving no double or overlying ridge lines.
Other than aesthetics, there is no technical reason to clear coat or rub out Klass Kote paint. When it dries, it is completely fuelproof. By the time the last trim color goes on, I’m usually burned out on finishing and ready to call it good enough.
If you choose to clear coat, Klass Kote clear is said to have a yellowish tint, which has led to many preferring to use automotive urethane clear coats. After installing all of the hardware, the finish has had enough time to thoroughly dry and typically has smudges. To polish it and gain UV protection, I give the paint a good wax job. My favorite is Nu Finish polish. It goes on and rubs off easily. Nu Finish is a polymer coating that will last for years.
Here is my way of painting in a nutshell:
- Two coats of dope over raw balsa
- Dry sand with an old piece of sandpaper
- 0.75-ounce glass cloth put down with unthinned finishing resin
- Dry block sand edges with 100 grit
- Second coat of finishing resin
- Dry block sand with 100–120 grit
- Spray Klass Kote primer
- Dry block sand with 150 grit
- Spot putty and feather
- Spray Klass Kote primer
- Dry block sand with 220 grit
- Spray color sealer coat
- Wet sand with 400 grit
- Spray white base coat
- Mask
- Spray trim colors
Football
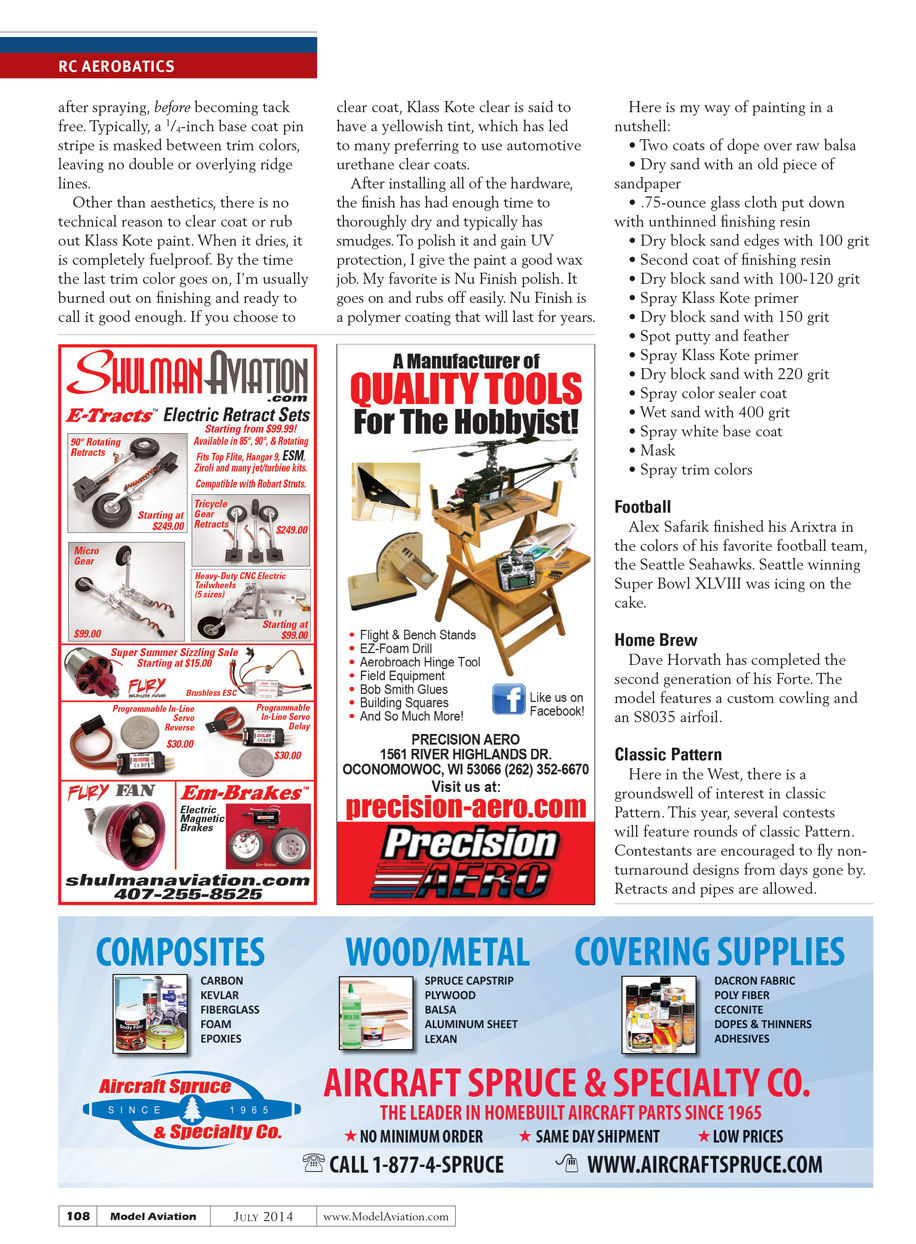
Alex Safarik finished his Arixtra in the colors of his favorite football team, the Seattle Seahawks. Seattle winning Super Bowl XLVIII was icing on the cake.
Home Brew
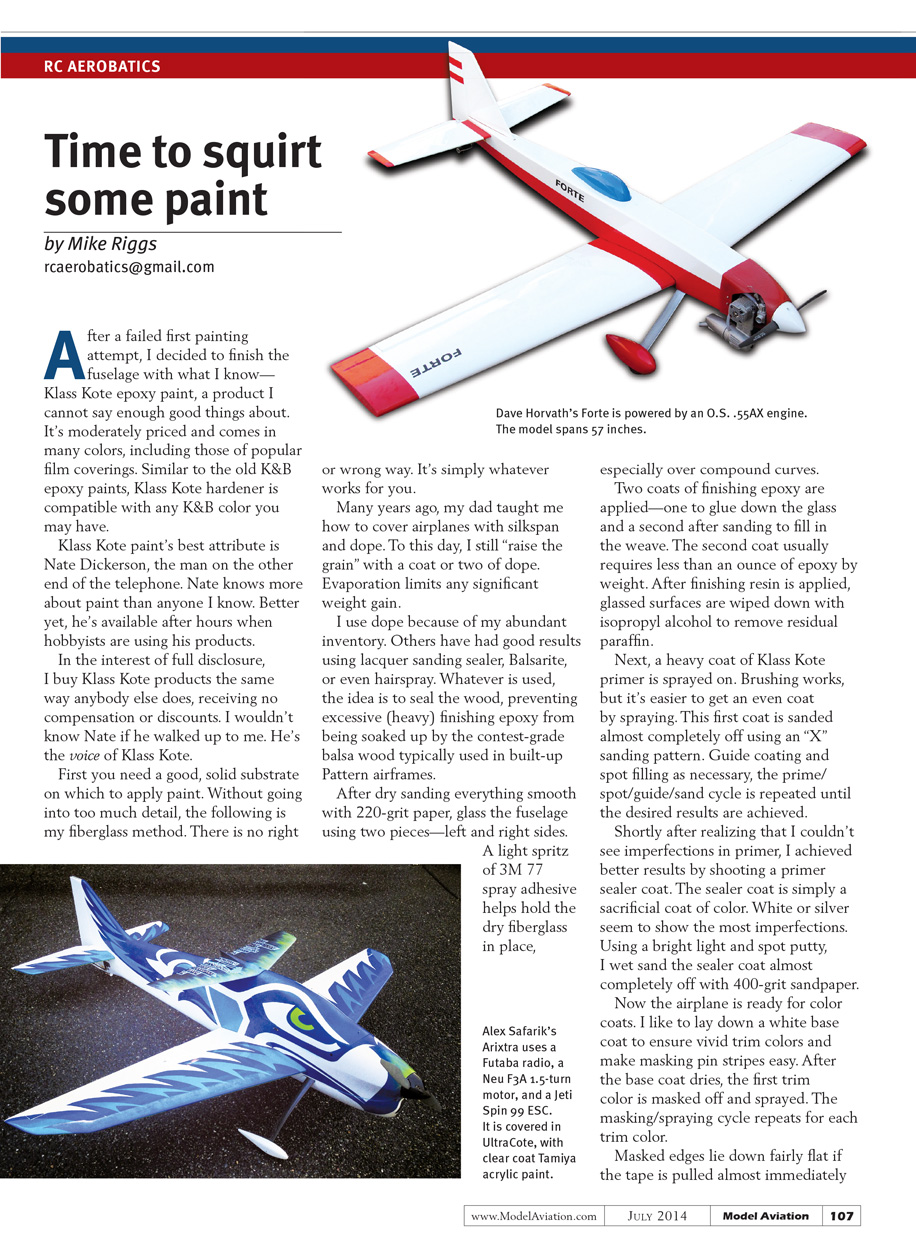
Dave Horvath has completed the second generation of his Forte. The model features a custom cowling and an S8035 airfoil.
Classic Pattern
Here in the West, there is a groundswell of interest in classic Pattern. This year, several contests will feature rounds of classic Pattern. Contestants are encouraged to fly non-turnaround designs from days gone by. Retracts and pipes are allowed.
Build-Along
Before falling into a building funk this past winter, I framed up an original Kaos. Would any readers be interested in a column build-along? It would be great to feature pictures of your favorite classic Pattern airplane. Hint, hint.
Flight complete!
SOURCES
- National Society of Radio Control Aerobatics (NSRCA)
- Klass Kote
(612) 243-1234 www.klasskote.com
- Nu Finish
- Classic Pattern Association
www.classicpatternassociation.com
Transcribed from original scans by AI. Minor OCR errors may remain.

