

RC Aerobatics Team USA
by Mike Riggs [email protected]
The 2015 F3A RC Aerobatics Team USA—Andrew Jesky (captain), Brett Wickizer, Jason Shulman, Mark Atwood (team manager), and Joseph Szczur (Junior competitor)—is headed to Dübendorf, Switzerland, in August for the F3A World Championship. The team needs our help.
Mark has pushed Team USA fundraising to a new level with a giant raffle. A $10 donation buys a chance to win an ever-expanding list of prizes. At the time of this writing, prizes include a Brenner Sharp contra-drive system, a 2-meter Bryan Hebert–designed Allure, and a fully composite 2-meter Andrew Jesky–designed Proteus.
An AJ Aircraft 73-inch Laser is in the prize mix for those looking for something other than a Pattern airplane. Check out the current prize list at the Team USA F3A website. The drawing will take place on September 15, 2015.
Kaos Build
Last fall, with my Kaos framed, I decided to take a building break. In late January, after the big holiday cleanup, I made my way out into the shop and began finishing the Kaos.
I really do not know how to explain fiberglassing, other than to say that if you ask five people how to do it, you'll likely get five different answers. None of the methods are right or wrong; it's just the way that particular person does it.
The best advice I can give someone who wants to learn is to find a person who has done it and look at the results. Ideally you should find somebody with experience. Try to avoid those who have only read about it or like to talk about it. You want someone willing to get his or her hands dirty with you.
Being unable to physically help, the best I can offer is something to read. Here's my overview of the process.
The biggest success factor I have found with fiberglassing is neatness. Like a mom telling a child to clean up his or her room, before each step I clean up the work area and place everything where I know where it is.
Every time I have glassed in a cluttered area, I have ended up with fiberglass strands everywhere—some coated with epoxy, some without. Believe me, washing fiberglass strands out of your hair or off of your arms is not a pleasant experience.
After the wood to be glassed is sealed and everything has been final sanded, clean the workshop and gather enough of the following supplies to complete the project.
- Fiberglass cloth: I use 0.7-ounce cloth. I find it easier to work with than lighter varieties.
- Epoxy: I use hobby brands for the convenience of buying at a hobby shop. Recently I've been using Z-Poxy.
- Popsicle sticks: Use these for mixing and slurping epoxy onto the surface. Sand one end of each stick square.
- Acid brushes: Handy for dabbing epoxy into hard-to-reach places.
- Mixing cups: For years I avoided the cost of plastic cups and used paper Dixie cups. Plastic cups are worth the extra pennies, if for no other reason than the graduated scale on their sides. You get a better, more-consistent mix.
- Paper towels: I have a roll permanently mounted to the wall above my workbench. Start with a full or nearly full roll. When you need them, you need them immediately.
- Toilet paper: Use it to swab wet spots. The toilet paper's ply is your choice.
- Squeegee: I use old credit cards or hotel room keys.
- Wax paper: Use this to protect your workbench.
- Ink marker: Used to mark fiberglass for cutting, as well as the mixing cups.
- Denatured alcohol: Some people use this to thin the epoxy, but I use it to wash the paraffin off of cured epoxy.
- Aerosol contact cement: I use this to stick cloth down over compound/concave curves.
- Gloves: I use nitrile gloves, while others use latex. Either works.
After gathering your laundry list of items, cut out the fiberglass pieces you will need for the first session—plus one. I tend to get bored with cutting, so I cut as I go. "Plus one" is so you'll have a place to use extra epoxy in case more is mixed than needed. Stack the pieces you've cut out on a piece of sawdust-free wax paper in the reverse order of their application. Lay out the fiberglass over the structure and smooth every inch with your fingertips. If you feel a rough spot, lift the glass and make it smooth. Sometimes sawdust finds its way under the fiberglass. After fiberglassing, the only way to fix something is with heavy filler. Make sure it's smooth.
To me, mixing alcohol into epoxy is a chemistry foul. Others do it and that's fine. I prefer to gently heat epoxy in either a pan of hot water or with a heat gun. Water is easier, unless my wife is cooking dinner.
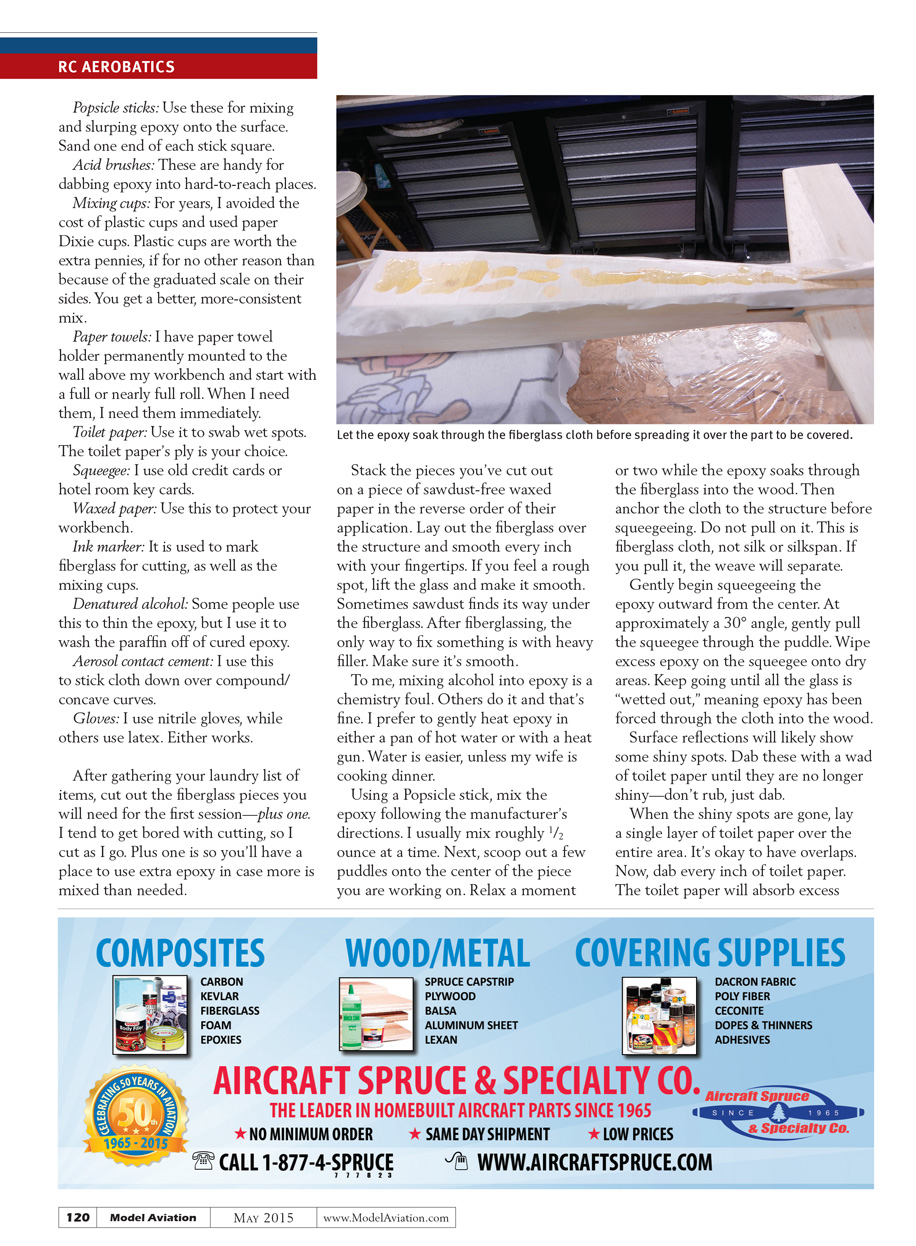
Using a Popsicle stick, mix the epoxy following the manufacturer's directions. I usually mix roughly 1/2 ounce at a time. Next, scoop out a few puddles onto the center of the piece you are working on. Relax a moment or two while the epoxy soaks through the fiberglass into the wood. Then anchor the cloth to the structure before squeegeeing. Do not pull on it. This is fiberglass cloth, not silk or silkspan. If you pull it, the weave will separate.
Gently begin squeegeeing the epoxy outward from the center. At approximately a 30° angle, gently pull the squeegee through the puddle. Wipe excess epoxy on the squeegee onto dry areas. Keep going until all the glass is "wetted out," meaning epoxy has been forced through the cloth into the wood.
Surface reflections will likely show some shiny spots. Dab these with a wad of toilet paper until they are no longer shiny—don't rub, just dab.
When the shiny spots are gone, lay a single layer of toilet paper over the entire area. It's okay to have overlaps. Now, dab every inch of toilet paper. The toilet paper will absorb excess epoxy and produce a nice, satin finish that is easy to sand. Gently peel back the toilet paper and discard. Repeat as many times as necessary until the paper no longer pulls up epoxy. It generally takes two applications.
Carefully check surface reflections for shiny spots or problem areas.
Sometimes there will be a piece that isn't stuck down. If gently rubbing with a gloved finger doesn't stick it down, dab it with a little epoxy on an acid brush.
It's time to let you in on a closely held secret: leave it alone. Clean up and walk away. Stop fussing with it and walk away for a few hours. After it has set, a heat gun can be used to enhance the cure.
When it's completely cured, fold the excess back over itself and sand the edge. Any medium-grit paper will work. I usually use whatever old worn-out sandpaper I have laying around. The idea is to flatten the surface.
Next time I'll attach the canopy and fill the weave of the cloth in preparation for primer.
Treasure Valley Pattern Contest
Here is my shameless self-promotion for the sixth annual Treasure Valley Pattern Contest, to be held at the Boise Area Radio Control Society (BARKS) flying field outside of beautiful Boise, Idaho, June 6–7.
Rain or shine we always have a hoot. This well-attended event attracts many Sportsman and Intermediate contestants.
While they last, F3A Team USA shirts and hats will be available for sale at all National Society of Radio Controlled Aerobatics (NSRCA) District 8 contests this year.
Flight complete.
Sources
- Team USA F3A www.teamusaf3a.com
- F3A World Championships www.f3a-wc2015.ch
- NSRCA www.nsrca.us
- BARKS www.barks.us
Transcribed from original scans by AI. Minor OCR errors may remain.

