
RADIO CONTROL GIANTS
John A. de Vries, 4610 Moffat Ln., Colorado Springs CO 80915
Faithful readers may recall Jim Messer and his Giant Scale designs. Jim operated a successful hobby shop in southern New York. He was a member of the STARS (Southern Tier Aero Radio Society) Radio Control (R/C) club, and he manufactured a small line of his designs as Giant Scale kits.
Jim decided to retire, so he sold his business to Dave Reid and took off for Florida. After some initial difficulty finding a suitable Florida club to join, Jim interrupted his retirement to design and fly several outstanding scale model airplanes.
He "cut" kits from his drawings and passed them out among modelers he met at a local hobby shop. The effort resulted in the duplication of his designs and membership in a great R/C club. Now you can share in Jim's designs once again.
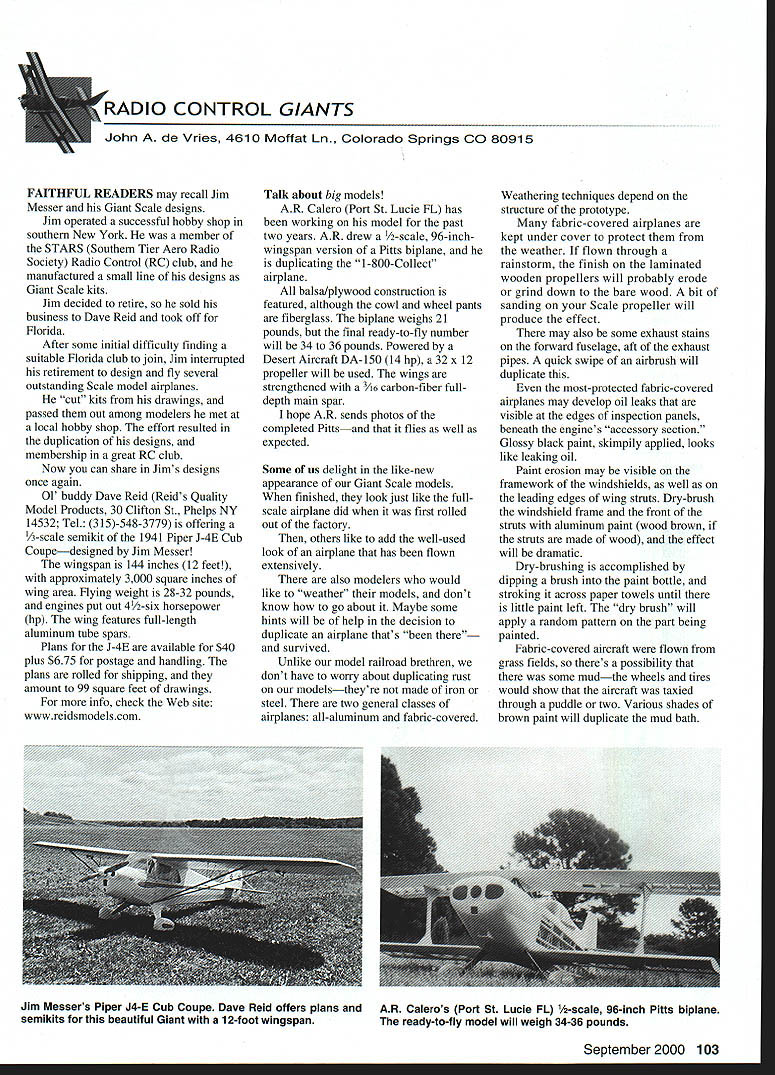
Ol' buddy Dave Reid (Reid's Quality Model Products, 30 Clifton St., Phelps NY 14532; Tel.: (315)‑548‑3779) is offering a 1/3-scale semikit of the 1941 Piper J-4E Cub Coupe—designed by Jim Messer!
- Wingspan: 144 inches (12 feet)
- Wing area: approximately 3,000 square inches
- Flying weight: 28–32 pounds
- Engine power: 4-1/2 to 6 horsepower
- Wing construction: full-length aluminum tube spars
Plans for the J-4E are available for $40 plus $6.75 for postage and handling. The plans are rolled for shipping and amount to 99 square feet of drawings. For more info, check the Web site: www.reidsmodels.com.
Talk about big models!
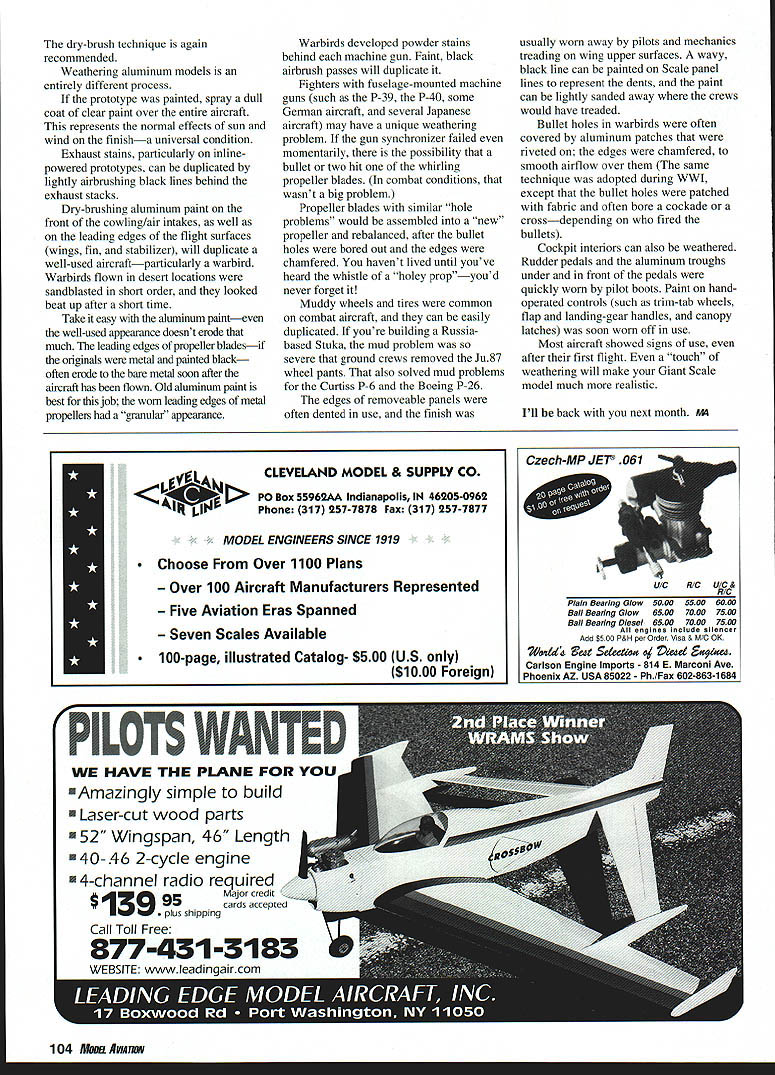
A.R. Calero (Port St. Lucie FL) has been working on a model for the past two years. A.R. drew a 1/2-scale, 96-inch-wingspan version of a Pitts biplane, duplicating the "1-800-Collect" airplane. All balsa/plywood construction is featured, although the cowl and wheel pants are fiberglass.
The biplane weighs 21 pounds at its current stage, but the final ready-to-fly number will be 34 to 36 pounds. It will be powered by a Desert Aircraft DA-150 (14 hp) with a 32 x 12 propeller. The wings are strengthened with a 3/16" carbon-fiber full-depth main spar. I hope A.R. sends photos of the completed Pitts—and that it flies as well as expected.
Some of us delight in the like-new appearance of our Giant Scale models. When finished, they look just like the full-scale airplane did when it was first rolled out of the factory. Others like to add the well-used look of an airplane that has been flown extensively. There are also modelers who would like to "weather" their models and don't know how to go about it. Maybe some hints will be of help in the decision to duplicate an airplane that's "been there" and survived.
Unlike our model railroad brethren, we don't have to worry about duplicating rust on our models—they're not made of iron or steel. There are two general classes of airplanes: all-aluminum and fabric-covered. Weathering techniques depend on the structure of the prototype.
Weathering fabric-covered aircraft
Many fabric-covered airplanes are kept under cover to protect them from the weather. If flown through a rainstorm, the finish on the laminated wooden propellers will probably erode or grind down to the bare wood. A bit of sanding on your scale propeller will produce the effect.
There may also be some exhaust stains on the forward fuselage, aft of the exhaust pipes. A quick swipe of an airbrush will duplicate this.
Even the most-protected fabric-covered airplanes may develop oil leaks that are visible at the edges of inspection panels, beneath the engine's "accessory section." Glossy black paint, skimpily applied, looks like leaking oil.
Paint erosion may be visible on the framework of the windshields, as well as on the leading edges of wing struts. Dry-brush the windshield frame and the front of the struts with aluminum paint (wood brown if the struts are made of wood), and the effect will be dramatic.
Dry-brushing is accomplished by dipping a brush into the paint bottle and stroking it across paper towels until there is little paint left. The "dry brush" will apply a random pattern on the part being painted.
Fabric-covered aircraft were flown from grass fields, so there's a possibility of mud—the wheels and tires would show that the aircraft was taxied through a puddle or two. Various shades of brown paint will duplicate the mud bath. The dry-brush technique is again recommended.
Weathering aluminum aircraft
Weathering aluminum models is an entirely different process.
If the prototype was painted, spray a dull coat of clear paint over the entire aircraft. This represents the normal effects of sun and wind on the finish—a universal condition.
Exhaust stains, particularly on inline-powered prototypes, can be duplicated by lightly airbrushing black lines behind the exhaust stacks.
Dry-brushing aluminum paint on the front of the cowling/air intakes, as well as on the leading edges of the flight surfaces (wings, fin, and stabilizer), will duplicate a well-used aircraft—particularly a warbird. Warbirds flown in desert locations were sandblasted in short order and looked beat up after a short time.
Take it easy with the aluminum paint—even the well-used appearance doesn't erode that much. The leading edges of propeller blades—if the originals were metal and painted black—often erode to the bare metal soon after the aircraft has been flown. Old aluminum paint is best for this job; the worn leading edges of metal propellers had a "granular" appearance.
Warbirds developed powder stains behind each machine gun. Black airbrush passes will duplicate this.
Fighters with fuselage-mounted machine guns (such as the P-39, the P-40, some German aircraft, and several Japanese aircraft) may have a unique weathering problem. If the gun synchronizer failed even momentarily, there is the possibility that a bullet or two hit one of the whirling propeller blades. Propeller blades with similar "hole problems" would be assembled into a "new" propeller and rebalanced after the bullet holes were bored out and the edges were chamfered. You haven't lived until you've heard the whistle of a "holey prop"—you'd never forget it!
Muddy wheels and tires were common on combat aircraft, and they can be easily duplicated. If you're building a Russia‑based Stuka, the mud problem was so severe that ground crews removed the Ju.87 wheel pants. That also solved mud problems for the Curtiss P‑6 and the Boeing P‑26.
The edges of removable panels were often dented in use, and the finish was usually worn away by pilots and mechanics treading on wing upper surfaces. A wavy, black line can be painted on scale panel lines to represent the dents, and the paint can be lightly sanded away where the crews would have treaded.
Bullet holes in warbirds were often covered by aluminum patches that were riveted on; the edges were chamfered to smooth airflow over them. (The same technique was adopted during WWI, except that the bullet holes were patched with fabric and often bore a cockade or a cross—depending on who fired the bullets.)
Weathering cockpit interiors and controls
Cockpit interiors can also be weathered. Rudder pedals and the aluminum troughs under and in front of the pedals were quickly worn by pilot boots. Paint on hand-operated controls (such as trim-tab wheels, flap and landing-gear handles, and canopy latches) was worn off in use.
Most aircraft showed signs of use, even after their first flight. Even a "touch" of weathering will make your Giant Scale model much more realistic.
I'll be back with you next month. MA
Transcribed from original scans by AI. Minor OCR errors may remain.

