
RADIO CONTROL HELICOPTERS
Eric Hawkinson, 319 Yellowstone Ave., Billings MT 59101; E-mail: [email protected]
IT'S ANOTHER great month to enjoy Radio Control (RC) helicopters! At this time of year, that should include everyone; the flying season is in full swing "up North," and the weather is still tolerably cool in the warmer regions.
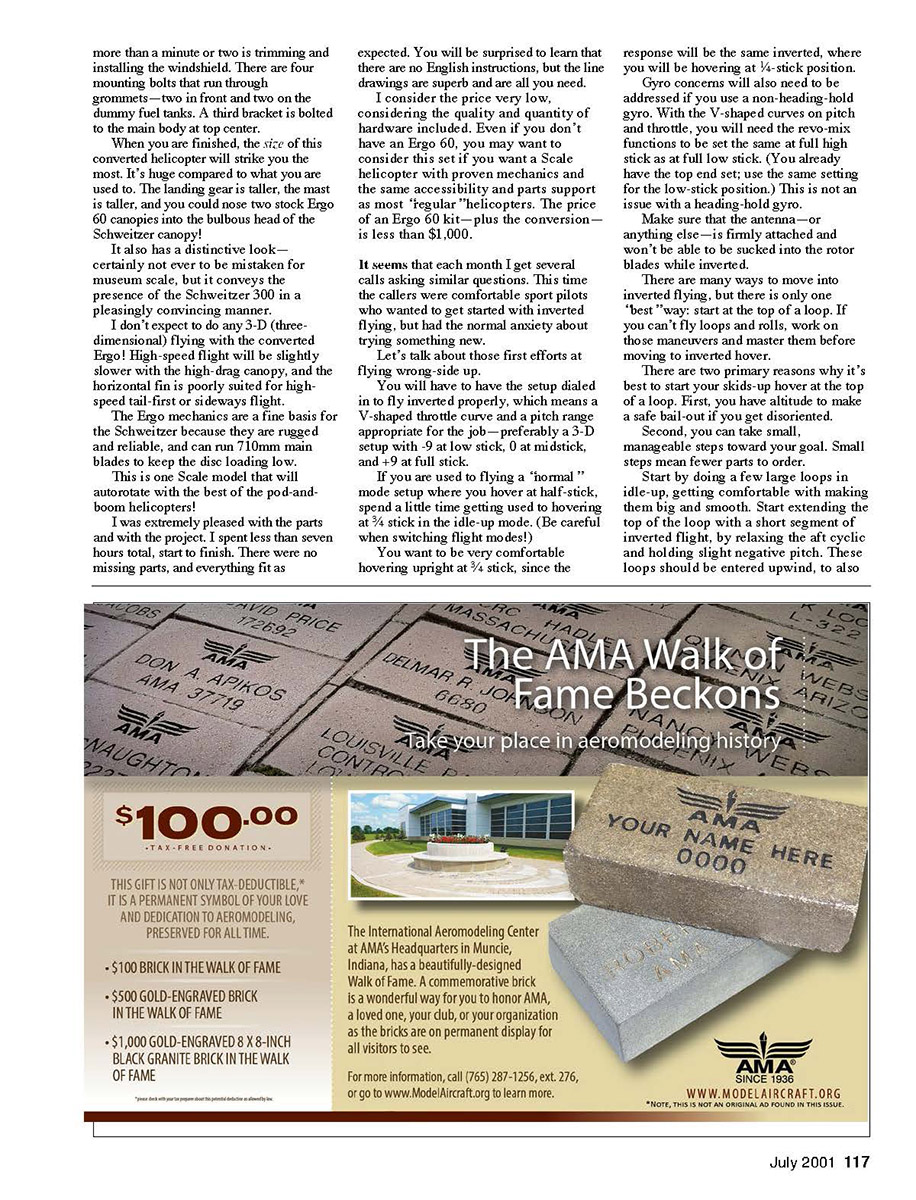
A few months ago, Model Aviation published a photo of two of my Ergo 60 helicopters. The Ergo 60 caused quite a sensation when it was released a few years ago, because it represented a new price point for high-quality, low parts-count, stacked-frame .60 helicopters.
Although it now has company in the "less than $600" range and has lost its "new item" status, the Ergo 60 continues to be a great value. There are many of them flying, ranging from completely stock to extensively (and expensively!) upgraded versions.
As do many owners, I installed a fair number of upgrades. Each time a sudden gust of gravity necessitated new parts, I would replace stock items with upgrade items.
My Ergos were eventually supplanted by newer helicopters — including two Vigors that flew for the first time this spring, and a Futura Nova that is nearly completed.
I didn't want to sell my "old reliable" Ergo 60s, but the new helicopters are more upscale models and I intend to spend the most time with them. I almost decided to hang up the Ergo as an emergency backup, then I saw an advertisement for a JR Schweitzer 300 conversion for the Ergo 60 or Z-230.
The JR Schweitzer 300 conversion
This package has been available for a while, but as a low-volume sales item. You probably won't see the set in your local hobby shop unless you special-order it.
The price tag of a little more than $400 seemed a bit much, but it came from the JR Helicopter Division so I expected that it would be a high-quality product. I bit the bullet and ordered one.
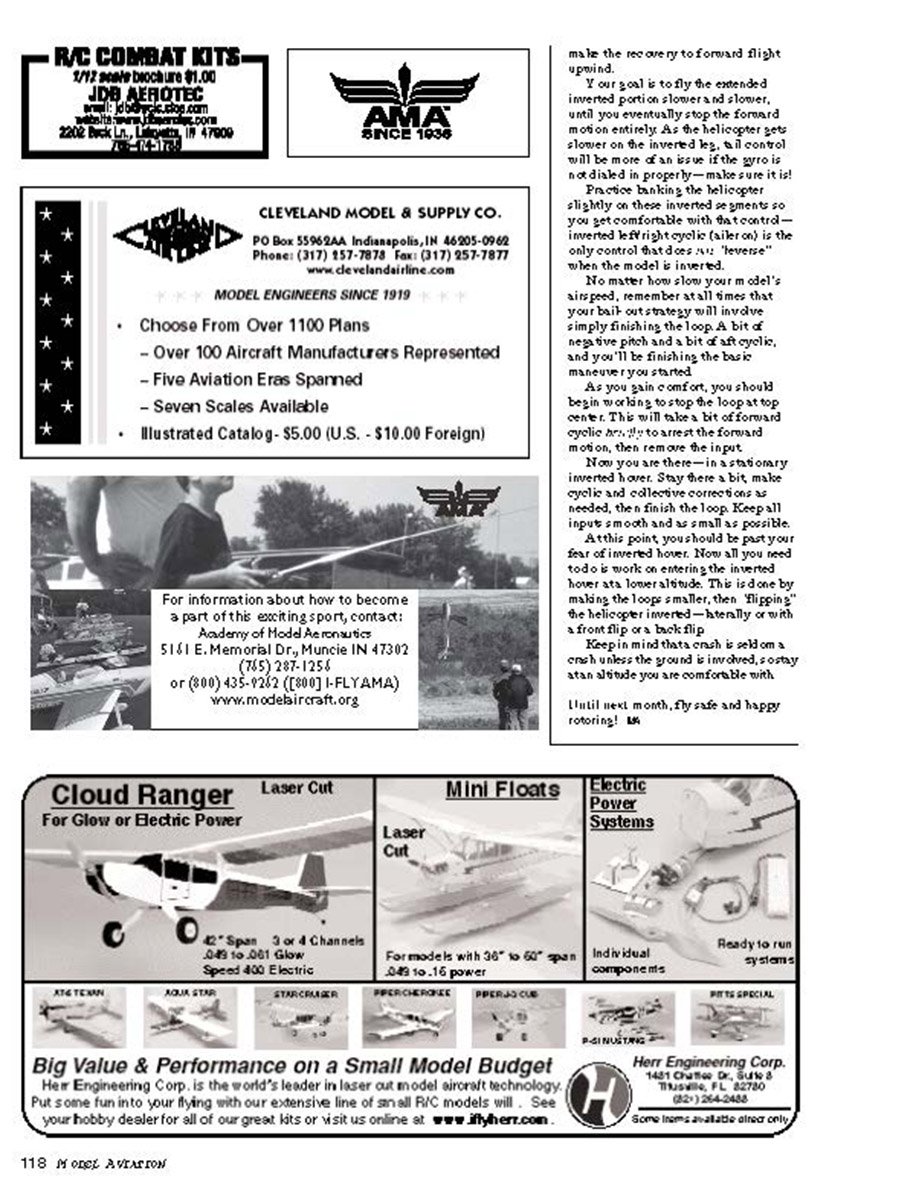
Now I'm as excited about my "old" Ergo as I was when I first got it! The JR Schweitzer 300 conversion is quite a bit more than a simple body set you install your mechanics into. It includes the body, and mine was flawlessly molded in fiberglass with no seams and no trimming needed. The body, fuel tanks, and fins are completely ready to install. With the bright-yellow finish molded into the parts, there is no need for paint. The only part that needs any "fitting" is the nicely molded clear-plastic windshield. It mounts very nicely if you cut it at the marked lines.
Before you get to the body mounting, you will have a small amount of unbuilding to do. The stock landing gear and dampeners are removed, as are the body-mounting posts and lower frame doublers.
A new set of frame doublers is installed; you get all of the hardware to install the new parts, so you can keep the stock parts and fasteners for future use.
You also install new body-mounting posts — a pair of nicely machined posts that hold the much wider scale body. The huge, but light, semiscale landing gear is made from machined-aluminum parts and many set screws.
There are some extra parts in the kit because it is designed to mount on a few different basic chassis, so don't get worried when you have some parts left over.
You use the original tailboom supports that attach to a new front mount that moves the vertical fin forward and below the tailboom. A short set of tailboom supports attaches to a new forward bracket, and a machined horizontal fin mount attaches the new fin and a tubular tail skid to the original tailcase.
At this point you're almost finished with mechanicals, except you need to install the new (taller) main mast so the flybar won't whack your new canopy. You get a new set of pushrods and links, as well as a new washout guide pin.
With the preliminary work done, the actual body-set installation is a cakewalk. Drill a few holes where marked, and hang the parts. The only step that takes more than a minute or two is trimming and installing the windshield. There are four mounting bolts that run through grommets — two in front and two on the dummy fuel tanks. A third bracket is bolted to the main body at top center.
When you are finished, the size of this converted helicopter will strike you the most. It's huge compared to what you are used to. The landing gear is taller, the mast is taller, and you could nose two stock Ergo 60 canopies into the bulbous head of the Schweitzer canopy!
It also has a distinctive look — certainly not ever to be mistaken for museum scale, but it conveys the presence of the Schweitzer 300 in a pleasingly convincing manner.
I don't expect to do any 3-D (three-dimensional) flying with the converted Ergo! High-speed flight will be slightly slower with the high-drag canopy, and the horizontal fin is poorly suited for high-speed tail-first or sideways flight.
The Ergo mechanics are a fine basis for the Schweitzer because they are rugged and reliable, and can run 70mm main blades to keep the disc loading low.
This is one Scale model that will autorotate with the best of the pod-and-boom helicopters!
I was extremely pleased with the parts and with the project. I spent less than seven hours total, start to finish. There were no missing parts, and everything fit as expected. You will be surprised to learn that there are no English instructions, but the line drawings are superb and are all you need.
I consider the price very low, considering the quality and quantity of hardware included. Even if you don't have an Ergo 60, you may want to consider this set if you want a Scale helicopter with proven mechanics and the same accessibility and parts support as most "regular" helicopters. The price of an Ergo 60 kit — plus the conversion — is less than $1,000.
Getting into inverted flying
It seems that each month I get several calls asking similar questions. This time the callers were comfortable sport pilots who wanted to get started with inverted flying, but had the normal anxiety about trying something new.
Let's talk about those first efforts at flying wrong-side up.
You will have to have the setup dialed in to fly inverted properly, which means a V-shaped throttle curve and a pitch range appropriate for the job — preferably a 3-D setup with -9 at low stick, 0 at midstick, and +9 at full stick.
If you are used to flying a "normal" mode setup where you hover at half-stick, spend a little time getting used to hovering at 3/4 stick in the idle-up mode. (Be careful when switching flight modes!)
You want to be very comfortable hovering upright at 3/4 stick, since the response will be the same inverted, where you will be hovering at 1/4-stick position.
Gyro concerns will also need to be addressed if you use a non-heading-hold gyro. With the V-shaped curves on pitch and throttle, you will need the revo-mix functions to be set the same at full high stick as at full low stick. (You already have the top end set; use the same setting for the low-stick position.) This is not an issue with a heading-hold gyro.
Make sure that the antenna — or anything else — is firmly attached and won't be able to be sucked into the rotor blades while inverted.
There are many ways to move into inverted flying, but there is only one "best" way: start at the top of a loop. If you can't fly loops and rolls, work on those maneuvers and master them before moving to inverted hover.
There are two primary reasons why it's best to start your skids-up hover at the top of a loop:
- You have altitude to make a safe bail-out if you get disoriented.
- You can take small, manageable steps toward your goal.
Start by doing a few large loops in idle-up, getting comfortable with making them big and smooth. Start extending the top of the loop with a short segment of inverted flight, by relaxing the aft cyclic and holding slight negative pitch. These loops should be entered upwind, to also make the recovery to forward flight upwind.
Your goal is to fly the extended inverted portion slower and slower, until you eventually stop the forward motion entirely. As the helicopter gets slower on the inverted leg, all control will be more of a use if the gyro is not dialed in properly — make sure it is!
Practice banking the helicopter slightly on these inverted segments so you get comfortable with the control — inverted left/right cyclic (aileron) is the only control that does not "reverse" when the model is inverted.
No matter how slow your model's airspeed, remember at all times that your bail-out strategy will involve simply finishing the loop. A bit of negative pitch and a bit of aft cyclic, and you'll be finishing the basic maneuver you started.
As you gain comfort, you should begin working to stop the loop at top center. This will take a bit of forward cyclic input to arrest the forward motion, then remove the input.
Now you are there — in a stationary inverted hover. Stay there a bit; make cyclic and collective corrections as needed, and then finish the loop. Keep all inputs smooth and as small as possible.
At this point you should be past your fear of inverted hover. Now all you need to do is work on entering the inverted hover at lower altitude. This is done by making the loop smaller, then "flipping" the helicopter inverted — literally or with a front flip or a back flip.
Keep in mind that a crash is seldom a crash unless the ground is involved, so stay at an altitude you are comfortable with.
Until next month, fly safe and happy rotoring!
Transcribed from original scans by AI. Minor OCR errors may remain.

