
RADIO CONTROL PYLON RACING
Duane Gall, 1267 S. Beeler Ct., Denver CO 80231
GETTING IT TOGETHER
In the June issue, I listed names and contact information for a half-dozen or so Quickie 500 racing models. Some are prefabricated (Almost Ready to Fly, or ARF) types, others are not.
ARFs are expensive. If you're new to racing, you may be long on flying skill and enthusiasm, but short on cash. You may think that disqualifies you from having a competitive airplane—not so.
This month and next, I'll walk through the assembly of two typical Q-500 kits—one with a fiberglass fuselage and one without.
The fiberglass model is the Mad Dog, designed by Kevin Matney of Matney Models (10765 Victory Rd., Erie MI 48133; Tel.: (734) 848-8195; Internet site: http://matneymodels.hypermart.net/index.html).
The balsa model is the X-1, by last month's local hero, Craig Farthing of Littleton CO, Tel.: (303) 933-1772.
Before I get started, I'll answer a frequently asked question: Why are virtually all of the Q-500 racers on the market today—including the two chosen for this construction feature—shoulder-wing, V-tail designs?
As is often the case in racing, the short answer is form follows function.
Tests with full-scale aircraft have shown that the higher you move the wing/fuselage junction in relation to the cross-section of the fuselage, the less induced drag there is at the wing root.
The difference is slight in low-stress cruising flight, but it becomes apparent in a high-G pylon turn; a high-wing airplane loses less speed as it goes through the turn.
Full-scale racers such as the Formula I Nemesis tend to be shoulder-wing designs. They would probably all be high-wing types, such as the 1930s Mr. Mulligan, if not for the fact that when a full-scale, high-wing airplane banks into the turn, the inboard wing obscures the pilot's view of the pylon and other aircraft.
Combat aircraft have a similar problem: an enemy above is more of a threat than an enemy below, so the wing goes on the bottom. That's why P-51s and other converted military aircraft flown in full-scale Unlimited racing are low-wing designs.
High-wing airplanes don't need dihedral for added stability in flight. That means there is no dihedral break at the center section of the wing, so you get a clean, single airfoil with no discontinuity. The structural benefit is that a single-spar, single-piece wing is stiffer and lighter. There is also less interference drag at the fuselage/wing junction.
For radio pylon models, a shoulder wing also provides good clearance for the propeller and allows for a thin fuselage at the wing roots, reducing frontal area.
Why the V-tail?
With a conventional flat stabilizer, there may be times (depending on the aircraft's angle of attack in relation to the oncoming air) when the "wake," or downwash behind the wing, interferes with the stabilizer, reducing its effectiveness.
With a V-tail, there's never more than a small portion of the tail in the wing wake, so elevator response is more uniform and predictable.
My experience with midwing Q-40s indicates that some places are better than others for mounting the tail, but any place is good for a V-tail.
Both kits featured here are designed with a flat reference plane on the bottom of the fuselage. This means that until you mount the landing gear, you can set the fuselage on a flat workbench and easily measure the squareness of the firewall and the incidence of the wing and tail, using a right-angle triangle and a ruler, respectively.
To align the V-tail, cut a square or rectangular piece of flat plywood, cradle it in the V-tail, and measure up from the tabletop at the front and rear. If the measurement is the same, the tail is set at 0° in relation to the thrustline. That's where you want it.
If the ends of the "V" are chopped off square, measure up from the tabletop to each corner. If the measurement is the same, the tail is set at 0° in relation to the thrustline, and is not tilted side-to-side.
Fuselage construction
Beauty is as beauty does. The X-1 fuselage comes "framed up," built straight on a fixture using slabs of 3/16-inch balsa sheet. The Mad Dog is made from fiberglass, but it has flat sides and a square cross-section.
"Why?" you may ask. Fiberglass can be molded into the most beautiful teardrop shape you can imagine, yet it is just a box.
The answer lies in the genesis of the Quickie 500 class in the 1970s. The designers of the event wanted to ensure that it did not fall prey to the kind of expensive sophistication that had begun to consume Formula I and its smaller cousin, Quarter Midget (using .15 engines).
So they wrote a requirement into the rules that the engine be completely exposed, and the fuselage had to be a simple box that anyone could duplicate with $10 worth of balsa. No exotic materials were allowed.
Engine mounting and blind nuts
However, the front end is fully enclosed. How do you get the blind nuts in there for mounting the engine?
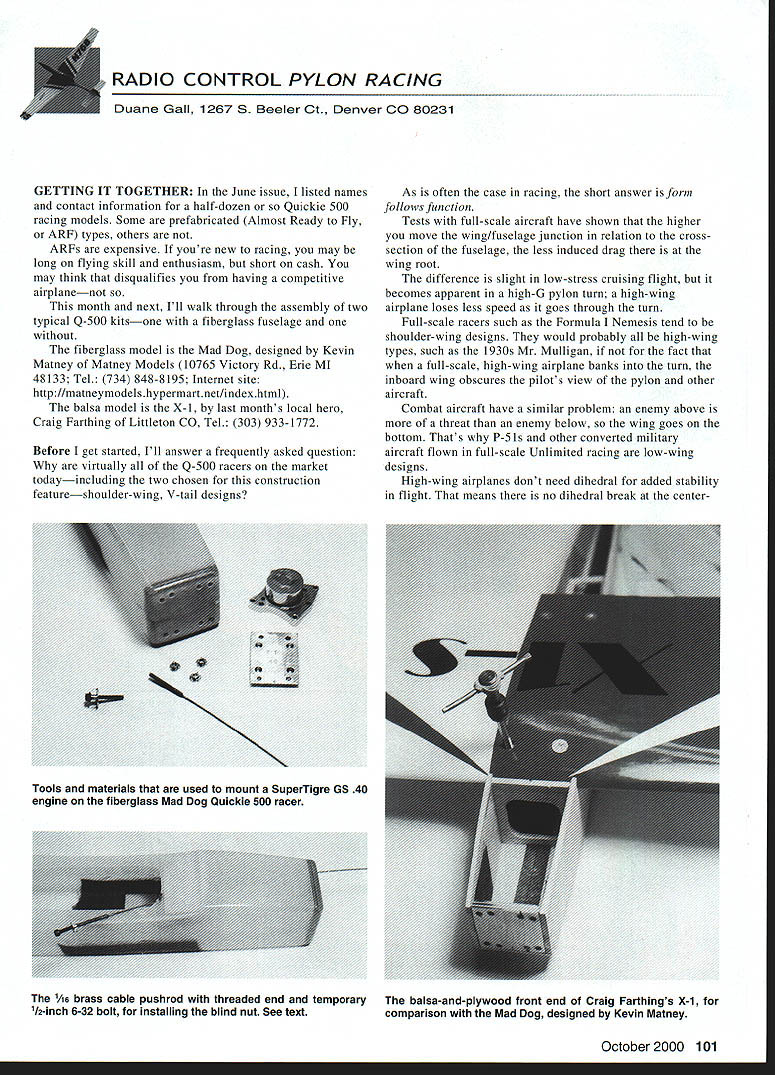
As one photo shows, I made a blind-nut installation tool by brazing approximately an inch of 6-32 threaded rod onto the end of a 7/16-inch brass cable pushrod. (High-temperature silver solder will work, if you don't want to braze.)
On the left is a 6-32 bolt, with which to initially "set" each blind nut. On the bolt is a wide-flanged blind nut—one of the cheap kind, from the hardware store. Its purpose is to keep the bolt head from punching through the firewall when I tighten it; a large washer would do just as well.
On the right in the photo are a Nelson engine backplate mount and a homemade backplate mount for the SuperTiger GS .40. I predrilled 3/16-inch holes in the firewall, to accommodate both.
In the middle of the photo are three sample blind nuts from Du-Bro—the only kind I use. The nuts have small flanges (so they won't bump into the corners of the fuselage on the backside of the firewall), and they are made of heavy-gauge material (so they won't fracture under vibration like the cheap ones from the hardware store).
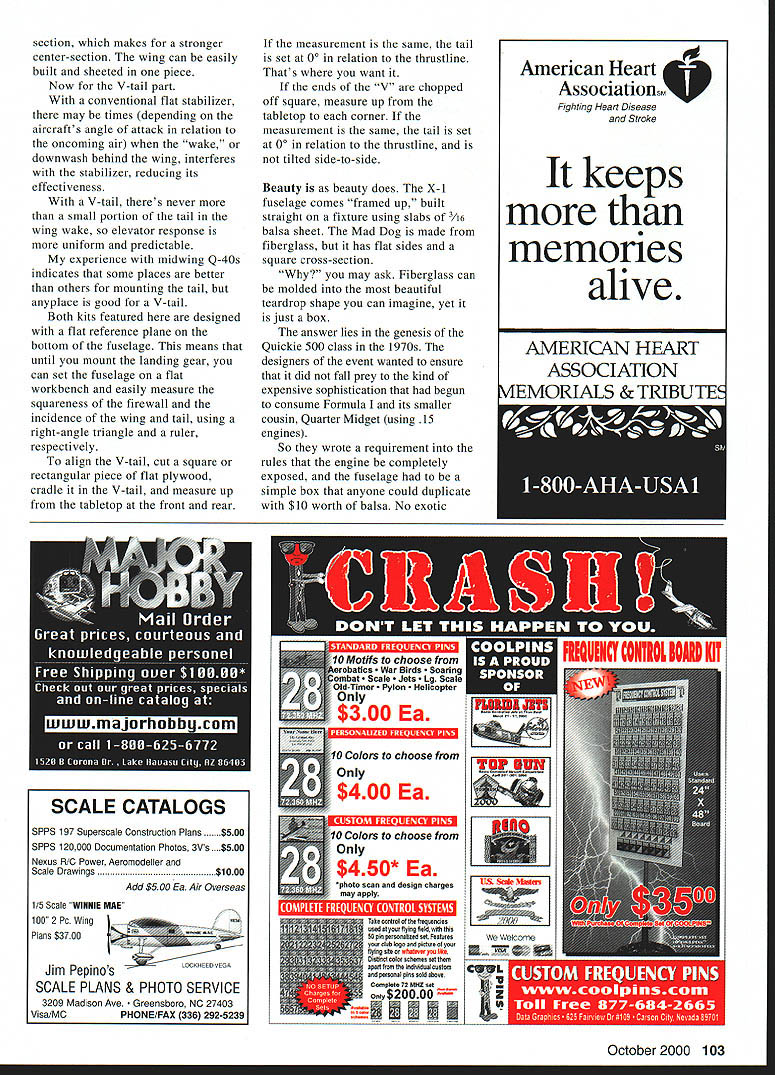
In another photo, I've pushed the insertable cable through one of the holes, and threaded a blind nut partway onto the end of the cable. From behind, I've threaded a 1/2-inch 6-32 bolt partway into the blind nut.
From here, the sequence is:
- Engage a hex driver onto the bolt.
- Pull with the cable and push with the hex driver, until the blind nut is pressed against the back of the hole in the firewall.
- Remove the cable, and engage the "setting" bolt (from previous photo) on the front side of the blind nut. Pull firmly on the "setting" bolt, to keep the blind nut in place.
- Remove the 1/2-inch bolt from the back side of the blind nut.
- Carefully thread the setting bolt the rest of the way through the blind nut; keep turning the bolt until you've drawn the blind nut fully into position, so it won't fall out. Remove the setting bolt.
The last step in the process is to mount the engine backplate with all four bolts, and tighten them fairly hard; do this gradually, in an "X" pattern.
Don't get carried away, lest you crush the plywood or strip the threads.
When all the blind nuts are tight, remove the backplate and put a drop of thin cyanoacrylate (CyA) in the front of each hole, to permanently mount the blind nut.
Give the CyA 20 minutes to fully cure, then clean out the threads with a 6-32 tap.
Comparing X-1 and Mad Dog front ends
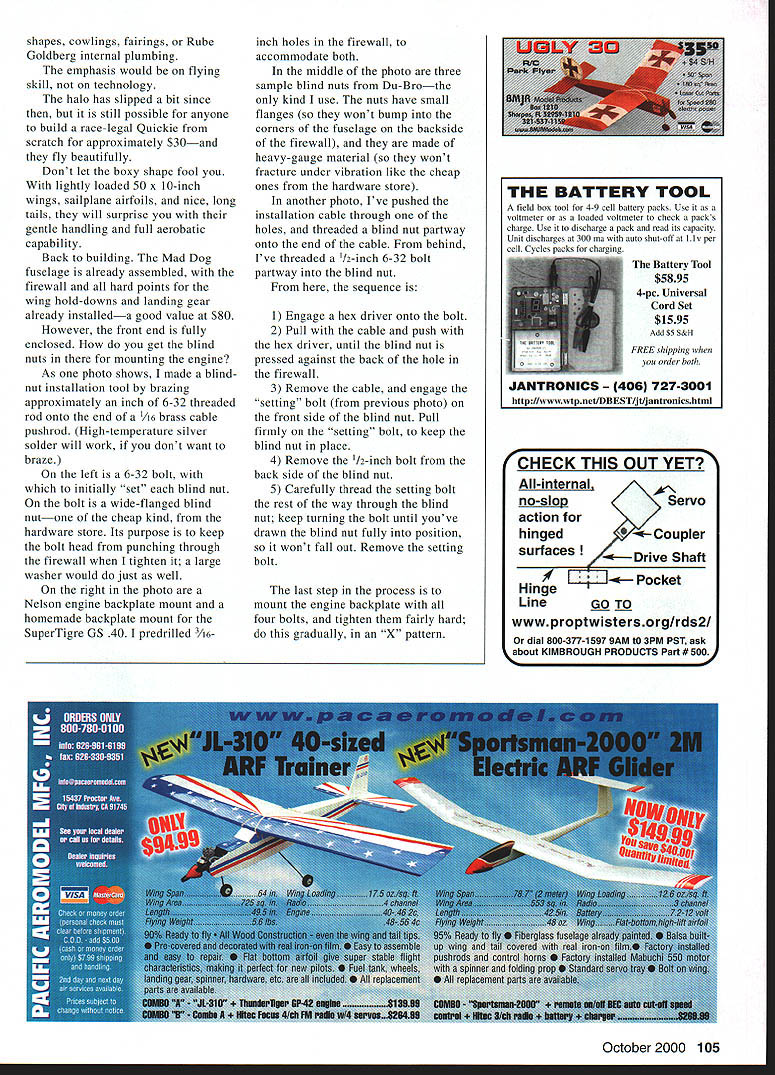
I'm getting a little ahead of myself in the last photo. I haven't built the wing yet, but it is being installed. I wanted you to see the X-1 front end, to compare with the Mad Dog.
The blind-nut installation process was easier here, because the top of the box is still open.
Note the 1/32-inch plywood doublers laminated to the inside of the balsa fuselage slabs. The firewall is mounted between them, with reinforcing pins (hardwood dowels or toothpicks) inserted through the laminations, into the edges of the firewall on both sides—three pins per side.
Craig does a similar thing with the wing hold-down plates. This treatment is essential for flying with high-powered engines, such as the Nelson and the Jett.
I am out of space for this month. Next month, the wings and tail feathers.
MA
Transcribed from original scans by AI. Minor OCR errors may remain.

