
RC Scale
Stan Alexander, 3709 Valley Ridge Dr., Nashville TN 37211; E-mail: [email protected]
Well, it's that time of year: many of us have filled or are filling out our Christmas lists.
Around home it really works great to use a highlighter on the item or items desired from a catalog. No, I usually don't ask for a new computer radio or a $3,000 radial engine, but a couple of books, a kit, or plans are usually on my list. My wife will go out to the local hobby shop and usually order the goodies. Ah, the woes of being married to a modeler.
PT-19 Update: The horizontal stab was good for fun-flying, but wanting to make it as close to scale as possible necessitated a few alterations.
One of these was to correct the shape at the outside tip of the stab. The extra scrap balsa added to correct the shape of the stab came from the kit and is 2¾ inches in length, attached at the outboard tip.
The balsa sheets supplied to cover the stab were checked for warps; several were warped, which can happen during the manufacturing process or from humidity, which is common here in Tennessee. These were stripped using an aluminum straightedge and an X‑acto® knife. Stripping is quicker, easier, and more accurate than sanding.
(The local hardware store or art-supply store should be able to help you with the straightedge. I have two lengths—36 and 72 inches—and they are also great for trimming MonoKote on sport models, with new blades in the knife!)
Robart 1/4-scale hinge points (part #310) were used to hinge the elevator as well as the rudder. Slots were cut into the trailing edge of the stab as per the prototype. Slots were side to side to accommodate the scale hinges. These slots leave the hinges exposed after construction is completed. Use a drop of Vaseline® applied with a toothpick to lubricate the bearing (both sides) before painting all of the hinges.
The elevators must also be slotted to complete the scale appearance of the tail feathers. Balsa sticks were added where slots were cut to allow more glue surface for attachment.
Installation of the hinges is simple. Center the location for the hinge, drill a 3/16 hole for each hinge, fill the hole with white glue (I use Pacer Hinge Glue), and push the hinge in. Be sure to press the hinge in carefully, stopping often as you proceed. Wipe away any excess glue with a tissue.
Once the hinge is installed, it won't back out. I would suggest using one hinge on a test strip of balsa to see how they work.
After you have the hinge installed, don't try to remove it; this will destroy the surface to which you are attaching the hinge.
Your local hobby shop probably stocks these and other Robart parts. Always use your local hobby shop, if you can—they are your best source for parts, as well as good advice—something you can't buy at any price.
Next time around we'll start on the wing modifications.
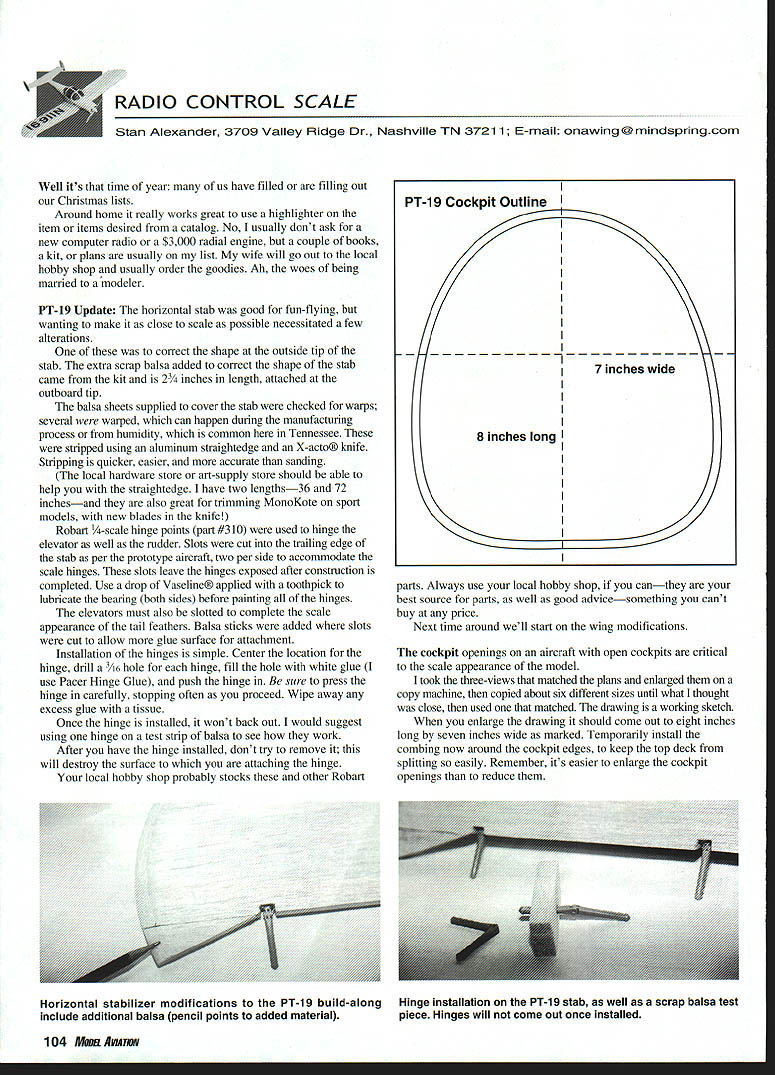
The cockpit openings on an aircraft with open cockpits are critical to the scale appearance of the model.
I took the three-views that matched the plans and enlarged them on a copy machine, then copied about six different sizes until what I thought was close, then used one that matched. The drawing is a working sketch.
When you enlarge the drawing it should come out to eight inches long by seven inches wide as marked. Temporarily install the coaming now around the cockpit edges, to keep the top deck from splitting so easily. Remember, it's easier to enlarge the cockpit openings than to reduce them.
New projects are always in the works; many of us probably have plans we'll never build, present company included.
Examining different plans can also give you ideas about how to accomplish tricky sections on your present project.
A plan-built model is now on the horizon after the PT-19. Not a Cub, nor another warbird, but something simple that I can take to the field each week and just have fun with, yet is still a Scale model. Several aircraft come to mind, including the Fokker D.VIII, one of the Monocoupes, or a Corben Baby Ace. Looking at those three, I guess it's time to start another file on a couple of subjects, for three-views and documentation.
Speaking of Monocoupes, the photos in my last column were not Velie Monocoupes, but later versions of the 110 Special and the 90A model as stated in the text.
Top Gun 1999—Equipment
Scale modeling and Scale competition are much different from Racing or Pattern, where you have many competitors using much the same equipment or airframe types. Scale modelers are, well, a different breed in a way. We usually build a model of what we like—not the latest technology in airframe construction or the most-powerful engine.
Most Scale modelers would rather spend the hundreds or thousands of hours building their favorite full-scale aircraft, then making it perform well at a fly-in or contest. Engines must therefore be the most-reliable, not the most-powerful, although it's nice to have both. The airframes are built using a multitude of different materials and finishing processes.
Going to a national or international Scale contest is one way to see what equipment Scale modelers are using. At the 1999 Top Gun Invitational there was a mixture of radio brands, engines, equipment and sizes of aircraft. I'm not going to list every airframe and the specs here, but here are a few interesting tidbits of information:
- Radios:
- Futaba: 33
- JR: 20
- Airtronics: 13
- Ace, Graupner, and Multiplex: 1 each
- In Team Scale and Expert classes:
- 30 entries were built from kits
- 19 were built from plans (eight of those 19 were Ziroli designs)
- Notable models:
- Largest: Phil Sibille's Piper Super Cub — 144 inches span, 37 pounds
- Smallest: Tad Kranenwisch's MiG-17 — 53 inches span, 16 pounds
- Fuel types:
- Gas: 18
- Jet-A: 11
- Widelcat: 9
- Omega: 7
- Cool Power: 3
- Byron: 3
- Others: personal blends, plus propane and specialty blends (e.g., Richard Feroldi's D.H.2 using Exxon gas)
One of the newer paint systems used by several modelers was the PPG paint system. Everyone is trying to find something that works to replace their familiar K&B Super Poxy. Several modelers are going to lacquer paint and some of the water-base paints with an overcoat of clear polyurethane. If you have success with one type or another, let us know.
FAI Team Qualifier
This year's qualifier was held just before the National Championships in Muncie. Three classes were flown: F4B (Control Line), F4C (RC), and F4C Large Scale (a nonfunded provisional class). Three members were selected from each team to represent the United States at the FAI World Championships in Interlaken, Switzerland.
- F4C team members: Ramon Torres, Hal Parenti, and Kim Foster
- F4B team members: Steve Ashby, Jack Patrola, and Dale Campbell
- F4C winners: Ed Reigel, Kirby Roberts, and Phil Sibille
The team manager is nominated at each qualifier by popular vote of the new team members, then approved by the FAI Committee. George Buso was selected as Team Manager, and Dale Frederick is Assistant Team Manager. Each has served in similar positions, and their experience will be a definite asset.
The Mid-Hudson R/C Society donated $500 to the Scale team, and George Buso presented it to Team Selection Committee Chairman John Quinette after Saturday evening at the Nationals. George's club has raised money for its own chartered AMA Club to make the donation.
Send donations to: FAI Scale Team Fund c/o George Buso, Team Manager 11 Maple Ln., Hyde Park NY 12538
That's about it for this month. Hope everyone has a happy holiday season.
Till next time, Fair Skies & Tail Winds. MA
Transcribed from original scans by AI. Minor OCR errors may remain.

