

Learn how to check the CG
by John Glezellis [email protected]
After a pilot becomes interested in Scale Aerobatics, he or she will quickly realize that all Scale Aerobatics classes feature similar maneuvers, but with a great difference in complexity.
When examining the 2014 Basic and Unlimited International Miniature Aerobatic Club (IMAC) programs, for example, a hammerhead maneuver is found. Although the Basic class has the hammerhead in the purest form, the Unlimited program adds an inverted entry and exit, two negative snap rolls on the vertical upline, and two consecutive rolls on the downline.
Competition Aerobatics teaches pilots not only how to execute certain groups of maneuvers, but how to tune the aircraft so they can perform a certain sequence with consistency.
I will begin by reviewing CG because it will have a great impact on how the airplane responds in flight. Then I will discuss two flight-mode options so complex maneuvers can be performed with minimal switching of dual and/or triple-rate activation during a sequence or maneuver.
Although the Spektrum DX18 will serve as the example, use this column as a foundation and replicate it, when applicable, with your system. Without further delay, let’s get started!
Trimming and Flying Techniques Defined
Before attempting any sequence, you must begin with the basics. In past columns I have covered some trimming fundamentals with respect to thrust angles, corrective mixes (rudder-to-aileron and rudder-to-elevator mixes to correct undesired knife-edge tendencies), etc. Because this column is oriented toward a few methods you can use to perform a complex maneuver, I will focus on the CG and rates.
I prefer a CG that is slightly nose-heavy, not only for the best breaks during a snap roll, but also for the best tracking throughout certain maneuvers. You can test this by pulling to a 45° upline and performing a half roll to an inverted climb. If the airplane executes a small arc toward the ground, it is slightly nose-heavy. If the airplane maintains the line or pushes to the undercarriage, it is either neutral or tail-heavy.
Having all rates on one switch is ideal for maneuvers that contain multiple elements, such as the stall turn found in the Unlimited program. During the maneuver, some may find it tedious to toggle multiple switches to perform the entry and exit radii, the snap rolls, the hammerhead portion, and so forth. I prefer to use flight modes where my rates for all control surfaces are on one switch. The low-rate setting has enough deflection for each segment of the sequence with the exception of snaps and spins, where I will activate my mid-rate setting. The high-rate setting is only for tail slides and 3-D maneuvers.
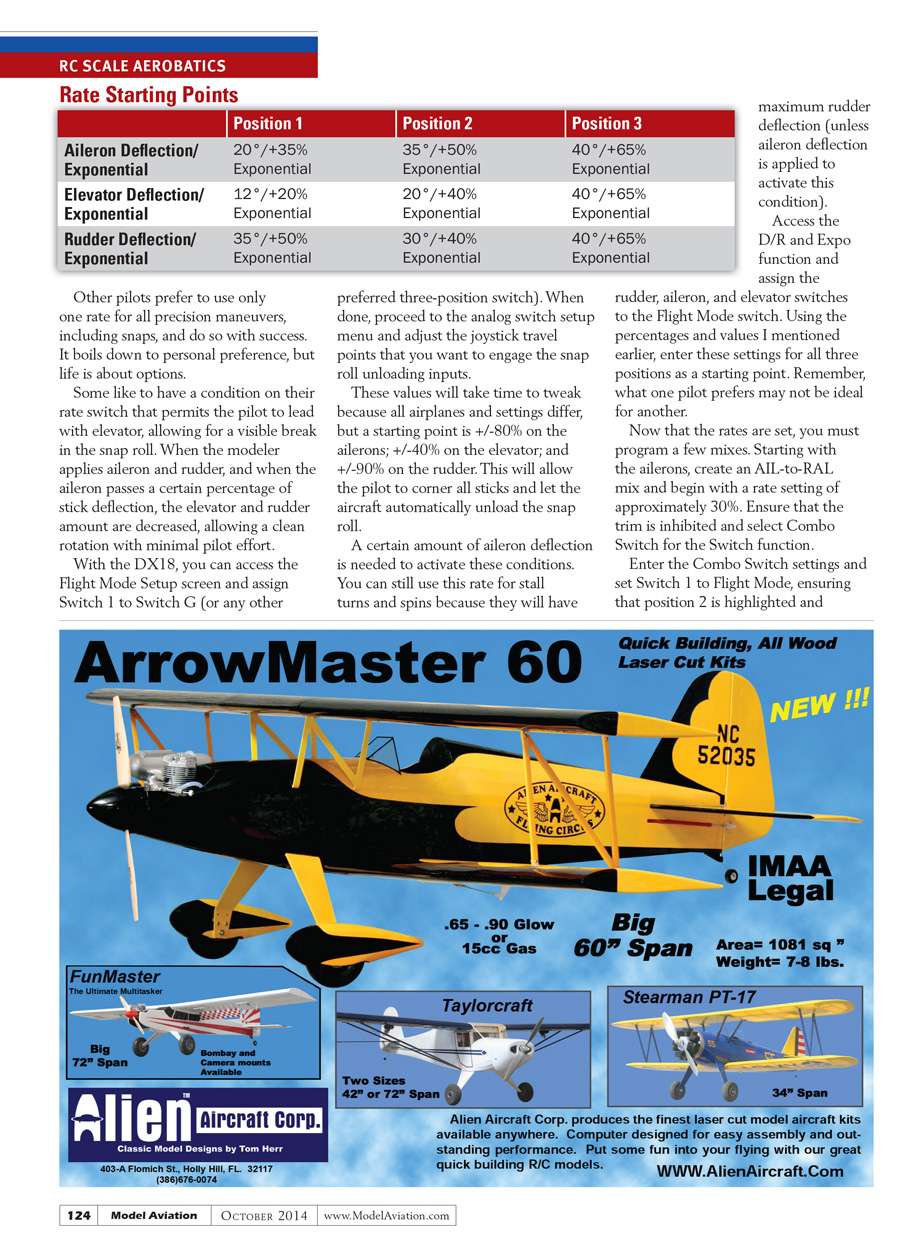
If unsure of a starting point for each rate, refer to the chart included with this column for appropriate deflection and exponential amounts. Other pilots prefer to use only one rate for all precision maneuvers, including snaps, and do so with success. It boils down to personal preference, but life is about options. Some like to have a condition on their rate switch that permits the flier to lead with elevator, allowing for a visible break in the snap roll. Then, when the modeler applies aileron and rudder, and when the aileron passes a certain percentage of stick deflection, the elevator and rudder amount are decreased, allowing a clean rotation with minimal pilot effort.
With the DX18, you can access the Flight Mode Setup screen and assign Flight Mode to a three-position switch (for example, Switch G). When done, proceed to the analog switch setup menu and adjust joystick travel points that you want to engage the snap-roll unloading inputs. These values will take time to tweak because all airplanes and settings differ, but a starting point is:
- Ailerons: ±80%
- Elevator: ±40%
- Rudder: ±90%
This will allow the pilot to corner all sticks and let the aircraft automatically unload the snap roll. A certain amount of aileron deflection is needed to activate these conditions. You can still use this rate for stall turns and spins because they will have maximum rudder deflection (unless aileron deflection is applied to activate the unloading condition).
Access the D/R and Expo function and assign the rudder, aileron, and elevator D/R and Expo switches to the Flight Mode switch. Using the percentages and values mentioned earlier, enter these settings for all three positions as a starting point. Remember, what one pilot prefers may not be ideal for another.
Now that the rates are set, you must program a few mixes. Start with the ailerons: create an AIL-to-RUD mix and begin with a rate setting of approximately 30%. Ensure that the trim is inhibited and select Combo Switch for the Switch function.
Enter the Combo Switch settings and set Switch 1 to Flight Mode, ensuring that position 2 is highlighted so the mix is active only in that position. Set the Relation to AND, set Switch 2 to the Aileron stick, and highlight and activate positions 0 and 2 under Switch 2. On the DX18, after each mix mentioned in this column has been made, select the specific Flight Mode, add the correct relation, and activate the corresponding stick for the mix to work as desired.
Perform two additional mixes:
- ELE-to-REL mix for the master and slave elevator channels.
- RUD-to-RRUD mix for the master and slave rudder channels.
These mixes may differ depending on your personal setup, so make adjustments accordingly. Duplicate the Combo Switch settings used for the AIL-to-RUD mix and watch the stick-deflection gauges to ensure that the control surfaces are moving as desired. When the aircraft is in the air, the pilot can tune these special mixes and deflection amounts. With time and proper tuning, an entire sequence can be performed without flipping a rate switch. Rate switches can be used solely for sequence and 3-D flight.
Final Thoughts
You should now know how to check your aircraft’s CG and how to program the model so it responds to your liking. With advanced computer radios, complex mixes such as those mentioned can decrease a pilot’s workload. During the trimming and setup process, however, never make immediate drastic changes.
Trim an aircraft in calm conditions and fly it multiple times before making a major change to the CG, a specific rate, etc. Take your time, observe the aircraft, and experiment. Patience and proper practice techniques will pay off when competition day arrives!
Until next time, fly hard!
SOURCES:
- Futaba — (800) 637-7660 — www.futaba-rc.com
- IMAC — www.mini-iac.com
- JR Americas — (217) 352-7595 — www.jramericas.com
- Spektrum — (800) 338-4639 — www.spektrumrc.com
Transcribed from original scans by AI. Minor OCR errors may remain.

