
The Horizontal-S maneuver
by John Glezellis [email protected]
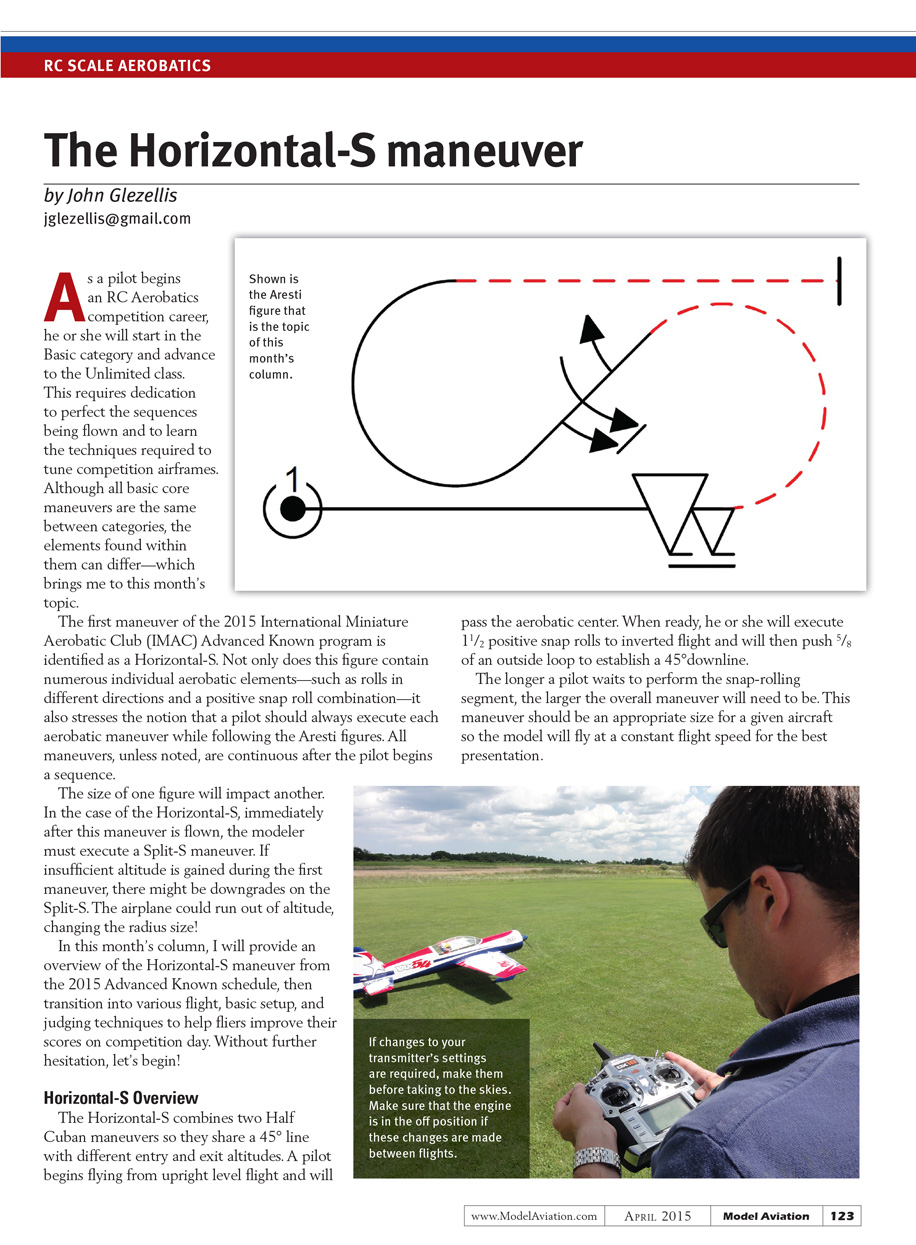
As a pilot begins an RC aerobatics competition career, he or she will start in the Basic category and advance to the Unlimited class. This requires dedication to perfect the sequences being flown and to learn the techniques required to tune competition airframes. Although all basic core maneuvers are the same between categories, the elements found within them can differ—which brings me to this month’s topic.
The first maneuver of the 2015 International Miniature Aerobatic Club (IMAC) Advanced Known program is identified as a Horizontal-S. Not only does this figure contain numerous individual aerobatic elements—such as rolls in different directions and a positive snap roll combination—it also stresses the notion that a pilot should always execute each aerobatic maneuver while following the Aresti figures. All maneuvers, unless noted, are continuous after the pilot begins a sequence.
The size of one figure will impact another. In the case of the Horizontal-S, immediately after this maneuver is flown, the modeler must execute a Split-S maneuver. If insufficient altitude is gained during the first maneuver, there might be downgrades on the Split-S. The airplane could run out of altitude, changing the radius size.
In this column I provide an overview of the Horizontal-S from the 2015 Advanced Known schedule, then discuss flight techniques, basic setup, and judging considerations to help fliers improve their scores on competition day.
Horizontal-S Overview
The Horizontal-S combines two Half Cuban maneuvers so they share a 45° line with different entry and exit altitudes. The pilot begins flying from upright, level flight and will pass the aerobatic center. When ready, the pilot executes 1½ positive snap rolls to inverted flight and then pushes 5/8 of an outside loop to establish a 45° downline. The longer a pilot waits to perform the snap-rolling segment, the larger the overall maneuver will need to be. This maneuver should be an appropriate size for a given aircraft so the model will fly at a constant flight speed for the best presentation.
After the 45° downline is drawn, a brief line segment should be visible. The pilot will then perform a half roll followed by 1½ rolls in the opposite direction. There should be a brief hesitation between the rolling elements, and the rolling segment should be centered on the downline. When complete, another line segment equal to the first must be shown. The pilot then pulls 5/8 of an inside loop to exit at a high altitude. Both 5/8 loops must contain the same radii, and the rolling combination must be perfectly centered on the 45° downline.
Control Surface Deflection
This figure contains many individual maneuvers. Key control and setup points:
- Begin with a locked heading and no altitude deviation as the aircraft passes the pilot.
- The snap-rolling segment must be flown from a stalled condition, which requires the pilot to “load” the wing by adding elevator input. As the wing’s angle of attack changes, apply aileron and rudder deflection in the same direction to produce the snap rotation.
- After the desired number of rotations, release stick inputs so the wings level, then begin the first 5/8 looping segment with no visible line between the snap roll and the loop.
- Use only enough control throw to accomplish each task. Overly sensitive controls make consistent flying difficult; judges will notice small corrections and downgrade scores. Start with the recommended control surface deflection and expo settings, then adjust to suit the aircraft and the sequence.
- Because this maneuver contains different aerobatic elements, use a flight mode, dual rates, or mixes to allow flying effectively on a single rate while providing something similar to an “automatic dual rate.” This simplifies pilot workload.
- During the 1½ positive snap roll, use only enough deflection to execute a clean snap. If the aircraft is difficult to control, reduce aileron for overly sensitive roll rate or reduce rudder if the model yaw becomes excessive.
- Flip the flight-mode or dual-rate switch (if applicable) before proceeding with the rest of the figure. Some pilots forget to change rates after a snap roll and only discover it in the next segment, which is hard to recover from under competition nerves.
Wind Correction Basics
Flying with wind present challenges at every experience level. The figure's apparent pace will change depending on wind speed. Consider a 15 mph crosswind blowing away from the pilot while the figure is flown left to right: the model’s flight path must be judged, so it must be yawed to remain parallel to the runway.
Depending on the aircraft attitude, this requires rudder inputs in both directions so the model’s nose is always pointed slightly toward the pilot. Judges penalize drifting—approximately 0.5 points per 5° of deviation. During a 5/8 partial loop, the flight path must be round and remain parallel to the runway. For 45° lines, judges will make an allowance for the aircraft’s position relative to the judges’ seating.
Final Thoughts
You have now seen basics of control inputs, judging elements, and setup fundamentals for the Horizontal-S maneuver.
Attending local competitions is the best way to gain experience because your problems, questions, and experiences can be discussed with pilots who have similar interests. Always remember to enjoy your model and everything this fine sport has to offer!
Until next time, fly hard!
Sources
- IMAC
- www.mini-iac.com
Transcribed from original scans by AI. Minor OCR errors may remain.

