

RC Slope Soaring 2014/02
A fiberglass fuselage repair method
by Dave Garwood [email protected]
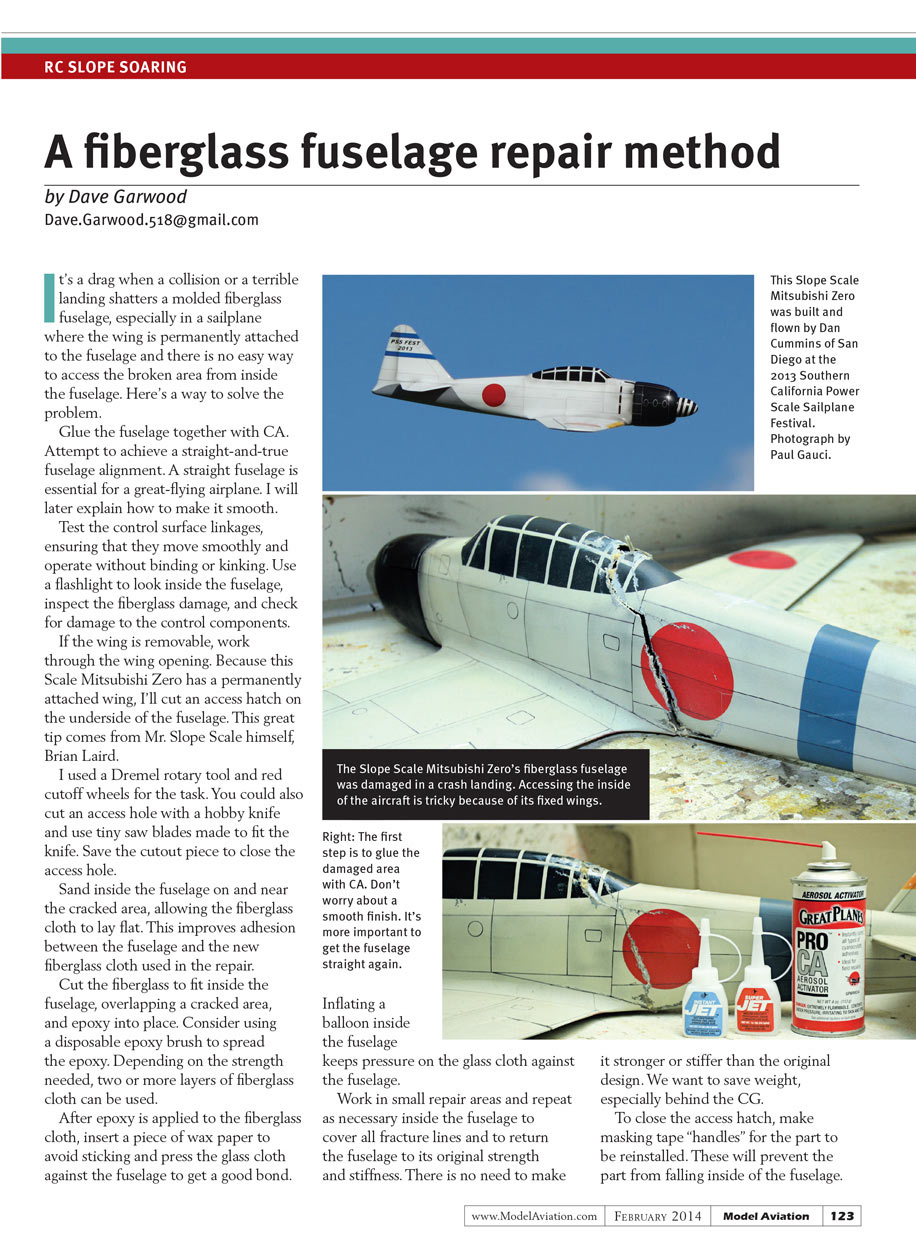
It's a drag when a collision or a terrible landing shatters a molded fiberglass fuselage, especially in a sailplane where the wing is permanently attached to the fuselage and there is no easy way to access the broken area from inside. Here's a way to solve the problem.
Glue the fuselage together with CA. Attempt to achieve a straight-and-true fuselage alignment — a straight fuselage is essential for a great-flying airplane. I will explain later how to make it smooth.
Test the control surface linkages, ensuring that they move smoothly and operate without binding or kinking. Use a flashlight to look inside the fuselage, inspect the fiberglass damage, and check for damage to the control components.
If the wing is removable, work through the wing opening. Because this Scale Mitsubishi Zero has a permanently attached wing, I cut an access hatch on the underside of the fuselage. This tip comes from Mr. Slope Scale himself, Brian Laird.
I used a Dremel rotary tool and red cutoff wheels for the task. You could also cut an access hole with a hobby knife and use tiny saw blades made to fit the knife. Save the cutout piece to close the access hole.
Sand inside the fuselage on and near the cracked area so the fiberglass cloth can lay flat. This improves adhesion between the fuselage and the new fiberglass cloth used in the repair.
Cut the fiberglass to fit inside the fuselage, overlapping the cracked area, and epoxy it into place. Consider using a disposable epoxy brush to spread the epoxy. Depending on the strength needed, two or more layers of fiberglass cloth can be used.
After epoxy is applied to the fiberglass cloth, insert a piece of wax paper to avoid sticking and press the glass cloth against the fuselage to get a good bond. Inflating a balloon inside the fuselage keeps pressure on the glass cloth against the fuselage. Work in small repair areas and repeat as necessary inside the fuselage to cover all fracture lines and to return the fuselage to its original strength and stiffness. There is no need to make it stronger or stiffer than the original design — we want to save weight, especially behind the CG.
To close the access hatch, make masking tape "handles" for the part to be reinstalled. These will prevent the part from falling inside the fuselage. Align the part flush with the fuselage for final curing. I used 30-minute epoxy with milled fiberglass to add durability and to slightly thicken the mix to fill the cutout slots. Insert the epoxy and milled fiberglass mix along all sides of the cut slot, cover the slots with masking tape, and turn the sailplane upright so the epoxy mix runs down and fills the slots and joins the cut part to the fuselage. To ensure that the epoxy mix flows into place, heat it with air from a heat gun. When the epoxy has cured, remove the tape and inspect the installation.
Don't worry about minor imperfections. You can sand the rough edges and fill the depressions with automotive body putty, sand again, and paint the repaired area. See the April 2008 issue of MA for an article about painting model aircraft (also available in the magazine's digital library). Remember to balance the airplane again because you've added weight behind the CG.
2.4 Radio Clinic
I learned plenty by viewing Paul Naton's 2.4 Radio Clinic video, especially the extensive section about range testing. The Radio Carbon Art video is worth the price and viewing time.
Soaring Speed Record
The fastest models are slope gliders. Spencer Lisenby flew his Kinetic 100 DP at 498 mph at Bird Springs Pass in Kern County, California, on March 6, 2012. Second on the glider speed roster is Joe Manor, who flew a Dynamic 130 to 483 mph at Weldon Hill in Lake Isabella, California, on April 15, 2013. The source of this data is www.RCSpeeds.com. It will be an exciting day when a model glider exceeds 500 mph.
SOURCES
- RCGroups (MA Slope Soaring blog) www.rcgroups.com/forums/showthread.php?t=1609874&post=266959342
- MA Digital Library https://library.modelaviation.com
- Radio Carbon Art (888) 834-2261 www.radiocarbonart.com
- League of Silent Flight www.silentflight.org
Transcribed from original scans by AI. Minor OCR errors may remain.

