

Rear
Joel Cimmino
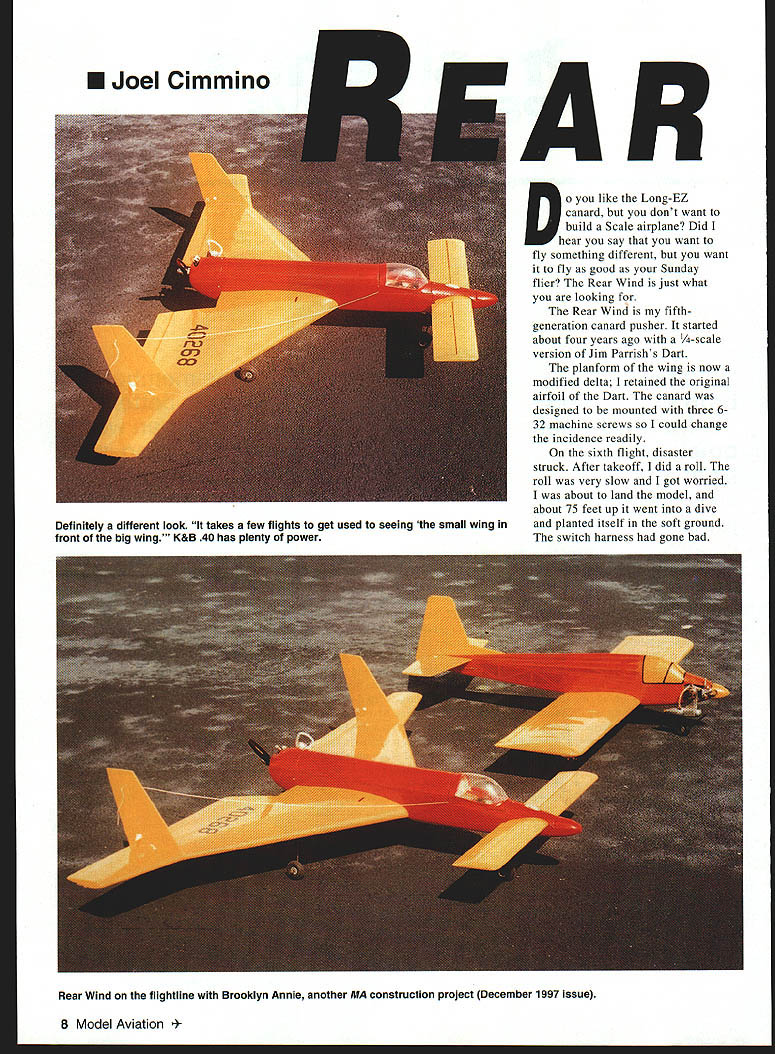
Do you like the Long-EZ canard, but you don't want to build a scale airplane? Do you want to fly something different, but have it handle as well as your Sunday flier? The Rear Wind is just what you are looking for.
The Rear Wind is my fifth-generation canard pusher. It started about four years ago as a 1/4-scale version of Jim Parrish's Dart. The planform of the wing is now a modified delta; I retained the original airfoil of the Dart. The canard was designed to be mounted with three 6-32 machine screws so I could change the incidence readily.
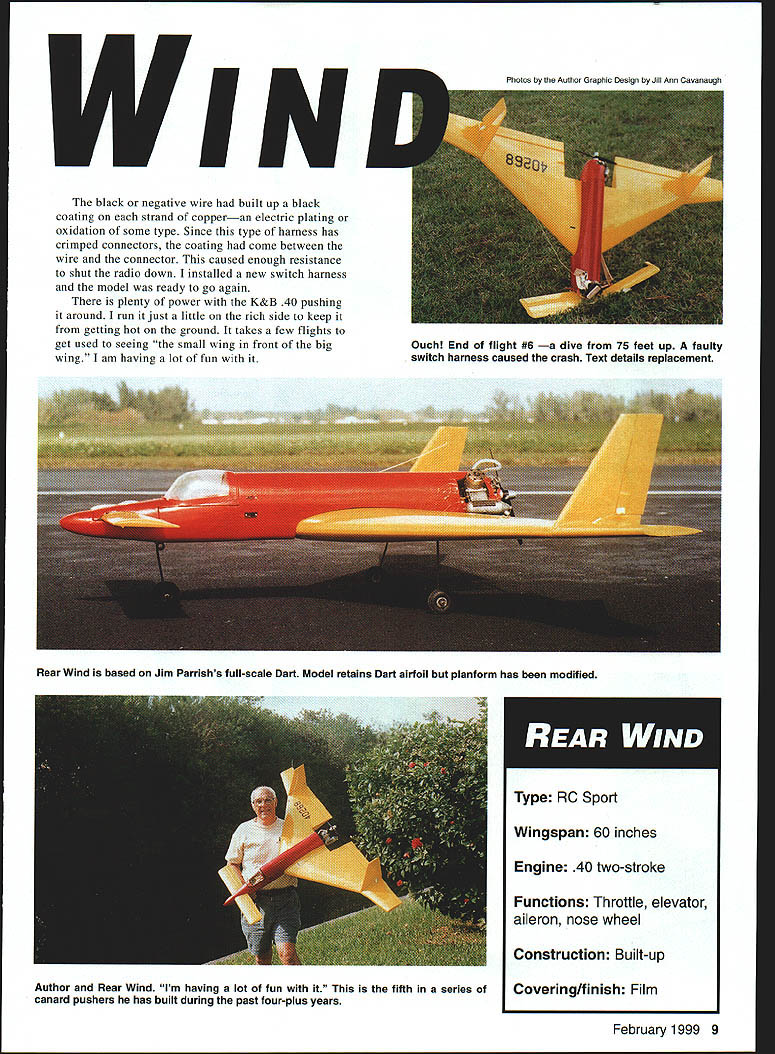
On the sixth flight, disaster struck. After takeoff I did a roll. The roll was very slow and I got worried. I was about to land the model, and about 75 feet up it went into a dive and planted itself in the soft ground. The switch harness had gone bad. The black (negative) wire had built up a black coating on each strand of copper—an electric plating or oxidation of some type. Since this type of harness has crimped connectors, the coating had come between the wire and the connector. This caused enough resistance to shut the radio down. I installed a new switch harness and the model was ready to go again.
There is plenty of power with the K&B .40 pushing it around. I run it just a little on the rich side to keep it from getting hot on the ground. It takes a few flights to get used to seeing "the small wing in front of the big wing." I am having a lot of fun with it.
REAR WIND
- Type: RC Sport
- Wingspan: 60 inches
- Engine: .40 two-stroke
- Functions: Throttle, elevator, aileron, nose wheel
- Construction: Built-up
- Covering/finish: Film
CONSTRUCTION
If you are to rate the difficulty of building from 1 (beginner) to 10 (expert), I would say that this project is a 5.
Wing
- The wing is built in halves. A construction fixture must be used. It is a tapered piece of 3/16" sheet and is put under the trailing edge of the wing. The taller end is at the center of the wing.
- Cut all ribs from 3/32" sheet. Cover the plans with clear plastic wrap and lay down the front and rear 1/4" x 1/4" spars. The rear spar will be pulled up into the rib later.
- Position the wing construction fixture under the trailing edge of each rib. Install all ribs. Note that R12 is two pieces. Glue the top front and rear spar in place.
- Using cyanoacrylate (CyA) adhesive, glue the 1/2" x 1" leading edge in place. Center each rib on the leading edge before gluing.
- Sheet the top of the wing with 3/32" balsa. Start with a 1-1/2" wide trailing edge sheet from R3 to R12. Install the leading edge sheeting. Note how it tapers from R9 to the centerline of the wing.
- Place 3/32" sheeting 1/2" from the trailing edge sheeting from R3 to one inch past R9. You will cut out the ailerons along the 1/2" gap after the wing is complete.
- Cut and glue 1/16" sheet webbing between the top and bottom spars for both front and rear spars. This will form a D-tube and egg-crate center section.
- Sheet from R4 to the centerline. Finish the top with 3/32" x 1/4" capstrips. Let dry overnight.
- Before sheeting the bottom of the wing, install the 1/16" plywood rib doubler for the landing gear block. Glue in the landing gear block and the vertical anchor block. Glue in the 1/8" plywood bellcrank mount. If you prefer a different type linkage, use it.
- Reinforce the joint at the rib with scrap 1/4" x 1/4". Make and install the linkage.
- If you intend to use rudder control, install conduit for the rudder cable. Sheet the bottom of the wing panel. Put the wing panel, right side up, back on the construction fixture and let the glue set up.
- Build the second half the same as the first panel.
- Block up the wingtip one inch and sand the center section to the dihedral angle. Join the wing panels.
- Cut and fit the 1/4" sheet between the left R3 and the right R3. This fits between the top and bottom spar and forms a channel.
- Cut and fit a short piece of 1/4" x 1/2" (R13) between the left and right main spars (top and bottom). Cut and fit a piece of 1/2" x 1" (R14) at the leading edge. Cut and fit the 1/4" x 1" plywood hold-down block. Glue between the right and left R1. Note the location from the profile.
- Carefully cut the ailerons along the gap of the sheeting. Trim each rib flush with the edge of the top and bottom sheeting. Add 1/4" sheet to the face of the wing and the face of the aileron.
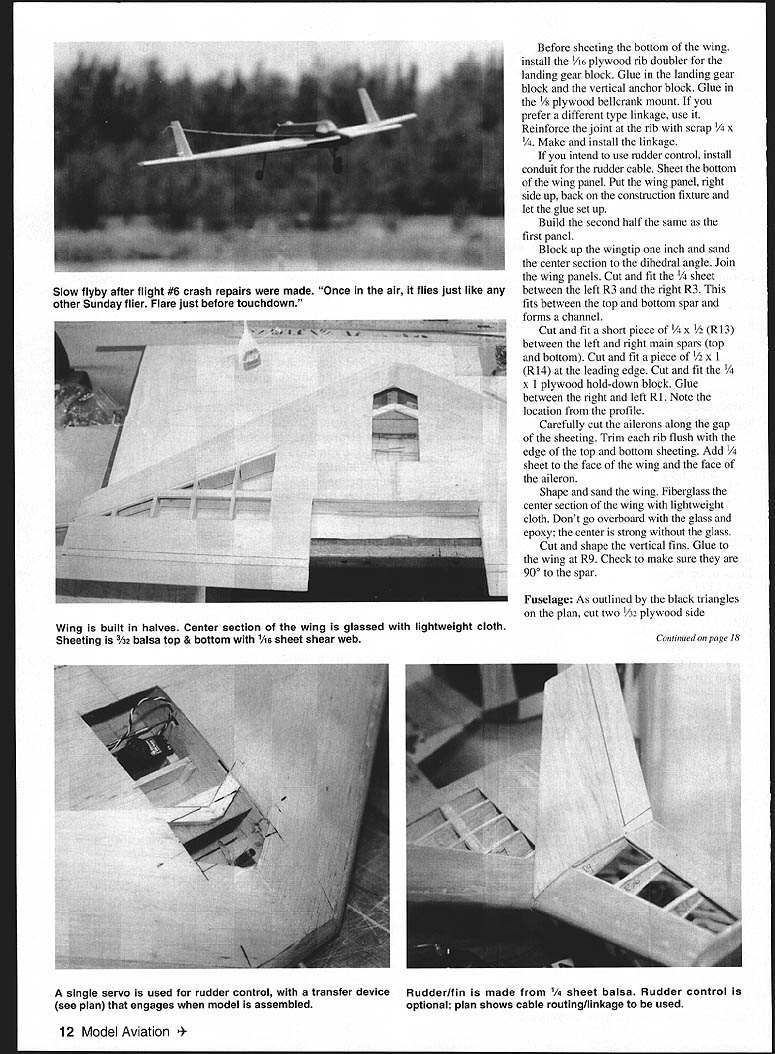
- Shape and sand the wing. Fiberglass the center section of the wing with lightweight cloth—don’t go overboard with the glass and epoxy; the center is strong without much glass.
- Cut and shape the vertical fins. Glue to the wing at R9. Check to make sure they are 90° to the spar.
Fuselage
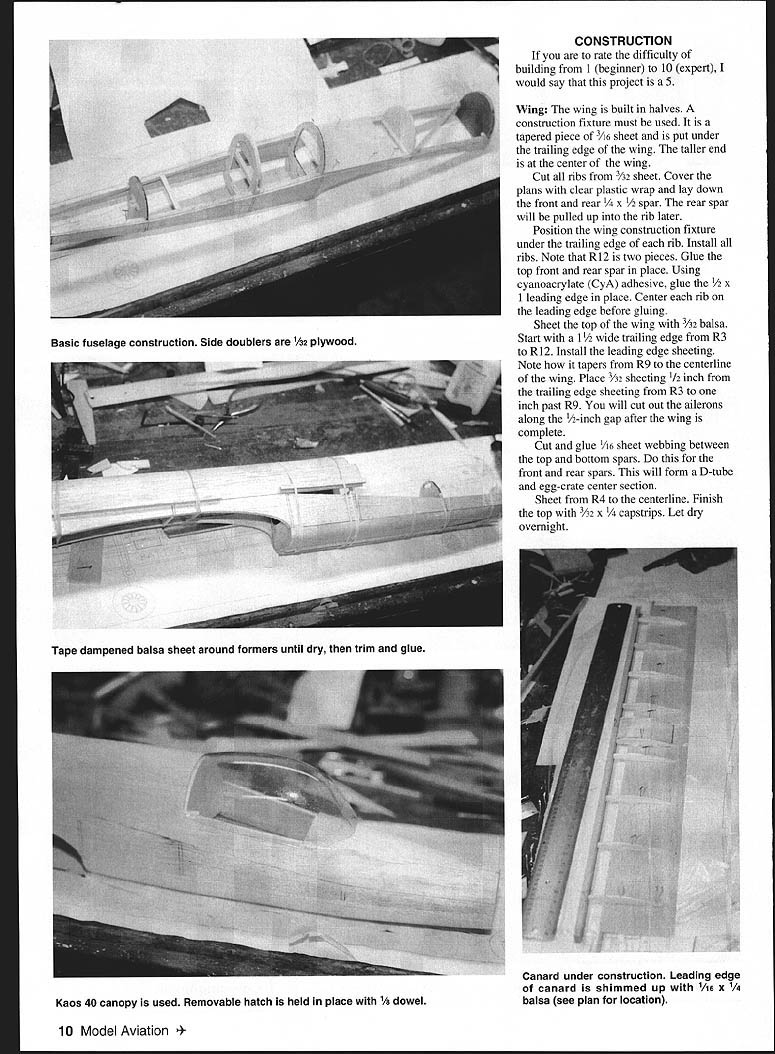
As outlined by the black triangles on the plan, cut two 1/32" plywood side doublers and put aside. Following the same outline, cut two pieces from 1/8" medium-hard balsa. Note that the sides do not stop at F2 but go to F1 and are longer than the plywood doubler. Be sure to make left and right sides.
Glue 1/4" square to the sides to key in the formers. Fill in the area around the wing saddle with 1/4" sheet.
Cut formers F1 to F6. Install your preferred nose gear block on F3. Lay one side flat on the board and glue in F3–F6. Be careful here and keep them 90° to the board. Carefully glue in platform F7. There is a slight taper, so note the end that goes to F3 and F4. This will help keep everything square. After the glue sets up, glue the other side on top and put a weight on top until dry.
Lift the assembly from the board and install F1 and F2. Keep it straight and true. Make the fuselage back from 1/8" sheet. Use CyA for the seams and let dry. Wet the sheet and gently bend around formers F3–F6. Do not glue at this time. Tape it down and let dry overnight before trimming and gluing.
Sheet or plank the belly of the fuselage from F1–F4. Finish the top nose area from F1–F3. This area will be cut out later for the canopy and front hatch.
Drill the holes for the engine mount. I show the engine mounted at 90° but have found that the tank and carburetor line up better at 45°. Add the hollowed nose block. Shape and sand the fuselage.
At this time I like to give one coat of dope to all raw wood. More about this in finishing.
Canard
Study the plan very well. You will be building on top of the plan and will not be able to see it.
Lay a long strip of 1/16" x 1/4" balsa under the clear wrap and along the leading edge sheeting. Cut four-inch-wide 3/32" balsa bottom sheeting 24-3/4" long. Sand the trailing edge to shape. Lay the bottom sheet on top of the 1/16" strip with the clear wrap between them.
Using a straightedge and the index marks on the plan, pin the 1/4" x 3/8" hard balsa spar on top of the bottom sheet. When you are sure it is all straight, CyA the spar to the bottom sheeting down the front half of the canard rib, using the index marks on the plan. Note that the bottom sheeting will curve up when the tab is pushed down. Glue on the 1/4" x 1/2" leading edge.
Using a #11 blade, cut through the bottom sheeting along the back side of the spar. Cut and shape the center filler block to an airfoil shape to fit between the top and bottom sheeting and glue in place. Pin down the 1/4" x 5/8" elevator leading edge behind the spar. Do not get any glue between it and the spar. Glue on the rear half of the rib. Trim the top of the spar and elevator leading edge to the top of the ribs. Sheet the top of the canard and let dry.
From the bottom side, using a #11 blade, cut between the spar and elevator leading edge. Cut away the elevators. Fit and install the elevator control horn to the center section and glue it back to the canard. Cut a piece of 1/32" plywood to 3/32" x 2" and glue it to the top of the canard at the center. Sand and put aside.
Rudder
Rudders are not needed on this model, but the rudders on the full-scale Dart are needed and work outward only. If both moved inward at the same time, they would create drag at the wingtips, slow the aircraft, and not help it turn.
To get the rudders to move independently, use a pull-pull setup with a spring-loaded center. The rudder must return to center by itself and not go past center. A small 1/32" plywood tab is screwed under the control horn to prevent the rudders from moving inward. The return spring is made by removing the hinge pin from two Du-Bro hinges.
Make a 90° bend in .030" x .030" wire. Using this wire as the hinge pin, put two Du-Bro hinges on it. Make another 90° bend at the other end to form a big Z (see plan). The two bends are not in the same plane but at 15° to each other. You must make one right and one left.
You can use a second servo in the wing for a rudder, or make the device I use to transfer the control from the fuselage to the wing. It will engage when the wing is put in place. It takes a little playing to get it right.
Finish
Install the necessary pushrods, tank, radio equipment, and engine. I use two coats of clear dope on the airframe; it makes it easier to cover and strengthens the airframe. Use your favorite covering and color, but keep in mind that it may take some time to get used to the model—choose colors you can see well.
Flying
- Set up the engine to run cool. Let it run strong but not lean (hot). Remember, there is no prop blast to cool the engine.
- When running on the ground, point the nose into the wind. Don't forget to put a pusher prop on the engine.
- Check your controls. Because this is a canard, down on the elevators will make the airplane go up.
- Let it build up speed before pulling back on the stick. Once in the air, it flies like any other Sunday flier.
- On landing, slow down and keep the nose level. It will sink slowly. Flare just before touchdown.
Thanks to my wife for her support and encouragement with this project.
Joel Cimmino 4206 NW 47th St. Tamarac, FL 33319-5820 (954) 739-6566 November 1–May 1
1701 DeWitt Ter. Linden, NJ 07036 (908) 486-6763 May 15–October 30 E-mail: [email protected]
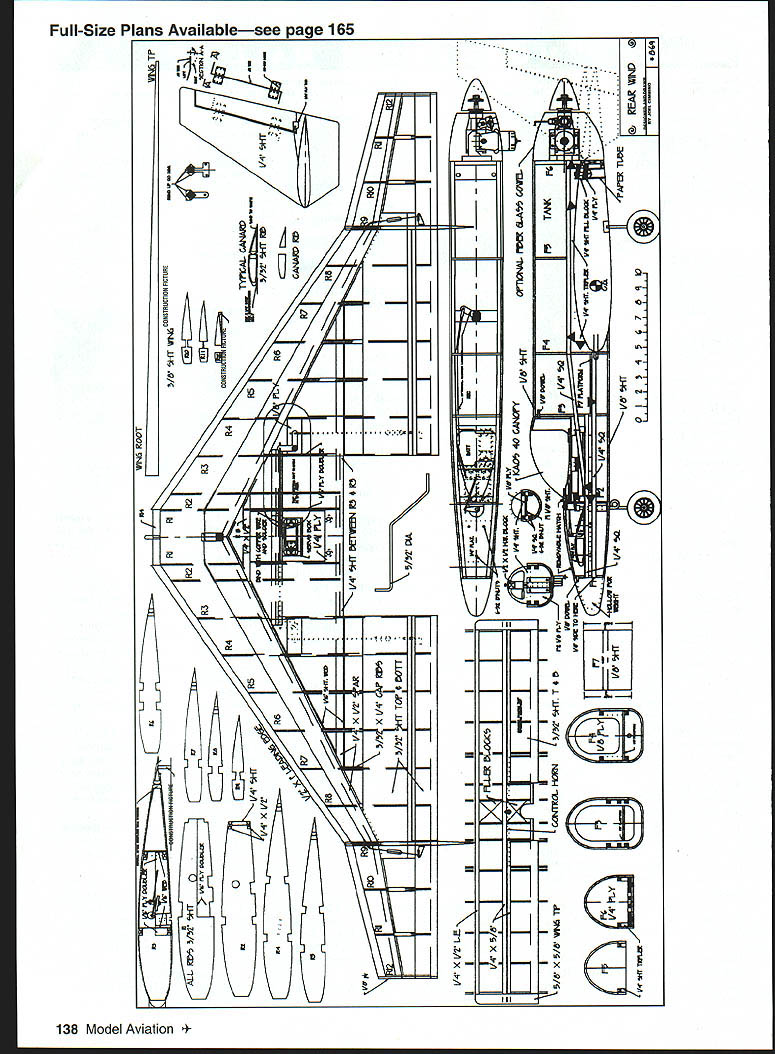
See plan on page 138.
No article text on this page — it contains only the full-size plans/diagrams for "Rear."
Transcribed from original scans by AI. Minor OCR errors may remain.

