
MULTIPLEX STUNTMASTER
Chris Mulcahy [email protected]
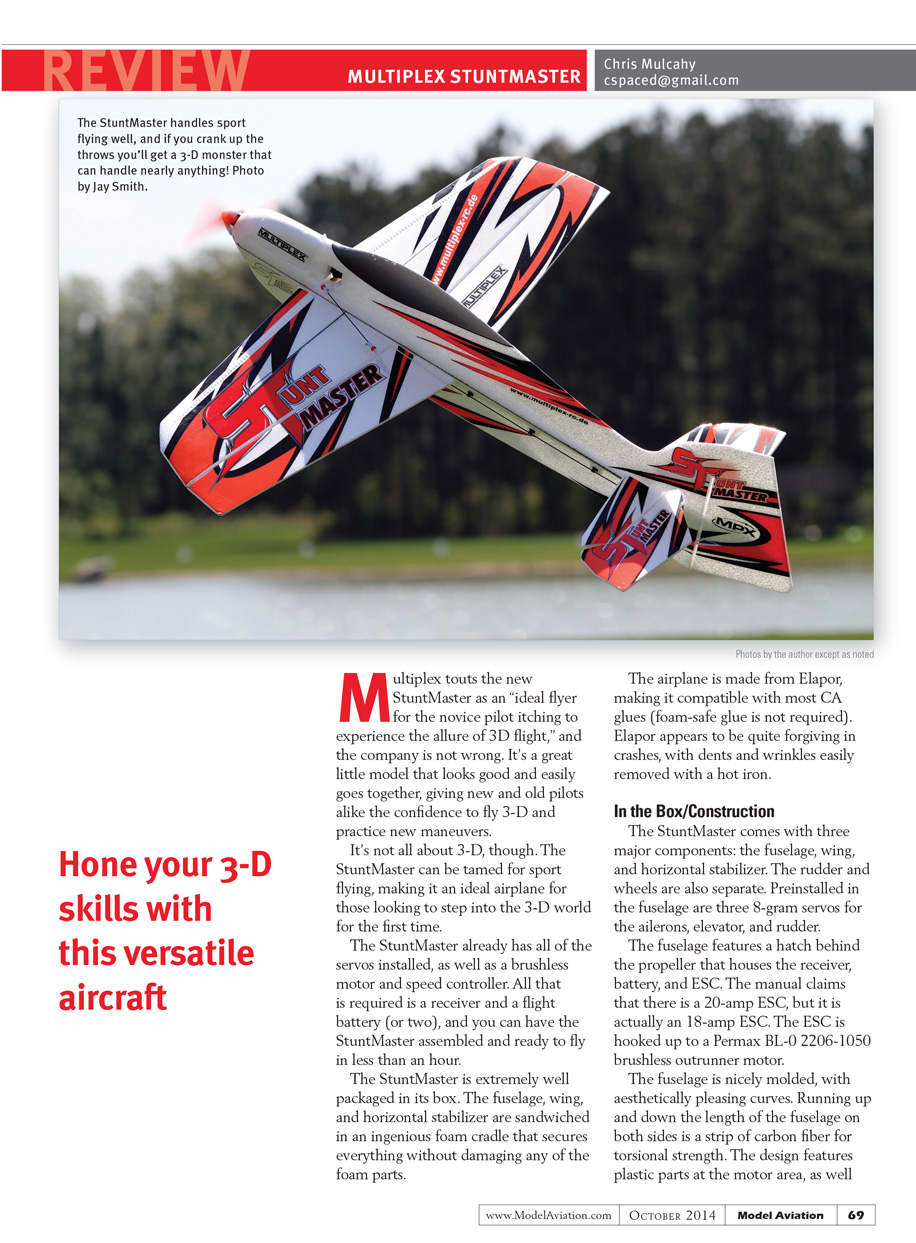
Hone your 3-D skills with this versatile aircraft
Multiplex touts the new StuntMaster as an "ideal flyer for the novice pilot itching to experience the allure of 3D flight," and the company is not wrong. It's a great little model that looks good and easily goes together, giving new and old pilots alike the confidence to fly 3-D and practice new maneuvers.
It's not all about 3-D, though. The StuntMaster can be tamed for sport flying, making it an ideal airplane for those looking to step into the 3-D world for the first time.
The StuntMaster already has all of the servos installed, as well as a brushless motor and speed controller. All that is required is a receiver and a flight battery (or two), and you can have the StuntMaster assembled and ready to fly in less than an hour.
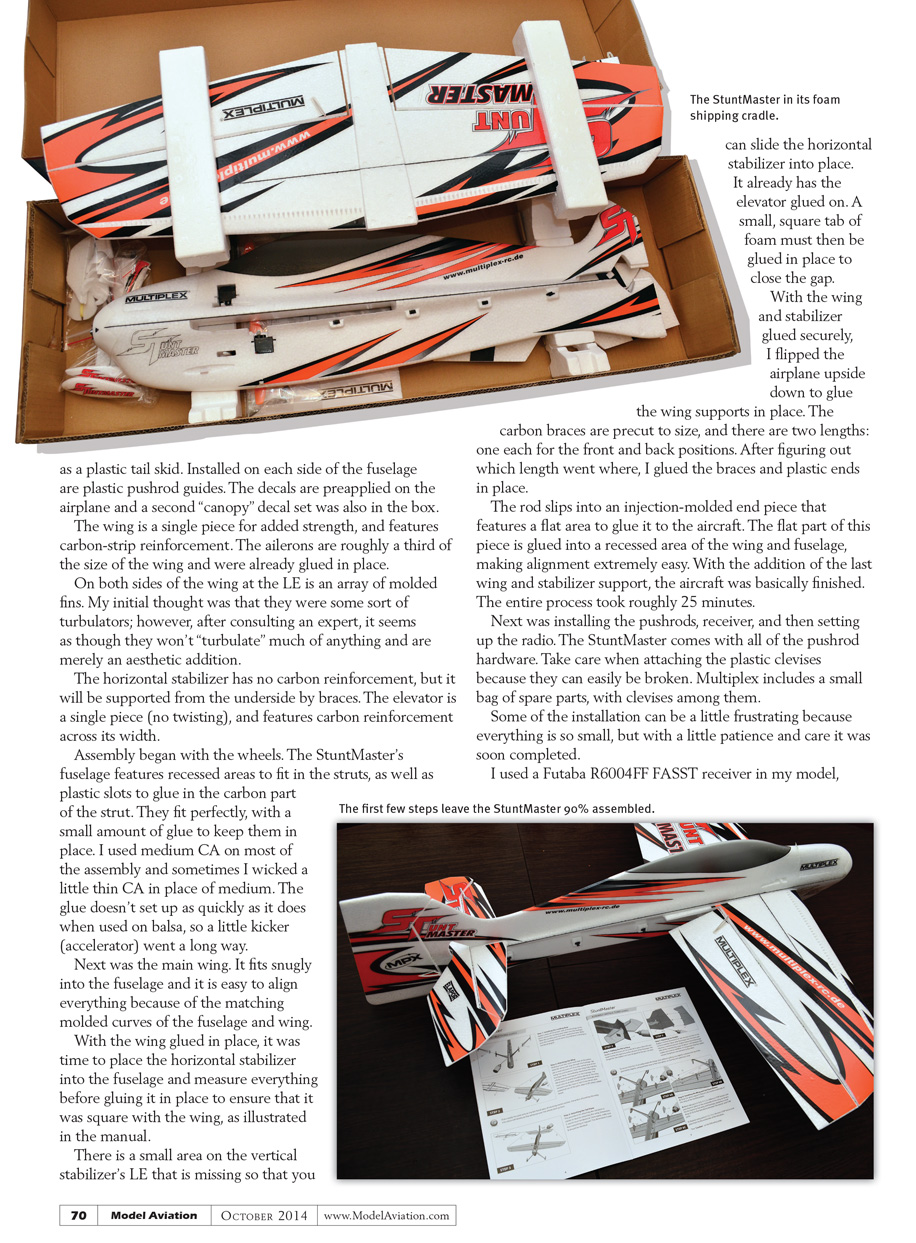
The StuntMaster is extremely well packaged in its box. The fuselage, wing, and horizontal stabilizer are sandwiched in an ingenious foam cradle that secures everything without damaging any of the foam parts.
The airplane is made from Elapor, making it compatible with most CA glues (foam-safe glue is not required). Elapor appears to be quite forgiving in crashes, with dents and wrinkles easily removed with a hot iron.
In the Box / Construction
The StuntMaster comes with three major components:
- Fuselage
- Wing
- Horizontal stabilizer
The rudder and wheels are also separate. Preinstalled in the fuselage are three 8-gram servos for the ailerons, elevator, and rudder.
The fuselage features a hatch behind the propeller that houses the receiver, battery, and ESC. The manual claims that there is a 20-amp ESC, but it is actually an 18-amp ESC. The ESC is hooked up to a Permax BL-0 2206-1050 brushless outrunner motor.
The fuselage is nicely molded, with aesthetically pleasing curves. Running up and down the length of the fuselage on both sides is a strip of carbon fiber for torsional strength. The design features plastic parts at the motor area, as well as a plastic tail skid. Installed on each side of the fuselage are plastic pushrod guides. The decals are pre-applied on the airplane and a second "canopy" decal set was also in the box.
The wing is a single piece for added strength and features carbon-strip reinforcement. The ailerons are roughly a third of the size of the wing and were already glued in place. On both sides of the wing at the leading edge (LE) is an array of molded fins. My initial thought was that they were some sort of turbulators; however, after consulting an expert, it seems as though they won't "turbulate" much of anything and are merely an aesthetic addition.
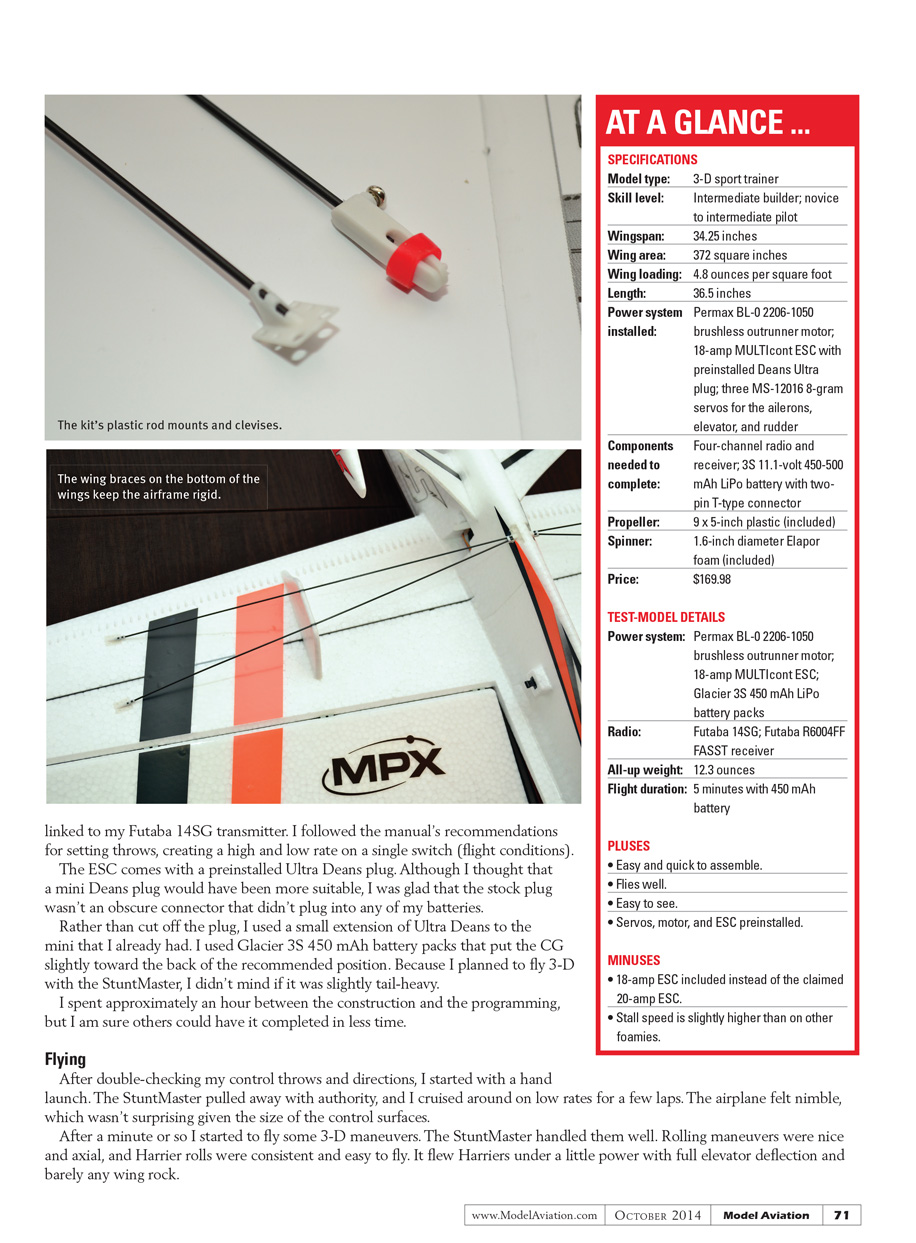
The horizontal stabilizer has no carbon reinforcement, but it is supported from the underside by braces. The elevator is a single piece (no twisting) and features carbon reinforcement across its width.
Assembly began with the wheels. The StuntMaster's fuselage features recessed areas to fit in the struts, as well as plastic slots to glue in the carbon part of the strut. They fit perfectly, with a small amount of glue to keep them in place. I used medium CA on most of the assembly and sometimes wicked a little thin CA in place of medium. The glue doesn't set up as quickly as it does when used on balsa, so a little kicker (accelerator) went a long way.
Next was the main wing. It fits snugly into the fuselage and it is easy to align everything because of the matching molded curves of the fuselage and wing.
With the wing glued in place, it was time to place the horizontal stabilizer into the fuselage and measure everything before gluing it in place to ensure that it was square with the wing, as illustrated in the manual.
There is a small area on the vertical stabilizer's leading edge that is missing so that you can slide the horizontal stabilizer into place. It already has the elevator glued on. A small, square tab of foam must then be glued in place to close the gap.
With the wing and stabilizer glued securely, I flipped the airplane upside down to glue the wing supports in place. The carbon braces are precut to size, and there are two lengths: one each for the front and back positions. After figuring out which length went where, I glued the braces and plastic ends in place.
The rod slips into an injection-molded end piece that features a flat area to glue it to the aircraft. The flat part of this piece is glued into a recessed area of the wing and fuselage, making alignment extremely easy. With the addition of the last wing and stabilizer support, the aircraft was basically finished. The entire process took roughly 25 minutes.
Next was installing the pushrods, receiver, and then setting up the radio. The StuntMaster comes with all of the pushrod hardware. Take care when attaching the plastic clevises because they can easily be broken. Multiplex includes a small bag of spare parts, with clevises among them.
Some of the installation can be a little frustrating because everything is so small, but with a little patience and care it was soon completed.
I used a Futaba R6004FF FASST receiver in my model, linked to my Futaba 14SG transmitter. I followed the manual's recommendations for setting throws, creating a high and low rate on a single switch (flight conditions).
The ESC comes with a preinstalled Ultra Deans plug. Although I thought that a mini Deans plug would have been more suitable, I was glad that the stock plug wasn't an obscure connector that didn't plug into any of my batteries.
Rather than cut off the plug, I used a small extension from Ultra Deans to the mini Deans that I already had. I used Glacier 3S 450 mAh battery packs that put the CG slightly toward the back of the recommended position. Because I planned to fly 3-D with the StuntMaster, I didn't mind if it was slightly tail-heavy.
I spent approximately an hour between the construction and the programming, but I am sure others could have it completed in less time.
Flying
After double-checking my control throws and directions, I started with a hand launch. The StuntMaster pulled away with authority, and I cruised around on low rates for a few laps. The airplane felt nimble, which wasn't surprising given the size of the control surfaces.
After a minute or so I started to fly some 3-D maneuvers. The StuntMaster handled them well. Rolling maneuvers were nice and axial, and Harrier rolls were consistent and easy to fly. It flew Harriers under a little power with full elevator deflection and barely any wing rock.
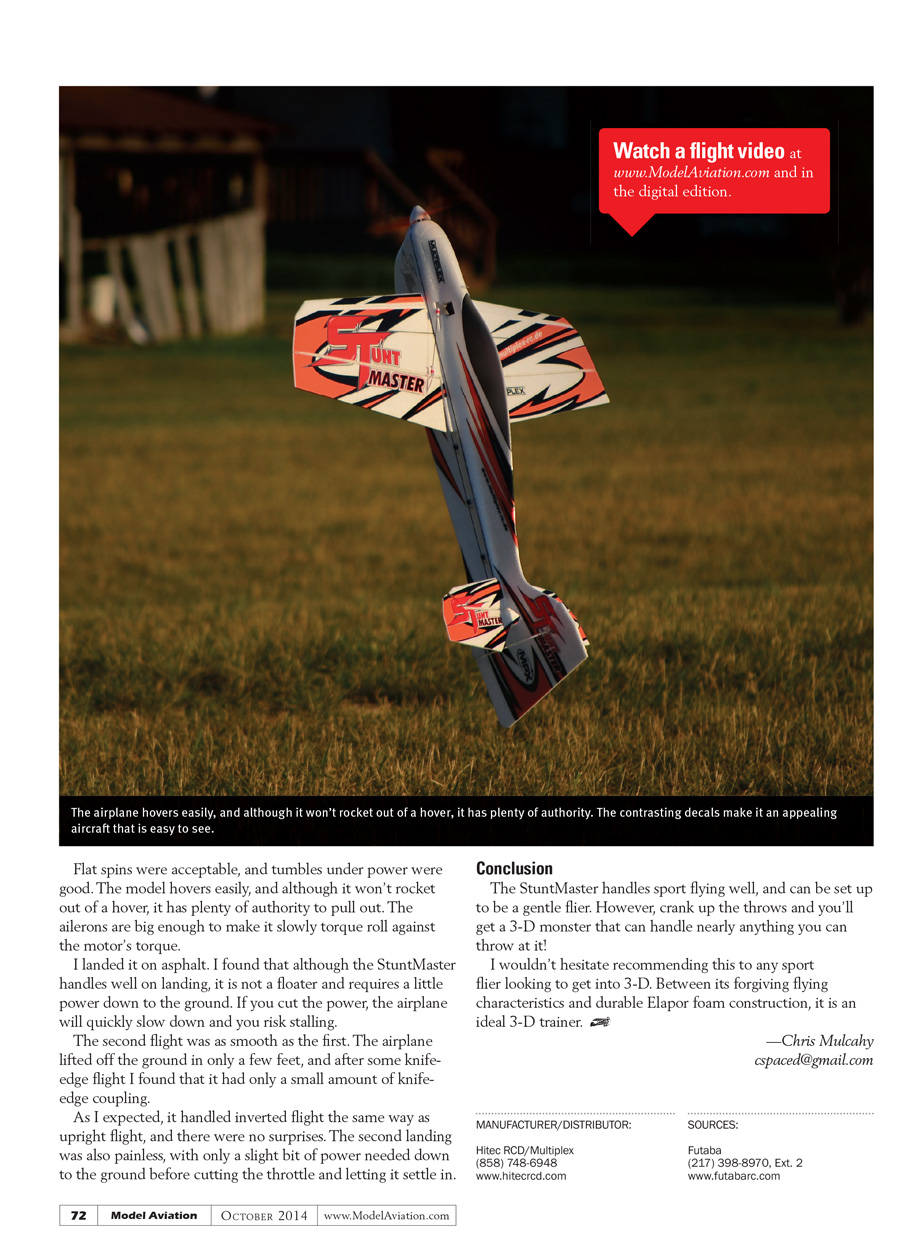
Flat spins were acceptable, and tumbles under power were good. The model hovers easily, and although it won't rocket out of a hover, it has plenty of authority to pull out. The ailerons are big enough to make it slowly torque roll against the motor's torque.
I landed it on asphalt. I found that although the StuntMaster handles well on landing, it is not a floater and requires a little power down to the ground. If you cut the power, the airplane will quickly slow down and you risk stalling.
The second flight was as smooth as the first. The airplane lifted off the ground in only a few feet, and after some knife-edge flight I found that it had only a small amount of knife-edge coupling.
As I expected, it handled inverted flight the same way as upright flight, and there were no surprises. The second landing was also painless, with only a slight bit of power needed down to the ground before cutting the throttle and letting it settle in.
Conclusion
The StuntMaster handles sport flying well and can be set up to be a gentle flier. However, crank up the throws and you'll get a 3-D monster that can handle nearly anything you can throw at it!
I wouldn't hesitate recommending this to any sport flier looking to get into 3-D. Between its forgiving flying characteristics and durable Elapor foam construction, it is an ideal 3-D trainer.
—Chris Mulcahy [email protected]
MANUFACTURER/DISTRIBUTOR
- Hitec RCD / Multiplex
- Phone: (858) 748-6948
- Website: www.hitecrcd.com
SOURCES
- Futaba
- Phone: (217) 398-8970, Ext. 2
- Website: www.futabarc.com
Transcribed from original scans by AI. Minor OCR errors may remain.

