
HORIZON HOBBY HANGAR 9 BEAVER 30CC ARF
Tom Sullivan [email protected]
A gentle giant for scale aficionados
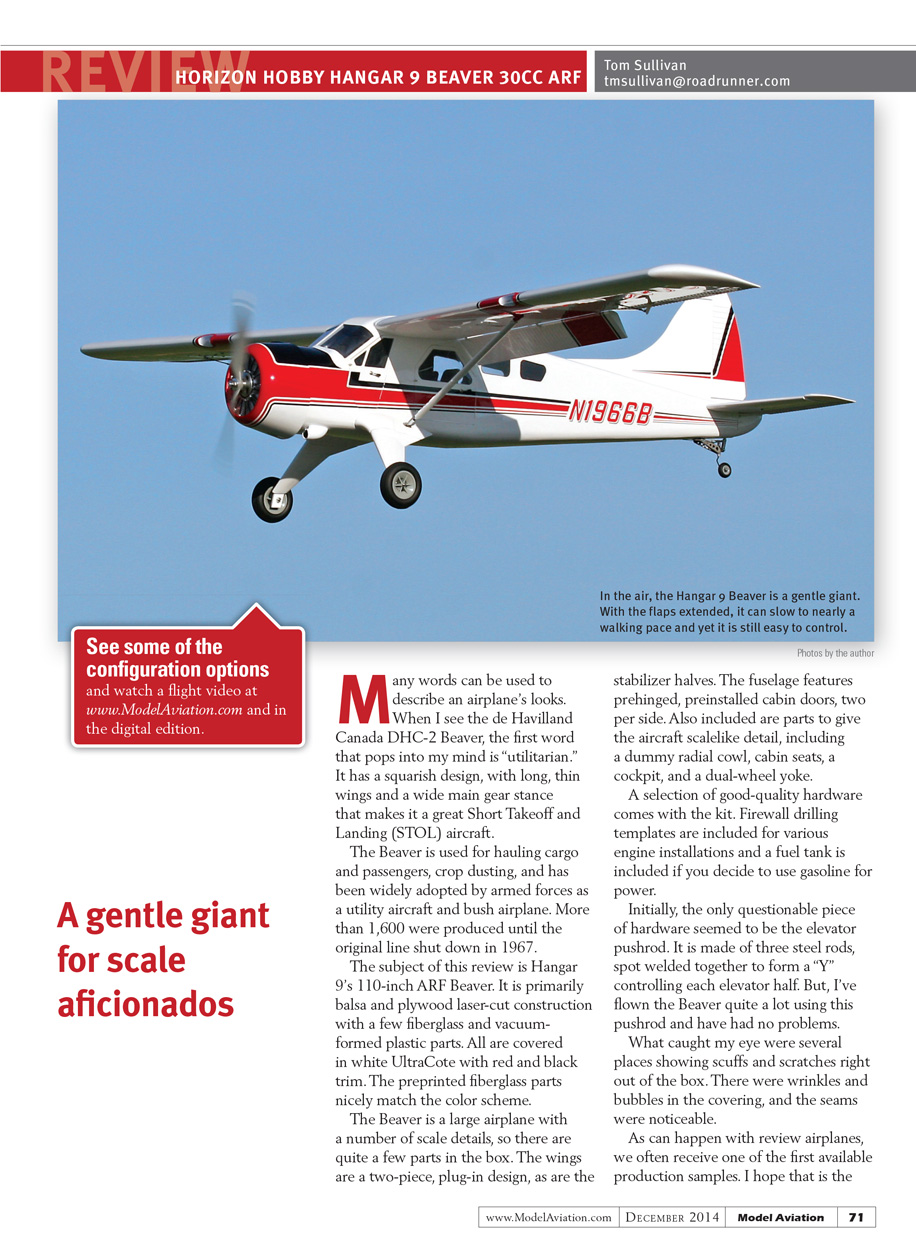
Many words can be used to describe an airplane’s looks. When I see the de Havilland Canada DHC-2 Beaver, the first word that pops into my mind is “utilitarian.” It has a squarish design, with long, thin wings and a wide main-gear stance that makes it a great Short Takeoff and Landing (STOL) aircraft.
The Beaver is used for hauling cargo and passengers, crop dusting, and has been widely adopted by armed forces as a utility aircraft and bush airplane. More than 1,600 were produced until the original line shut down in 1967.
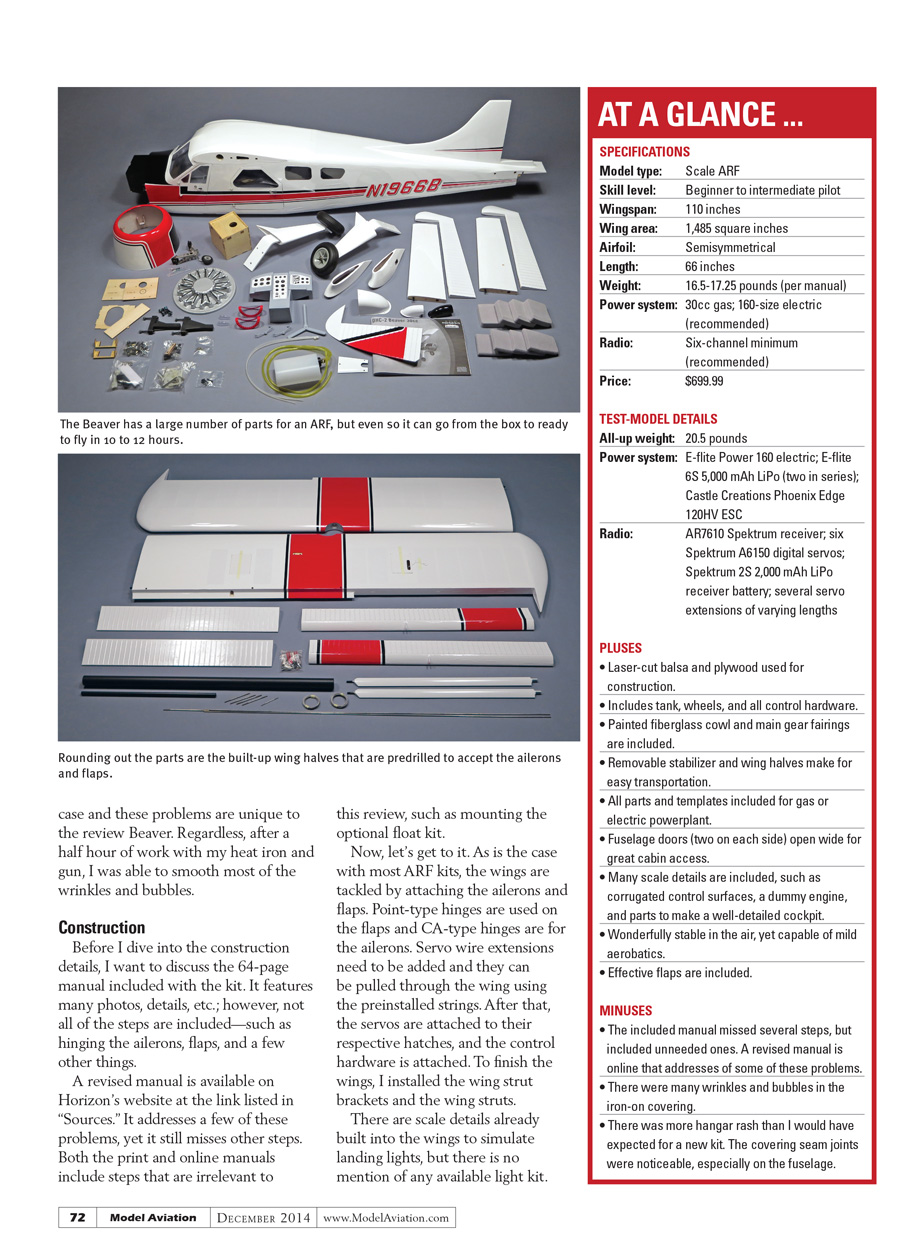
The subject of this review is Hangar 9’s 110-inch ARF Beaver. It is primarily balsa and plywood laser-cut construction with a few fiberglass and vacuum-formed plastic parts. All are covered in white UltraCote with red and black trim. The preprinted fiberglass parts nicely match the color scheme.
The Beaver is a large airplane with a number of scale details, so there are quite a few parts in the box. The wings are a two-piece, plug-in design, as are the stabilizer halves. The fuselage features pre-hinged, pre-installed cabin doors (two per side). Also included are parts to give the aircraft scale-like detail, including a dummy radial cowl, cabin seats, a cockpit, and a dual-wheel yoke.
A selection of good-quality hardware comes with the kit. Firewall-drilling templates are included for various engine installations and a fuel tank is included if you decide to use gasoline for power.
Initially, the only questionable piece of hardware seemed to be the elevator pushrod. It is made of three steel rods spot-welded together to form a “Y” that controls each elevator half. I’ve flown the Beaver quite a lot using this pushrod and have had no problems.
What caught my eye were several places showing scuffs and scratches right out of the box. There were wrinkles and bubbles in the covering, and the seams were noticeable. As can happen with review airplanes, we often receive one of the first available production samples. I hope that is the case and these problems are unique to the review Beaver. Regardless, after a half hour of work with my heat iron and gun, I was able to smooth most of the wrinkles and bubbles.
Construction
Before I dive into construction details, I want to discuss the 64-page manual included with the kit. It features many photos and details; however, not all of the steps are included—such as hinging the ailerons, flaps, and a few other items. A revised manual is available on Horizon's website (see Sources). It addresses a few of these problems, yet it still misses other steps. Both the print and online manuals include steps that are irrelevant to this review, such as mounting the optional float kit.
As is the case with most ARF kits, the wings are tackled by attaching the ailerons and flaps. Point-type hinges are used on the flaps and CA-type hinges are used for the ailerons. Servo wire extensions need to be added and can be pulled through the wing using the preinstalled strings. After that, the servos are attached to their respective hatches and the control hardware is installed. To finish the wings, I installed the wing-strut brackets and the wing struts.
There are scale details already built into the wings to simulate landing lights, but there is no mention of any available light kit. Searching the Internet, I happened upon Dimension Engineering's EasyLight kit. For less than $20 I purchased a tiny circuit board with one JR-compatible servo connector. I plugged it into a spare channel and can quickly control the light via a two-position switch on the transmitter. It is powered by the onboard receiver battery and doesn't require separate power.
The only modification I made was to unsolder the LEDs from the board. By soldering long leads to the LEDs and a couple of connectors for quick hookup, I could mount these LEDs in place on each wing. I drilled a hole in the "reflector" large enough to pass the wire through, and ran the wire lead out of the end of the wing. It was a simple modification.
Fuselage work begins by installing the main gear (assuming you're not using the optional float kit). Each half of the main gear is covered by a two-piece fiberglass fairing. These fairings are held in place with a liberal amount of clear silicone. I found that the fit wasn't perfect and it took some work to align them. I used masking tape to hold things in position while the silicone dried overnight.
Installing the tailwheel was next. This is a beefed-up design that mimics the system used on the full-scale Beaver. Four screws hold it in place, but I had to trim a significant portion off the plastic rear mounting bracket so it would seat properly. Once in place, separate pull-pull systems for the tailwheel and rudder were installed.
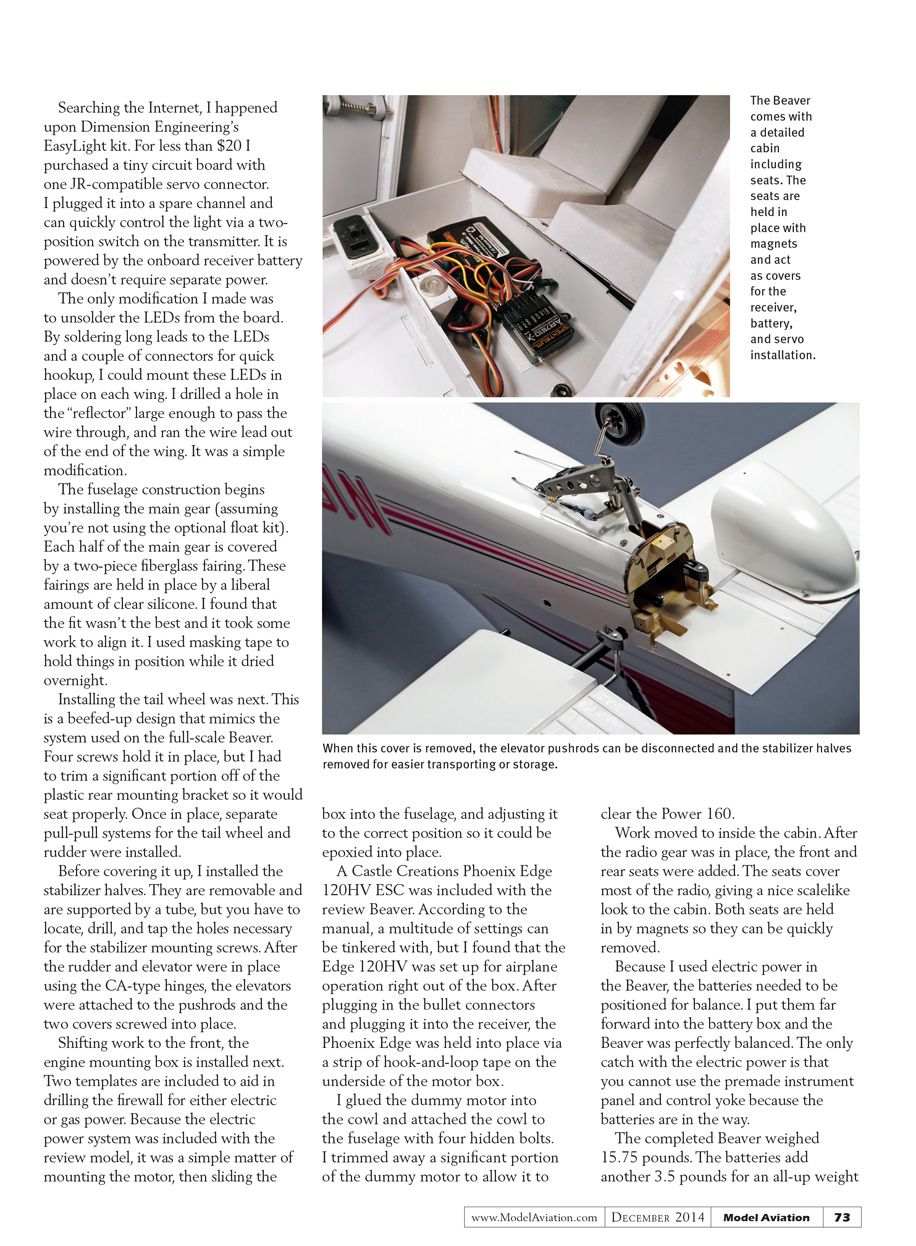
Before covering things up, I installed the stabilizer halves. They are removable and are supported by a tube, but you have to locate, drill, and tap the holes necessary for the stabilizer mounting screws. After the rudder and elevator were installed using CA-type hinges, the elevators were attached to the pushrods and the two covers were screwed into place.
At the front, the engine-mounting box is installed next. Two templates are included to aid in drilling the firewall for either electric or gas power. Because the electric power system was included with the review model, it was a simple matter of mounting the motor, sliding the box into the fuselage, and adjusting it to the correct position so it could be epoxied into place.
A Castle Creations Phoenix Edge 120HV ESC was included with the review Beaver. According to the manual, a multitude of settings can be tinkered with, but I found that the Edge 120HV was set up for airplane operation right out of the box. After plugging in the bullet connectors and plugging it into the receiver, the Phoenix Edge was held into place via a strip of hook-and-loop tape on the underside of the motor box.
I glued the dummy motor into the cowl and attached the cowl to the fuselage with four hidden bolts. I trimmed away a significant portion of the dummy motor to allow it to clear the Power 160.
Work moved to the cabin. After the radio gear was in place, the front and rear seats were added. The seats cover most of the radio, giving a nice scale-like look to the cabin. Both seats are held in by magnets so they can be quickly removed.
Because I used electric power in the Beaver, the batteries needed to be positioned for balance. I put them far forward into the battery box and the Beaver was perfectly balanced. The only catch with the electric power is that you cannot use the premade instrument panel and control yoke because the batteries are in the way.
The completed Beaver weighed 15.75 pounds. The batteries added another 3.5 pounds for an all-up weight of 19.25 pounds. That was near the top end of the recommended weight for the model and well within the range to clear the Power 160. With electric power it can go from the box to ready to fly in 10 to 12 hours.
Flying
Assembling the aircraft at the field is surprisingly simple for a model of this size. No tools are needed. The wing struts are held in with a clip and the wing halves are secured to the fuselage with a thumb-tightened nylon bolt.
Not knowing how effective the flaps would be, I chose not to use them during the first takeoff. Even without flaps and using only half power, the Beaver quickly accelerated down the runway and was off the ground in roughly 200 feet.
When the Beaver was up to a safe altitude, I backed off the throttle and found it would easily cruise around between one-third and one-half throttle without flaps.
With the trim passes completed, I decided to try out the flaps. As you might expect with a STOL-type design, the flaps are extremely effective. With half flaps, the Beaver will slow down to a ridiculously slow speed, yet it is still fully controllable. I could do incredibly tight horizontal figure eights with the Beaver close to knife-edge, and yet it didn't fall out of the sky at these slow speeds.
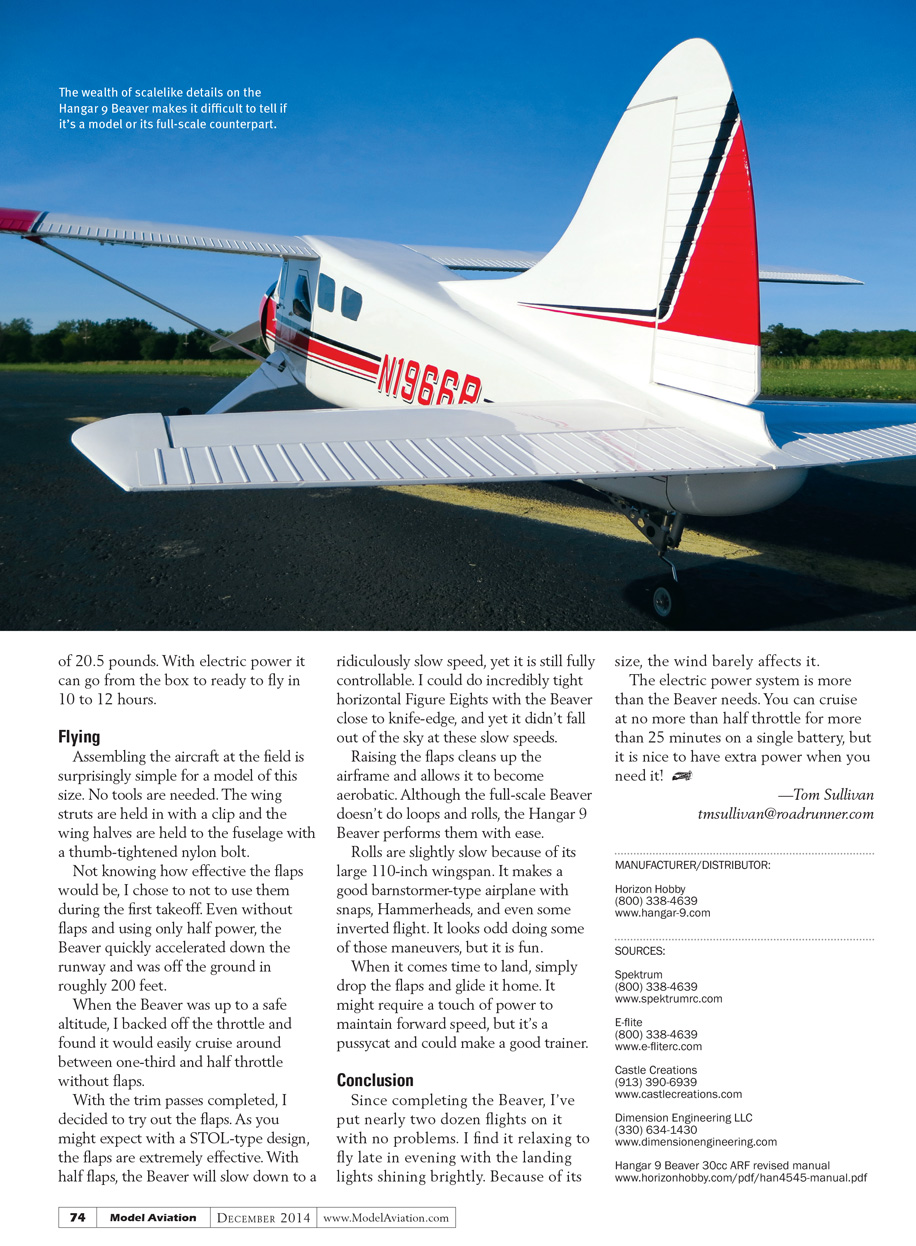
Raising the flaps cleans up the airframe and allows it to become aerobatic. Although the full-scale Beaver doesn't do loops and rolls, the Hangar 9 Beaver performs them with ease. Rolls are slightly slow because of its large 110-inch wingspan. It makes a good barnstormer-type airplane with snaps, Hammerheads, and even some inverted flight. It looks odd doing some of those maneuvers, but it is fun.
When it comes time to land, simply drop the flaps and glide it home. It might require a touch of power to maintain forward speed, but it's a pussycat and could make a good trainer.
Conclusion
Since completing the Beaver, I've put nearly two dozen flights on it with no problems. I find it relaxing to fly late in the evening with the landing lights shining brightly. Because of its size, the wind barely affects it.
The electric power system is more than the Beaver needs. You can cruise at no more than half throttle for more than 25 minutes on a single battery, but it is nice to have extra power when you need it!
—Tom Sullivan [email protected]
MANUFACTURER/DISTRIBUTOR
- Horizon Hobby
(800) 338-4639 www.hangar-9.com
SOURCES
- Spektrum
(800) 338-4639 www.spektrumrc.com
- E-flite
(800) 338-4639 www.e-flite.com
- Castle Creations
(913) 390-6939 www.castlecreations.com
- Dimension Engineering LLC
(330) 634-1430 www.dimensionengineering.com
- Hangar 9 Beaver 30cc ARF revised manual
www.horizonhobby.com/pdf/han4545-manual.pdf
Transcribed from original scans by AI. Minor OCR errors may remain.

