

REVIEW Aeroworks Cessna 195
Jack Frost [email protected]
Scale appeal with a trainer feel
First Impressions
Unpacking the box revealed not only a well-built airplane, but care in packaging to keep it in good condition during its travels. The covering required minor attention, which is expected because of heat and humidity changes during storage and transportation. It was easily smoothed out with a heat gun and a cotton glove.
Great care had been taken to organize the parts and hardware in a logical fashion. The hardware was of excellent quality and well suited for its intended purpose. This is a large airplane that requires plenty of surface area to lay out everything.
The aircraft came with a CD containing the building instructions. I may be old-school, but I would prefer a paper manual that I could mark up if I wished. I printed the manual from the CD and it was quite extensive. I think offering both the CD and a paper manual or a choice of the two might be a good idea, even if it slightly increases the cost.
Construction
The Cessna 195 was my first AeroWorks aircraft and I was impressed with the 94-page instruction manual. Although it was as thick as the one that came with my new TV, it was more helpful. Contained within were more than 100 color photos illustrating each step of the assembly process.
The manual was clear, concise, and presented a well-thought-out plan of attack for the build. I will only briefly touch on the assembly process. If you would like to learn more, download the manual from the AeroWorks website listed in the "Sources" section.
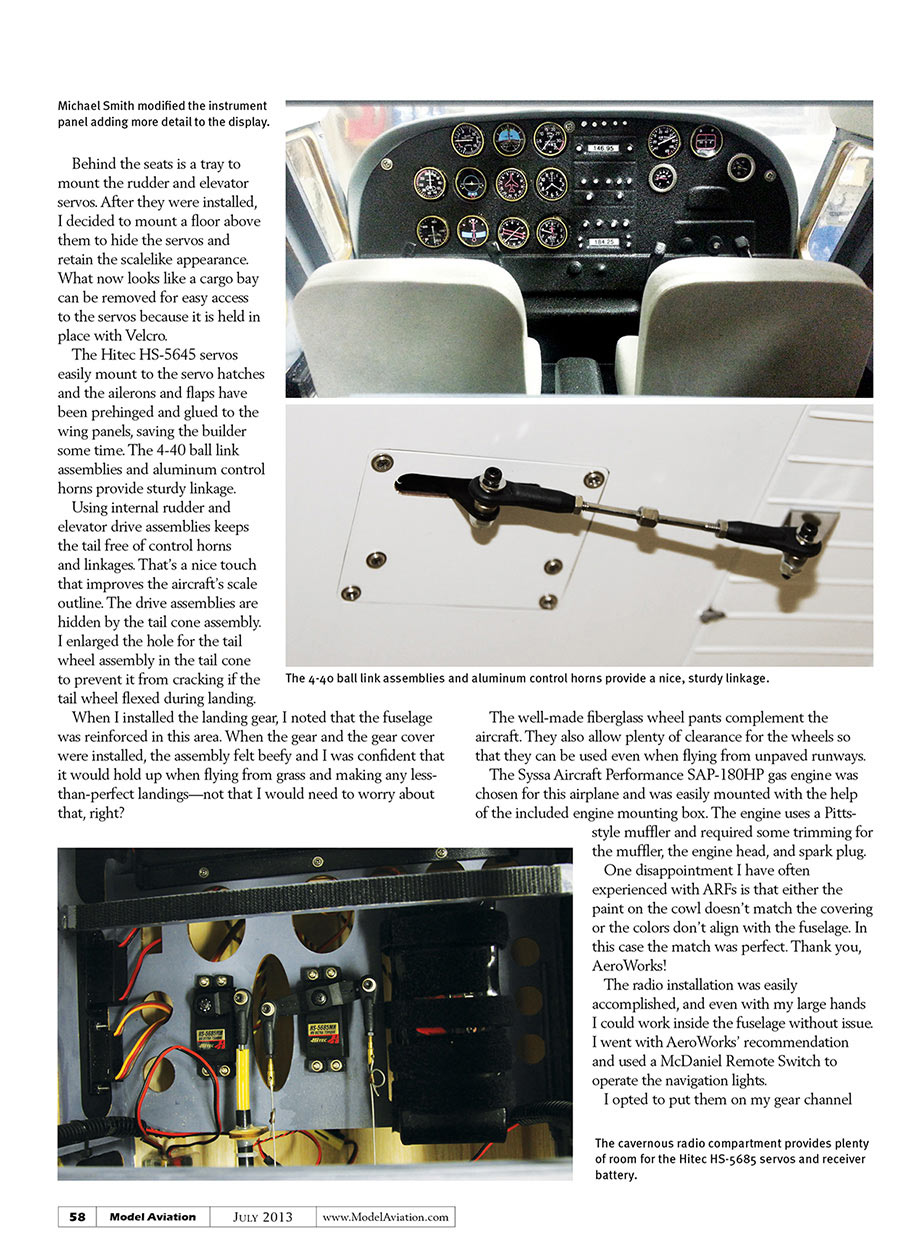
The Cessna comes with a detailed cockpit, which includes the instrument panel, yokes, seats, and floor. With a little research and the help of my friend and National Model Aviation Museum director, Michael Smith, we added more detail to the instrument panel and its myriad displays. I also found that the provided yokes are slightly different than the photos found online, but that is minor.
Behind the seats is a tray to mount the rudder and elevator servos. After they were installed, I decided to mount a floor above them to hide the servos and retain the scalelike appearance. What now looks like a cargo bay can be removed for easy access to the servos because it is held in place with Velcro.
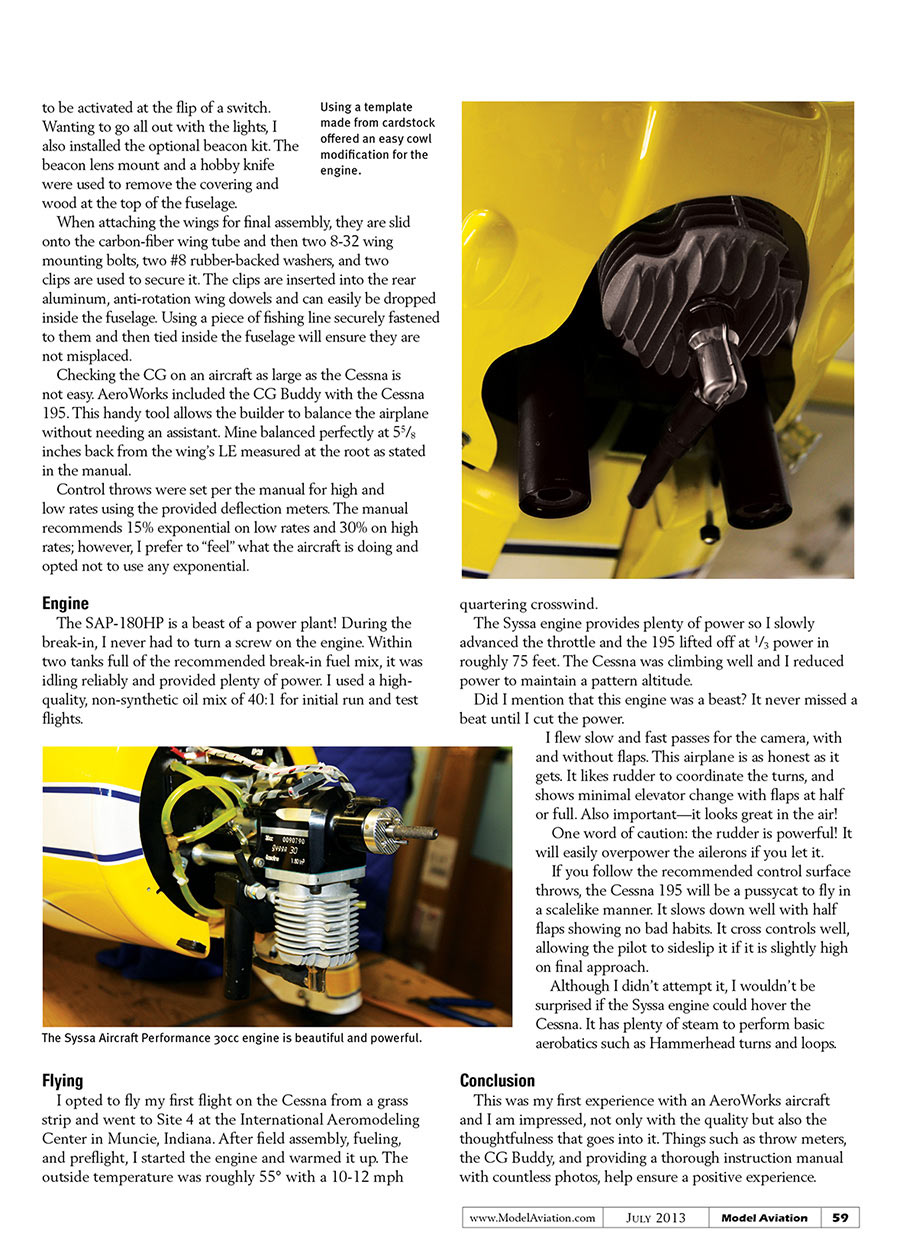
The Hitec HS-5645 servos easily mount to the servo hatches and the ailerons and flaps have been prehinged and glued to the wing panels, saving the builder some time. The 4-40 ball link assemblies and aluminum control horns provide sturdy linkage.
Using internal rudder and elevator drive assemblies keeps the tail free of control horns and linkages. That's a nice touch that improves the aircraft's scale outline. The drive assemblies are hidden by the tail cone assembly. I enlarged the hole for the tail wheel assembly in the tail cone to prevent it from cracking if the tail wheel flexed during landing.
When I installed the landing gear, I noted that the fuselage was reinforced in this area. When the gear and the gear cover were installed, the assembly felt beefy and I was confident that it would hold up when flying from grass and making any less-than-perfect landings—not that I would need to worry about that, right?
The well-made fiberglass wheel pants complement the aircraft. They also allow plenty of clearance for the wheels so that they can be used even when flying from unpaved runways.
The Syssa Aircraft Performance SAP-180HP gas engine was chosen for this airplane and was easily mounted with the help of the included engine mounting box. The engine uses a Pitts-style muffler and required some trimming for the muffler, the engine head, and the spark plug.
One disappointment I have often experienced with ARFs is that either the paint on the cowl doesn't match the covering or the colors don't align with the fuselage. In this case the match was perfect. Thank you, AeroWorks!
The radio installation was easily accomplished, and even with my large hands I could work inside the fuselage without issue. I went with AeroWorks' recommendation and used a McDaniel Remote Switch to operate the navigation lights. I opted to put them on my gear channel to be activated at the flip of a switch.
Wanting to go all out with the lights, I also installed the optional beacon kit. The beacon lens mount and a hobby knife were used to remove the covering and wood at the top of the fuselage.
When attaching the wings for final assembly, they are slid onto the carbon-fiber wing tube and then two 8-32 wing mounting bolts, two #8 rubber-backed washers, and two clips are used to secure it. The clips are inserted into the rear aluminum, anti-rotation wing dowels and can easily be dropped inside the fuselage. Using a piece of fishing line securely fastened to them and then tied inside the fuselage will ensure they are not misplaced.
Checking the CG on an aircraft as large as the Cessna is not easy. AeroWorks included the CG Buddy with the Cessna 195. This handy tool allows the builder to balance the airplane without needing an assistant. Mine balanced perfectly at 5 5/8 inches back from the wing's leading edge measured at the root, as stated in the manual.
Control throws were set per the manual for high and low rates using the provided deflection meters. The manual recommends 15% exponential on low rates and 30% on high rates; however, I prefer to "feel" what the aircraft is doing and opted not to use any exponential.
Engine
The SAP-180HP is a beast of a power plant! During the break-in, I never had to turn a screw on the engine. Within two tanks full of the recommended break-in fuel mix, it was idling reliably and provided plenty of power. I used a high-quality, non-synthetic oil mix of 40:1 for initial run and test flights.
Flying
I opted to fly my first flight on the Cessna from a grass strip and went to Site 4 at the International Aeromodeling Center in Muncie, Indiana. After field assembly, fueling, and preflight, I started the engine and warmed it up. The outside temperature was roughly 55° with a 10–12 mph quartering crosswind.
The Syssa engine provides plenty of power so I slowly advanced the throttle and the 195 lifted off at 1/3 power in roughly 75 feet. The Cessna was climbing well and I reduced power to maintain a pattern altitude.
Did I mention that this engine was a beast? It never missed a beat until I cut the power.
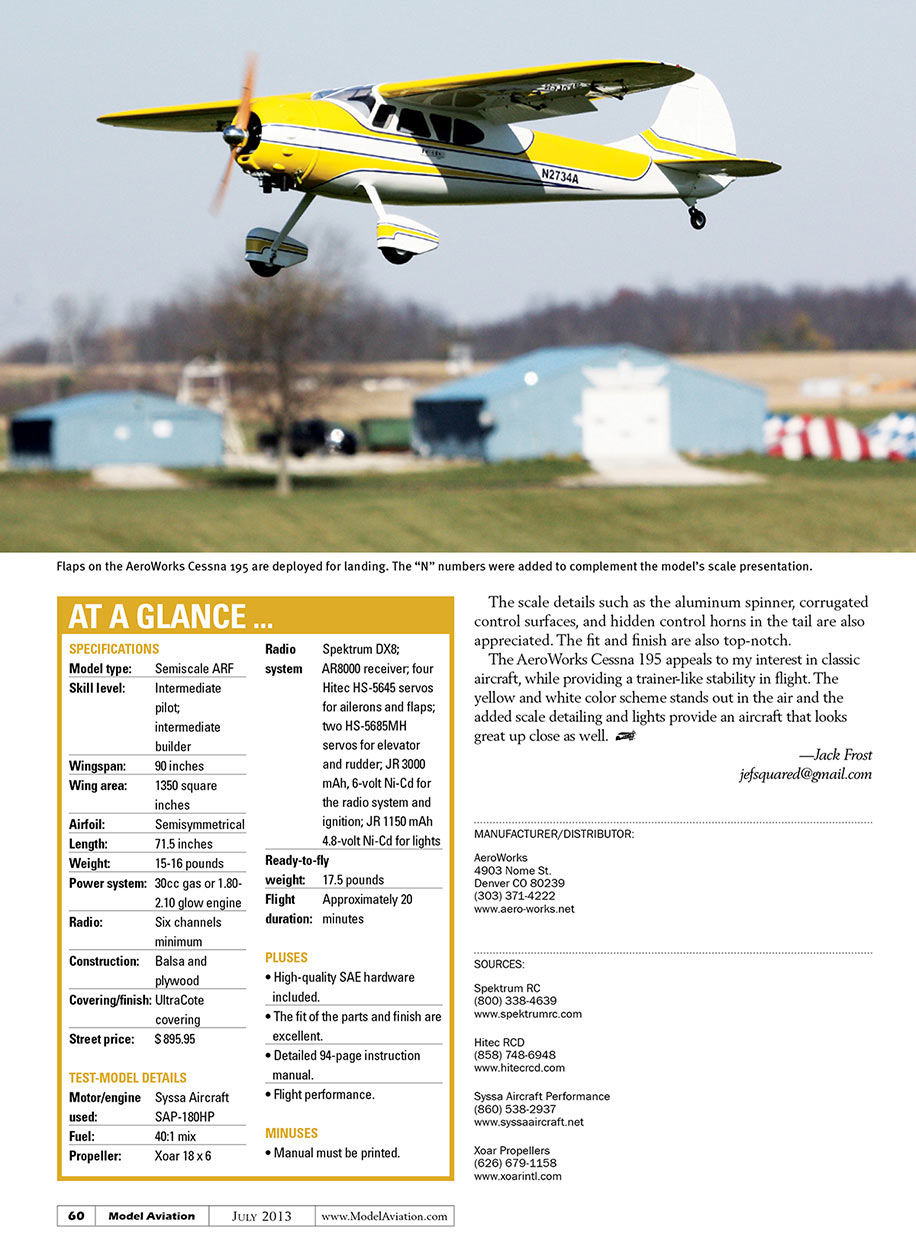
I flew slow and fast passes for the camera, with and without flaps. This airplane is as honest as it gets. It likes rudder to coordinate the turns, and shows minimal elevator change with flaps at half or full. Also important — it looks great in the air!
One word of caution: the rudder is powerful! It will easily overpower the ailerons if you let it.
If you follow the recommended control surface throws, the Cessna 195 will be a pussycat to fly in a scalelike manner. It slows down well with half flaps showing no bad habits. It cross-controls well, allowing the pilot to sideslip it if it is slightly high on final approach.
Although I didn't attempt it, I wouldn't be surprised if the Syssa engine could hover the Cessna. It has plenty of steam to perform basic aerobatics such as hammerhead turns and loops.
Conclusion
This was my first experience with an AeroWorks aircraft and I am impressed, not only with the quality but also the thoughtfulness that goes into it. Things such as throw meters, the CG Buddy, and providing a thorough instruction manual with countless photos help ensure a positive experience.
The scale details such as the aluminum spinner, corrugated control surfaces, and hidden control horns in the tail are also appreciated. The fit and finish are top-notch. The AeroWorks Cessna 195 appeals to my interest in classic aircraft, while providing a trainer-like stability in flight. The yellow and white color scheme stands out in the air and the added scale detailing and lights provide an aircraft that looks great up close as well.
—Jack Frost [email protected]
AT A GLANCE ...
SPECIFICATIONS
- Model type: Semiscale ARF
- Skill level: Intermediate pilot; intermediate builder
- Wingspan: 90 inches
- Wing area: 1350 square inches
- Airfoil: Semisymmetrical
- Length: 71.5 inches
- Weight: 15–16 pounds
- Power system: 30cc gas or 1.80–2.10 glow engine
- Radio: Six channels minimum
- Construction: Balsa and plywood
- Covering/finish: UltraCote covering
- Street price: $895.95
TEST-MODEL DETAILS
- Motor/engine used: Syssa Aircraft SAP-180HP
- Fuel: 40:1 mix
- Propeller: Xoar 18 x 6
RADIO SYSTEM
- Spektrum DX8; AR8000 receiver
- Four Hitec HS-5645 servos for ailerons and flaps
- Two Hitec HS-5685HM servos for elevator and rudder
- JR 3000 mAh, 6-volt Ni-Cd for the radio system and ignition
- JR 1150 mAh 4.8-volt Ni-Cd for lights
- Ready-to-fly weight: 17.5 pounds
- Flight duration: Approximately 20 minutes
PLUSES
- High-quality SAE hardware included.
- The fit of the parts and finish are excellent.
- Detailed 94-page instruction manual.
- Flight performance.
MINUSES
- Manual must be printed.
MANUFACTURER/DISTRIBUTOR
AeroWorks 4903 Nome St. Denver, CO 80239 (303) 371-4222 www.aero-works.net
SOURCES
Spektrum RC (800) 338-4639 www.spektrumrc.com
Hitec RCD (858) 748-6948 www.hitecrcd.com
Syssa Aircraft Performance (860) 538-2937 www.syssaaircraft.net
Xoar Propellers (626) 679-1158 www.xoarintl.com
Transcribed from original scans by AI. Minor OCR errors may remain.

