
Review: Great Planes Super Stearman EP ARF
Tom Sullivan [email protected]
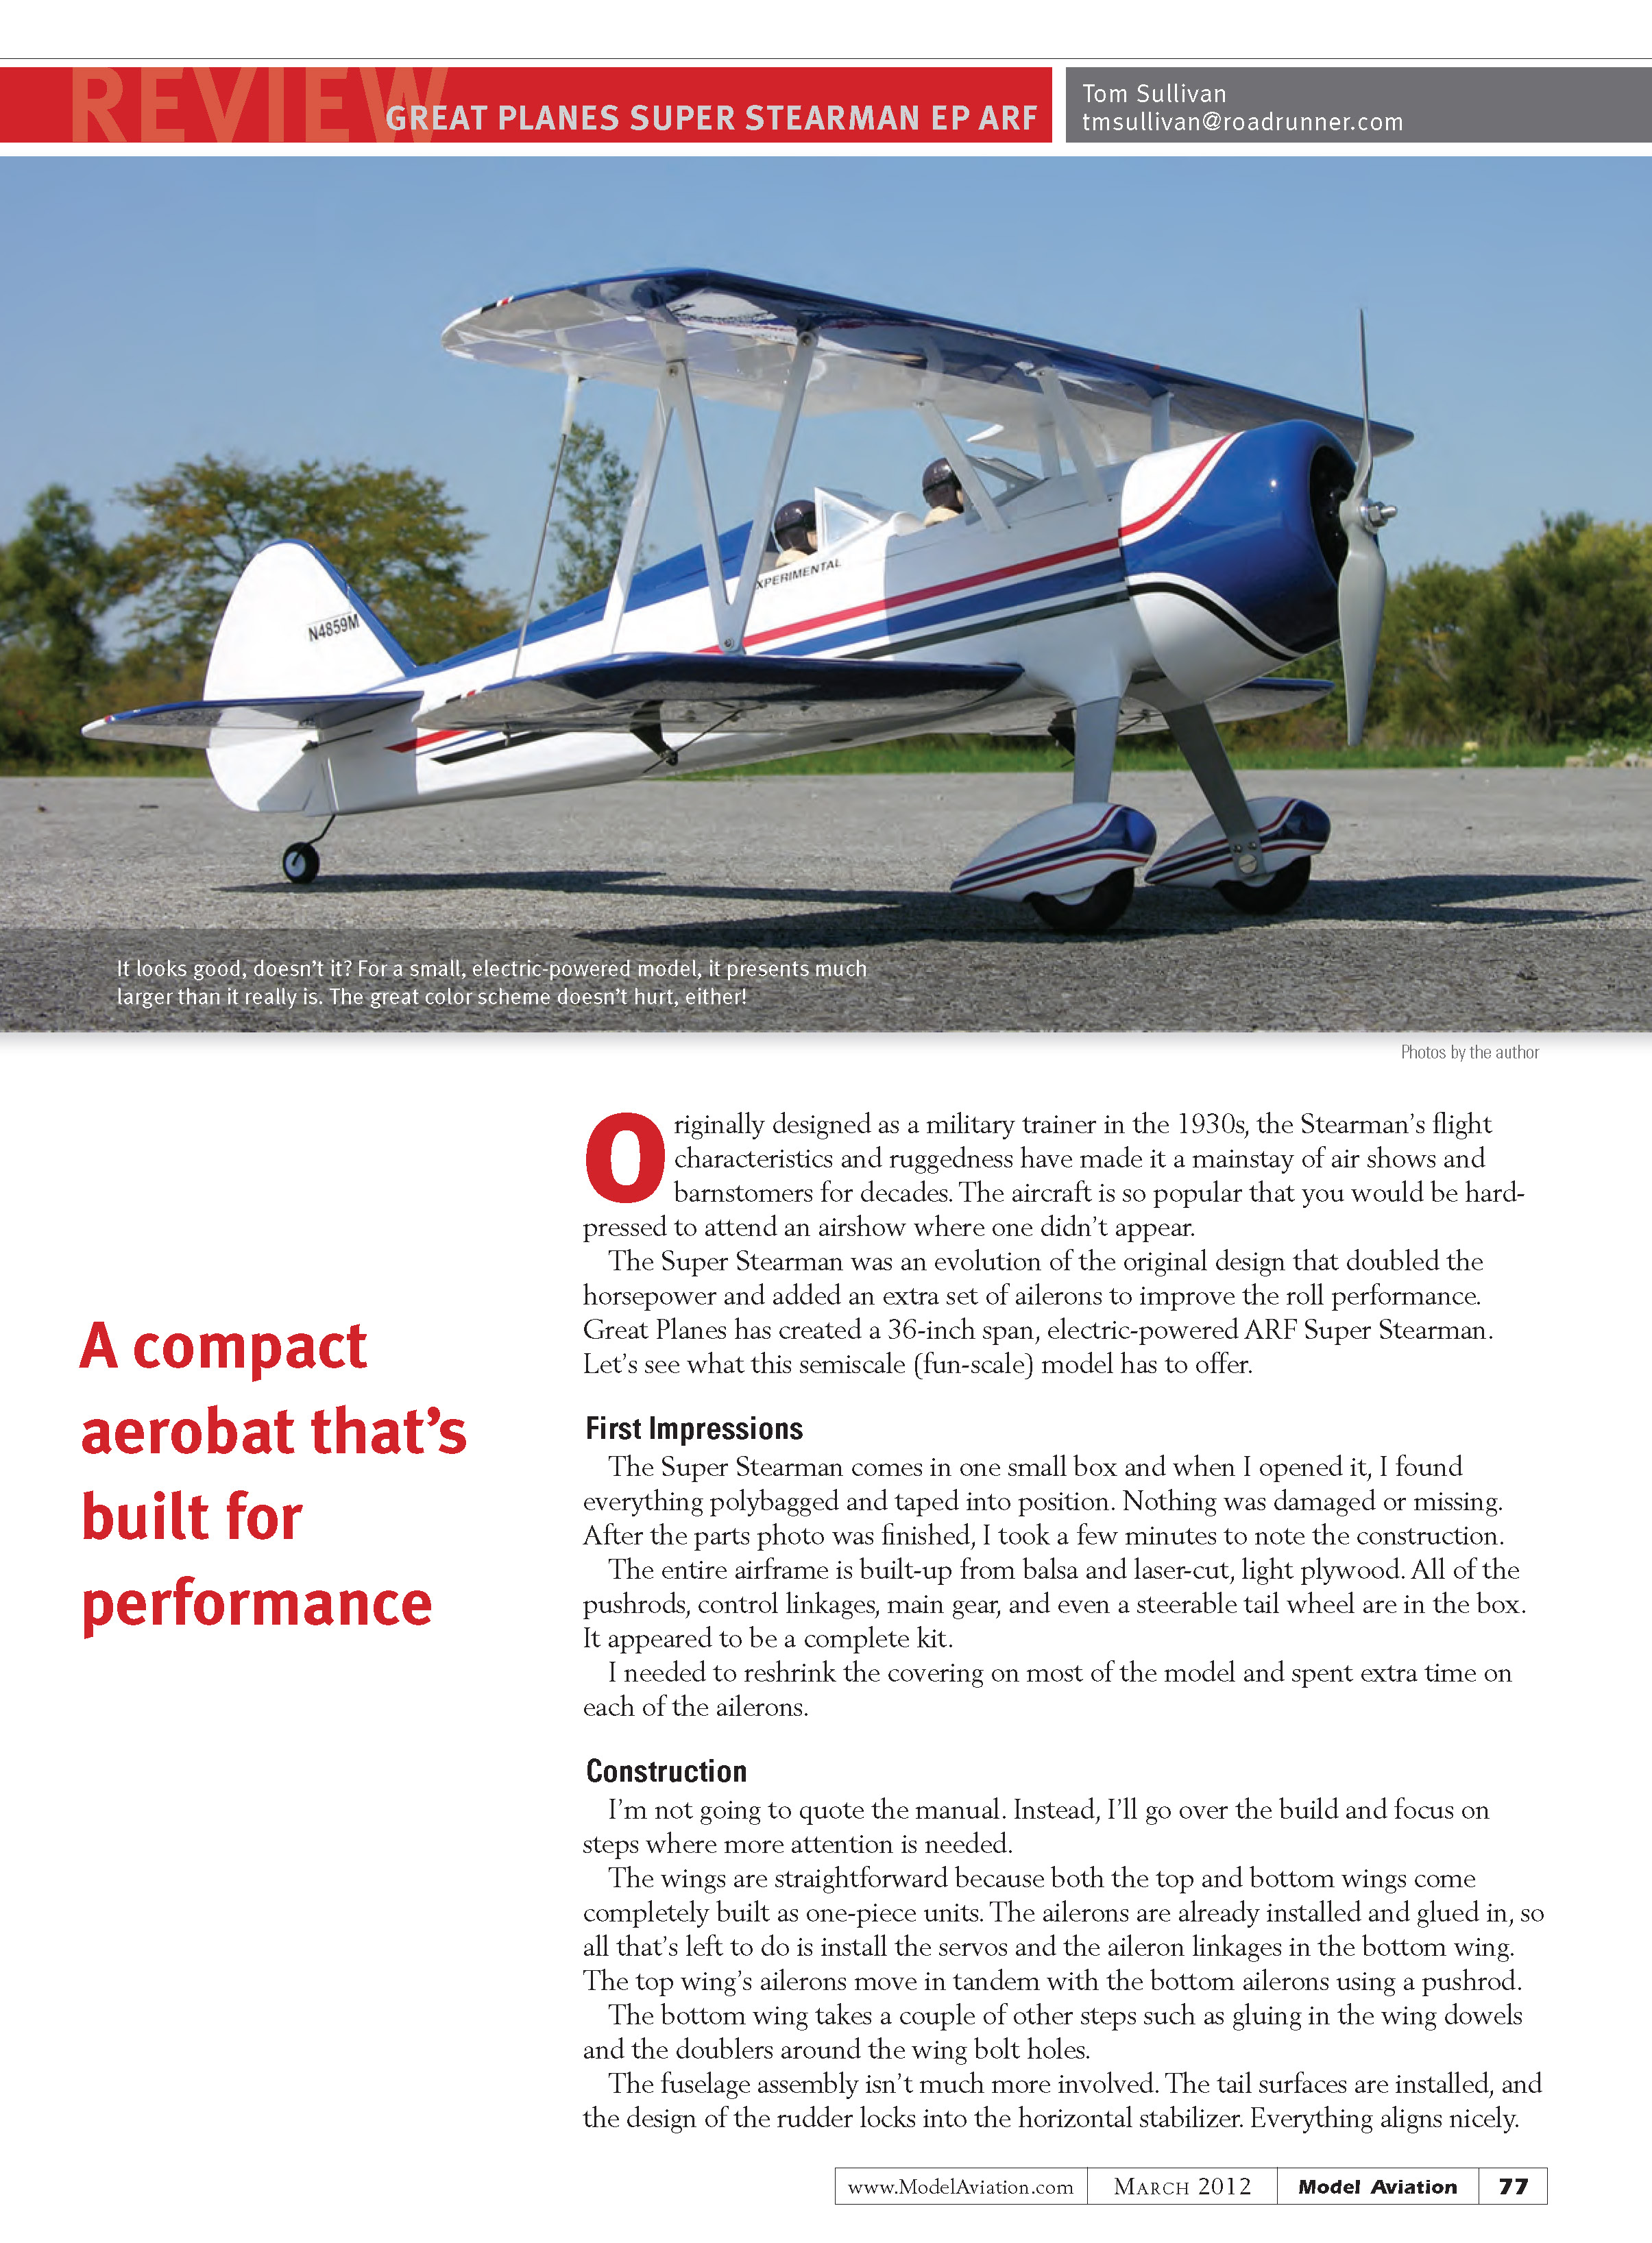
Originally designed as a military trainer in the 1930s, the Stearman's flight characteristics and ruggedness have made it a mainstay of air shows and barnstormers for decades. The aircraft is so popular that you would be hard-pressed to attend an airshow where one didn't appear.
The Super Stearman was an evolution of the original design that doubled the horsepower and added an extra set of ailerons to improve roll performance. Great Planes has created a 36-inch-span, electric-powered ARF Super Stearman. Let's see what this semiscale (fun-scale) model has to offer.
A compact aerobat that's built for performance
First Impressions
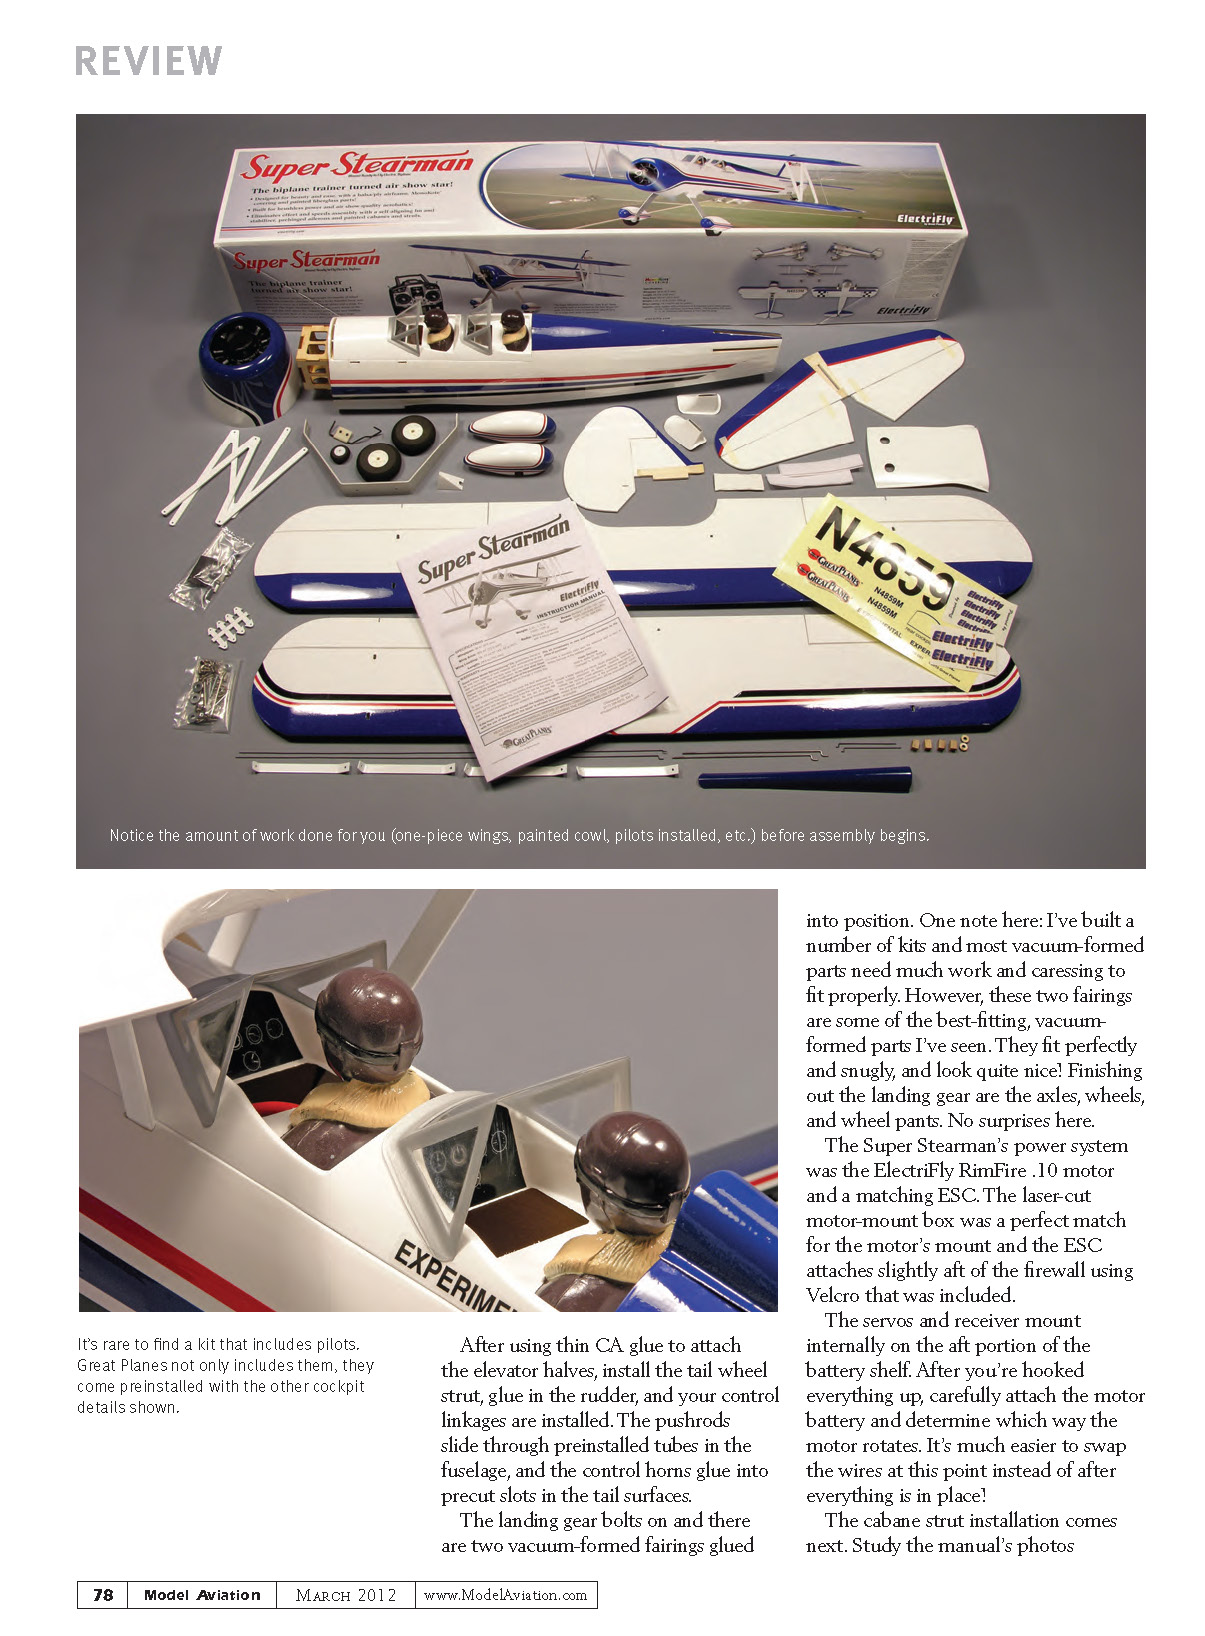
The Super Stearman comes in one small box. When I opened it, I found everything polybagged and taped into position. Nothing was damaged or missing. After the parts photo was finished, I took a few minutes to note the construction.
The entire airframe is built-up from balsa and laser-cut light plywood. All of the pushrods, control linkages, main gear, and even a steerable tail wheel are in the box. It appeared to be a complete kit.
I needed to reshrink the covering on most of the model and spent extra time on each of the ailerons.
Construction
I’m not going to quote the manual. Instead, I'll go over the build and focus on steps where more attention is needed.
The wings are straightforward because both the top and bottom wings come completely built as one-piece units. The ailerons are already installed and glued in, so all that's left to do is install the servos and the aileron linkages in the bottom wing. The top wing's ailerons move in tandem with the bottom ailerons using a pushrod.
The bottom wing takes a couple of other steps such as gluing in the wing dowels and the doublers around the wing-bolt holes.
Fuselage assembly isn't much more involved. The tail surfaces are installed, and the design of the rudder locks into the horizontal stabilizer. Everything aligns nicely. After using thin CA to attach the elevator halves, install the tail wheel strut, glue in the rudder, and install the control linkages. The pushrods slide through preinstalled tubes in the fuselage, and the control horns glue into precut slots in the tail surfaces.
The landing gear bolts on and there are two vacuum-formed fairings glued into position. One note here: I’ve built a number of kits and most vacuum-formed parts need much work and caressing to fit properly. However, these two fairings are some of the best-fitting vacuum-formed parts I’ve seen. They fit perfectly and snugly, and look quite nice.
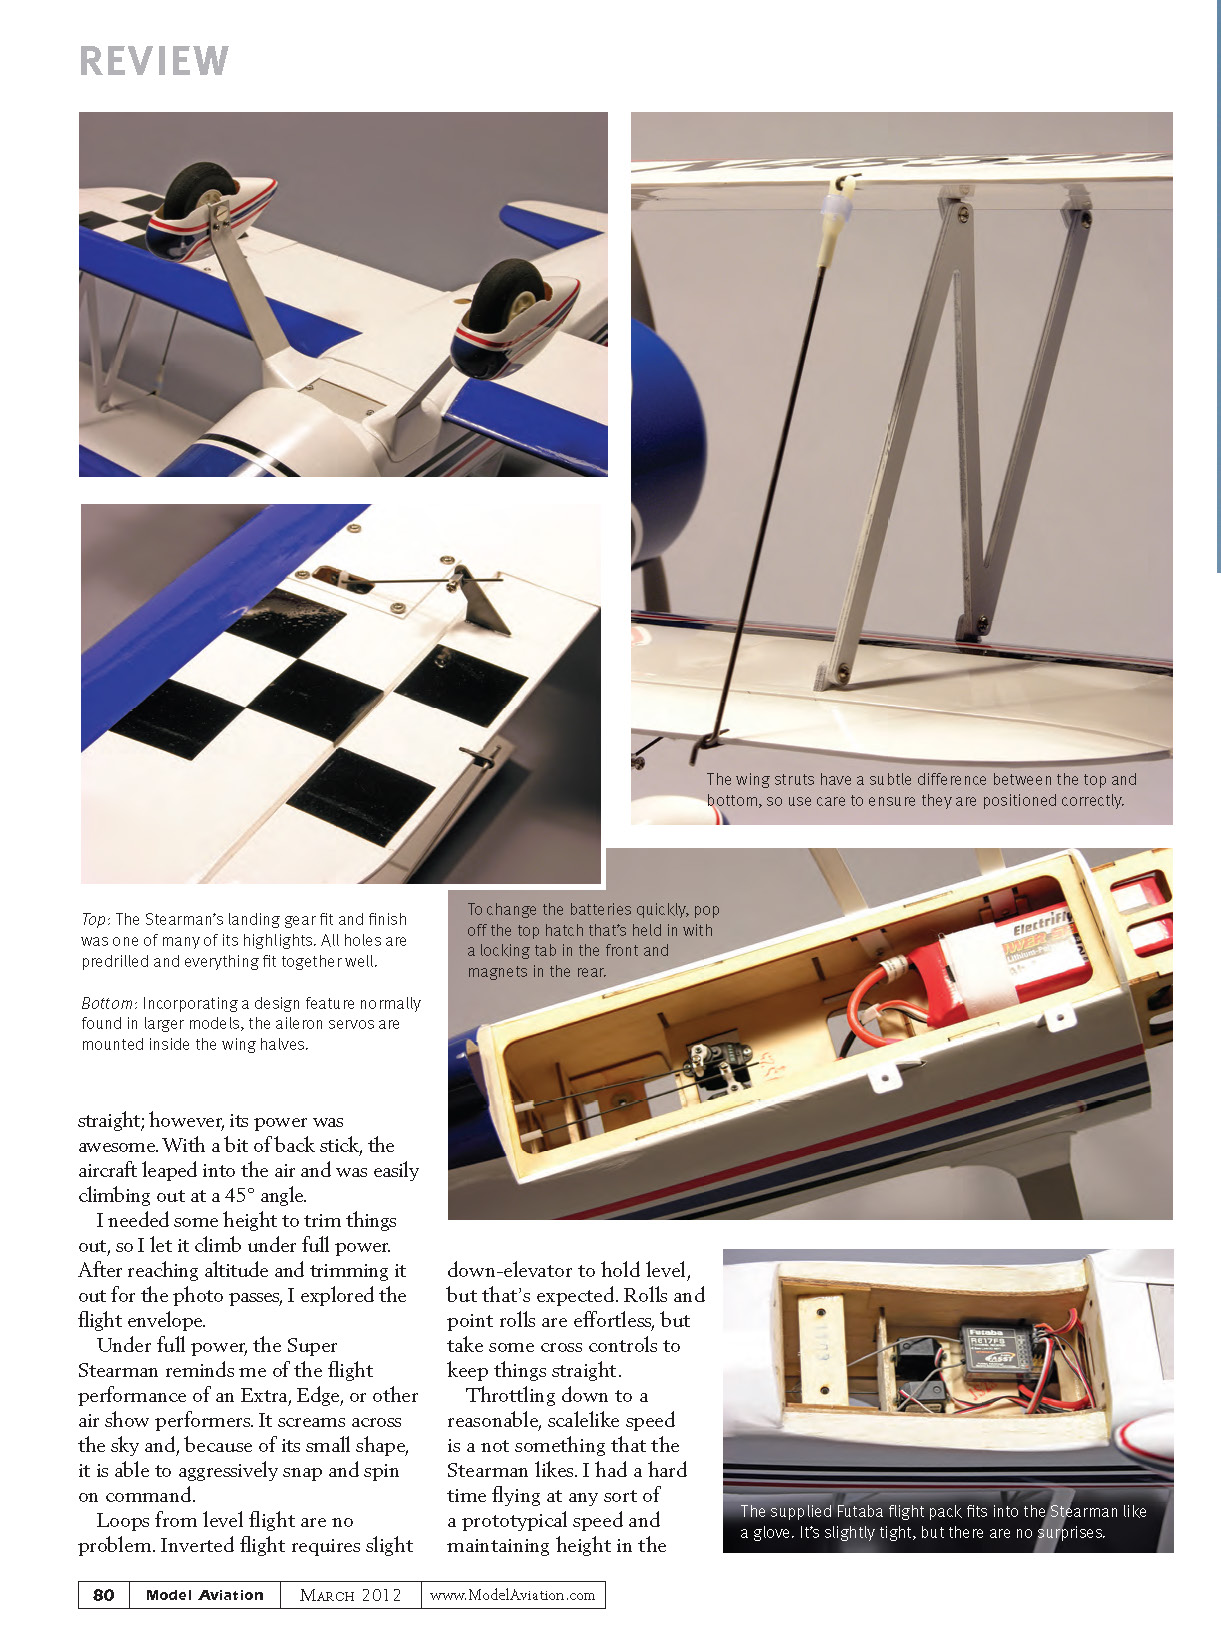
Finishing out the landing gear are the axles, wheels, and wheel pants. No surprises here.
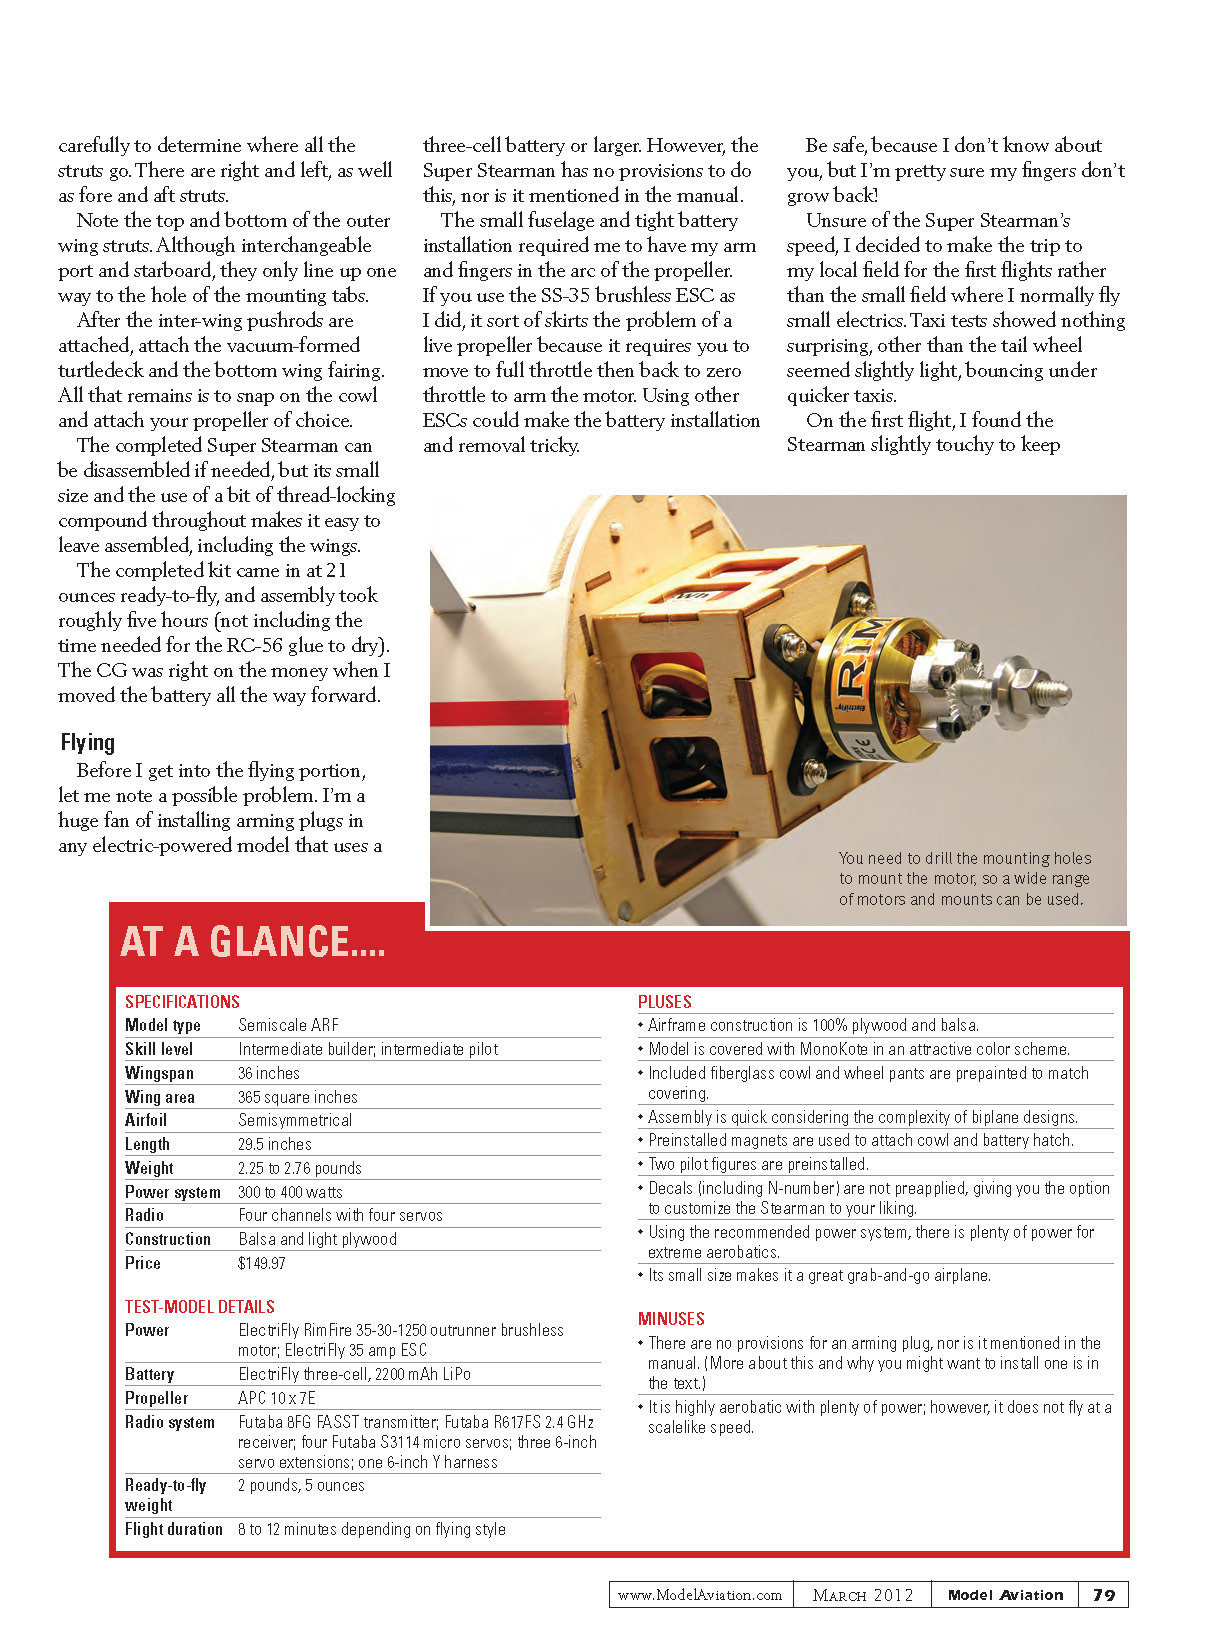
The Super Stearman’s power system was the ElectriFly RimFire .10 motor and a matching ESC. The laser-cut motor-mount box was a perfect match for the motor’s mount and the ESC attaches slightly aft of the firewall using the included Velcro.
The servos and receiver mount internally on the aft portion of the battery shelf. After you hook everything up, carefully attach the motor battery and determine which way the motor rotates. It’s much easier to swap the wires at this point instead of after everything is in place.
The cabane strut installation comes next. Study the manual’s photos carefully to determine where all the struts go. There are right and left, as well as fore and aft struts. Note the top and bottom of the outer wing struts: although interchangeable port and starboard, they only line up one way with the mounting-tab holes.
After the inter-wing pushrods are attached, install the vacuum-formed turtledeck and the bottom wing fairing. All that remains is to snap on the cowl and attach your propeller of choice.
The completed Super Stearman can be disassembled if needed, but its small size and the use of a bit of thread-locking compound throughout makes it easy to leave assembled, including the wings.
The completed kit came in at 2.1 pounds ready-to-fly, and assembly took roughly five hours (not including time needed for the RC-56 glue to dry). The CG was right on the money when I moved the battery all the way forward.
Flying
Before I get into the flying portion, let me note a possible problem. I’m a huge fan of installing arming plugs in any electric-powered model that uses a three-cell battery or larger. However, the Super Stearman has no provisions to do this, nor is it mentioned in the manual.
The small fuselage and tight battery installation required me to have my arm and fingers in the arc of the propeller. If you use the SS-35 brushless ESC as I did, it sort of skirts the problem of a live propeller because it requires you to move to full throttle then back to zero throttle to arm the motor. Using other ESCs could make battery installation and removal tricky.
Be safe—my fingers don’t grow back!
Unsure of the Super Stearman’s speed, I decided to make the trip to my local field for the first flights rather than the small field where I normally fly small electrics. Taxi tests showed nothing surprising, other than the tail wheel seemed slightly light, bouncing under quicker taxis.
On the first flight, I found the Stearman slightly touchy to keep straight; however, its power was awesome. With a bit of back stick, the aircraft leaped into the air and was easily climbing out at a 45° angle.
I needed some height to trim things out, so I let it climb under full power. After reaching altitude and trimming it out for the photo passes, I explored the flight envelope.
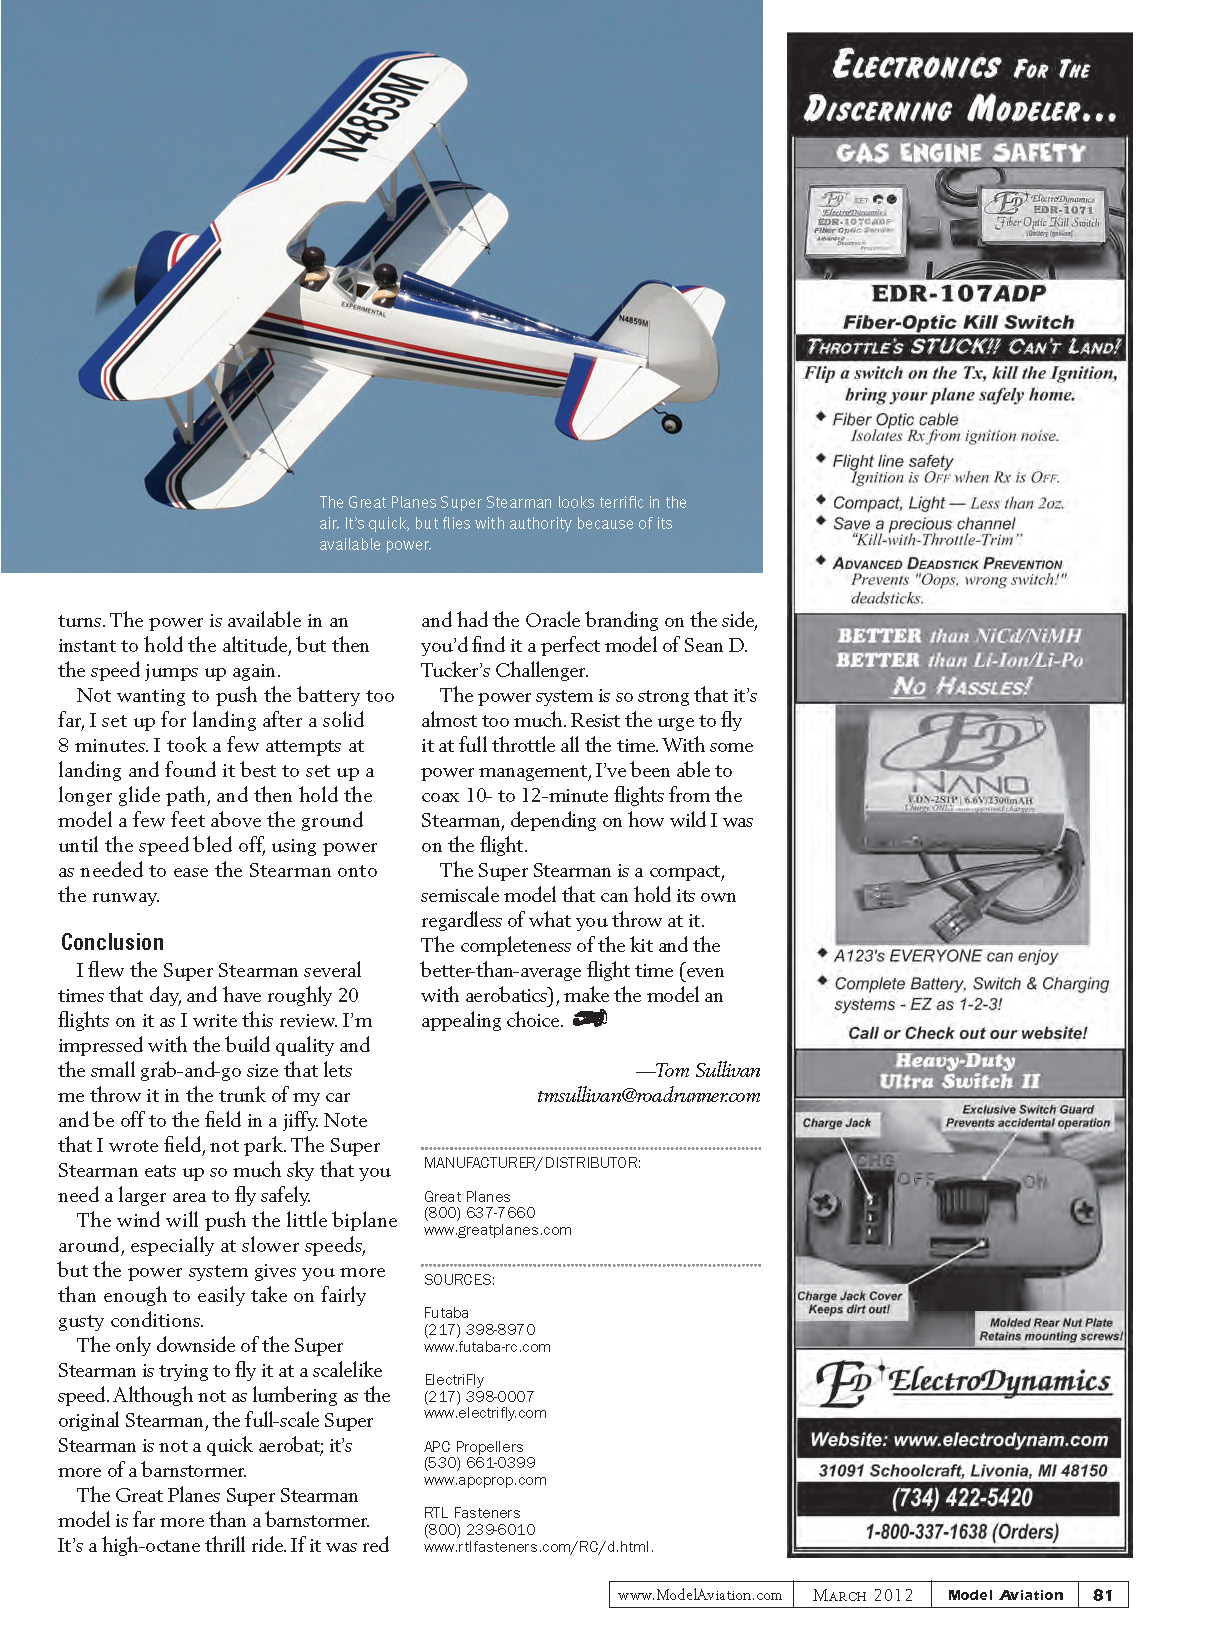
Under full power, the Super Stearman reminds me of the flight performance of an Extra, Edge, or other air-show performers. It screams across the sky and, because of its small shape, is able to aggressively snap and spin on command.
Loops from level flight are no problem. Inverted flight requires slight down elevator to hold level, but that’s expected. Rolls and point rolls are effortless, but take some cross controls to keep things straight.
Throttling down to a reasonable, scalelike speed is not something the Stearman likes. I had a hard time flying at any sort of prototypical speed and maintaining height. With the airplane trimmed properly there was always a tendency to float and the Stearman would either climb or descend depending on where in the propwash it was relative to the fuselage and lower wing. The power is available in an instant to hold altitude, but then the speed jumps up again.
Not wanting to push the battery too far, I set up for landing after a solid eight minutes. I took a few attempts at landing and found it best to set up a longer glide path, then hold the model a few feet above the ground until the speed bled off, using power as needed to ease the Stearman onto the runway.
Conclusion
I flew the Super Stearman several times that day, and have roughly 20 flights on it as I write this review. I'm impressed with the build quality and the small grab-and-go size that lets me throw it in the trunk of my car and be off to the field in a jiffy. Note that I wrote field, not park—the Super Stearman eats up so much sky that you need a larger area to fly safely.
The wind will push the little biplane around, especially at slower speeds, but the power system gives you more than enough to easily handle fairly gusty conditions.
The only downside of the Super Stearman is trying to fly it at a scalelike speed. Although not as lumbering as the original Stearman, the full-scale Super Stearman is not a quick aerobat; it's more of a barnstormer.
The Great Planes Super Stearman model is far more than a barnstormer. It's a high-octane thrill ride. If it was red and had Oracle branding on the side, you'd find it a perfect model of Sean D. Tucker's Challenger.
The power system is so strong that it's almost too much. Resist the urge to fly it at full throttle all the time. With some power management, I've been able to coax 10- to 12-minute flights from the Stearman, depending on how wild I was on the sticks.
The Super Stearman is a compact, semiscale model that can hold its own regardless of what you throw at it. The completeness of the kit and the better-than-average flight time (even with aerobatics) make the model an appealing choice.
—Tom Sullivan [email protected]
MANUFACTURER/DISTRIBUTOR:
Great Planes (800) 637-7660 www.greatplanes.com
SOURCES:
- Futaba — (217) 398-8970 — www.futaba-rc.com
- ElectriFly — (217) 398-0007 — www.electrifly.com
- APC Propellers — (530) 661-0399 — www.apcprop.com
- RTL Fasteners — (800) 239-6010 — www.rtlfasteners.com/RC/d.html
Transcribed from original scans by AI. Minor OCR errors may remain.

