

Review: Horizon Hobby Habu 2 EDF BNF-2013/04
Jon Barnes <[email protected]>
Before the autumn of 2009, the only people familiar with the word habu were herpetologists and wordsmiths. Before that time, if you used the word habu in a sentence you were likely talking about one of several different venomous Asian snakes (although in the context of a magazine devoted to model aviation, I need to mention that Habu was also the nickname of the SR-71 Blackbird high-altitude reconnaissance aircraft).
Things changed in late 2009 when ParkZone announced the release of its first electric ducted-fan (EDF) jet model and immediately made the word Habu a part of the vernacular of electric-powered aircraft enthusiasts around the world.
This Z-Foam composition ARF jet featured a power system anchored by the E-flite Delta V 69mm fan and was fast in the air. Its quick and modular assembly, wide speed envelope, and the availability of replacement parts made it a popular electric jet aircraft for intermediate-level pilots.
Within several months of its release, it was not uncommon to routinely see several of them in the air together at club fields and fly-ins. Many of the pilots who were flying pricy turbine-powered aircraft joined the ranks of Habu owners.
What was not to like about a fast-building and affordable ARF that could provide a quick jet fix without needing to reach for the 5-gallon jug of Jet A?
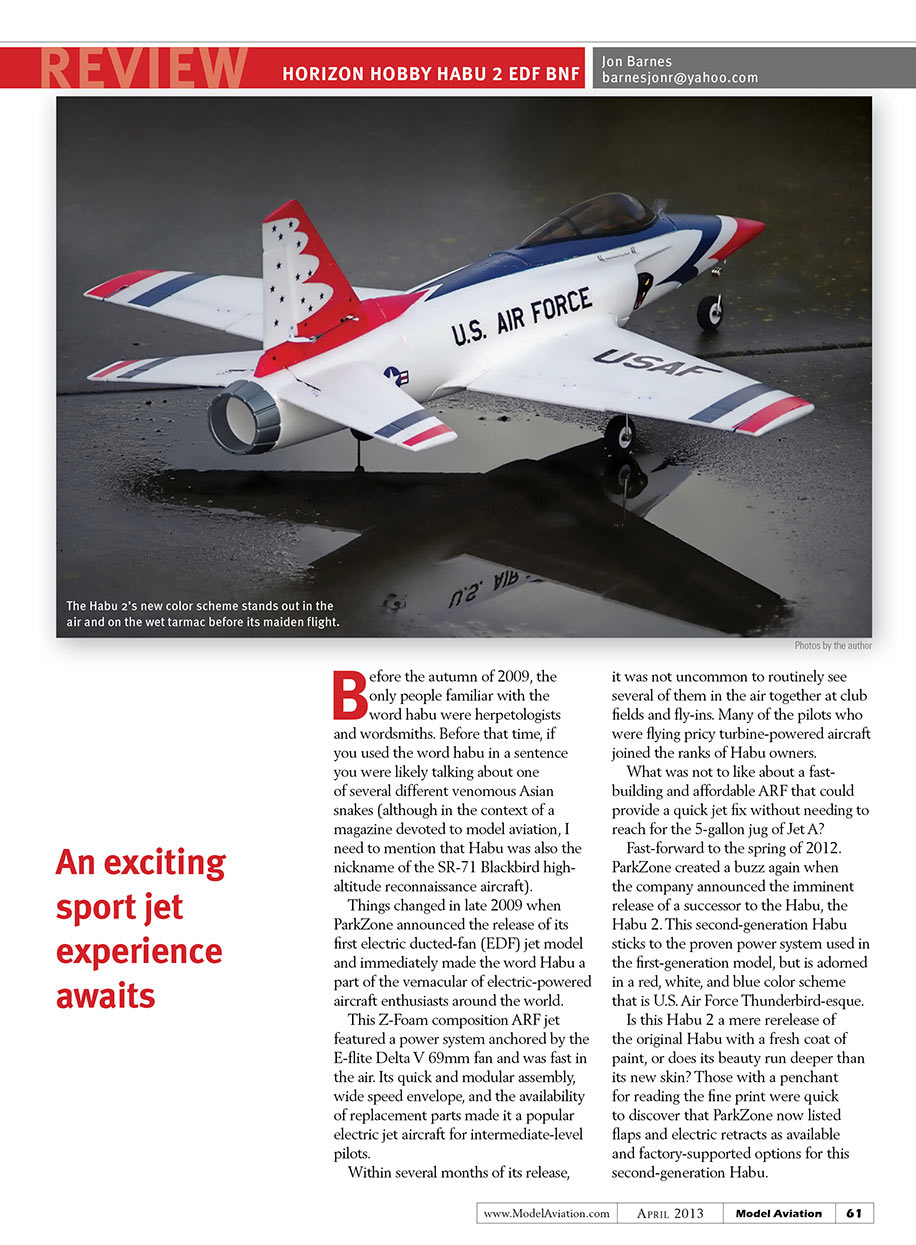
Fast-forward to the spring of 2012. ParkZone created a buzz again when the company announced the imminent release of a successor to the Habu, the Habu 2. This second-generation Habu sticks to the proven power system used in the first-generation model, but is adorned in a red, white, and blue color scheme that is U.S. Air Force Thunderbird-esque.
Is this Habu 2 a mere rerelease of the original Habu with a fresh coat of paint, or does its beauty run deeper than its new skin? Those with a penchant for reading the fine print were quick to discover that ParkZone now listed flaps and electric retracts as available and factory-supported options for this second-generation Habu.
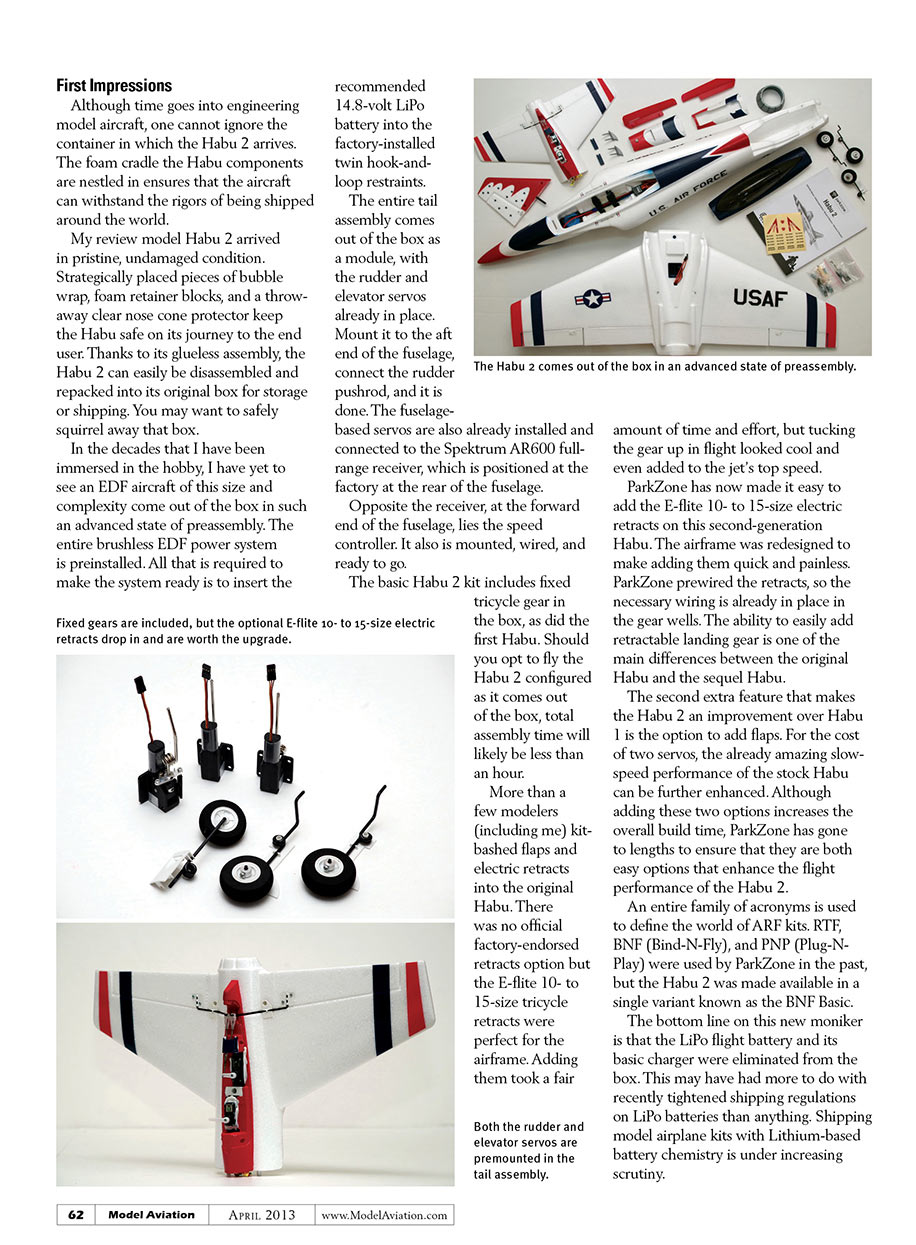
The Habu 2 comes out of the box in an advanced state of preassembly. Fixed gears are included, but the optional E-flite 10- to 15-size electric retracts drop in and are worth the upgrade. Both the rudder and elevator servos are premounted in the tail assembly.
First Impressions
Although time goes into engineering model aircraft, one cannot ignore the container in which the Habu 2 arrives. The foam cradle the Habu components are nestled in ensures that the aircraft can withstand the rigors of being shipped around the world. My review model Habu 2 arrived in pristine, undamaged condition. Strategically placed pieces of bubble wrap, foam retainer blocks, and a throw-away clear nose cone protector keep the Habu safe on its journey to the end user. Thanks to its glueless assembly, the Habu 2 can easily be disassembled and repacked into its original box for storage or shipping. You may want to safely squirrel away that box.
In the decades that I have been immersed in the hobby, I have yet to see an EDF aircraft of this size and complexity come out of the box in such an advanced state of preassembly. The entire brushless EDF power system is preinstalled. All that is required to make the system ready is to insert the recommended 14.8-volt LiPo battery into the factory-installed twin hook-and-loop restraints. The entire tail assembly comes out of the box as a module, with the rudder and elevator servos already in place. Mount it to the aft end of the fuselage, connect the rudder pushrod, and it is done. The fuselage-based servos are also already installed and connected to the Spektrum AR600 full-range receiver, which is positioned at the factory at the rear of the fuselage. Opposite the receiver, at the forward end of the fuselage, lies the speed controller. It also is mounted, wired, and ready to go. The basic Habu 2 kit includes fixed tricycle gear in the box, as did the first Habu. Should you opt to fly the Habu 2 configured as it comes out of the box, total assembly time will likely be less than an hour.
More than a few modelers (including me) kit-bashed flaps and electric retracts into the original Habu. There was no official factory-endorsed retracts option but the E-flite 10- to 15-size tricycle retracts were perfect for the airframe. Adding them took a fair amount of time and effort, but tucking the gear up in flight looked cool and even added to the jet’s top speed.
ParkZone has now made it easy to add the E-flite 10- to 15-size electric retracts on this second-generation Habu. The airframe was redesigned to make adding them quick and painless. ParkZone prewired the retracts, so the necessary wiring is already in place in the gear wells. The ability to easily add retractable landing gear is one of the main differences between the original Habu and the sequel Habu.
The second extra feature that makes the Habu 2 an improvement over Habu 1 is the option to add flaps. For the cost of two servos, the already amazing slow-speed performance of the stock Habu can be further enhanced. Although adding these two options increases the overall build time, ParkZone has gone to lengths to ensure that they are both easy options that enhance the flight performance of the Habu 2.
An entire family of acronyms is used to define the world of ARF kits. RTF, BNF (Bind-N-Fly), and PNP (Plug-N-Play) were used by ParkZone in the past, but the Habu 2 was made available in a single variant known as the BNF Basic.
The bottom line on this new moniker is that the LiPo flight battery and its basic charger were eliminated from the box. This may have more to do with recently tightened shipping regulations on LiPo batteries than anything. Shipping model airplane kits with lithium-based battery chemistry is under increasing scrutiny.
Hobby shops that sell ParkZone products will likely stock the necessary and appropriate battery for the Habu 2. The type of charger typically included in the box with a kit such as the Habu 2 is an entry-level unit. The majority of intermediate modelers, to whom this product is marketed, will either already own a more advanced and faster-performing charger or will easily be able to seek out and purchase one.
Construction
The Habu 2 is a glueless, modular ARF kit. Assembly is limited to attaching the landing gear to the wing and fuselage, mounting the empennage assembly, and attaching the wing to the fuselage. Most of the other details have already been addressed by factory personnel.
One will have to bind the included Spektrum AR600 receiver to their transmitter, obtain and charge a LiPo battery, and then set up the radio. The total required effort is minimal.
Should you choose to use the included fixed tricycle gear, you can probably assemble the Habu in less than 60 minutes. If you prefer to add the optional electric retracts and flaps, the total assembly time may be two hours.
Adding retracts in the original Habu required that you own a Dremel and weren't afraid to use it. Preparing the airframe to accept the tricycle retracts required enough material removal to qualify the operation as major surgery. The wing was barely thick enough to accommodate them. I accidentally punched through in one place when installing mine and had to strategically add a new graphic.
Adding the E-flite electric retracts requires a screwdriver, but you must unholster the Dremel to trim the length of the coil struts and axles. ParkZone preinstalls the landing gear servo leads in the airframe.
Remove the blue gear cover dummy plates, slide the retracts into position, and secure each with four mounting screws. The retract package includes a three-to-one adapter harness that is used to connect all three retract units to channel five on the Spektrum AR600 receiver.
One important detail not addressed in the assembly manual involves the orientation of the wheel and tire assemblies. All three wheels are concave on one side. Install the nose wheel improperly, and it will be prone to catch on the outer plate that outlines the nose gear bay opening.
ParkZone paid close attention to the little details on the Habu 2, such as making the multicolored stripes on the nose gear opening plate perfectly align with the stripes on the fuselage.
Activating the optional flaps is a straightforward proposition, although it is best to connect them to your receiver and configure them for correct operation before you glue them permanently into the wing pockets.
Removing the blue-and-white tape that hides the channel routing the servo leads across the bottom of the wing is necessary to route the flaps servo leads. The adhesive on this should be tackier; once removed, it did not want to stick in place.
Few fasteners are needed to assemble the Habu 2, but it would be advantageous to label the packaging to prevent confusion. The instructions clearly state the size and length of each fastener for any given step.
Flying
Intermediate and advanced pilots will instantly be comfortable flying the Habu 2. It is a well-mannered sport EDF jet. Newer jet pilots may be slightly challenged by its performance envelope. Flying a jet requires staying ahead of it at all times.
At wide-open throttle, the Habu 2 will quickly eat up sky. As an ARF EDF, it is surprisingly fast out of the box and speeds can reach roughly 80 mph on the stock power system. The Habu 2 is designed to be forgiving in flight and serves as a capable sport EDF with which to improve one's jet skills. It can be safely slowed to speeds that would cause other jet models to fall from the sky.
It is not uncommon to have a jet wander off course as it accelerates down the runway because of a poorly engineered nose wheel steering system. This is not true of the Habu 2. The robust construction and arrangement of the nose gear steering system belies good design and engineering.
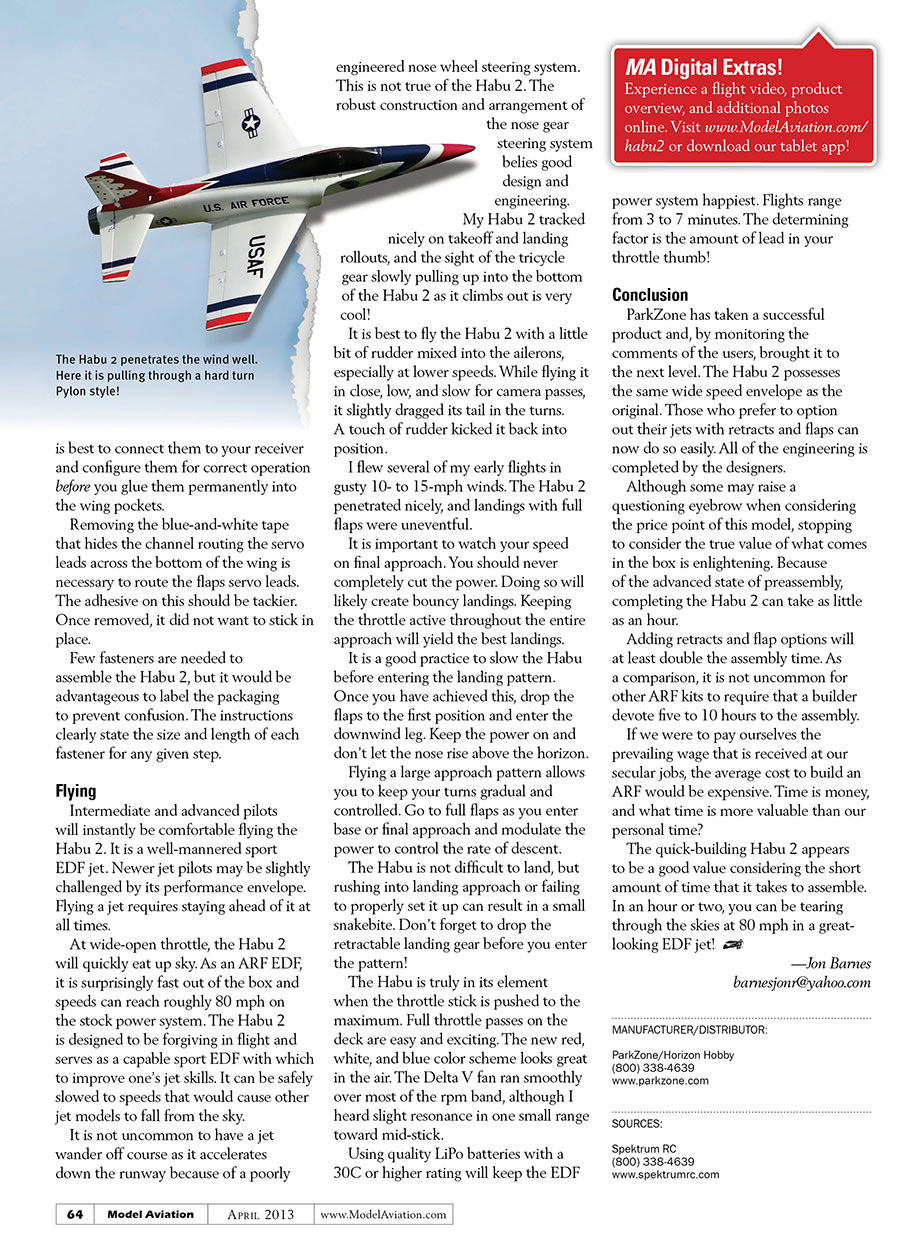
My Habu 2 tracked nicely on takeoff and landing rollouts, and the sight of the tricycle gear slowly pulling up into the bottom of the Habu 2 as it climbs out is very cool!
It is best to fly the Habu 2 with a little bit of rudder mixed into the ailerons, especially at lower speeds. While flying it in close, low, and slow for camera passes, it slightly dragged its tail in the turns. A touch of rudder kicked it back into position.
I flew several of my early flights in gusty 10- to 15-mph winds. The Habu 2 penetrated nicely, and landings with full flaps were uneventful.
It is important to watch your speed on final approach. You should never completely cut the power. Doing so will likely create bouncy landings. Keeping the throttle active throughout the entire approach will yield the best landings.
It is a good practice to slow the Habu before entering the landing pattern. Once you have achieved this, drop the flaps to the first position and enter the downwind leg. Keep the power on and don't let the nose rise above the horizon.
Flying a large approach pattern allows you to keep your turns gradual and controlled. Go to full flaps as you enter base or final approach and modulate the power to control the rate of descent.
The Habu is not difficult to land, but rushing into landing approach or failing to properly set it up can result in a small snakebite. Don't forget to drop the retractable landing gear before you enter the pattern!
The Habu is truly in its element when the throttle stick is pushed to the maximum. Full throttle passes on the deck are easy and exciting. The new red, white, and blue color scheme looks great in the air. The Delta V fan ran smoothly over most of the rpm band, although I heard slight resonance in one small range toward mid-stick.
Using quality LiPo batteries with a 30C or higher rating will keep the EDF power system happiest. Flights range from 3 to 7 minutes. The determining factor is the amount of lead in your throttle thumb!
Conclusion
ParkZone has taken a successful product and, by monitoring the comments of the users, brought it to the next level. The Habu 2 possesses the same wide speed envelope as the original. Those who prefer to option out their jets with retracts and flaps can now do so easily. All of the engineering is completed by the designers.
Although some may raise a questioning eyebrow when considering the price point of this model, stopping to consider the true value of what comes in the box is enlightening. Because of the advanced state of preassembly, completing the Habu 2 can take as little as an hour.
Adding retracts and flap options will at least double the assembly time. As a comparison, it is not uncommon for other ARF kits to require that a builder devote five to 10 hours to the assembly.
If we were to pay ourselves the prevailing wage that is received at our secular jobs, the average cost to build an ARF would be expensive. Time is money, and what time is more valuable than our personal time?
The quick-building Habu 2 appears to be a good value considering the short amount of time that it takes to assemble. In an hour or two, you can be tearing through the skies at 80 mph in a great-looking EDF jet!
—Jon Barnes [email protected]
MANUFACTURER/DISTRIBUTOR:
- ParkZone/Horizon Hobby
- (800) 338-4639
- www.parkzone.com
SOURCES:
- Spektrum RC
- (800) 338-4639
- www.spektrumrc.com
Transcribed from original scans by AI. Minor OCR errors may remain.

