
RETRO RC E'SINBAD THE SAILOR 36
Jerry Smith [email protected]
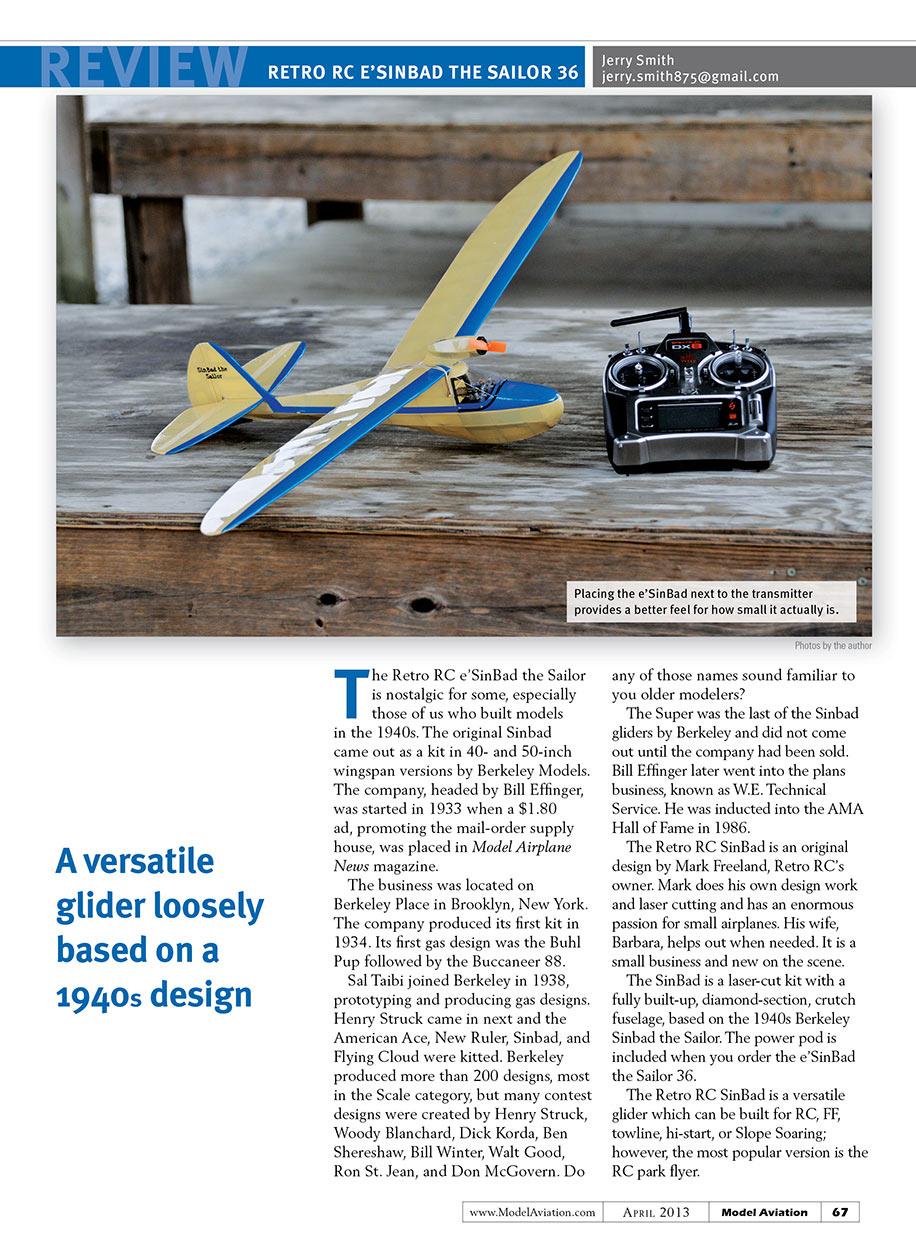
The Retro RC e'SinBad the Sailor is nostalgic for some, especially those of us who built models in the 1940s. The original Sinbad came out as a kit in 40- and 50-inch wingspan versions by Berkeley Models. The company, headed by Bill Effinger, was started in 1933 when a $1.80 ad promoting the mail-order supply house was placed in Model Airplane News magazine. The business was located on Berkeley Place in Brooklyn, New York. The company produced its first kit in 1934. Its first gas design was the Buhl Pup followed by the Buccaneer 88. Sal Taibi joined Berkeley in 1938, prototyping and producing gas designs. Henry Struck came in next and the American Ace, New Ruler, Sinbad, and Flying Cloud were kitted. Berkeley produced more than 200 designs, most in the Scale category, but many contest designs were created by Henry Struck, Woody Blanchard, Dick Korda, Ben Shereshaw, Bill Winter, Walt Good, Ron St. Jean, and Don McGovern. The Super was the last of the Sinbad gliders by Berkeley and did not come out until the company had been sold. Bill Effinger later went into the plans business, known as W.E. Technical Service. He was inducted into the AMA Hall of Fame in 1986.
The Retro RC SinBad is an original design by Mark Freeland, Retro RC's owner. Mark does his own design work and laser cutting and has an enormous passion for small airplanes. His wife, Barbara, helps out when needed. It is a small business and new on the scene. The SinBad is a laser-cut kit with a fully built-up, diamond-section crutch fuselage, based on the 1940s Berkeley Sinbad the Sailor. The optional electric power pod is included when you order the e'SinBad the Sailor 36 and transforms the SinBad into a docile park flyer when sandwiched between the wings on the wing joiner wires.
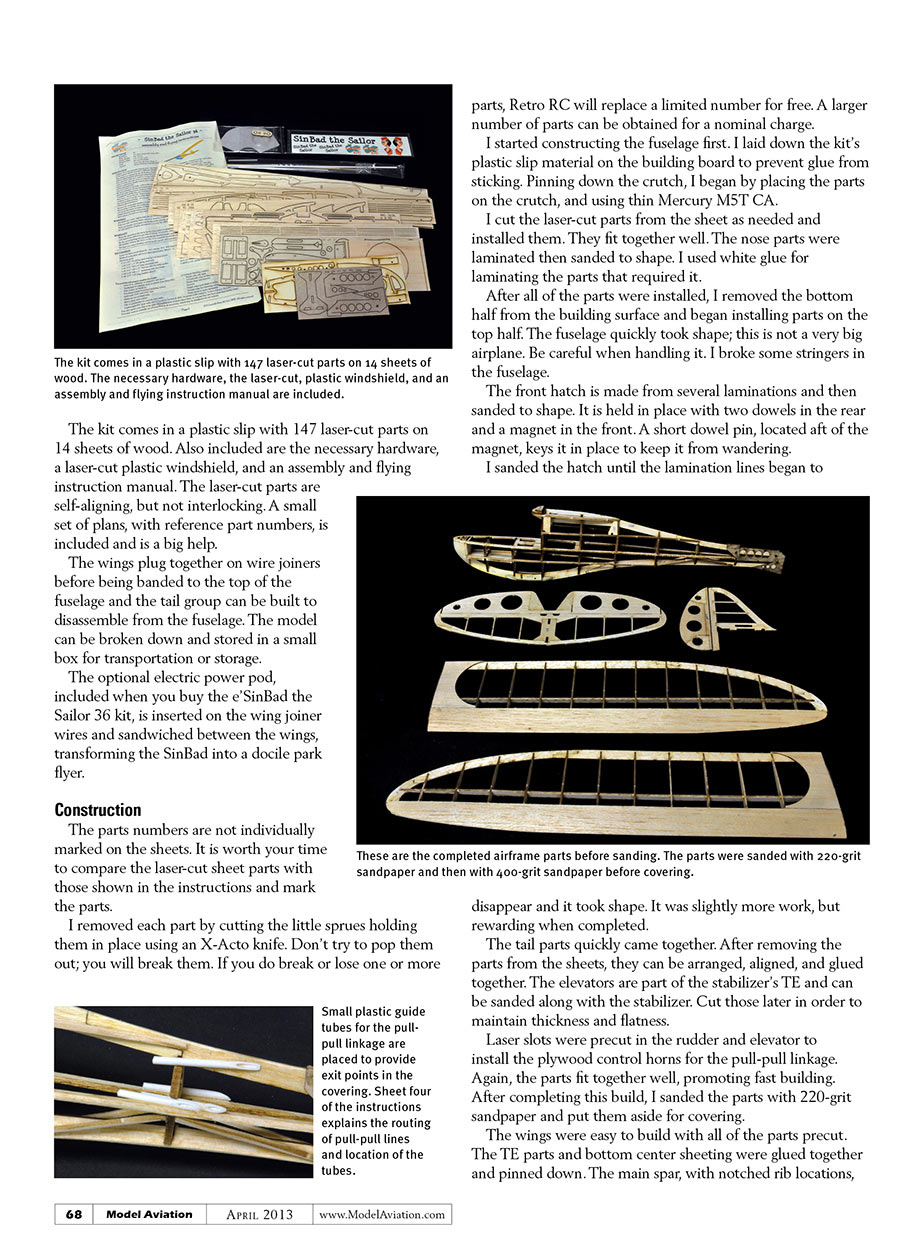
The SinBad is a versatile glider which can be built for RC, FF, towline, hi-start, or slope soaring; however, the most popular version is the RC park flyer. The kit comes in a plastic slip with 147 laser-cut parts on 14 sheets of wood. The necessary hardware, a laser-cut plastic windshield, and an assembly and flying instruction manual are included. The laser-cut parts are self-aligning, but not interlocking. A small set of plans, with reference part numbers, is included and is a big help. The wings plug together on wire joiners before being banded to the top of the fuselage and the tail group can be built to disassemble from the fuselage. The model can be broken down and stored in a small box for transportation or storage.
Construction
The parts numbers are not individually marked on the sheets. It is worth your time to compare the laser-cut sheet parts with those shown in the instructions and mark the parts. Remove each part by cutting the little sprues holding them in place using an X-Acto knife — don’t try to pop them out or you will break them. If you do break or lose one or more parts, Retro RC will replace a limited number for free; a larger number of parts can be obtained for a nominal charge.
I started constructing the fuselage first. I laid down the kit’s plastic slip material on the building board to prevent glue from sticking. Pinning down the crutch, I began by placing the parts on the crutch and using thin Mercury M5T CA. I cut the laser-cut parts from the sheet as needed and installed them; they fit together well. The nose parts were laminated then sanded to shape. I used white glue for laminating the parts that required it.
After all of the parts were installed on the bottom half, I removed it from the building surface and began installing parts on the top half. The fuselage quickly took shape; this is not a very big airplane, so be careful when handling it — I broke some stringers in the fuselage. The front hatch is made from several laminations and then sanded to shape. It is held in place with two dowels in the rear and a magnet in the front. A short dowel pin, located aft of the magnet, keys it in place to keep it from wandering. I sanded the hatch until the lamination lines began to disappear; it took a bit more work but was rewarding when completed.
The tail parts quickly came together. After removing the parts from the sheets, they can be arranged, aligned, and glued together. The elevators are part of the stabilizer's trailing edge and can be sanded along with the stabilizer; cut them later to maintain thickness and flatness. Laser slots were precut in the rudder and elevator to install the plywood control horns for the pull-pull linkage. Again, the parts fit together well, promoting fast building. After completing this stage I sanded the parts with 220-grit sandpaper and put them aside for covering.
The wings were easy to build with all of the parts precut. The trailing-edge parts and bottom center sheeting were glued together and pinned down. The main spar, with notched rib locations, was installed and pinned. The ribs and top center sheeting were added and pinned in place. The wing panels were built on the bench before joining. The wings were joined on the bench using the dihedral/wing joiner wires and checked for proper alignment. The tips were sanded to shape and the aileron servo cutouts were made.
After gluing the ribs in place, the leading edge went on next, followed by the top spar. Before installing the top sheeting, I installed the aluminum tubing for the wire wing joiners in the end of the wing with 30-minute Mercury epoxy and capped it off with a plywood rib. The top sheeting was laser cut to shape and was applied with Mercury MST CA. Leave the panels flat until the glue cures to prevent warping. The parts fit well and the assembly was straightforward.
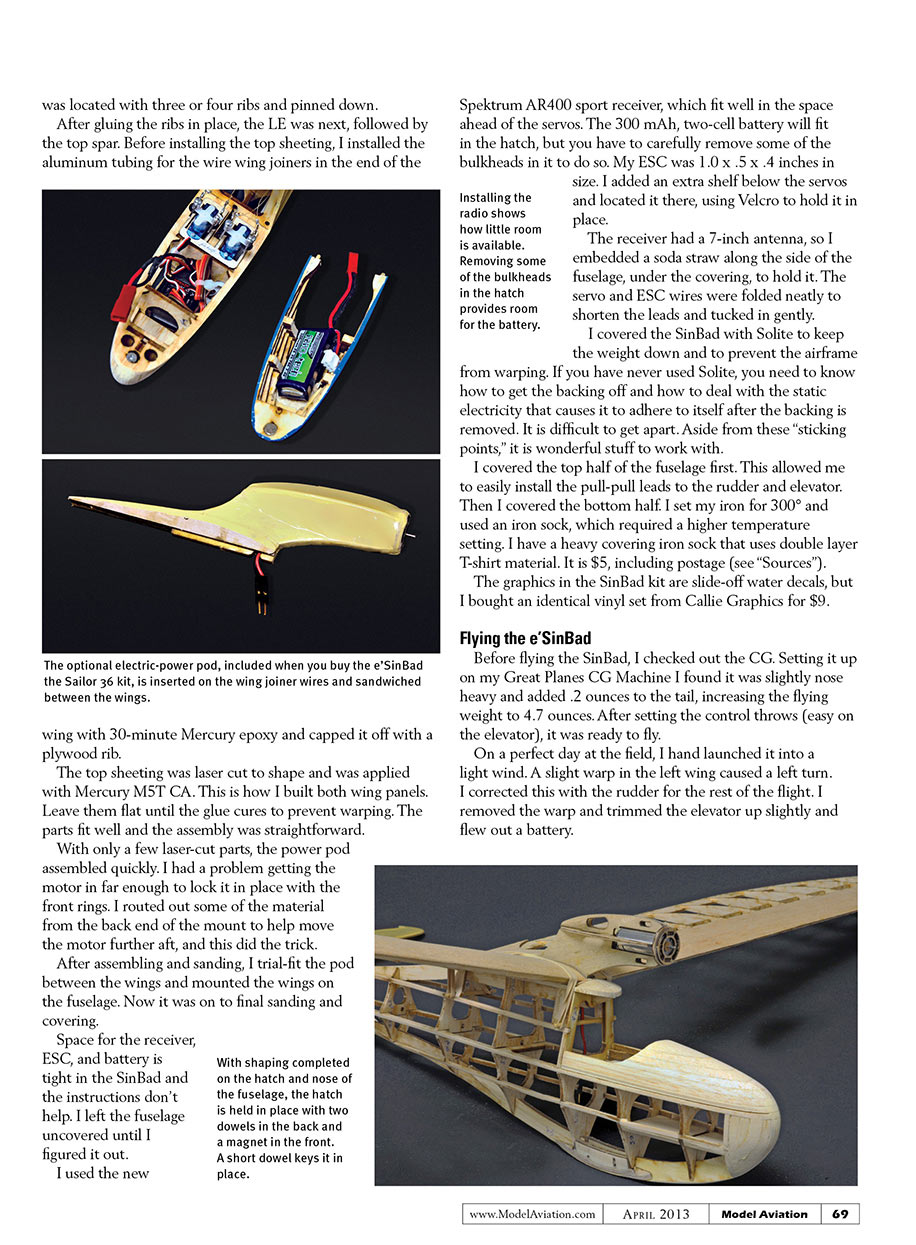
With only a few laser-cut parts, the power pod assembled quickly. I had a problem getting the motor in far enough to lock it in place with the front rings, so I routed out some material from the back end of the mount to move the motor further aft — that solved it. After assembling and sanding, I trial-fit the pod between the wings and mounted the wings on the fuselage. Then came final sanding and covering.
Space for the receiver, ESC, and battery is tight in the SinBad and the instructions don’t provide detailed help. I left the fuselage uncovered until I figured it out. I used the new Spektrum AR400 sport receiver, which fit well in the space ahead of the servos. A 300 mAh two-cell battery will fit in the hatch, but you have to carefully remove some of the bulkheads to do so. My ESC measured 1.0 x 0.5 x 0.4 inches; I added an extra shelf below the servos and located the ESC there, using Velcro to hold it in place.
The receiver had a 7-inch antenna, so I embedded a soda straw along the side of the fuselage, under the covering, to hold it. The servo and ESC wires were folded neatly to shorten the leads and tucked in gently.
I covered the SinBad with Solite to keep the weight down and to prevent the airframe from warping. If you have never used Solite, learn how to remove the backing and how to deal with the static electricity that causes it to adhere to itself after the backing is removed — it can be difficult to get apart. Aside from these "sticking points," it is wonderful stuff to work with.
I covered the top half of the fuselage first. This allowed me to easily install the pull-pull leads to the rudder and elevator, then I covered the bottom half. I set my iron to 300°F and used an iron sock, which required a higher temperature setting. I have a heavy covering iron sock that uses double-layer T-shirt material; it cost $5 including postage (see "Sources").
The graphics in the SinBad kit are slide-off water decals, but I bought an identical vinyl set from Callie Graphics for $9.
Flying the e'SinBad
Before flying, I checked the CG. Setting it up on my Great Planes CG Machine I found it was slightly nose heavy and added 0.2 ounces to the tail, increasing the flying weight to 4.7 ounces. After setting the control throws (easy on the elevator), it was ready to fly.
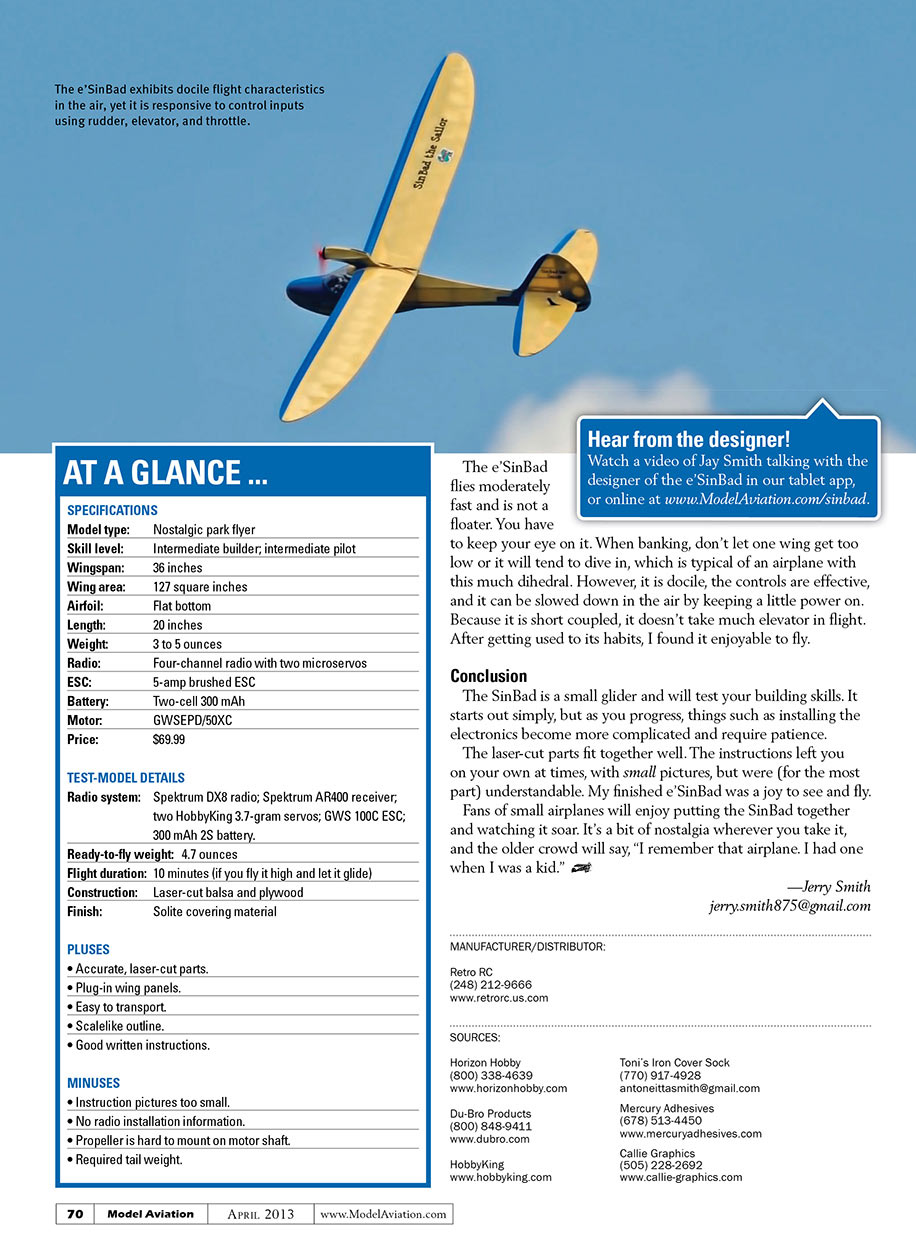
On a perfect day at the field, I hand-launched it into a light wind. A slight warp in the left wing caused a left turn; I corrected this with the rudder for the rest of the flight. I removed the warp, trimmed the elevator up slightly, and flew out a battery. The e'SinBad exhibits docile flight characteristics in the air, yet it is responsive to control inputs using rudder, elevator, and throttle.
The e'SinBad flies moderately fast and is not a floater — you have to keep your eye on it. When banking, don’t let one wing get too low or it will tend to dive in, which is typical of an airplane with this much dihedral. However, it is docile, the controls are effective, and it can be slowed down in the air by keeping a little power on. Because it is short-coupled, it doesn’t take much elevator in flight. After getting used to its habits, I found it enjoyable to fly.
AT A GLANCE ...
SPECIFICATIONS
- Model type: Nostalgic park flyer
- Skill level: Intermediate builder; intermediate pilot
- Wingspan: 36 inches
- Wing area: 127 square inches
- Airfoil: Flat bottom
- Length: 20 inches
- Weight: 3 to 5 ounces
- Radio: Four-channel radio with two microservos
- ESC: 5-amp brushed ESC
- Battery: Two-cell 300 mAh
- Motor: GWSEPD/50XC
- Price: $69.99
TEST-MODEL DETAILS
- Radio system: Spektrum DX8 radio; Spektrum AR400 receiver; two HobbyKing 3.7-gram servos; GWS 100C ESC; 300 mAh 2S battery
- Ready-to-fly weight: 4.7 ounces
- Flight duration: 10 minutes (if you fly it high and let it glide)
- Construction: Laser-cut balsa and plywood
- Finish: Solite covering material
PLUSES
- Accurate, laser-cut parts
- Plug-in wing panels
- Easy to transport
- Scale-like outline
- Good written instructions
MINUSES
- Instruction pictures too small
- No radio installation information
- Propeller is hard to mount on motor shaft
- Required tail weight
Hear from the designer!
Watch a video of Jay Smith talking with the designer of the e'SinBad in our tablet app, or online at www.ModelAviation.com/sinbad.
Conclusion
The SinBad is a small glider and will test your building skills. It starts out simply, but as you progress, things such as installing the electronics become more complicated and require patience.
The laser-cut parts fit together well. The instructions leave you on your own at times, with small pictures, but are (for the most part) understandable. My finished e'SinBad was a joy to see and fly.
Fans of small airplanes will enjoy putting the SinBad together and watching it soar. It’s a bit of nostalgia wherever you take it, and the older crowd will say, “I remember that airplane. I had one when I was a kid.”
— Jerry Smith [email protected]
MANUFACTURER/DISTRIBUTOR: Retro RC (248) 212-9666 www.retrorc.us.com
SOURCES:
- Horizon Hobby — (800) 338-4639 — www.horizonhobby.com
- Du-Bro Products — (800) 848-9411 — www.dubro.com
- HobbyKing — www.hobbyking.com
- Toni’s Iron Cover Sock — (770) 417-4928 — [email protected]
- Mercury Adhesives — (678) 513-4450 — www.mercuryadhesives.com
- Callie Graphics — (505) 228-2692 — www.callie-graphics.com
Transcribed from original scans by AI. Minor OCR errors may remain.

