
ROCHOBBY STREGA P-51
Jon Barnes [email protected]
I am smitten with electric-powered, fixed-wing RC aircraft, and I spend way too much time looking at and lusting after that next must-have airplane. When I saw MotionRC’s video of the new RocHobby Strega P-51, I was almost instantly in love with it!
I have a soft spot in my heart for warbirds. Many of the aircraft that fly at the Reno National Championship Air Races each year are retired warbirds. The extreme makeovers that these super-high-performance, modified vintage airplanes undergo are incredible.
There is every indication that RocHobby intends to create an entire series of models based on some of the more infamous Reno racing warbirds. The second model to appear in the RocHobby Reno Racers series is the Strega P-51. (The first was a Sea Fury known on the racing circuit as Critical Mass.)
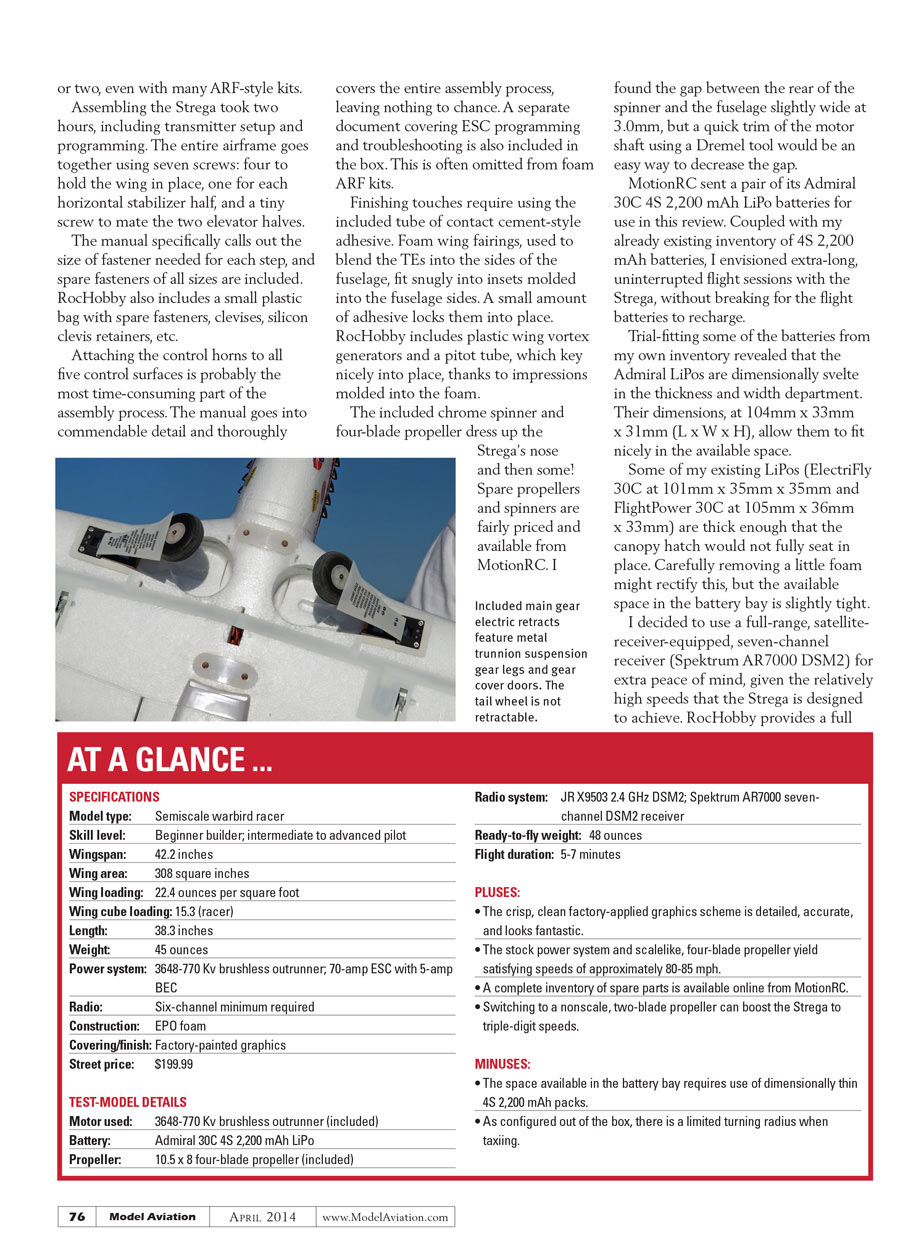
Manufactured from durable, ding-resistant Expanded Polyolefin (EPO) foam, this brilliant red-and-white model is capable of speeds in excess of 85 mph using the factory-installed, four-cell LiPo-powered brushless power system. The included electric, servo-less retracts sport metal trunnion struts.
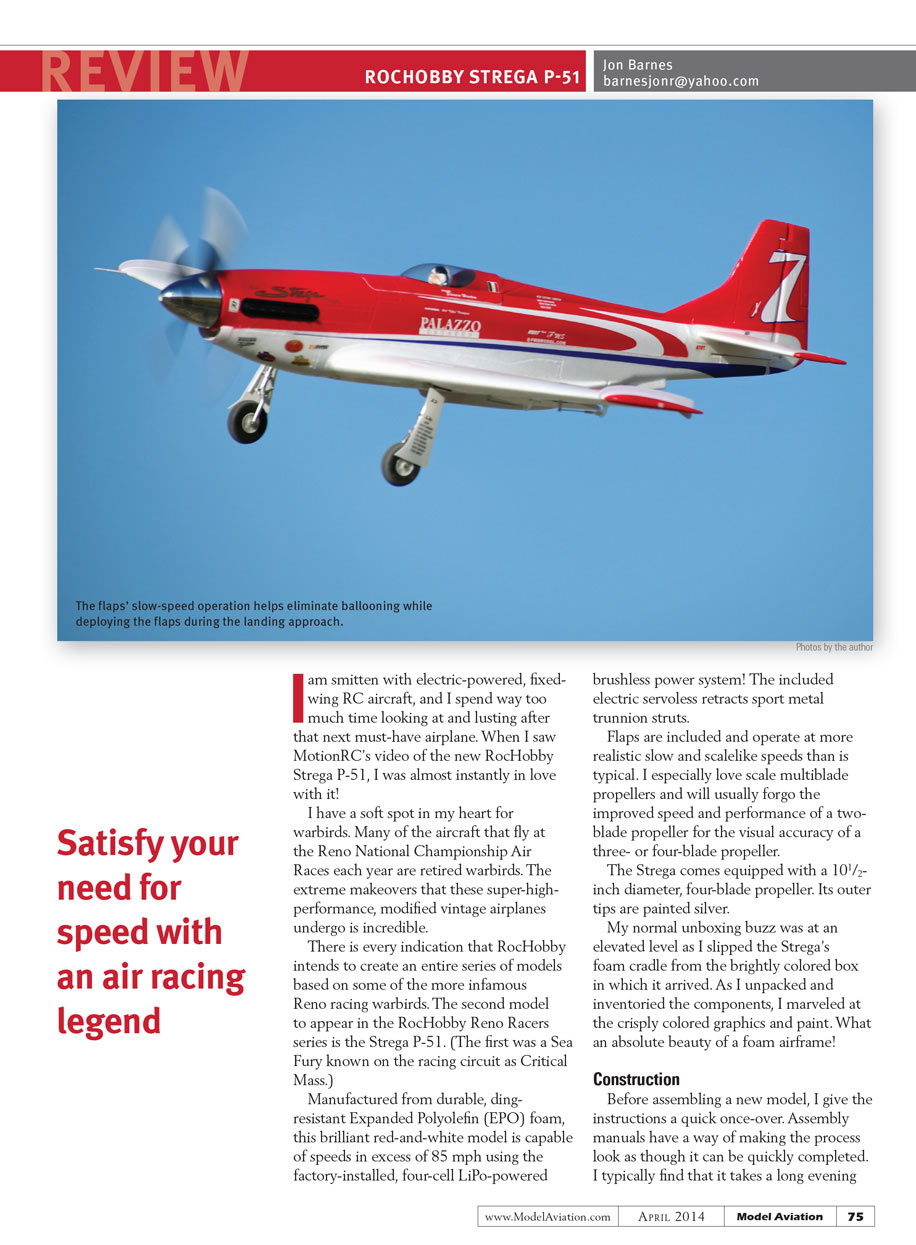
Flaps are included and operate at more realistic, slow, scale-like speeds than is typical. I especially love scale multiblade propellers and will usually forgo the improved speed and performance of a two-blade propeller for the visual accuracy of a three- or four-blade propeller.
The Strega comes equipped with a 10 1/2-inch-diameter, four-blade propeller. Its outer tips are painted silver.
My usual unboxing buzz was elevated as I slipped the Strega’s foam cradle from the brightly colored box in which it arrived. As I unpacked and inventoried the components, I marveled at the crisply colored graphics and paint. What an absolute beauty of a foam airframe!
Construction
Before assembling a new model, I give the instructions a quick once-over. Assembly manuals have a way of making the process look as though it can be quickly completed. I typically find that it takes a long evening or two, even with many ARF-style kits.
Assembling the Strega took about two hours, including transmitter setup and programming. The entire airframe goes together using seven screws: four to hold the wing in place, one for each horizontal stabilizer half, and a tiny screw to mate the two elevator halves. The manual specifically calls out the size of fastener needed for each step, and spare fasteners of all sizes are included. RocHobby also includes a small plastic bag with spare fasteners, clevises, silicone clevis retainers, etc.
Attaching the control horns to all five control surfaces is probably the most time-consuming part of the assembly process. The manual goes into commendable detail and thoroughly covers the entire assembly process, leaving nothing to chance. A separate document covering ESC programming and troubleshooting is also included in the box — something often omitted from foam ARF kits.
Finishing touches require using the included tube of contact-cement-style adhesive. Foam wing fairings, used to blend the trailing edges into the sides of the fuselage, fit snugly into insets molded into the fuselage sides. A small amount of adhesive locks them into place. RocHobby includes plastic wing vortex generators and a pitot tube, which key neatly into place thanks to impressions molded into the foam.
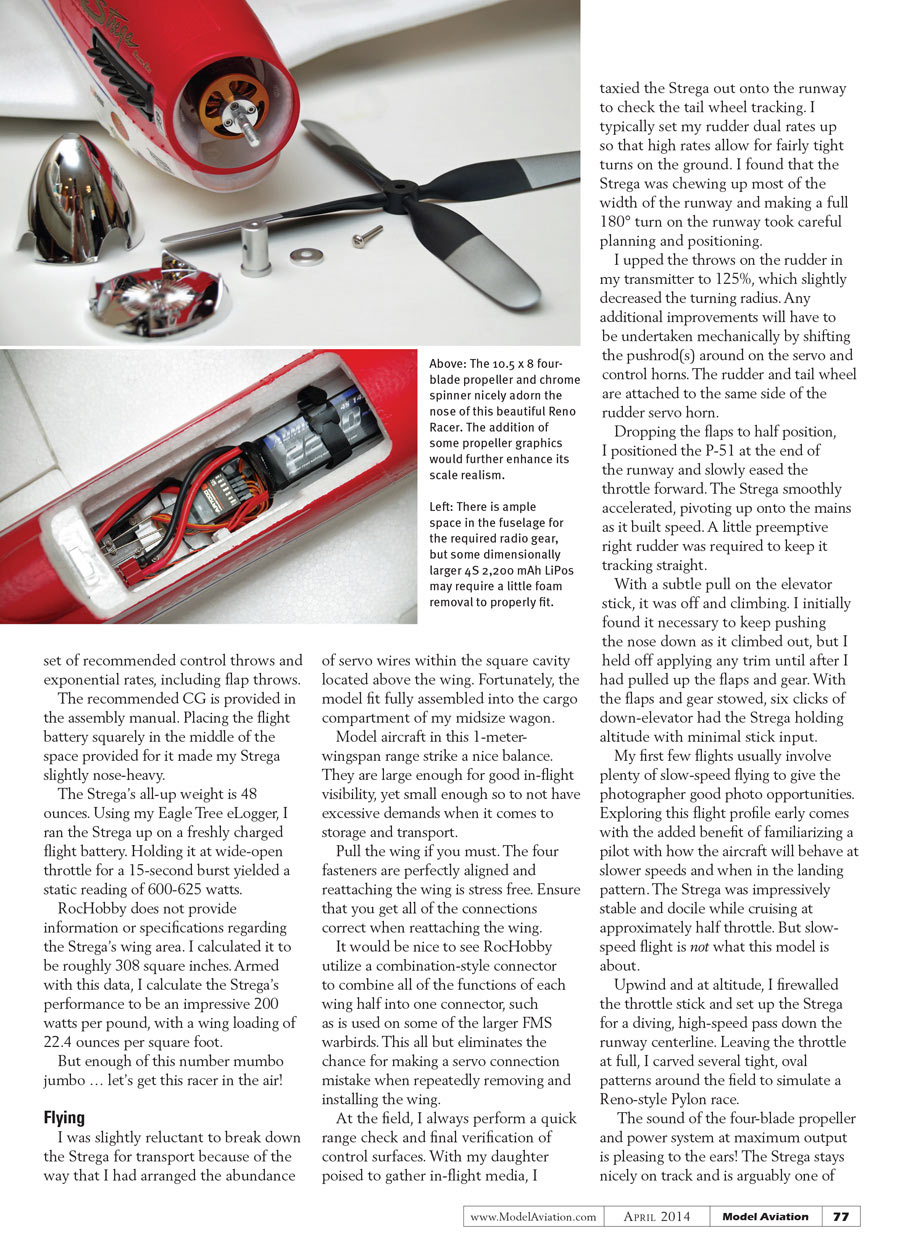
The included chrome spinner and four-blade propeller dress up the Strega’s nose and then some. Spare propellers and spinners are fairly priced and available from MotionRC. I found the gap between the rear of the spinner and the fuselage slightly wide at 3.0 mm, but a quick trim of the motor shaft using a Dremel tool would be an easy way to decrease the gap. MotionRC sent a pair of its Admiral 30C 4S 2,200 mAh LiPo batteries for use in this review. Coupled with my existing inventory of 4S 2,200 mAh batteries, I envisioned extra-long, uninterrupted flight sessions with the Strega without breaking for battery recharge.
Trial-fitting some of the batteries from my own inventory revealed that the Admiral LiPos are dimensionally svelte in thickness and width. Their dimensions — 104 mm x 33 mm x 31 mm (L x W x H) — allow them to fit nicely in the available space.
Some of my existing LiPos (ElectriFly 30C at 101 mm x 35 mm x 35 mm and FlightPower 30C at 105 mm x 36 mm x 33 mm) are thick enough that the canopy hatch would not fully seat. Carefully removing a little foam might rectify this, but the available space in the battery bay is slightly tight.
I decided to use a full-range, satellite-receiver-equipped, seven-channel receiver (Spektrum AR7000 DSM2) for extra peace of mind, given the relatively high speeds that the Strega is designed to achieve. RocHobby provides a full set of recommended control throws and exponential rates, including flap throws.
The recommended CG is provided in the assembly manual. Placing the flight battery squarely in the middle of the space provided made my Strega slightly nose-heavy.
The Strega's all-up weight is 48 ounces. Using my Eagle Tree eLogger, I ran the Strega up on a freshly charged flight battery. Holding it at wide-open throttle for a 15-second burst yielded a static reading of 600–625 watts.
RocHobby does not provide information or specifications regarding the Strega's wing area. I calculated it to be roughly 308 square inches. Armed with this data, I calculate the Strega's performance to be an impressive 200 watts per pound, with a wing loading of 22.4 ounces per square foot.
But enough of this number mumbo-jumbo — let's get this racer in the air!
Flying
I was slightly reluctant to break down the Strega for transport because of the way I had arranged the abundance of servo wires within the square cavity located above the wing. Fortunately, the model fit fully assembled into the cargo compartment of my midsize wagon.
Model aircraft in this 1-meter-wingspan range strike a nice balance. They are large enough for good in-flight visibility, yet small enough not to have excessive demands when it comes to storage and transport.
If you must pull the wing, the four fasteners are perfectly aligned and reattaching the wing is stress free. Ensure that you get all of the connections correct when reattaching the wing. It would be nice to see RocHobby utilize a combination-style connector to combine all of the functions of each wing half into one connector, such as is used on some of the larger FMS warbirds. This all but eliminates the chance of a servo-connection mistake when repeatedly removing and installing the wing.
At the field, I always perform a quick range check and final verification of all control surfaces. With my daughter poised to gather in-flight media, I taxied the Strega out onto the runway to check the tail-wheel tracking. I typically set my rudder dual rates so that high rates allow for fairly tight turns on the ground. I found that the Strega was chewing up most of the width of the runway, and making a full 180° turn on the runway took careful planning and positioning.
I upped the throws on the rudder in my transmitter to 125%, which slightly decreased the turning radius. Any additional improvements will have to be undertaken mechanically by shifting the pushrods around on the servo and control horns. The rudder and tail wheel are attached to the same side of the rudder servo horn.
Dropping the flaps to half position, I positioned the P-51 at the end of the runway and slowly eased the throttle forward. The Strega smoothly accelerated, pivoting up onto the mains as it built speed. A little preemptive right rudder was required to keep it tracking straight.
With a subtle pull on the elevator stick, it was off and climbing. I initially found it necessary to keep pushing the nose down as it climbed out, but I held off applying any trim until after I had pulled up the flaps and gear. With the flaps and gear stowed, six clicks of down-elevator had the Strega holding altitude with minimal stick input.
My first few flights usually involve plenty of slow-speed flying to give the photographer good photo opportunities. Exploring this flight profile early comes with the added benefit of familiarizing a pilot with how the aircraft will behave at slower speeds and when in the landing pattern. The Strega was impressively stable and docile while cruising at approximately half throttle. But slow-speed flight is not what this model is about.
Upwind and at altitude, I firewalled the throttle stick and set up the Strega for a diving, high-speed pass down the runway centerline. Leaving the throttle at full, I carved several tight, oval patterns around the field to simulate a Reno-style pylon race.
The sound of the four-blade propeller and power system at maximum output is pleasing to the ears. The Strega stays nicely on track and is arguably one of the most stable aircraft that I have flown in several years.
My first flights took place on a day when the winds were almost nil, with temperatures in the high 60s. Under these nearly ideal conditions, the aircraft’s in-flight behavior inspired confidence.
On the second battery, I repeatedly brought the Strega in fast and low for photos. With each successive pass, I eased it slightly closer to the ground, but the Strega never felt as though it had any surprises waiting for me. This airplane stays aimed where you tell it to go, and it looks so good in the air — what is not to love about red, white, and chrome?
Flipping the gear and flaps switches, I made a few dirty passes for the camera and entered the downwind for landing. I like to keep my approaches large and lazy, with sweeping, gradual turns through each leg. I settled the Strega on final, holding roughly 20% throttle until I crossed the threshold.
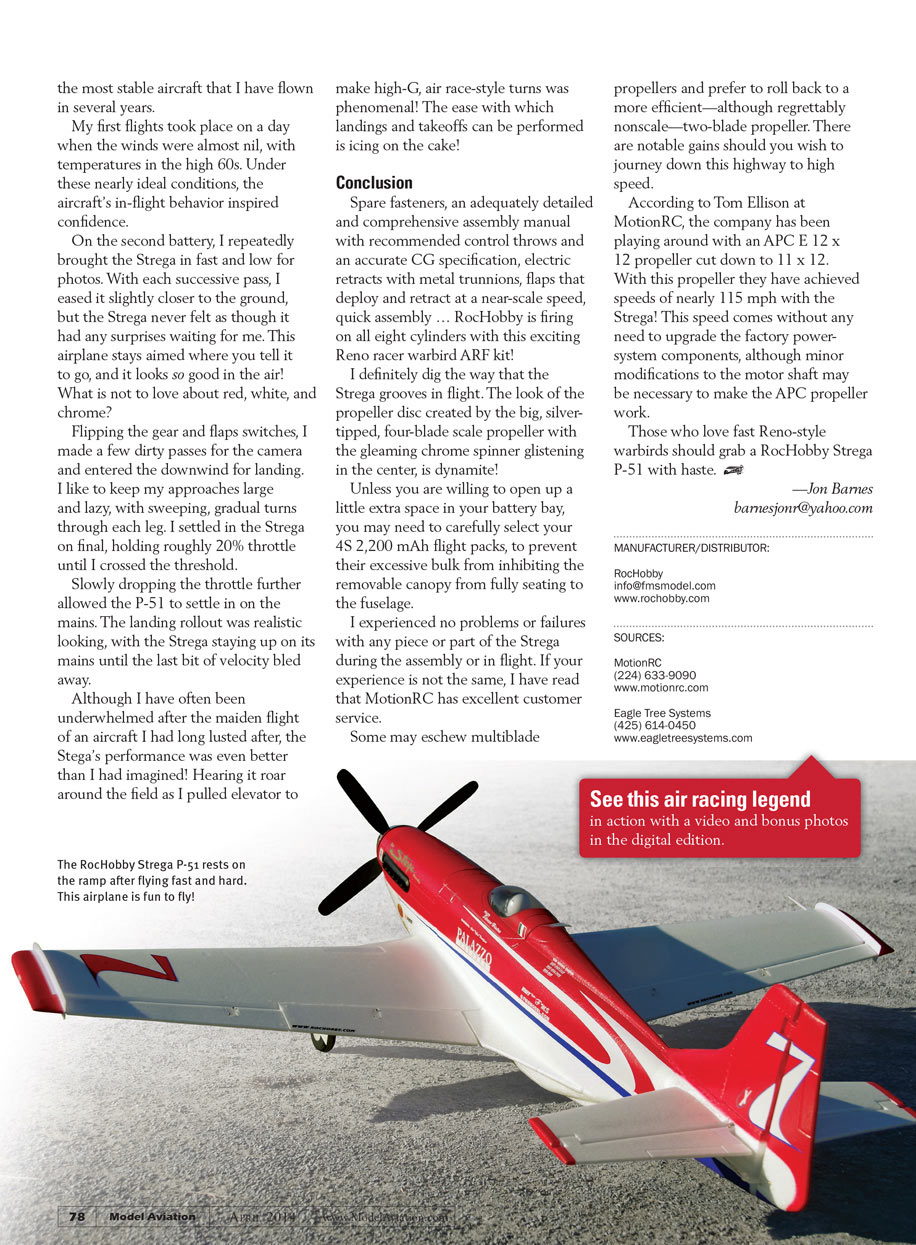
Slowly dropping the throttle further allowed the P-51 to settle in on the mains. The landing rollout was realistic-looking, with the Strega staying up on its mains until the last bit of velocity bled away.
Although I have often been underwhelmed after the maiden flight of an aircraft I had long lusted after, the Strega’s performance was even better than I had imagined. Hearing it roar around the field as I pulled elevator to make high-G, air-race-style turns was phenomenal. The ease with which landings and takeoffs can be performed is icing on the cake.
Conclusion
Spare fasteners, an adequately detailed and comprehensive assembly manual with recommended control throws and an accurate CG specification, electric retracts with metal trunnions, flaps that deploy and retract at near-scale speed, quick assembly — RocHobby is firing on all eight cylinders with this exciting Reno-racer warbird ARF kit.
I definitely dig the way that the Strega grooves in flight. The look of the propeller disc created by the big, silver-tipped, four-blade scale propeller with the gleaming chrome spinner in the center is dynamite.
Unless you are willing to open up a little extra space in your battery bay, you may need to carefully select your 4S 2,200 mAh flight packs to prevent their excessive bulk from inhibiting the removable canopy from fully seating to the fuselage.
I experienced no problems or failures with any piece or part of the Strega during assembly or in flight. If your experience differs, I have read that MotionRC has excellent customer service.
Some may eschew multiblade propellers and prefer to roll back to a more efficient — although regrettably non-scale — two-blade propeller. There are notable changes should you wish to journey down this highway to high speed.
According to Tom Ellison at MotionRC, the company has been experimenting with an APC E 12 x 12 propeller cut down to 11 x 12. With this propeller they have achieved speeds of nearly 115 mph with the Strega. This speed comes without any need to upgrade the factory power-system components, although minor modifications to the motor shaft may be necessary to make the APC propeller work.
Those who love fast Reno-style warbirds should grab a RocHobby Strega P-51 with haste.
— Jon Barnes [email protected]
MANUFACTURER/DISTRIBUTOR
- RocHobby
- [email protected]
- www.rochobby.com
SOURCES
- MotionRC
- (224) 633-9090
- www.motionrc.com
- Eagle Tree Systems
- (425) 614-0450
- www.eagletreesystems.com
Transcribed from original scans by AI. Minor OCR errors may remain.

