
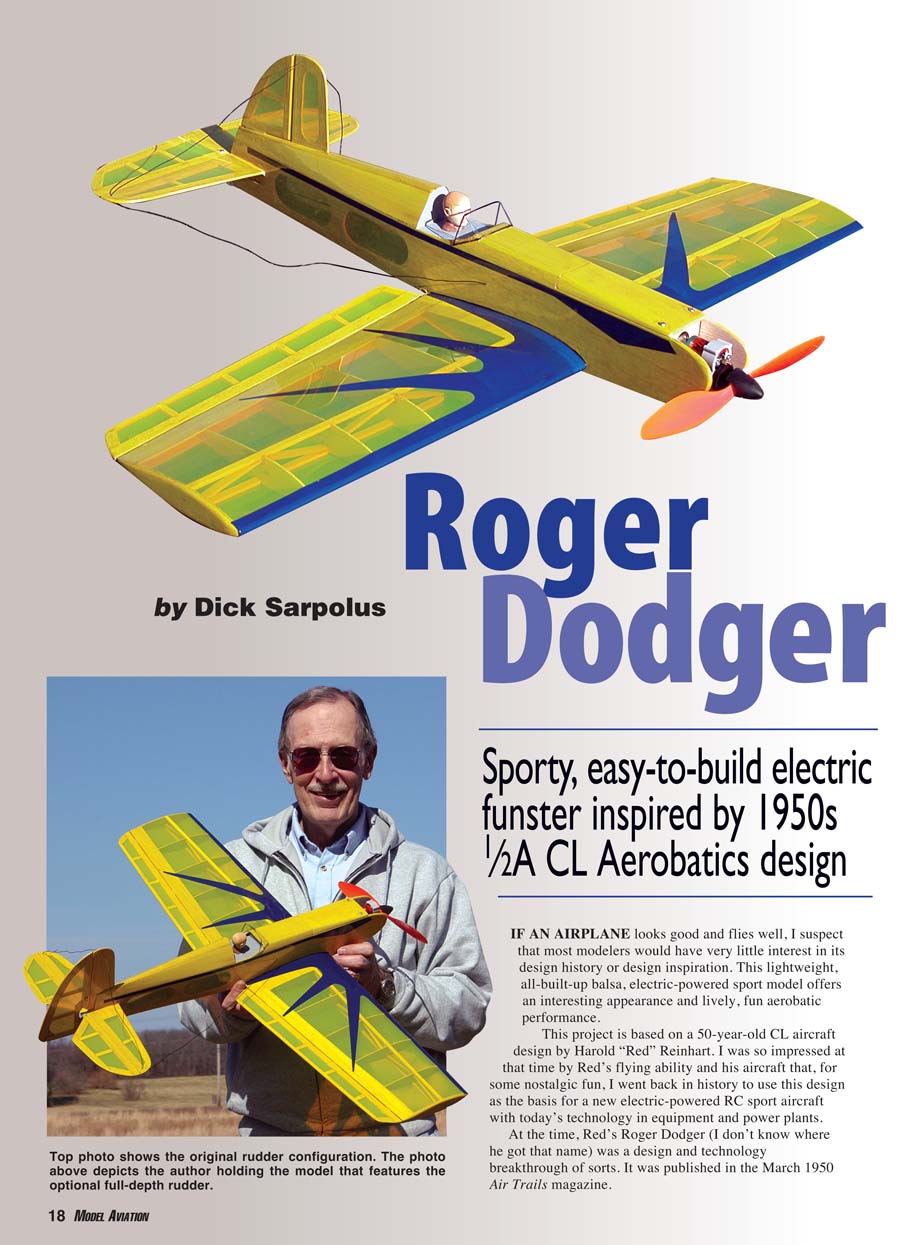
Roger Dodger - 2005/05
by Dick Sarpolus
Sporty, easy-to-build electric funster inspired by 1950s 1/2A CL Aerobatics design
If an airplane looks good and flies well, I suspect that most modelers would have very little interest in its design history or design inspiration. This lightweight, all-built-up balsa, electric-powered sport model offers an interesting appearance and lively, fun aerobatic performance.
This project is based on a 50-year-old CL aircraft design by Harold "Red" Reinhart. I was so impressed at that time by Red's flying ability and his aircraft that, for some nostalgic fun, I went back in history to use this design as the basis for a new electric-powered RC sport aircraft with today's technology in equipment and power plants.
At the time, Red's Roger Dodger (I don't know where he got that name) was a design and technology breakthrough of sorts. It was published in the March 1950 Air Trails magazine.
In a time when most modelers felt that only a large Class D (.60-size engine) CL aerobatics model on 60- or 70-foot lines could perform well, Red built this small, light airframe using a then-new .049 glow engine and flying on 15-foot-long string lines. He showed that it could fly great and do everything the big models could do. His designing and flying skills were absolutely top-notch. I borrowed the Roger Dodger's overall appearance, modifying it to accommodate the electronic equipment and motor and batteries we use today for RC sport flying. I like this airplane's different appearance, and it offers plenty of sportflying fun in a small package.
My Roger Dodger is built traditionally, with balsa ribs, spars, etc. I used no molded plastic, no foam, and no shortcuts. The ARFs are nice, but I like making sawdust in the workshop. This model worked out to have a 35-inch wingspan with 280 square inches of wing area, and it's 27 inches long. The weight—ready to go with a brushless motor and a Li-Poly battery pack—is 17 ounces, for a wing loading of 8.7 ounces per square foot.
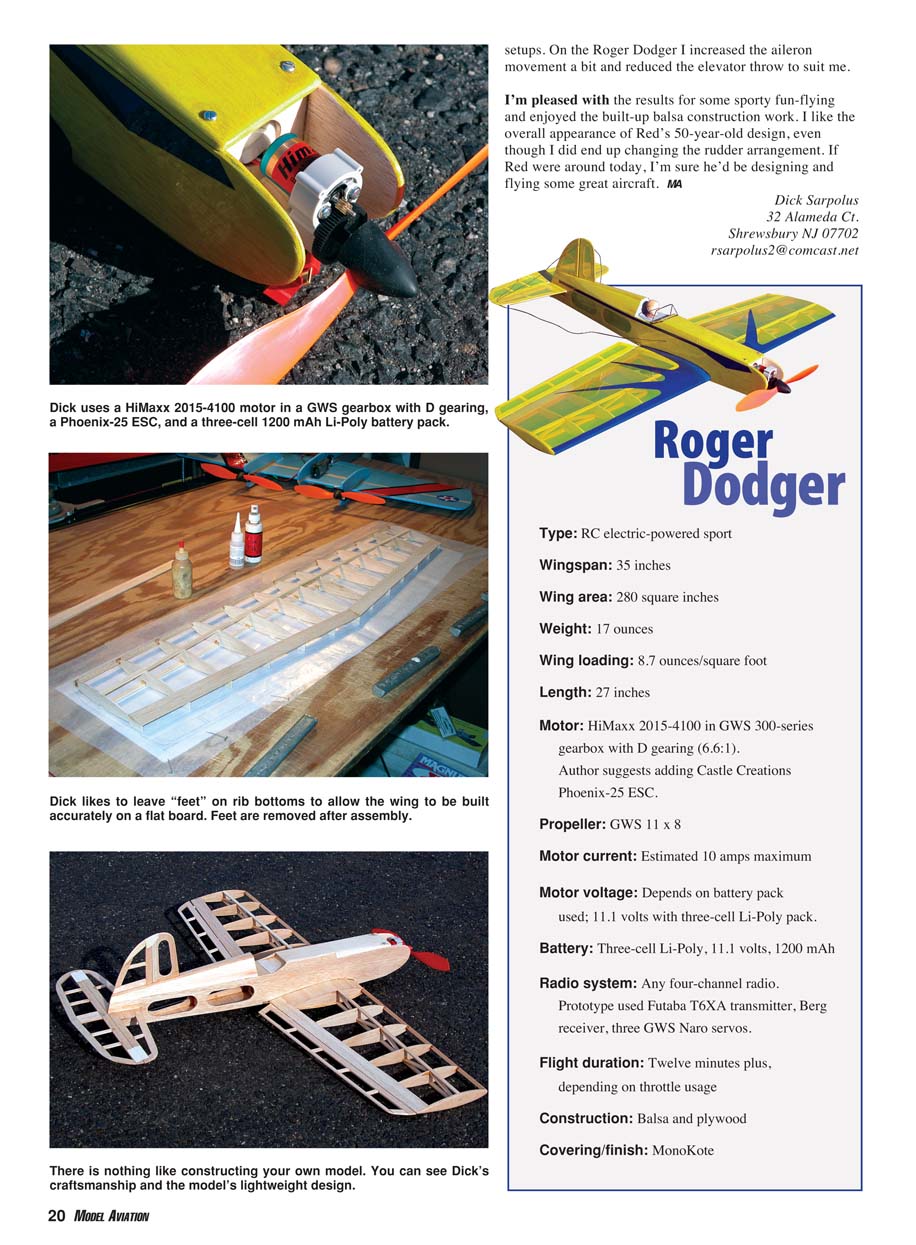
From some experience with similar-size and -weight airplanes, I figured that a Speed 400 or Speed 480 direct-drive setup would work and be exceptionally low in cost. However, the benefits of brushless motors—so much more power and longer flight times because of their higher efficiency—have convinced me to go brushless. I'm using a HiMaxx 2015-4100 motor in a GWS gearbox with its D gearing, a Castle Creations Phoenix-25 ESC, and a three-cell 1200 mAh Li-Poly battery pack. I'm sure that many other power setups would also work well.
If you're a sport-flying scratchbuilder and like working from plans for your aircraft projects, take a close look and consider this design. I didn't bother hooking up the movable rudder on my prototype model, figuring that it was quite small and that I'd get along without it for sporty flying. And Roger does fly fine that way. If you're uninterested in the design heritage and want a full-house aircraft with an effective rudder, I've drawn a suggested rudder modification on the plans. Split the elevator and install a large rudder farther to the rear for even more aerobatic fun. After flying my Roger Dodger for a while as originally built, I did cut into it and make this easy modification, as shown. I like the additional fun you can have with the large rudder.
CONSTRUCTION
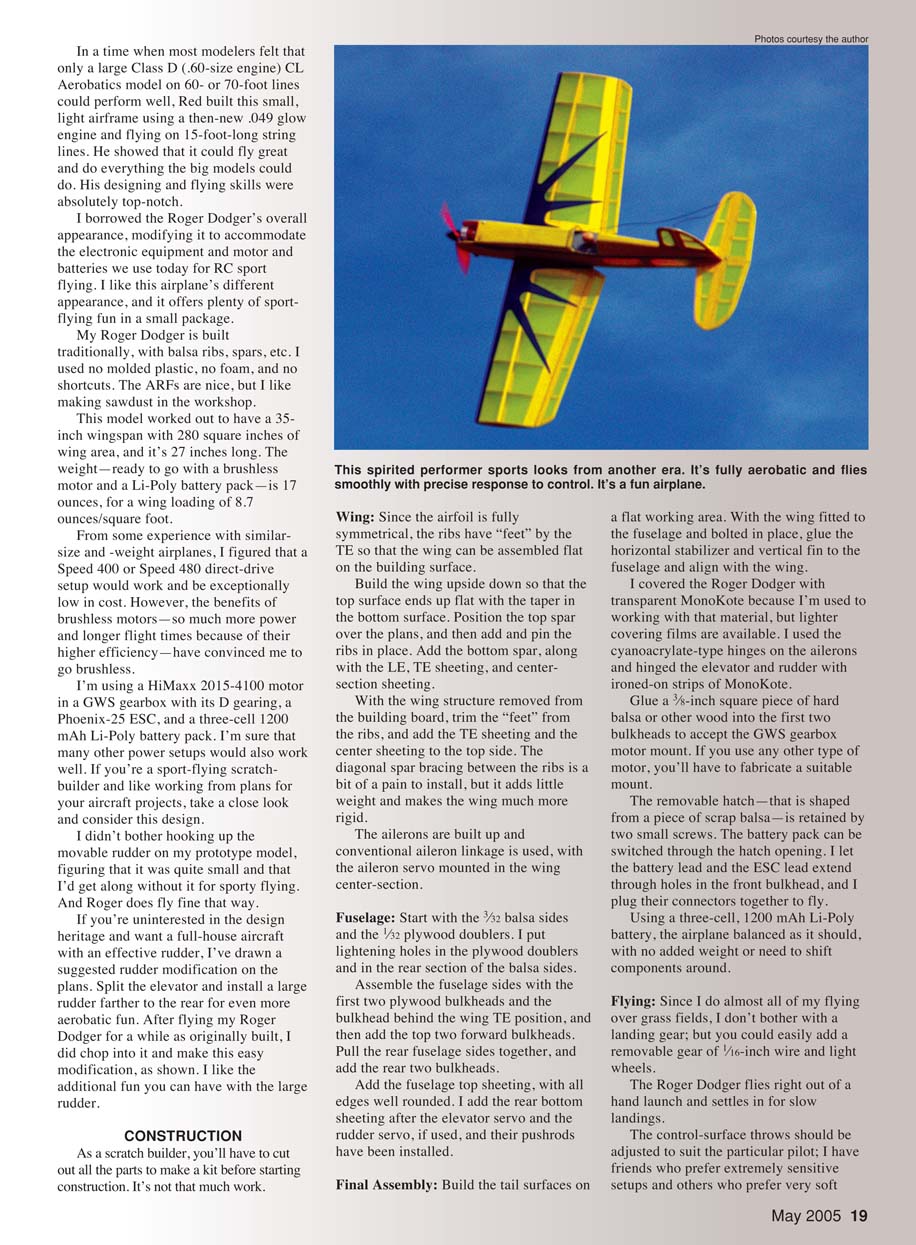
As a scratch builder, you'll have to cut out all the parts to make a kit before starting construction. It's not that much work. This spirited performer sports looks from another era. It's fully aerobatic and flies smoothly with precise response to control. It's a fun airplane.
Wing
- The airfoil is fully symmetrical. The ribs have "feet" by the trailing edge so the wing can be assembled flat on the building surface.
- Build the wing upside down so that the top surface ends up flat with the taper in the bottom surface.
- Position the top spar over the plans, then add and pin the ribs in place. Add the bottom spar, along with the leading-edge (LE) and trailing-edge (TE) sheeting, and center-section sheeting.
- With the wing structure removed from the building board, trim the "feet" from the ribs and add the TE sheeting and the center sheeting to the top side.
- The diagonal spar bracing between the ribs is a bit of a pain to install, but it adds little weight and makes the wing much more rigid.
- The ailerons are built up and conventional aileron linkage is used, with the aileron servo mounted in the wing center-section.
Fuselage
- Start with the 3/32" balsa sides and the 1/32" plywood doublers. I put lightening holes in the plywood doublers and in the rear section of the balsa sides.
- Assemble the fuselage sides with the first two plywood bulkheads and the bulkhead behind the wing TE position, then add the top two forward bulkheads.
- Pull the rear fuselage sides together and add the rear two bulkheads.
- Add the fuselage top sheeting, with all edges well rounded.
- I added the rear bottom sheeting after the elevator servo and the rudder servo (if used) and their pushrods had been installed.
Final Assembly
- Build the tail surfaces on a flat working area.
- With the wing fitted to the fuselage and bolted in place, glue the horizontal stabilizer and vertical fin to the fuselage and align with the wing.
- Covering: I used transparent MonoKote because I'm used to working with that material, but lighter covering films are available.
- Hinges: I used cyanoacrylate-type hinges on the ailerons and hinged the elevator and rudder with ironed-on strips of MonoKote.
- Glue a 3/8" scrap piece of hard balsa or other wood into the first two bulkheads to accept the GWS gearbox motor mount. If you use any other type of motor, you'll have to fabricate a suitable mount.
- The removable hatch—shaped from a piece of scrap balsa—is retained by two small screws. The battery pack can be switched through the hatch opening. I let the battery lead and the ESC lead extend through holes in the front bulkhead and plug their connectors together to fly.
- Using a three-cell, 1200 mAh Li-Poly battery, the airplane balanced as it should, with no added weight or need to shift components around.
Flying
- I do almost all of my flying over grass fields, so I don't bother with a landing gear; but you could easily add a removable gear of 1/16" wire and light wheels.
- The Roger Dodger flies right out of a hand launch and settles in for slow landings.
- Control-surface throws should be adjusted to suit the particular pilot; I have friends who prefer extremely sensitive setups and others who prefer very soft setups. The Roger Dodger has washout built in as shown on the plans.
- For my setup I increased the aileron movement a bit and reduced the elevator throw to suit me.
- Flight performance: sporty, fun, fully aerobatic with precise control.
I'm pleased with the results for some sporty fun-flying and enjoyed the built-up balsa construction work. I like the overall appearance of Red's 50-year-old design, even though I did end up changing the rudder arrangement. If Red were around today, I'm sure he'd be designing and flying some great aircraft.
Dick Sarpolus 32 Alameda Ct. Shrewsbury, NJ 07702 [email protected]
Specifications
- Type: RC electric-powered sport
- Wingspan: 35 inches
- Wing area: 280 square inches
- Weight: 17 ounces (ready to fly)
- Wing loading: 8.7 ounces per square foot
- Length: 27 inches
- Motor: HiMaxx 2015-4100 in GWS 300-series gearbox with D gearing (6.6:1)
- ESC: Castle Creations Phoenix-25 (author's suggestion)
- Propeller: GWS 11 x 8
- Motor current: Estimated 10 amps maximum
- Motor voltage: Depends on battery pack used; 11.1 volts with three-cell Li-Poly pack
- Battery: 3-cell (11.1 V) Li-Poly, 1200 mAh
- Radio system: Any four-channel radio (prototype used Futaba T6XA transmitter, Berg receiver, three GWS Nano servos)
- Flight duration: 12 minutes plus, depending on throttle usage
- Construction: Balsa and plywood
- Covering/finish: MonoKote
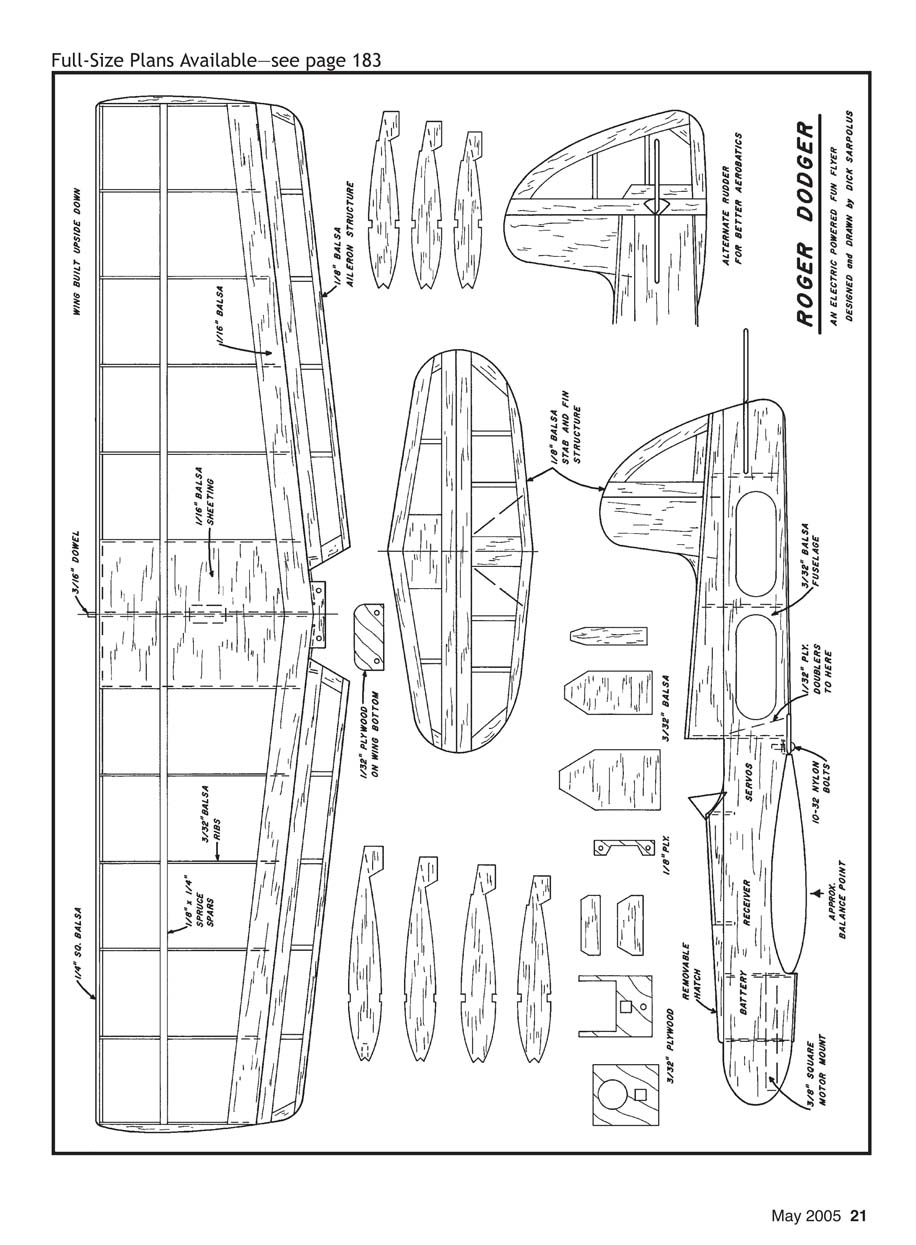
Plan / Build notes (diagram labels)
- WING BUILT UPSIDE DOWN
- 1/16" BALSA SHEETING
- 1/8" x 1/4" SPRUCE SPARS
- 3/32" BALSA RIBS
- 1/16" SQ. BALSA
- 3/16" DOWEL
- 1/32" PLYWOOD ON WING BOTTOM
- ALTERNATE RUDDER FOR BETTER AEROBATICS
- SERVOS
- RECEIVER
- BATTERY
- REMOVABLE HATCH
- 1/8" PLY
- 1/8" SQUARE MOTOR MOUNT
- APPROX. BALANCE POINT
Transcribed from original scans by AI. Minor OCR errors may remain.

