
Router Techniques
by Chet Ryba
Using a woodworking router to make parts for models and other wood items can be interesting and productive. Many model-airplane parts can be produced that will duplicate the originals, and they can be made in any quantities desired.
Prototypes and limited production runs are practical without the expense of steel-rule dies or other methods that are better suited for large production. Using easily made wood fixtures, the parts are superior to hand-cut ones and are all identical.
Among the parts that can be made in this manner are wing ribs, wingtips made from solid balsa (which are used in some models), fuselage sides, and formers made from Lite Ply. The endless possibilities are limited only by the imagination and ingenuity of the individual.
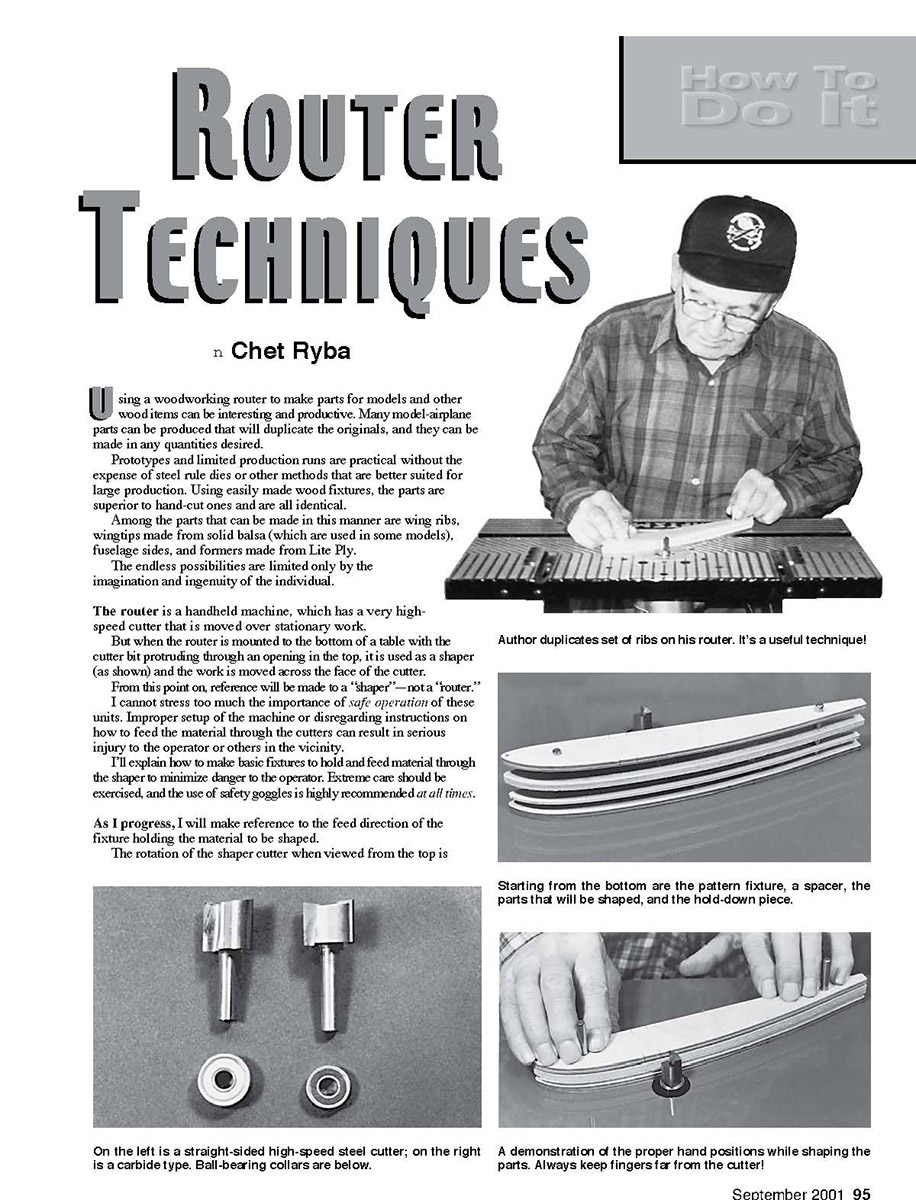
The router is a handheld machine that has a very high-speed cutter moved over stationary work. But when the router is mounted to the bottom of a table with the cutter bit protruding through an opening in the top, it is used as a shaper and the work is moved across the face of the cutter. From this point on, reference will be made to a "shaper" — not a "router."
I cannot stress too much the importance of safe operation of these units. Improper setup of the machine or disregarding instructions on how to feed the material through the cutters can result in serious injury to the operator or others in the vicinity. I'll explain how to make basic fixtures to hold and feed material through the shaper to minimize danger to the operator. Extreme care should be exercised, and the use of safety goggles is highly recommended at all times.
As I progress, I will make reference to the feed direction of the fixture holding the material to be shaped. The rotation of the shaper cutter when viewed from the top is counterclockwise; so when it is specified to feed with the rotation, the fixture is moved from the left to the right.
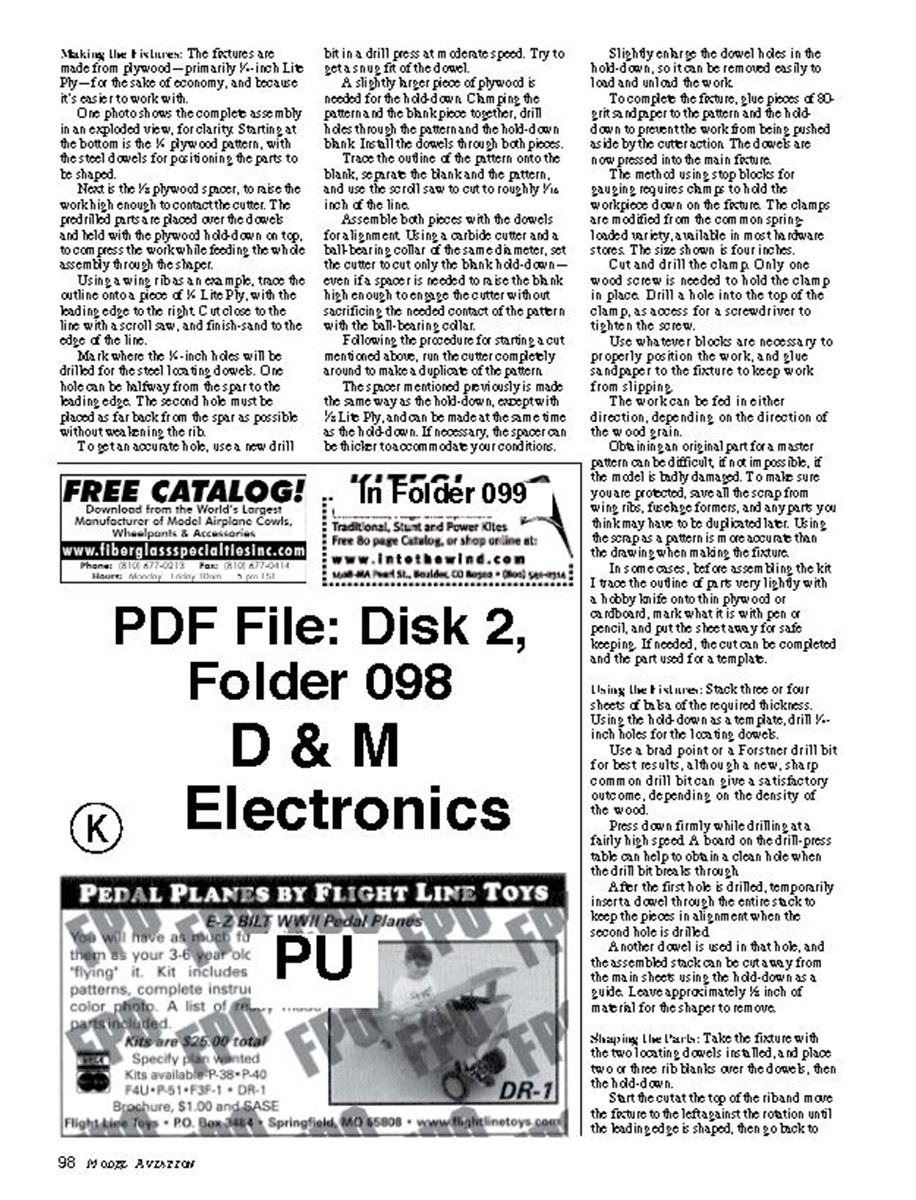
Feeding this direction requires extreme caution, because the cutter can grab the work and pull it out of your hands. To avoid that, leave only roughly 1/16 inch of material to be removed by the cutter, and slowly but firmly contact the shaper collar while holding the fixture down on the table. It helps to rest the heel of your hands on the shaper table until you get the feel of the cutter action.
Feeding material with the rotation gives a smoother cut and helps prevent tearout — particularly when going across grain or at a sharp grain angle.
When specified to feed against rotation, the fixture is moved from the right to the left. This is the usual way to feed the work, except in cases mentioned before. The same precautions in starting the cut apply.
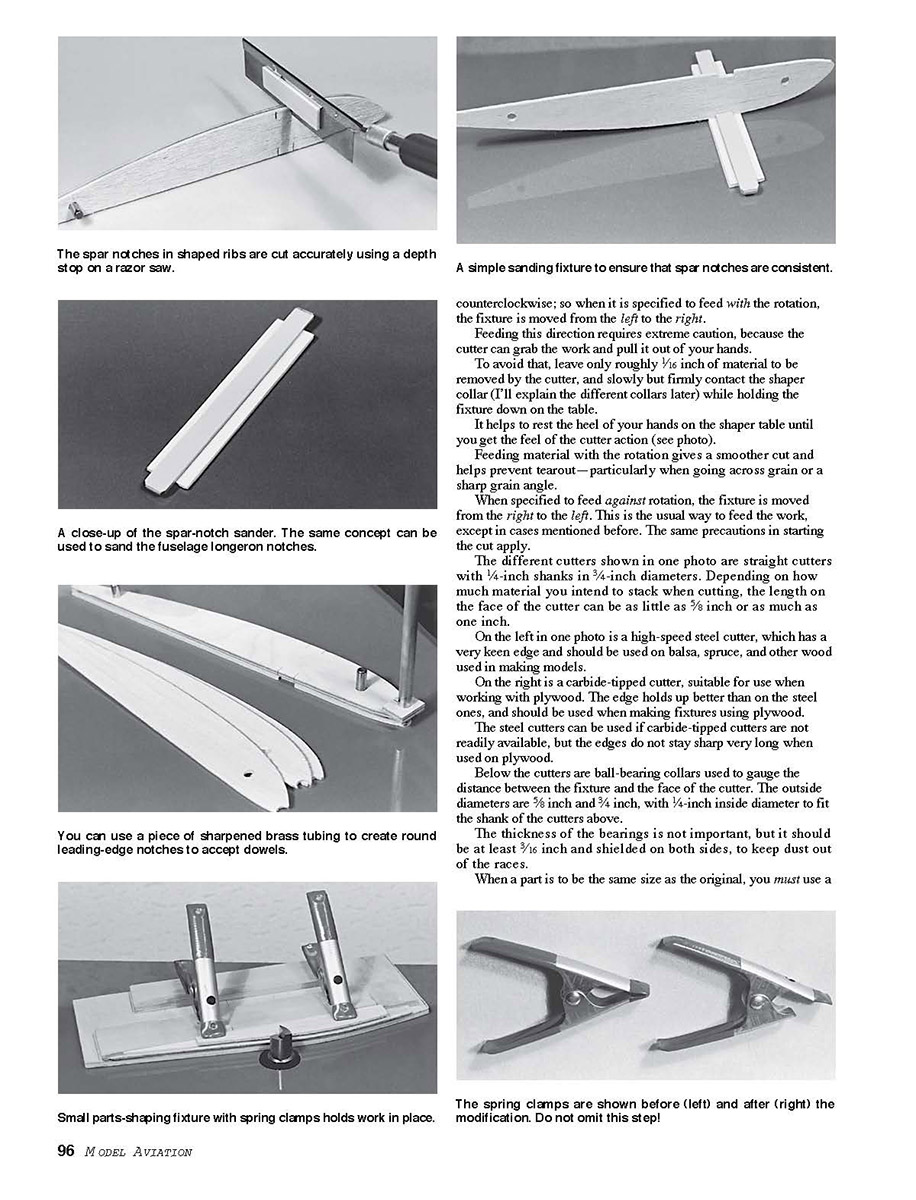
The different cutters are typically straight cutters with 1/4-inch shanks in 3/4-inch diameters. Depending on how much material you intend to stack when cutting, the length on the face of the cutter can be as little as 5/16 inch or as much as one inch.
- High-speed steel cutters have a very keen edge and should be used on balsa, spruce, and other woods used in making models.
- Carbide-tipped cutters are suitable for use when working with plywood. The edge holds up better than the steel ones and should be used when making fixtures using plywood.
Steel cutters can be used if carbide-tipped cutters are not readily available, but the edges do not stay sharp very long when used on plywood.
Below the cutters are ball-bearing collars used to gauge the distance between the fixture and the face of the cutter. Typical outside diameters are 5/8 inch and 3/4 inch, with a 1/4-inch inside diameter to fit the shank of the cutters. The thickness of the bearings is not important, but it should be at least 3/16 inch and shielded on both sides to keep dust out of the races.
When a part is to be the same size as the original, you must use a template. The template is temporarily fastened to the work and the profile of the template is followed with a bearing collar. When making a template, be certain the template edge is true and well sanded; imperfections will be transferred to the work. The typical procedure when making parts from a template is to cut the parts oversized and then finish them to size with the template.
- Plywood parts are cut with the face of the cutter bearing on the template and the plywood being held against the bearing.
- When the part is made from solid stock, use the bearing on the fixture and hold the part against the bearing.
When using the shaper, always make sure the work is clamped securely to the fixture. Spring clamps work well for small parts and will not mar the work if felt pads are used between the clamp jaws and the part. For larger parts, use screws or hold-downs. Do not use your hands to hold the work.
Many wings require 1/16-inch balsa sheeting on top of the centersection of the wing. To make the top of the wing ribs 1/16 inch smaller, use a 5/64-inch collar with the 3/4-inch cutter. For example, to use 1/16-inch sheeting over the whole front of the wing (forward of the spar and to the leading edge), then use capstrips from the sheeting to the trailing edge.
The bearing must be high enough above the table to give full contact of the outer race against the fixture. Because of the space between the cutter and the bearing, a shim or spacer must be used to raise the work so the cutter is fully effective.
There are several methods to position the work in the fixture:
- Dowel method:
- The preferred way is to use 1/4-inch-diameter steel dowels, such as die-makers use. If those dowels are not available, you can make them from 3/16-inch round steel. Cut the steel into whatever lengths are needed to insert them into the fixture and still have enough protruding to accommodate the stack of parts and the plywood hold-down.
- The dowel method allows repositioning the work in other fixtures to perform secondary operations, such as accurately cutting a notch in the ribs to accommodate material for a wing leading edge and/or notching ribs for spars.
- To install dowels: drill holes in the fixture and the hold-down, press the dowels in a bit with a bit in a drill press at moderate speed to get a snug fit.
- Stop-block method:
- Use stop blocks if there is a straight edge that can be used. Trim the work for length so it can be gauged along one side and one end. A flat-bottomed wing rib can be gauged from the bottom and from the trailing edge, which is usually 90° relative to the bottom.
- This method requires clamping the work to the fixture but allows shaping very small pieces with less danger to the operator. For accuracy, it is best to stack no more than two parts to be cut at one time.
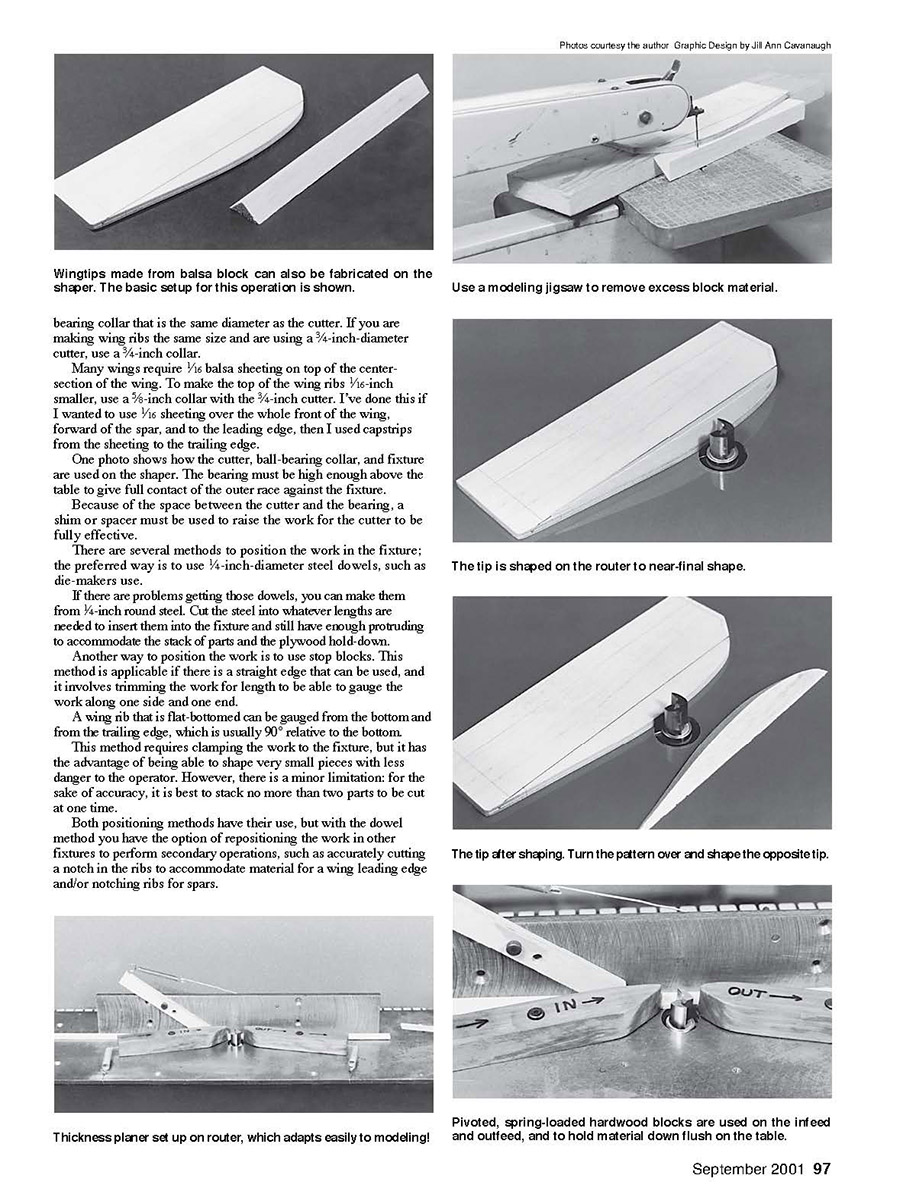
To make a hold-down and spacer for the dowel method:
- A slightly larger piece of plywood is needed for the hold-down. Clamp the pattern and the blank piece together, drill dowel holes through the pattern and the hold-down blank. Install the dowels through both pieces.
- Trace the outline of the pattern onto the blank, separate the blank and the pattern, and use a scroll saw to cut to roughly 1/8 inch of the line.
- Assemble both pieces with the dowels for alignment. Using a carbide cutter and a ball-bearing collar of the same diameter, set the cutter to cut only the blank hold-down — even if a spacer is needed to raise the blank high enough to engage the cutter without sacrificing the needed contact of the pattern with the ball-bearing collar.
- Run the cutter completely around to make a duplicate of the pattern.
- The spacer is made the same way as the hold-down, except use 3/8-inch Lite Ply; it can be thicker if necessary.
- Slightly enlarge the dowel holes in the hold-down so it can be removed easily to load and unload the work.
- To prevent the work from being pushed aside by the cutter action, glue pieces of 80-grit sandpaper to the pattern and the hold-down. The dowels are now pressed into the main fixture.
The method using stop blocks for gauging requires chamfering the workpiece down on the fixture. The clamps are modified from the common spring-loaded variety. The size shown is four inches. Cut and drill the clamp; only one wood screw is needed to hold the clamp in place. Drill a hole into the top of the clamp as a recess for a screwdriver to tighten the screw. Use whatever blocks are necessary to properly position the work, and glue sandpaper to the fixture to keep work from slipping.
Obtaining an original part for a master pattern can be difficult if the model is badly damaged. To make sure you are protected, save all the scrap from wing ribs, fuselage formers, and any parts that may have to be duplicated later. Using the scraps as patterns is of some value when re-making the fixtures. In some cases, before assembling the kit I trace the outline of a part very lightly with a hobby knife onto thin plywood or cardboard, mark what it is with pen or pencil, and put the sheet away for safekeeping. If needed, the cut can be completed and the part used for a template.
Using the fixtures:
- Stack three or four sheets of balsa of the required thickness. Using the hold-down as a template, drill 1/8-inch holes for the locating dowels.
- Use a brad-point or Forstner drill bit for best results, although a new, sharp common drill bit can give a satisfactory outcome depending on the density of the wood.
- Press down firmly while drilling at a fairly high speed. A board on the drill-press table can help to obtain a clean hole when the drill bit breaks through.
- After the first hole is drilled, temporarily insert a dowel through the entire stack to keep the pieces in alignment when the second hole is drilled.
- A center dowel is used in that hole, and the assembled stack can be cut away from the main sheets using the hold-down as a guide. Leave approximately 1/8 inch of material for the shaper to remove.
Shaping the parts:
- Take the fixture with the two locating dowels installed, place two or three rib blanks over the dowels, then put the hold-down in place.
- Start the cut at the top of the rib and move the fixture to the left against the rotation until the leading edge is shaped, then go back to the top of the rib and move the fixture to the right to cut with the rotation.
- Be extra careful when going around the trailing edge, and continue along the bottom edge until the rib is completed.
Notching for spars or leading-edge dowels:
- Use the dowel holes for positioning the rib in the fixture for these operations. The hold-down can be used for the notching.
- Mark the position and width of the spar, and make two cuts with a fine-tooth hobby saw slightly deeper than the thickness of the spar.
- To control the depth of the cut, tape a piece of plywood to the side of the saw so that only enough of the blade is exposed to make the cut.
- Install two dowels in the 1/8-inch holes. Probe ribs one at a time on the dowels and make the cuts. Remove the material between the cuts with a hobby knife; make sure the notch is shallower than needed for the spar. The last step is to sand it to the proper depth with a sanding block.
Leading-edge dowel notches:
- Cutting the round notch for a leading-edge dowel can be done accurately with a drilling jig. Use the same fixture used for cutting the spar notch, except that a predrilled 1/4-inch-thick block is placed on the leading edge of the fixture. The hole in the block must be the same size as the dowel.
- Make a hollow drill using brass or steel tubing to drill the leading-edge notch in the balsa rib.
- Where a notch for square material is needed, mark and cut a square from the rib fixture. Using it for a pattern, cut the individual rib with a hobby knife.
Solid-like wingtips: Some models are designed with solid-balsa wingtips. Kitmakers often furnish two triangular blocks of wood and tell you to shape them with a knife and sandpaper. A better way is to make a simple pattern fixture.
- Use the wingtip rib as a pattern; trace it on a 1/8-inch piece of Lite Ply and include a good line at the bottom of the rib.
- Place a corresponding line on the other side of the rib; it's used to position one edge of the triangular block prior to shaping and allows the same fixture to make the left and right wingtip.
- Cut and sand to the line. Use double-stick tape, a small amount of glue, or screws to hold the block in place while shaping.
- After the block is mounted, turn the fixture over and support it on a block of wood while cutting off the excess material on a scroll or band saw to within 1/16 inch or less. After shaping the tip, remove it from the fixture and repeat the procedure for the opposite tip.
All the preceding procedures are basic, and variations can be utilized to produce many other parts. Plywood fuselage parts, such as sides, formers, and firewall, are made using carbide cutters.
Using the Shaper as a Thickness Planer
You can accurately make special sizes or replacement wing spars and longerons by adapting the shaper to a thickness planer. The attachment I've used for years is made from a steel plate that is nine inches wide, 24 inches long, and 1/4 inch thick, with a one-inch hole for the cutter. The fence is a length of 2 1/2 x 2 1/2-inch iron or aluminum angle.
- Feed the stock into the cutter; the space between the fence and the cutter determines the thickness.
- Spring-loaded, pivoted wood blocks hold the material against the fence before and after leaving the cutter. Another spring-loaded block holds the work down on the table and is pivoted on the fence.
- Adjust the spring tensions to firmly hold the work yet allow it to be pushed through easily. Feed the strip in a continual stream, and the last one is pulled through from the outfeed end.
- It is important that the work be fed against the rotation of the cutter to prevent it from being pulled in.
- To avoid the time and expense of making a separate table, drill and tap the shaper table to accommodate the guide blocks. In place of the angle iron, a piece of wood can be bolted to the existing shaper fence.
Sawstrips:
- Make sawstrips from boards that are slightly thicker than the finished size. Adjust the fence to remove approximately 1/8 inch of stock. Start with the wider dimension and run each side alternately until the finished thickness is obtained. The width is done in the same manner.
- For parts stock, white pine or spruce give excellent quality. The weights are roughly the same, and the strength is almost equal.
- Good spar material can often be found in old door and window frames, which have straight grain. Store these boards in a safe, dry place and cut up as needed.
Transcribed from original scans by AI. Minor OCR errors may remain.

