
SAB Goblin 500
Chris Mulcahy
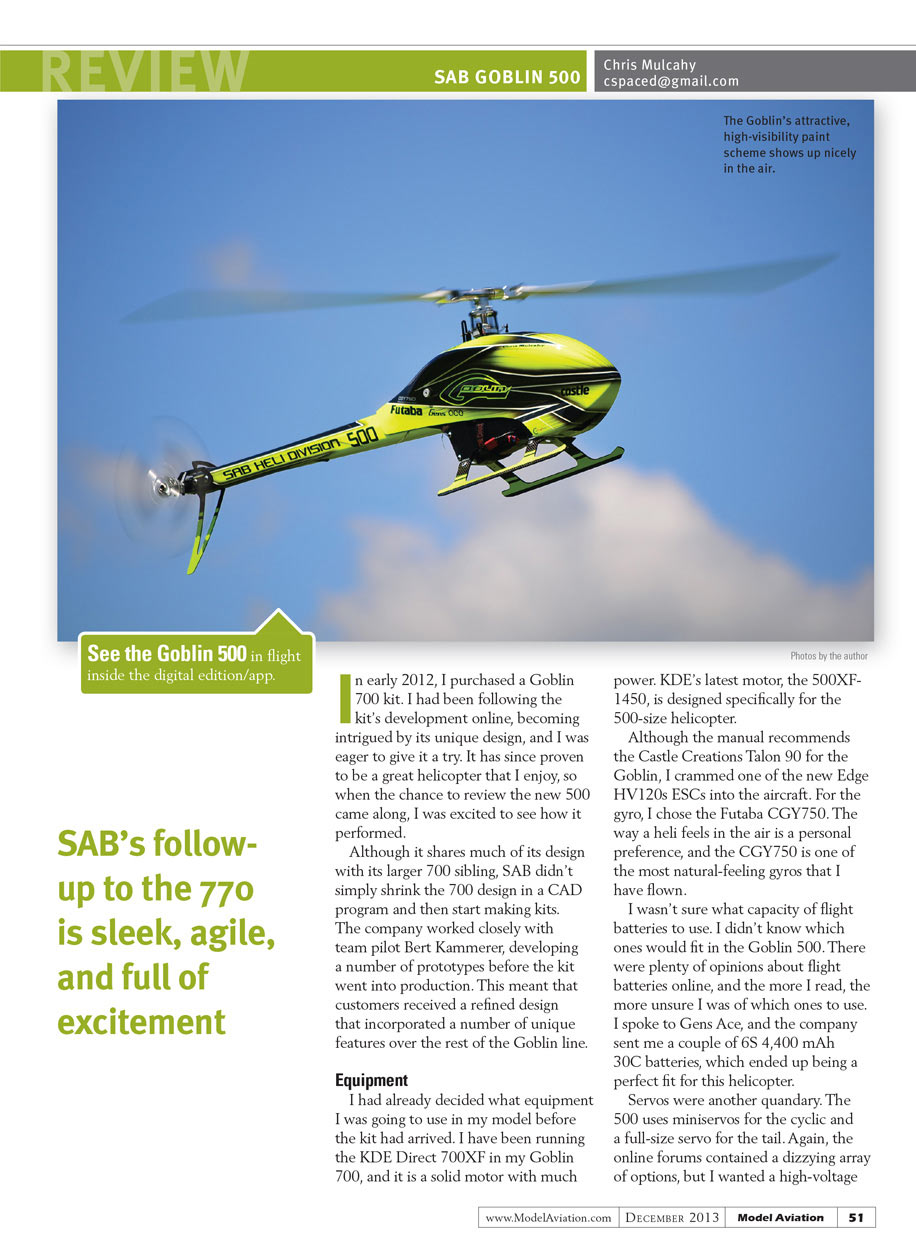
In early 2012, I purchased a Goblin 700 kit. I had been following the kit's development online, becoming intrigued by its unique design, and I was eager to give it a try. It has since proven to be a great helicopter that I enjoy, so when the chance to review the new 500 came along, I was excited to see how it performed.
Although it shares much of its design with its larger 700 sibling, SAB didn't simply shrink the 700 design in a CAD program and then start making kits. The company worked closely with team pilot Bert Kammerer, developing a number of prototypes before the kit went into production. This meant that customers received a refined design that incorporated a number of unique features over the rest of the Goblin line.
SAB’s follow-up to the 770 is sleek, agile, and full of excitement
Equipment
I had already decided what equipment I was going to use in my model before the kit had arrived. I have been running the KDE Direct 700XF in my Goblin 700, and it is a solid motor with much power. KDE's latest motor, the 500XF-1450, is designed specifically for the 500-size helicopter.
Although the manual recommends the Castle Creations Talon 90 for the Goblin, I crammed one of the new Edge HV120s ESCs into the aircraft. For the gyro, I chose the Futaba CGY750. The way a heli feels in the air is a personal preference, and the CGY750 is one of the most natural-feeling gyros that I have flown.
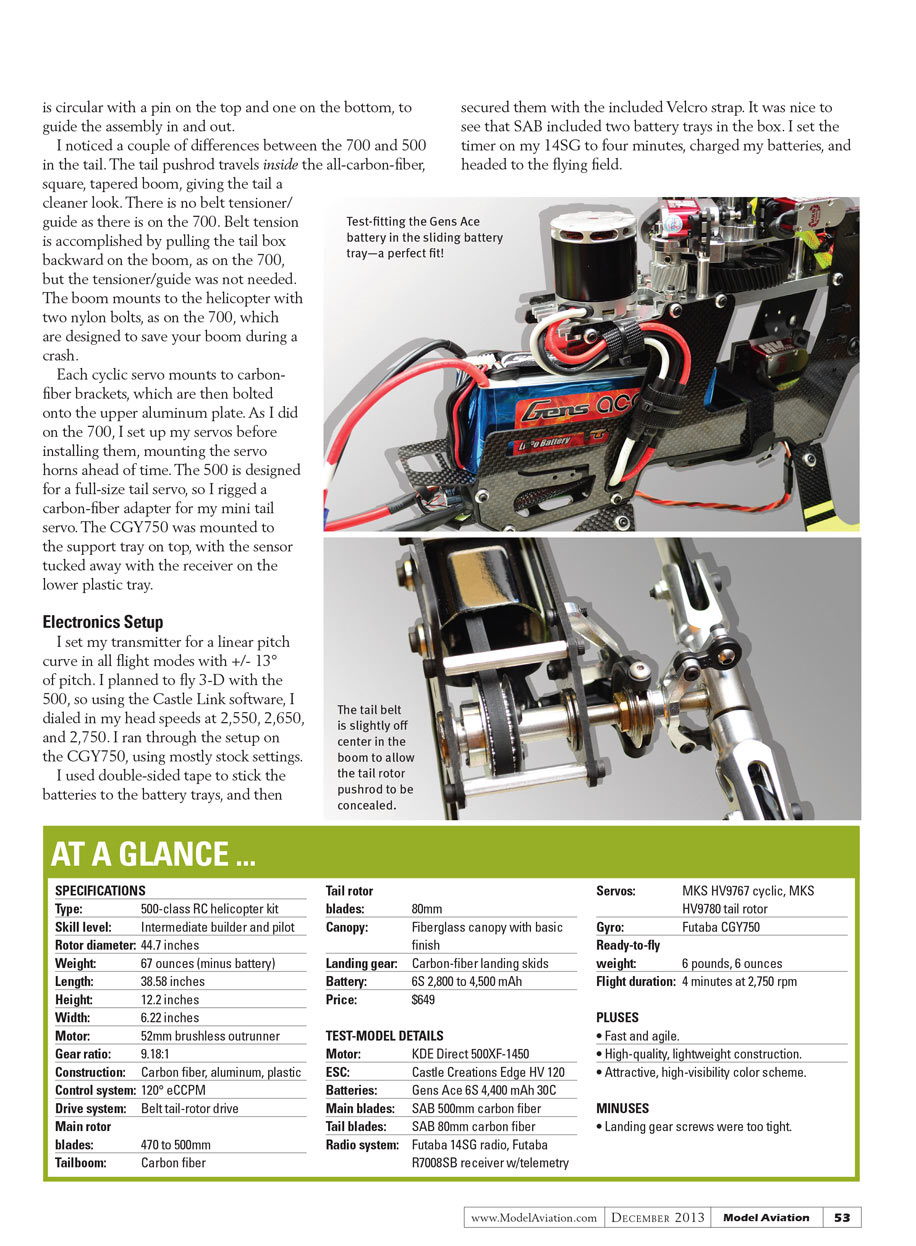
I wasn't sure what capacity of flight batteries to use. I didn't know which ones would fit in the Goblin 500. There were plenty of opinions about flight batteries online, and the more I read, the more unsure I was of which ones to use. I spoke to Gens Ace, and the company sent me a couple of 6S 4,400 mAh 30C batteries, which ended up being a perfect fit for this helicopter.
Servos were another quandary. The 500 uses miniservos for the cyclic and a full-size servo for the tail. Again, the online forums contained a dizzying array of options, but I wanted a high-voltage setup. At the time, there were only a few available options for HV miniservos. I talked to MKS Servos USA and the company had the perfect servo setup for the 500.
What I didn't know at the time was that these servos were new, and I was lucky enough to receive the first set of HV miniservos in the US. The HV9767 cyclic servos and the HV9780 tail servo are all miniservos, which meant a little head scratching when it was time to install that mini tail servo into a full-size servo slot.
In the Box
The Goblin 500 arrived packaged in a similar fashion to the rest of the Goblin series. There are four smaller boxes that contain all of the parts, plus an empty fifth box (to be used for future combo packages).
Most of the aluminum parts are tucked away in three foam trays, which are stacked in one of the main boxes. The rest of the carbon parts, hardware, and canopy/boom are distributed among the remaining boxes. The 500mm long main and tail blades came separately packaged.
Assembly
The full-color instruction manual has clear diagrams and instructions. All of the parts are bagged with labels, which in turn correspond to each step in the instruction manual.
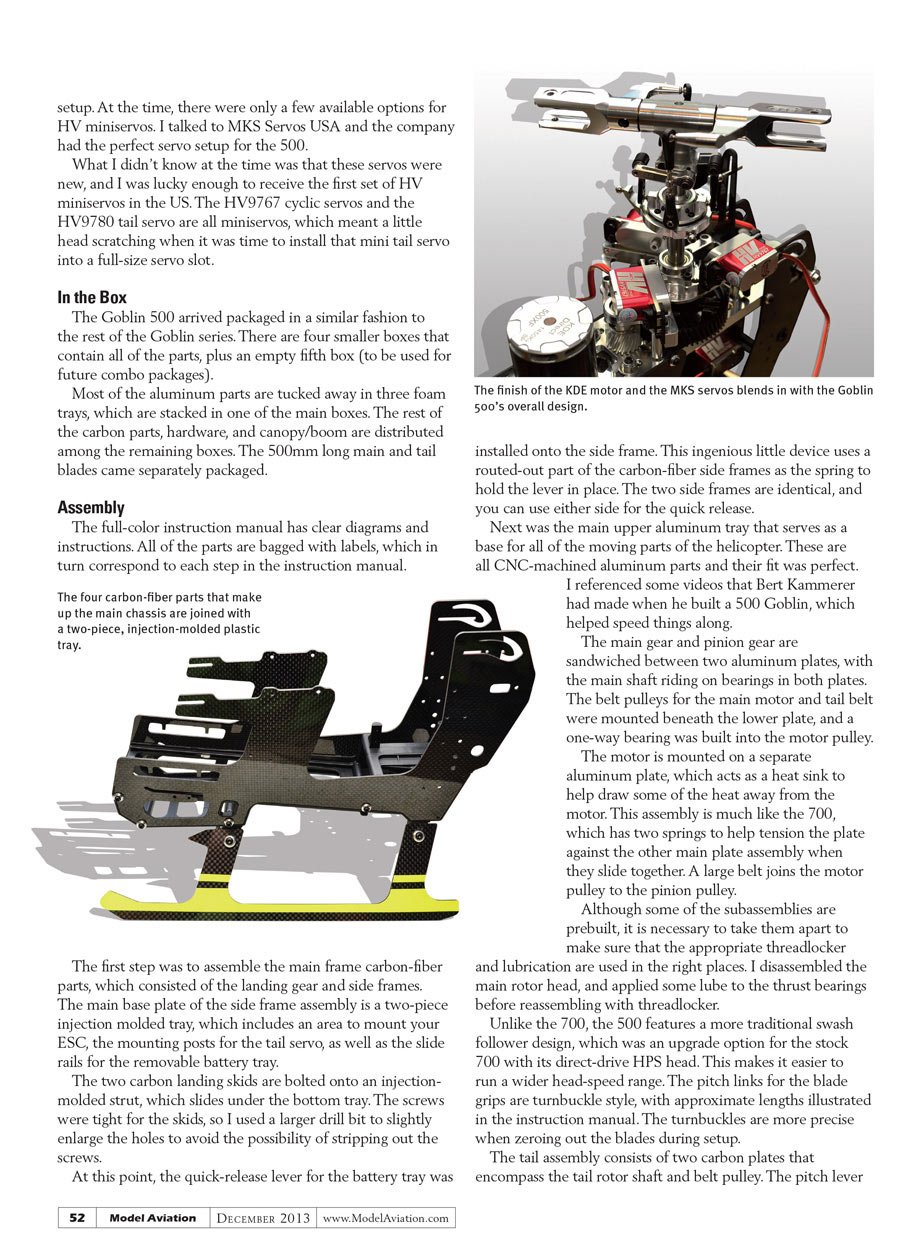
The first step was to assemble the main frame carbon-fiber parts, which consisted of the landing gear and side frames. The main base plate of the side frame assembly is a two-piece injection molded tray, which includes an area to mount your ESC, the mounting posts for the tail servo, as well as the slide rails for the removable battery tray.
The two carbon landing skids are bolted onto an injection-molded strut, which slides under the bottom tray. The screws were tight for the skids, so I used a larger drill bit to slightly enlarge the holes to avoid the possibility of stripping out the screws.
At this point, the quick-release lever for the battery tray was installed onto the side frame. This ingenious little device uses a routed-out part of the carbon-fiber side frames as the spring to hold the lever in place. The two side frames are identical, and you can use either side for the quick release.
Next was the main upper aluminum tray that serves as a base for all of the moving parts of the helicopter. These are all CNC-machined aluminum parts and their fit was perfect.
I referenced some videos that Bert Kammerer had made when he built a 500 Goblin, which helped speed things along.
The main gear and pinion gear are sandwiched between two aluminum plates, with the main shaft riding on bearings in both plates. The belt pulleys for the main motor and tail belt were mounted beneath the lower plate, and a one-way bearing was built into the motor pulley.
The motor is mounted on a separate aluminum plate, which acts as a heat sink to help draw some of the heat away from the motor. This assembly is much like the 700, which has two springs to help tension the plate against the other main plate assembly when they slide together. A large belt joins the motor pulley to the pinion pulley.
Although some of the subassemblies are prebuilt, it is necessary to take them apart to make sure that the appropriate threadlocker and lubrication are used in the right places. I disassembled the main rotor head, and applied some lube to the thrust bearings before reassembling with threadlocker.
Unlike the 700, the 500 features a more traditional swash follower design, which was an upgrade option for the stock 700 with its direct-drive HPS head. This makes it easier to run a wider head-speed range. The pitch links for the blade grips are turnbuckle style, with approximate lengths illustrated in the instruction manual. The turnbuckles are more precise when zeroing out the blades during setup.
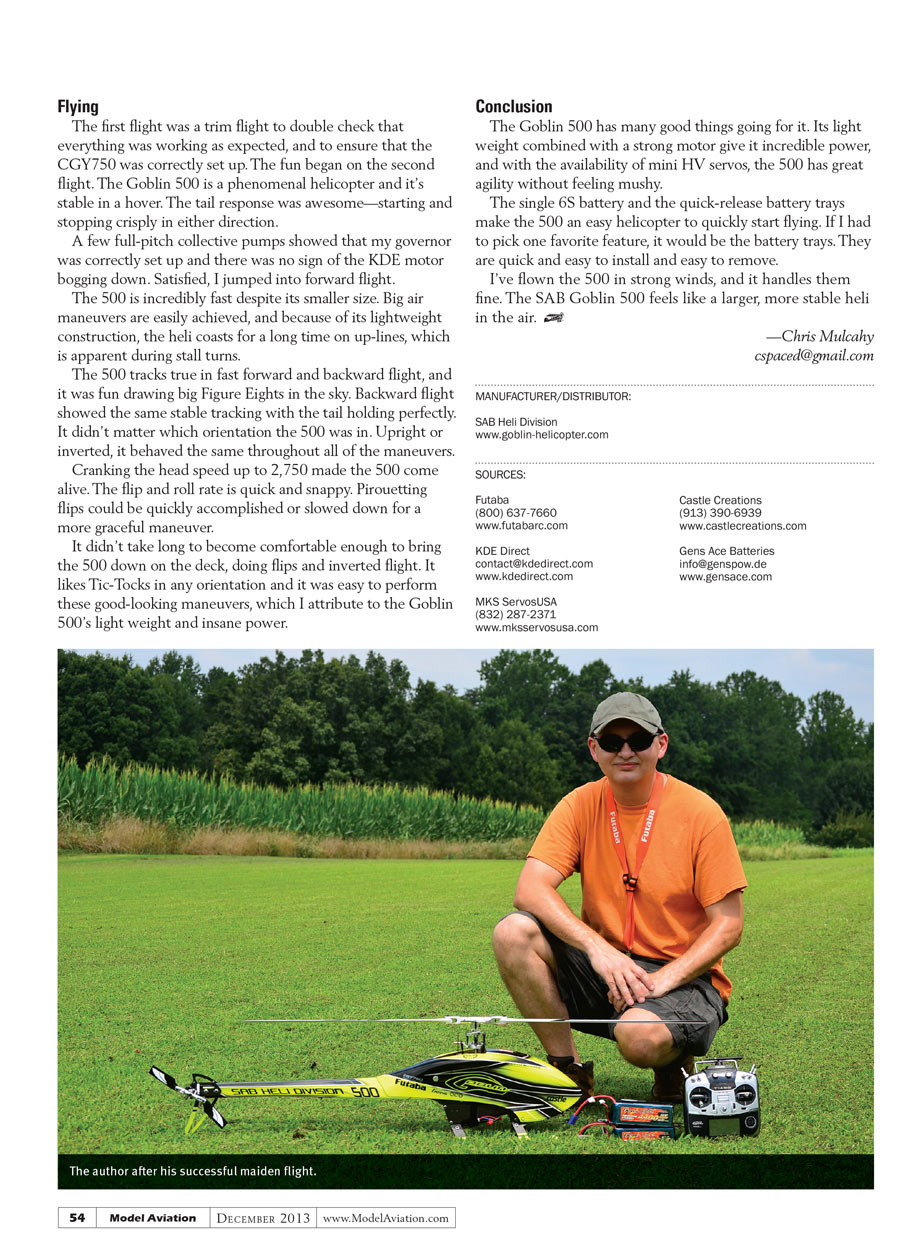
The tail assembly consists of two carbon plates that encompass the tail rotor shaft and belt pulley. The pitch lever is circular with a pin on the top and one on the bottom, to guide the assembly in and out.
I noticed a couple of differences between the 700 and 500 in the tail. The tail pushrod travels inside the all-carbon-fiber, square, tapered boom, giving the tail a cleaner look. There is no belt tensioner/guide as there is on the 700. Belt tension is accomplished by pulling the tail box backward on the boom, as on the 700, but the tensioner/guide was not needed. The boom mounts to the helicopter with two nylon bolts, as on the 700, which are designed to save your boom during a crash.
Each cyclic servo mounts to carbon-fiber brackets, which are then bolted onto the upper aluminum plate. As I did on the 700, I set up my servos before installing them, mounting the servo horns ahead of time. The 500 is designed for a full-size tail servo, so I rigged a carbon-fiber adapter for my mini tail servo. The CGY750 was mounted to the support tray on top, with the sensor tucked away with the receiver on the lower plastic tray.
Electronics Setup
I set my transmitter for a linear pitch curve in all flight modes with +/- 13° of pitch. I planned to fly 3-D with the 500, so using the Castle Link software, I dialed in my head speeds at 2,550, 2,650, and 2,750. I ran through the setup on the CGY750, using mostly stock settings.
I used double-sided tape to stick the batteries to the battery trays, and then secured them with the included Velcro strap. It was nice to see that SAB included two battery trays in the box. I set the timer on my 14SG to four minutes, charged my batteries, and headed to the flying field.
AT A GLANCE ...
SPECIFICATIONS
Type: 500-class RC helicopter kit
Skill level: Intermediate builder and pilot
Rotor diameter: 44.7 inches
Weight: 67 ounces (minus battery)
Length: 38.58 inches
Height: 12.2 inches
Width: 6.22 inches
Motor: 52mm brushless outrunner
Gear ratio: 9.18:1
Construction: Carbon fiber, aluminum, plastic
Control system: 120° eCCPM
Drive system: Belt tail-rotor drive
Main rotor blades: 470 to 500mm
Tailboom: Carbon fiber
Tail rotor blades: 80mm
Canopy: Fiberglass canopy with basic finish
Landing gear: Carbon-fiber landing skids
Battery: 6S 2,800 to 4,500 mAh
Price: $649
Tail rotor servos: MKS HV9767 cyclic, MKS HV9780 tail rotor
Gyro: Futaba CGY750
Ready-to-fly weight: 6 pounds, 6 ounces
Flight duration: 4 minutes at 2,750 rpm
PLUSES
- Fast and agile.
- High-quality, lightweight construction.
- Attractive, high-visibility color scheme.
MINUSES
- Landing gear screws were too tight.
TEST-MODEL DETAILS
Motor: KDE Direct 500XF-1450
ESC: Castle Creations Edge HV 120
Batteries: Gens Ace 6S 4,400 mAh 30C
Main blades: SAB 500mm carbon fiber
Tail blades: SAB 80mm carbon fiber
Radio system: Futaba 14SG radio, Futaba R7008SB receiver w/telemetry
Flying
The first flight was a trim flight to double check that everything was working as expected, and to ensure that the CGY750 was correctly set up. The fun began on the second flight. The Goblin 500 is a phenomenal helicopter and it's stable in a hover. The tail response was awesome—starting and stopping crisply in either direction.
A few full-pitch collective pumps showed that my governor was correctly set up and there was no sign of the KDE motor bogging down. Satisfied, I jumped into forward flight.
The 500 is incredibly fast despite its smaller size. Big air maneuvers are easily achieved, and because of its lightweight construction, the heli coasts for a long time on up-lines, which is apparent during stall turns.
The 500 tracks true in fast forward and backward flight, and it was fun drawing big Figure Eights in the sky. Backward flight showed the same stable tracking with the tail holding perfectly. It didn't matter which orientation the 500 was in. Upright or inverted, it behaved the same throughout all of the maneuvers.
Cranking the head speed up to 2,750 made the 500 come alive. The flip and roll rate is quick and snappy. Pirouetting flips could be quickly accomplished or slowed down for a more graceful maneuver.
It didn't take long to become comfortable enough to bring the 500 down on the deck, doing flips and inverted flight. It likes Tic-Tocks in any orientation and it was easy to perform these good-looking maneuvers, which I attribute to the Goblin 500's light weight and insane power.
Conclusion
The Goblin 500 has many good things going for it. Its light weight combined with a strong motor give it incredible power, and with the availability of mini HV servos, the 500 has great agility without feeling mushy.
The single 6S battery and the quick-release battery trays make the 500 an easy helicopter to quickly start flying. If I had to pick one favorite feature, it would be the battery trays. They are quick and easy to install and easy to remove.
I've flown the 500 in strong winds, and it handles them fine. The SAB Goblin 500 feels like a larger, more stable heli in the air.
—Chris Mulcahy [email protected]
MANUFACTURER/DISTRIBUTOR:
SAB Heli Division www.goblin-helicopter.com
SOURCES:
- Futaba — (800) 637-7660, www.futabarc.com
- KDE Direct — [email protected], www.kdedirect.com
- MKS ServosUSA — (832) 287-2371, www.mksservosusa.com
- Castle Creations — (913) 390-6939, www.castlecreations.com
- Gens Ace Batteries — [email protected], www.gensace.com
Transcribed from original scans by AI. Minor OCR errors may remain.

