
Safety in Model Flight Operations Part 2
by Donald Brooks
IN THE THIRD article of this safety series, which was published last month, I wrote about the risks of model flight operations in terms of where we fly and what we fly. In this article — the conclusion of this portion of “From the Ground Up” — I will cover how we fly safely.
This installment includes flight instruction for the novice pilot and safety standards I derived from my experience as a flight instructor and club safety officer and from the AMA Safety Code. The discussion includes techniques and practices to make our model flying safe and injury free.
I will approach this discussion for the benefit of the novice pilot. Even if you are an experienced model flier, please consider the five safety standards for your flying.
In the last article we left off with your aircraft idling on the taxiway. Now I’ll take you, the novice pilot, out to the runway and we will fly your airplane and discuss safety concerns as we do so. I will perform the takeoff. You will control the model aircraft via the remote buddy box — your transmitter tied to mine — when I hold the switch in your direction.
Flight Instruction
If you are an inexperienced model-aircraft pilot, your first consideration should be finding and joining a flying club that provides flight instruction. I have often told the story of the 12-second flight. The story rattles around in the unofficial annals of model aviation history.
There have been many short-lived models, and among them may have been a 1/4-scale Piper J-3 Cub, a beautiful Pitts biplane, a sport aerobatic model, or a simple four-channel trainer. The proud owner and prospective aviator took no action to gain access to a model flight instructor. How hard could it be? He knew how full-scale aircraft flew. He believed he could just go out to the open field and fly his model, so he decided to go it alone.
He took off with the aircraft and climbed it to an altitude he thought was comfortable and safe before making the first turn. Then he carefully gave the signal for a 180° turn. The aircraft was headed toward him and a gust of wind disturbed its heading.
He moved the stick to correct and the model suddenly entered a spiral dive. In the roughly 12 seconds since leaving the ground, the airplane hit it with a resounding smack and shattering of balsa and covering.
The new pilot then realized that the perspective was not the same as that from the cockpit of a full-scale aircraft. He wished he had found an instructor to give his aircraft a longer life.
Does this sound familiar? Most flying clubs have qualified instructors who can help you through the hard spots of learning to fly radio control. Join one and get help.
Since you are reading this magazine I will assume that you are an AMA member. This membership provides you with essential insurance coverage that you need for launching anything more than a rubber-powered aircraft.
Section 3 of the AMA Safety Code for radio-controlled flight reads, “I will not fly my model aircraft in the presence of spectators until I become a proficient flier, unless I am assisted by an experienced pilot.”
This specific Safety Code item is intended to prevent undue risk to spectators from a loss of model control caused by an unqualified pilot. Engaging a flight instructor will accelerate your learning process and you can concentrate on flying practice rather than building practice.
How We Fly — Flight-Operations Safety Standards
I have organized this discussion around five flight-safety standards — A to E — derived from my experience as a flying-club safety officer and instructor. I will talk you through an imaginary training flight along the way. These standards include references to provisions of the AMA Safety Code specific to RC flying that I have not discussed or that need further discussion. CL (control-line) flying and FF (free-flight) operations have a few additional particular safety requirements related to clearing the overflight area and preflight testing of the equipment, but I will not discuss those here. If you don’t know what the specific requirements for RC models are, find the 2006 AMA Safety Code in this issue and read them now. Come back when you finish and we will continue.
We do not intend to hurt others or ourselves. That’s a good thing. As fliers who comply with the AMA Safety Code, we intend to actively prevent accidents. We can do that by applying the five levels of safety defense appropriate for the risk:
- the right attitude
- prechecks
- backups
- isolation
- barriers
We use the first three to prevent an accident from occurring. If an accident occurs that is beyond our control, we plan ahead and use the last two to minimize the risk of anyone being hurt or any property being damaged.
The flight-safety standards are as follows.
A) Use positive frequency control
Sections 5 and 6 of the AMA Radio Control Safety Code involve frequency control.
Section 5 reads, “I will operate my model aircraft using only radio-control frequencies currently allowed by the Federal Communications Commission (FCC).” This reminds us that radio amateurs are the only ones who can use the ham frequencies.
Section 6 discusses the possible interference of radio transmitters operated within three miles of each other and how to avoid such interference.
The FCC is the federal agency that controls the use of radio broadcast frequencies in the United States. If this frequency control did not exist, the use of the radio bands would be chaotic, with constant interference between users.
Radio bands are dedicated to specific purposes. There are several bands allocated for model control: 27 MHz, 72 MHz, 50 and 53 MHz (only legal for licensed amateur radio operators), and the recently authorized 2.4 GHz spread-spectrum band.
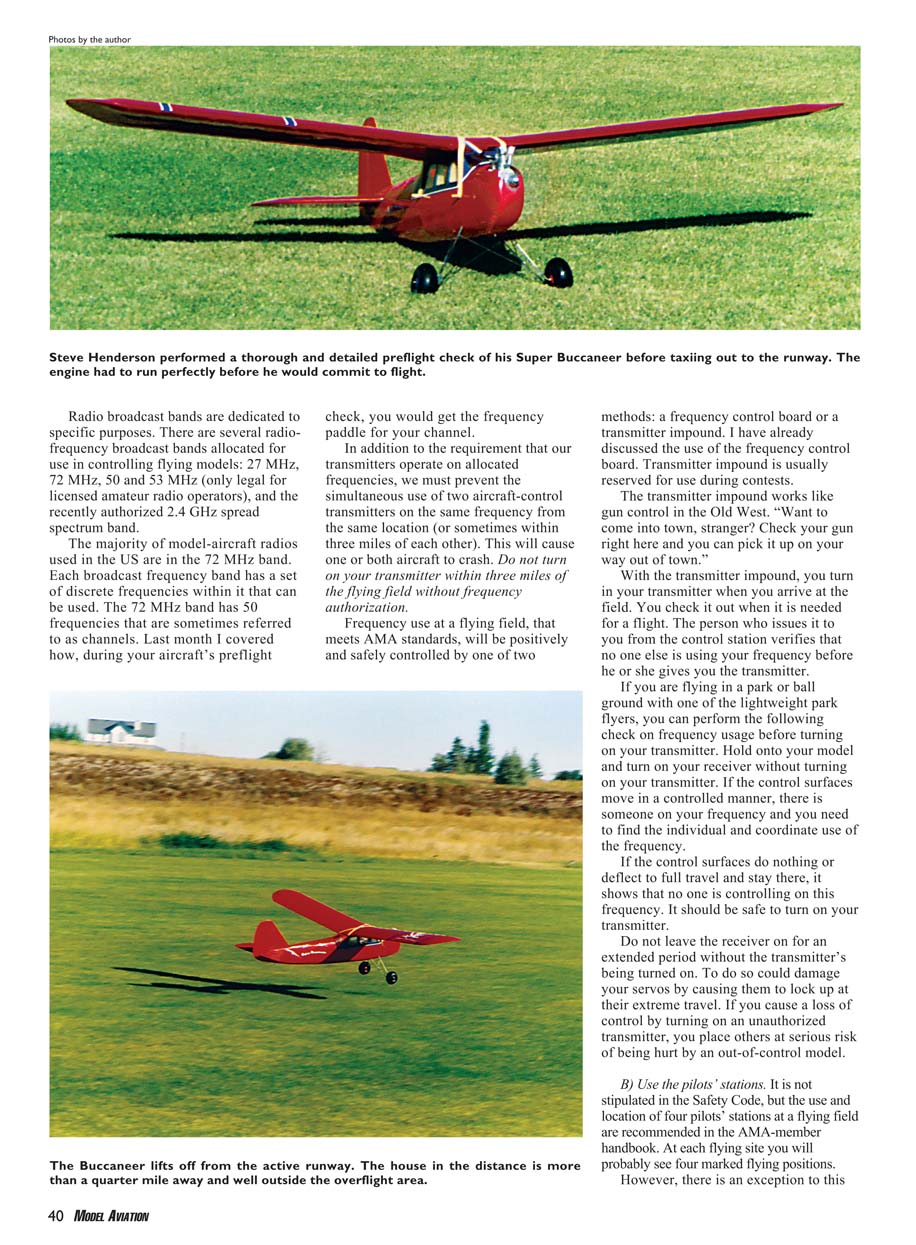
The majority of model-aircraft radios used in the U.S. are in the 72 MHz band. Each band has discrete frequencies (channels). The 72 MHz band has 50 frequencies. During your aircraft’s preflight check you would get the frequency paddle for your channel.
In addition to the requirement that our transmitters operate on allocated frequencies, we must prevent the simultaneous use of two aircraft-control transmitters on the same frequency from the same location (or sometimes within three miles of each other). This will cause one or both aircraft to crash. Do not turn on your transmitter within three miles of a flying field without frequency authorization.
Frequency use at a flying field that meets AMA standards will be positively and safely controlled by one of two methods: a frequency control board or a transmitter impound. Transmitter impound is usually reserved for contests.
The transmitter impound works like gun control in the Old West: check your transmitter when you arrive and pick it up when you leave. The person who issues it from the control station verifies that no one else is using your frequency before giving it to you.
If you are flying in a park or ball ground with a lightweight park flyer, you can perform the following check before turning on your transmitter: hold the model and turn on the receiver without turning on your transmitter. If the control surfaces move in a controlled manner, someone else is on your frequency and you need to find that individual to coordinate frequency use.
If the control surfaces do nothing or deflect to full travel and stay there, it indicates no one is controlling on this frequency. It should be safe to turn on your transmitter.
Do not leave the receiver on for an extended period without the transmitter being turned on. Doing so could damage your servos by causing them to lock up at extreme travel. If you cause a loss of control by turning on an unauthorized transmitter, you place others at serious risk.
B) Use the pilots’ stations
It is not stipulated in the Safety Code, but the use and location of four pilots’ stations at a flying field are recommended in the AMA-member handbook. At most flying sites you will see four marked flying positions.
There is an exception: Air Combat matches permit as many as eight fliers at one time with additional barriers, safety gear, and greater separation distances between flight operations and spectators.
Pilot positions may be marked using circles on concrete, yellow concrete pads set in the grass, or other means. Use them. The pilot-position markings provide physical separation between pilots and radios and limit the number of aircraft in flight at any time to four.
If there are already four fliers on station, wait your turn. Limiting the number of models airborne at one time minimizes the chance of a midair collision and resulting crash.
If you see an empty pilots’ station, carry your airplane out to the runway. My club considers taxiing models in the pit areas an unacceptable safety hazard. Taxiing is permitted on the taxiways.
As you approach the runway edge, set the airplane on the grass. Be considerate: do not carry a noisy aircraft behind the fliers who are already on station. The noise would be a distraction and would prevent them from noticing if their aircraft suddenly had an engine out.
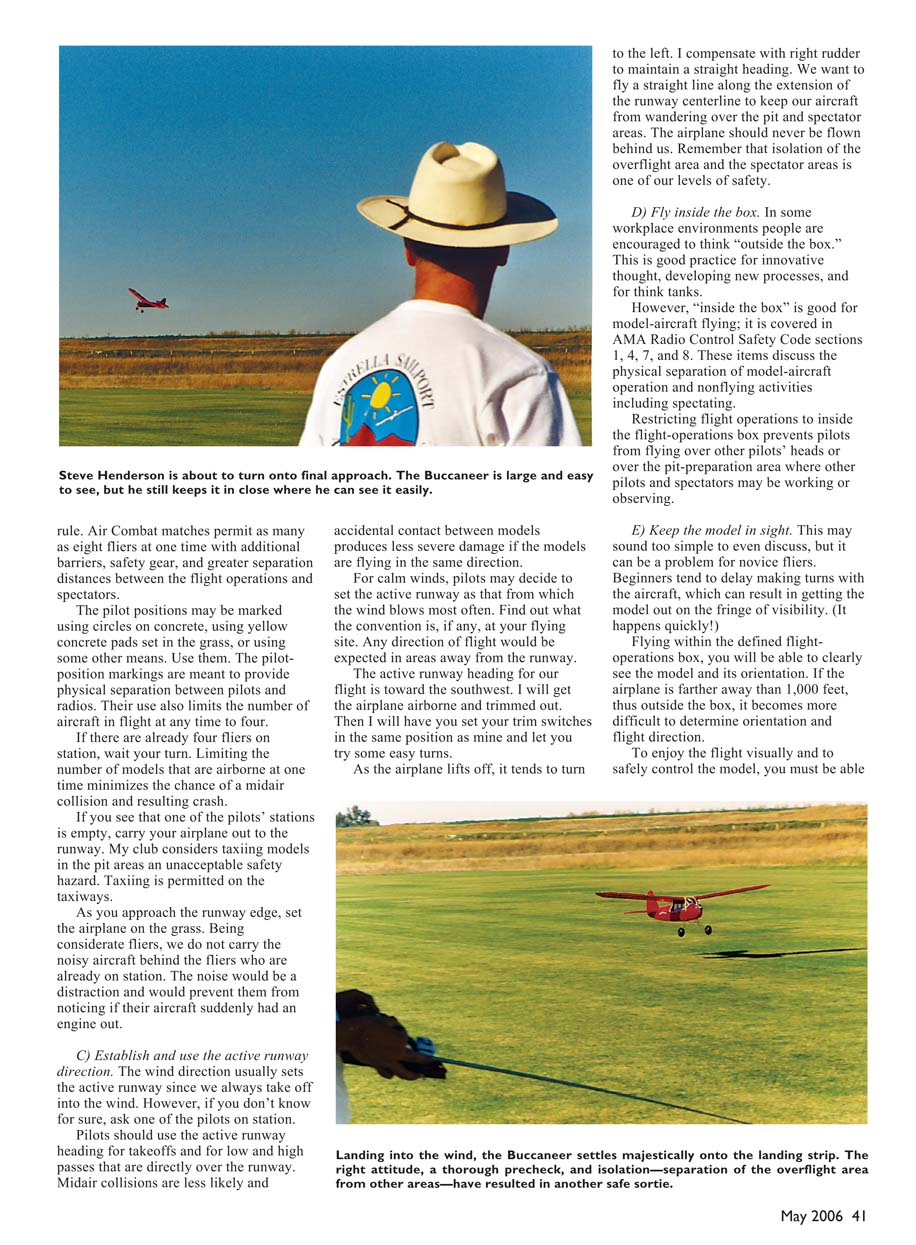
C) Establish and use the active runway direction
Wind direction usually sets the active runway since we always take off into the wind. If you don't know for sure, ask one of the pilots on station.
Pilots should use the active runway heading for takeoffs and for low and high passes directly over the runway. Midair collisions are less likely and accidental contact between models produces less severe damage if the models are flying in the same direction.
For calm winds, pilots may decide to set the active runway as that from which the wind blows most often. Find out what the convention is, if any, at your flying site. Any direction of flight would be expected in areas away from the runway.
The active runway heading for our flight is toward the southwest. I will get the airplane airborne and trimmed out. Then I will have you set your trim switches in the same position as mine and let you try some easy turns.
As the airplane lifts off, it tends to turn to the left. I compensate with right rudder to maintain a straight heading. We want to fly a straight line along the extension of the runway centerline to keep our aircraft from wandering over the pit and spectator areas. The airplane should never be flown behind us. Remember that isolation of the overflight area and the spectator areas is one of our levels of safety.
D) Fly inside the box
In some workplace environments people are encouraged to think "outside the box." This is good practice for innovation. However, "inside the box" is good for model-aircraft flying; it is covered in AMA Radio Control Safety Code sections 1, 4, 7, and 8. These items discuss the physical separation of model-aircraft operation and nonflying activities including spectating.
Restricting flight operations to inside the flight-operations box prevents pilots from flying over other pilots' heads or over the pit-preparation area where other pilots and spectators may be working or observing.
E) Keep the model in sight
This may sound too simple to discuss, but it can be a problem for novice fliers. Beginners tend to delay making turns with the aircraft, which can result in getting the model to the fringe of visibility. It happens quickly.
Flying within the defined flight-operations box, you will be able to clearly see the model and its orientation. If the airplane is farther away than about 1,000 feet, thus outside the box, it becomes more difficult to determine orientation and flight direction.
To enjoy the flight visually and to safely control the model, you must be able to see the model and its orientation at all times.
Transcribed from original scans by AI. Minor OCR errors may remain.

