


Searching for Free Flight Airplanes
By John Patton
For many years Free Flighters have been wandering around trying to find our airplanes on foot or atop small dirt bikes, following what we hope are the "lines" the models took during their flights. Most of the time we try to get visual lines or fixes on the directions our airplanes take by sighting in on a mountain, a tree, or, here in Arizona, a cactus. We are usually successful and we get our models back to fly again.
However, sometimes we get off course because we have to cross obstacles such as ditches or highways, or because we just plain don't walk too straight. If we waste a bunch of time searching and can't find our models quickly, it affects how many flights we can put up at a contest. The best time to fly on any given contest day is usually fairly short. The ultimate nightmare is losing models that really should be easy to find.
This article describes a simple way to locate a model by using wind speed to calculate flight distance and wind direction to predict a point where the model should be sitting — then navigating to that point with a Global Positioning System (GPS). It's a relatively inexpensive yet high-tech approach to getting our models out of the corn. By knowing the amount of time the airplane is in the air and the accurate wind speed and direction, you can go straight to the model.
How the model behaves
A Free Flight model is typically set up to glide in circles as it follows the wind to its (it is hoped) maximum flight. The aircraft drifts downwind in this circle for as long as you have set the timer for the dethermalizer device. That timer is a known time and is used in your calculations, with a fudge factor for how long it takes the airplane to lose altitude after dethermalizing.
It is best if you can see the model and time it until it lands. This reduces time-related errors. Even if the flight is not a max, you can accurately follow the aircraft's path straight downwind with GPS information. This is difficult to do with only a compass if you are not an expert.
There are marine binoculars available with built-in electronic compasses that can give you an accurate heading as you follow the model's flight path. You need to know wind speed and wind direction accurately for the next part of the equation — the old "wet finger in the air" won't do it.
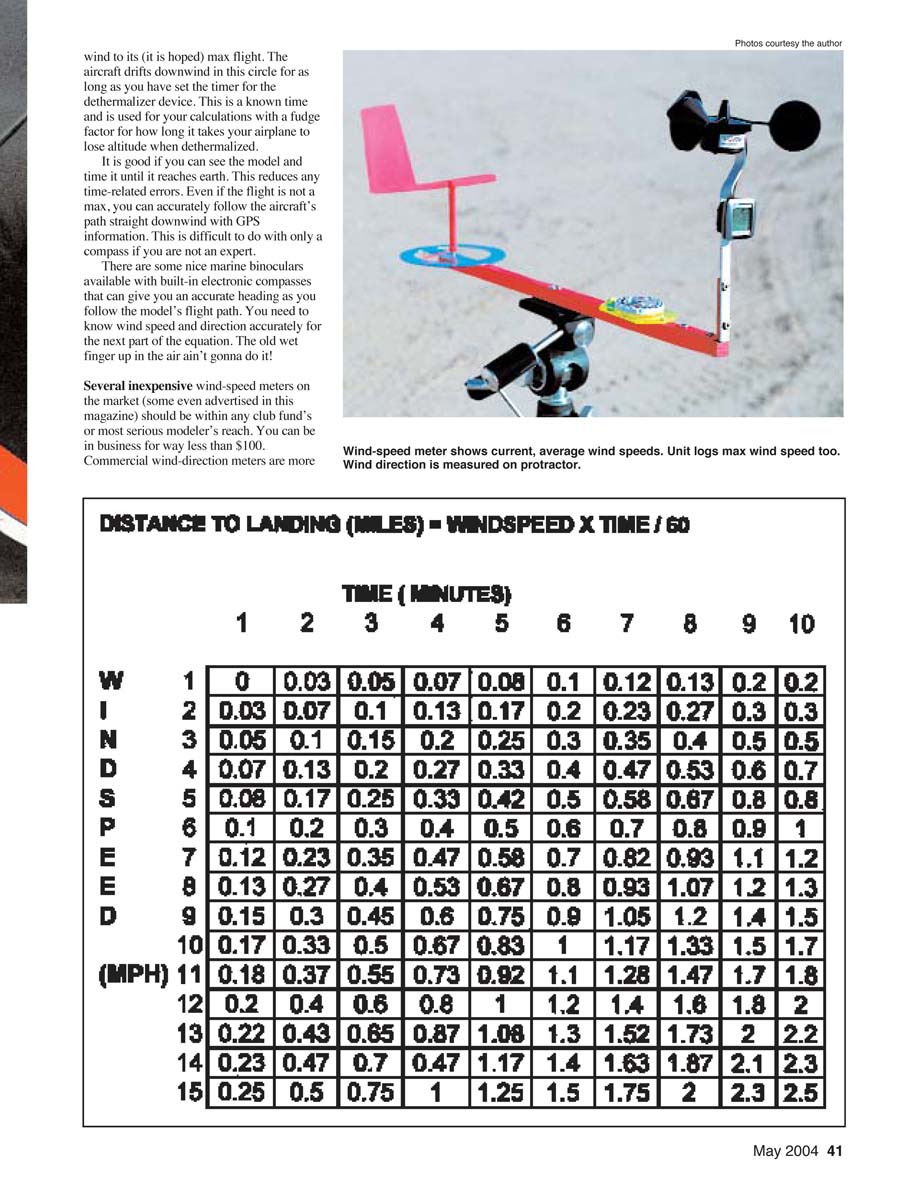
Several inexpensive wind-speed meters on the market (some even advertised in this magazine) should be within any club fund's or most serious modeler's reach. You can be in business for well under $100. Commercial wind-direction meters are more complex (read: expensive). In this article I refer to a simple yet extremely accurate wind-direction meter option.
Calculating distance traveled
You can calculate the distance the model has traveled by multiplying the time of flight (in minutes) by the wind speed (in miles per hour) and dividing by 60:
- Distance (miles) = Time (minutes) × Wind speed (mph) ÷ 60
Examples:
- A four-minute flight in a 6 mph breeze: 6 × 4 ÷ 60 = 0.40 mile
- A seven-minute flight in an 8 mph breeze: 7 × 8 ÷ 60 = 0.93 mile
Once you know the distance, combine it with wind-direction information to determine the bearing from the launch site to the likely resting point.
Using a GPS (Garmin eTrex example)
You will use the "Projecting a Waypoint" feature, which is common to most GPS units. Instructions vary by brand; the steps below are for the Garmin eTrex, but the concepts apply broadly.
- Turn the GPS on and let it acquire satellites so it can determine your current position.
- Mark the launch site as a waypoint:
- Press and hold the "Enter" button until the "Mark Waypoint" page appears.
- Name the waypoint (for example, "Field").
- Use the "Down" button to select "OK" and press "Enter."
- Open the waypoint list:
- Press the "Page" button to go to the "Menu" page.
- Select and enter "Waypoints."
- Find and select your "Field" waypoint to open the "Review Waypoints" page.
- Project a new waypoint:
- Select "Project" from the "Review Waypoints" page to open the "Project Waypoint" page.
- Enter the distance (calculated earlier) and bearing (wind direction) in the number and angle fields. You may name the projected waypoint if you wish.
- After entering the distance and angle, the GPS returns you to the "Review Waypoint" page.
- Navigate to the projected waypoint:
- Scroll to the "Go To" function and press "Enter"; this selects the projected waypoint as the destination.
- The unit will activate the "Pointer" (or "Compass") page, which will steer you to the waypoint.
- You can also use the "Map" page to follow the line to the model.
Note: Many GPS units will not accept a distance smaller than 0.1 mile. Remember that 0.1 mile = 528 feet. If you need to go 0.34 mile, enter 0.3 mile and then follow the GPS readout for the remaining 0.04 mile (about 211 feet) using the pointer.
Wind measurement rig
A basic and accurate setup to measure wind speed and direction is simple to build:
- Wind-speed meter (anemometer) mounted on one end of a bar (e.g., Vortex Pro-1200).
- Wind-direction measured at the other end of the bar by a weathervane device that indicates the bearing in compass degrees (readable on a protractor scale).
- Mount the entire rig on a tripod to get it high off the ground.
- Orient the bar to magnetic north and read the wind direction on the protractor scale that increases numerically clockwise.
This gives you a reliable wind speed and an accurate wind bearing to use in your projections.
Gear checklist (suggested)
- GPS unit with "Project Waypoint" feature (moving-map units are helpful)
- Wind-speed meter (anemometer)
- Wind-direction device / weathervane and protractor
- Tripod or mounting rig
- Binoculars with electronic compass (optional, but useful for sighting)
- Notebook or phone for timing flights
It may feel like you have gone back to school, but once set up, this method will save time and reduce lost models. Enough with the lessons — let's go fly!
John Patton 4228 N. 35 Pl. Phoenix, AZ 85018
Sources
Vortex Pro-1200:
- ItWorks (Innovative Tech Works)
- 527 Flume St., Chico, CA 95928
- www.itworks.com
- www.weathershop.com
Transcribed from original scans by AI. Minor OCR errors may remain.

