
The ShyFox
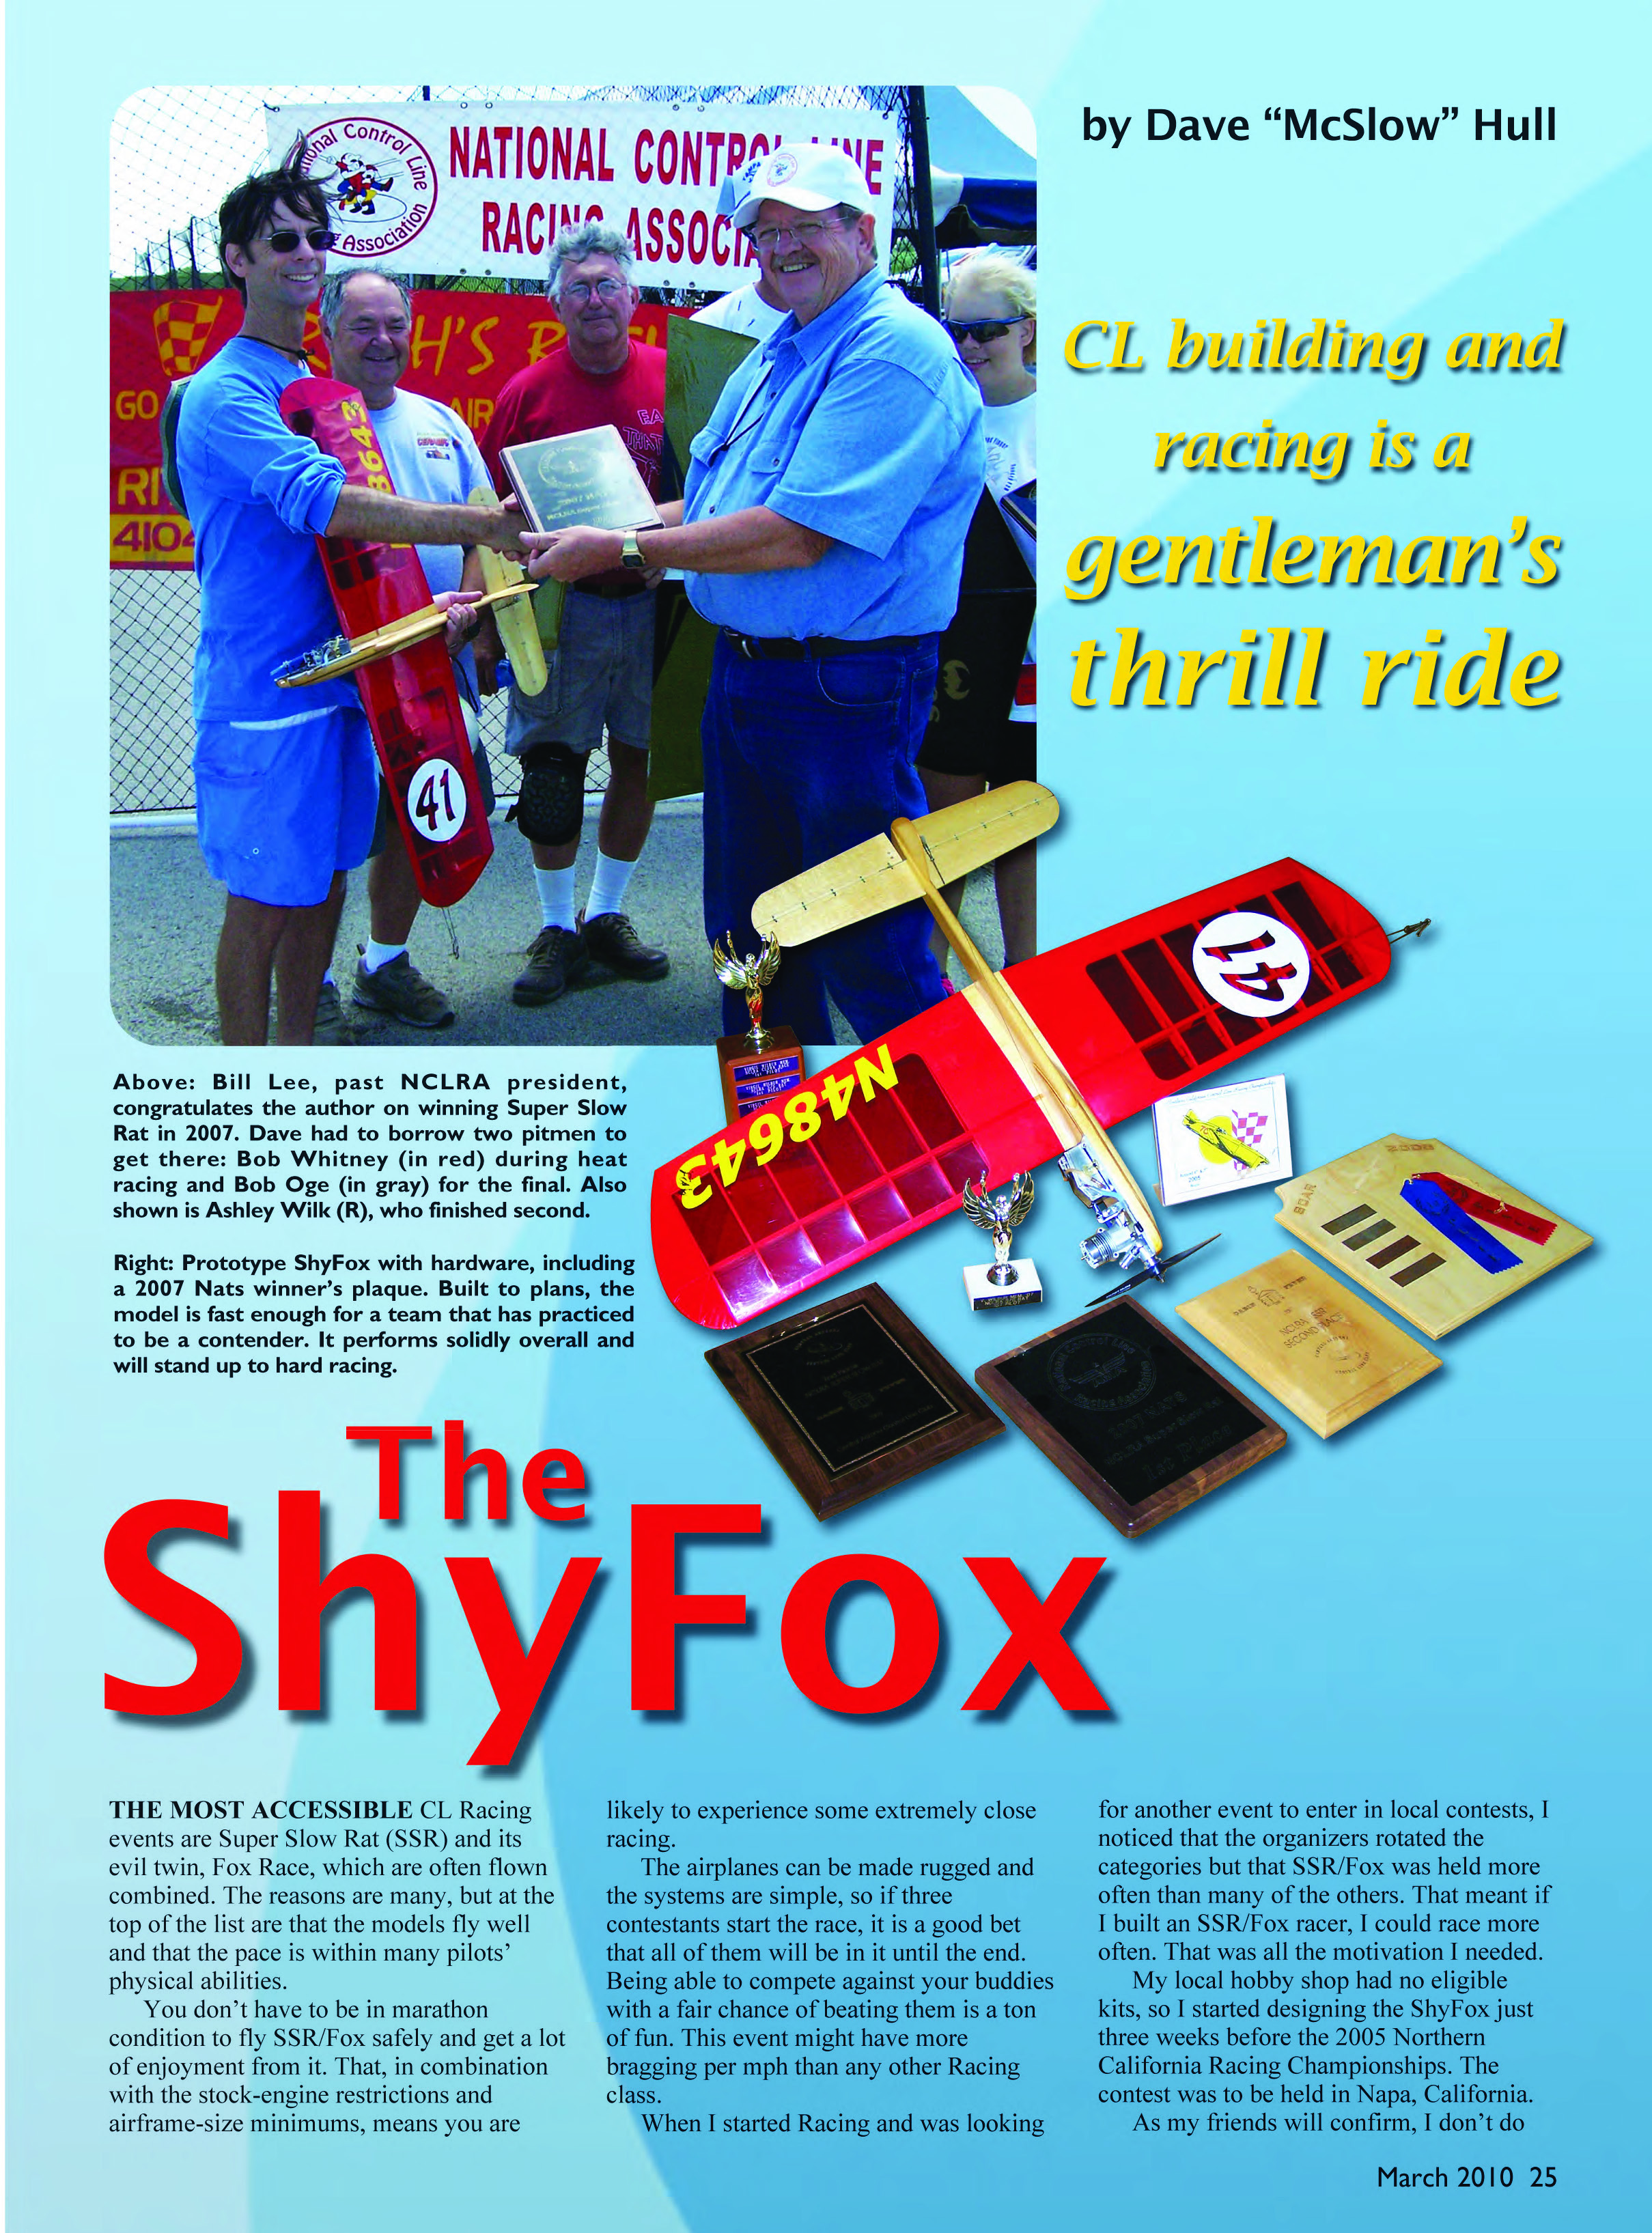
by Dave "McSlow" Hull
THE MOST ACCESSIBLE CL racing events are Super Slow Rat (SSR) and its evil twin, Fox Race, which are often flown combined. The models fly well and the pace is within many pilots' physical abilities, so you don't have to be in marathon condition to fly SSR/Fox safely and enjoy it. Stock-engine restrictions and airframe-size minimums encourage extremely close, fair racing. The airplanes can be made rugged and the systems are simple, so if three contestants start, it's a good bet all will finish. This event might have more bragging per mph than any other racing class.
When I started racing and wanted another event to enter at local contests, I noticed SSR/Fox was held more often than many others. If I built an SSR/Fox racer, I could race more often. My local hobby shop had no eligible kits, so I started designing the ShyFox three weeks before the 2005 Northern California Racing Championships in Napa, California.
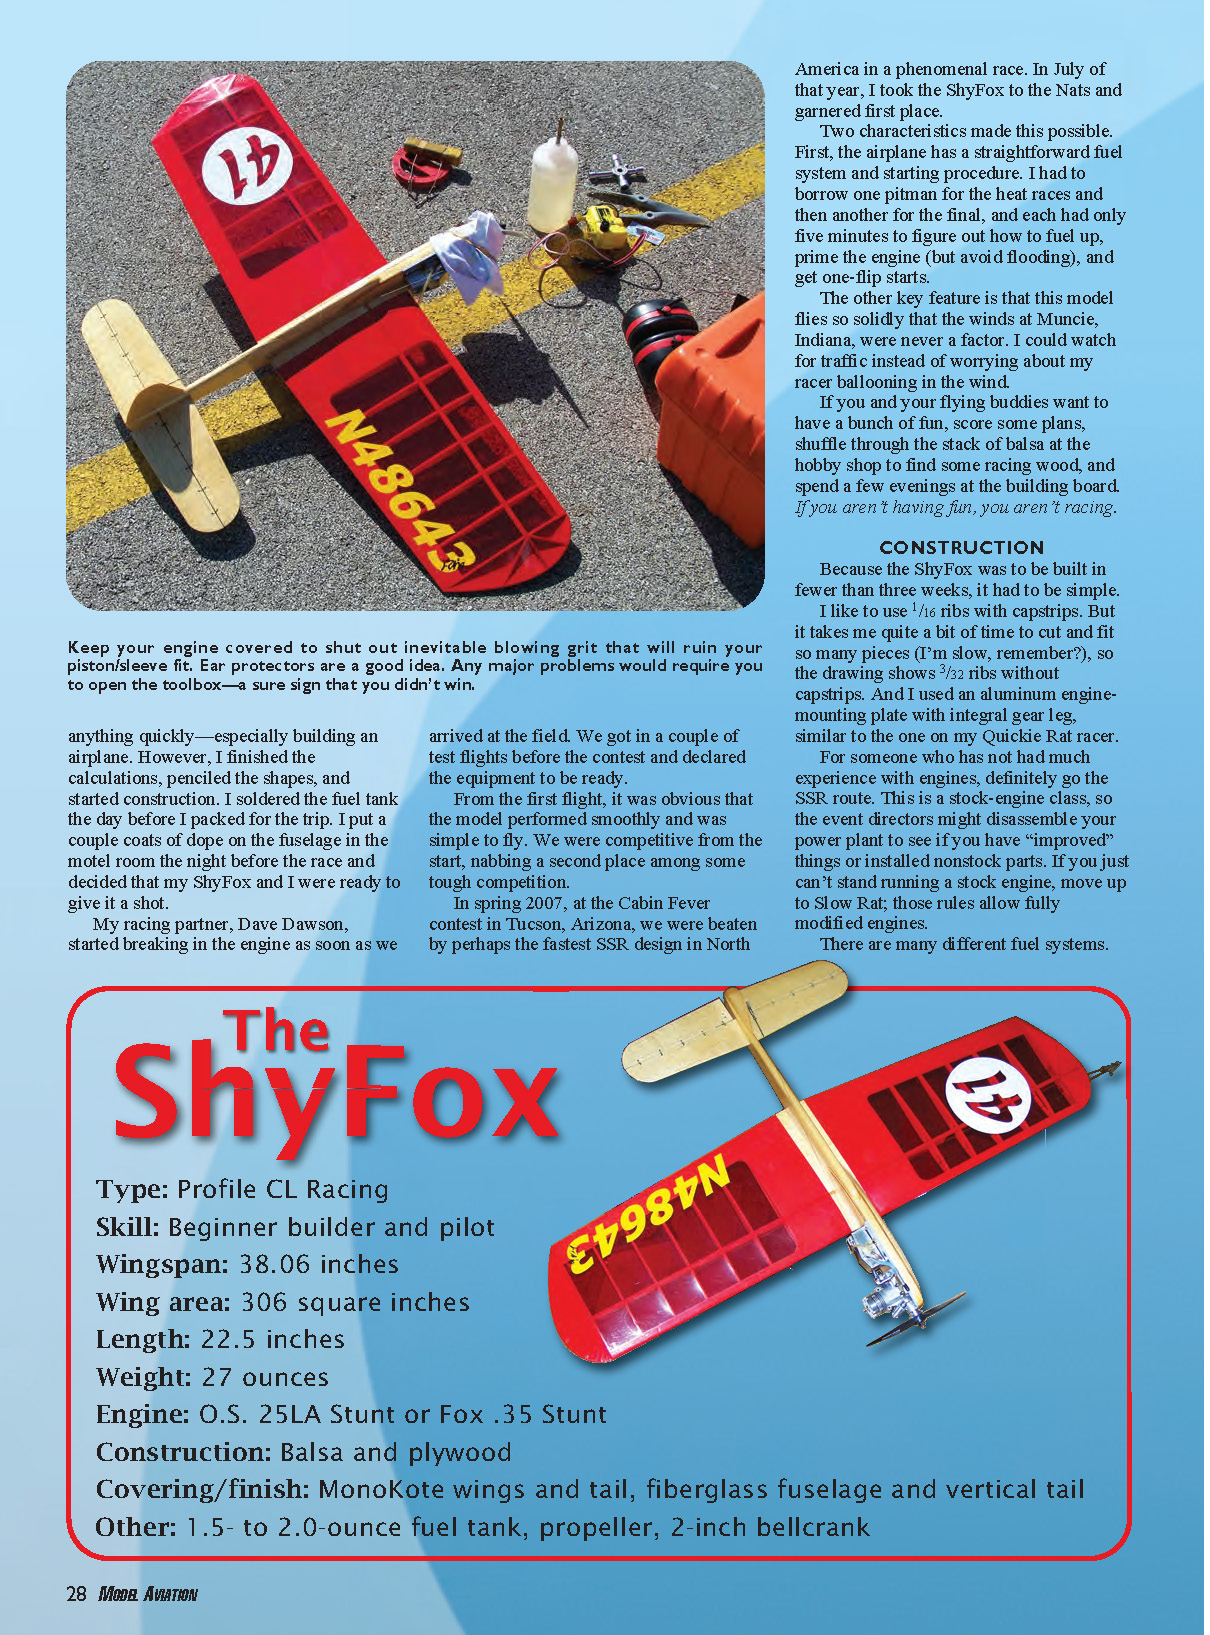
As my friends will confirm, I don't do anything quickly—especially building an airplane. However, I finished the calculations, penciled the shapes, and started construction. I soldered the fuel tank the day before I packed for the trip and put a couple coats of dope on the fuselage in the motel room the night before the race. My racing partner, Dave Dawson, started breaking in the engine as soon as we arrived at the field. We got in a couple of test flights and declared the equipment ready. From the first flight the model performed smoothly and was simple to fly; we were competitive from the start, nabbing a second place among some tough competition.
In spring 2007 at Cabin Fever in Tucson, Arizona, we were beaten by perhaps the fastest SSR design in North America in a phenomenal race. In July of that year, I took the ShyFox to the Nats and garnered first place. Two characteristics made this possible: a straightforward fuel system and starting procedure (I borrowed pitmen for heats who had only minutes to learn fueling and starting), and a model that flies solidly so wind is rarely a factor.
If you and your flying buddies want a bunch of fun, score some plans, shuffle through the balsa at the hobby shop for racing wood, and spend a few evenings at the building board. If you aren't having fun, you aren't racing.
Construction
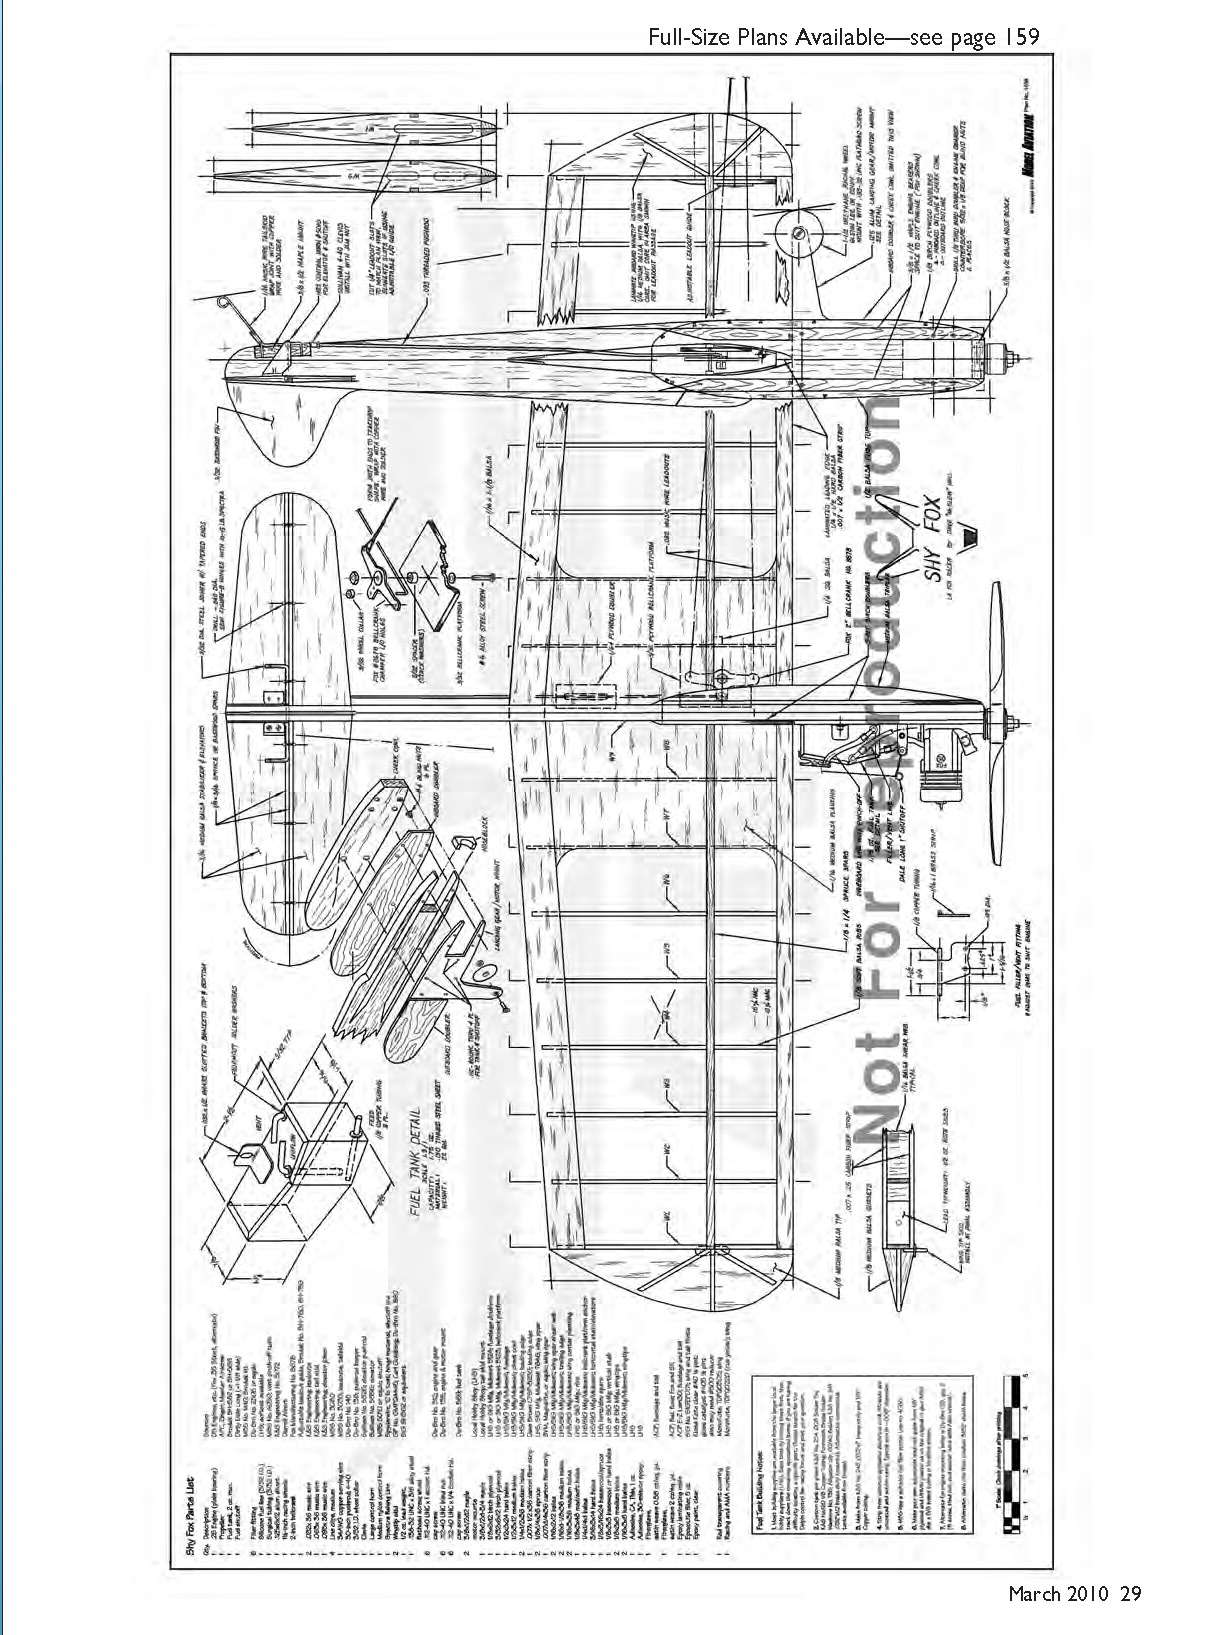
Because the ShyFox had to be built in fewer than three weeks, it was designed to be simple. I prefer 1/16-inch ribs with capstrips, but to save time the drawing shows 3/32-inch ribs without capstrips. I used an aluminum engine-mounting plate with integral gear leg, similar to the one on my Quickie Rat racer.
For someone inexperienced with engines, go the SSR route. SSR is a stock-engine class and officials may disassemble your engine to check for nonstock parts. If you can't tolerate stock engines, move up to Slow Rat, where modifications are allowed.
Fuel system and starting tips
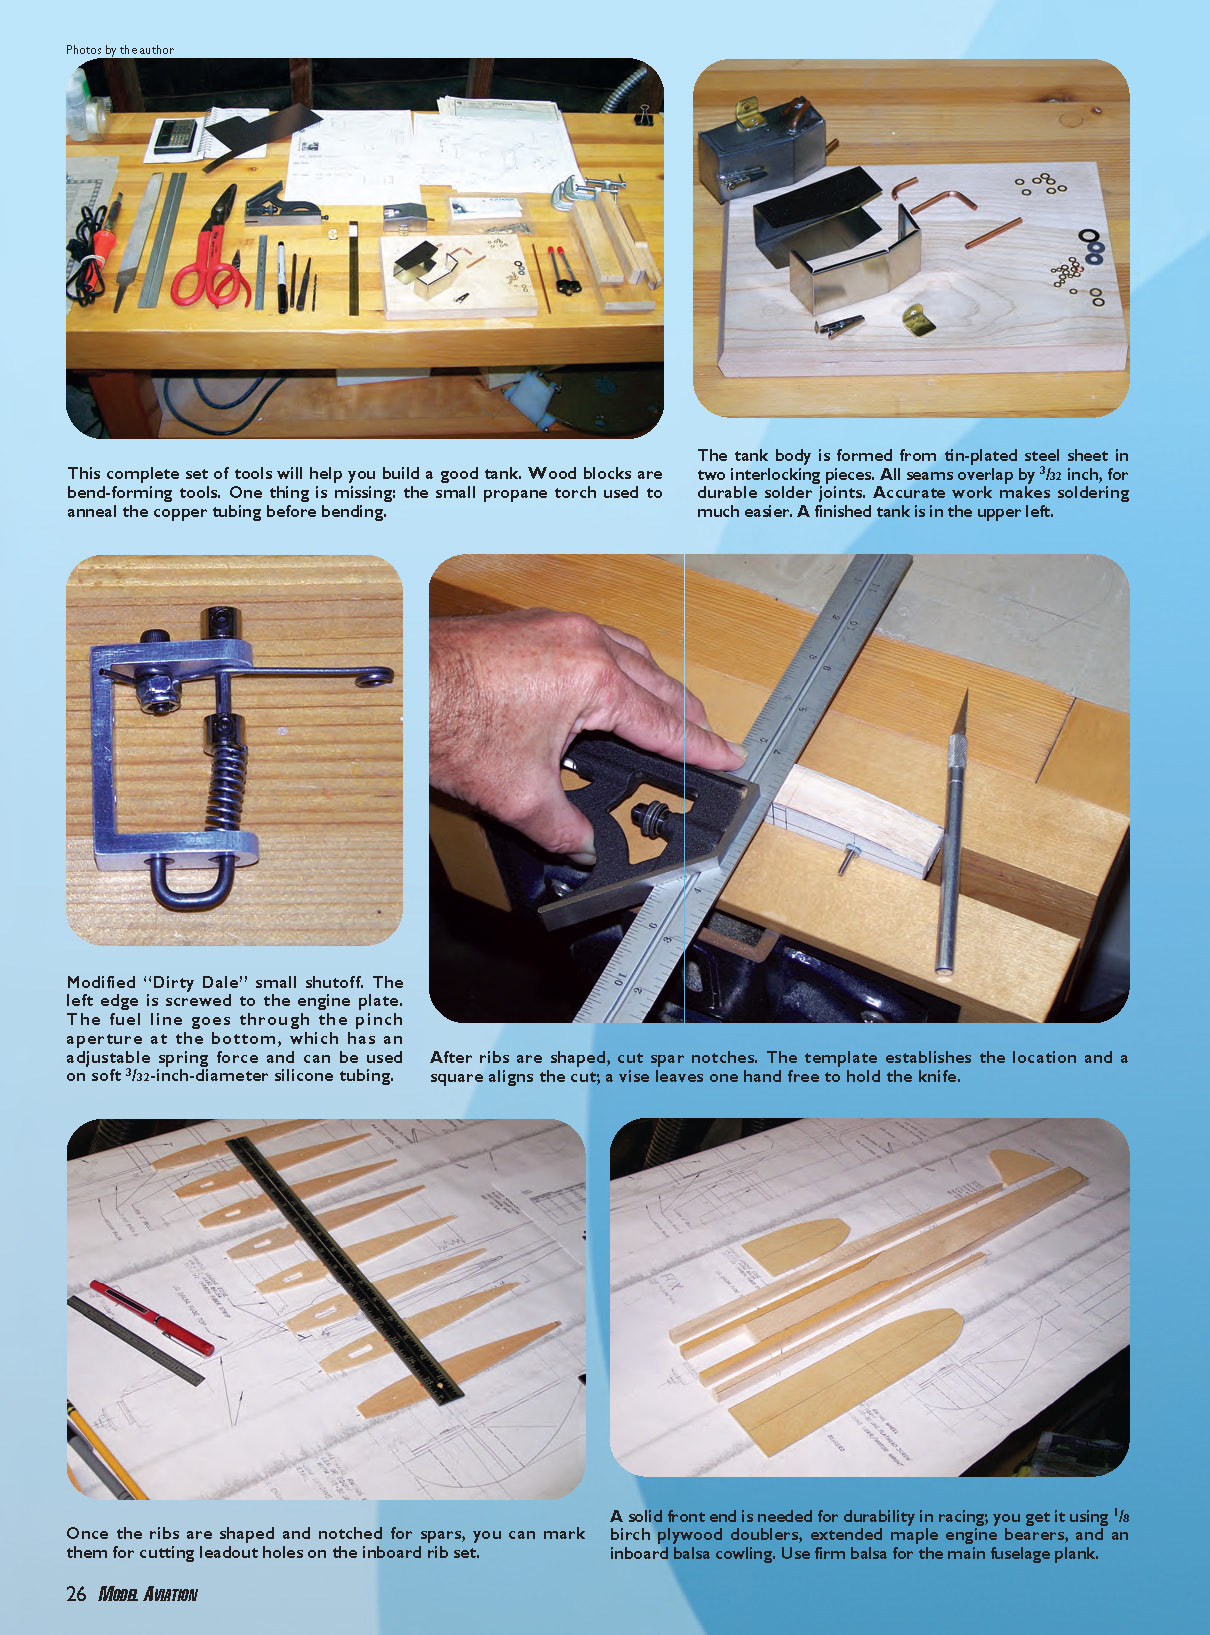
Numerous fuel systems work well; some are harder to tune. To achieve the correct number of laps, size the tank to match your engine. Rules permit up to a 2-ounce tank, but many .25 engines will overrun on that much fuel and you may be disqualified for not completing the required two pit stops. I suggest bench-running your engine to determine how much fuel is required to last 105–120 seconds when set slightly rich of peak; that should yield about 35–40 laps at typical ShyFox speeds—roughly 1.5 ounces for many engines. Scale the tank length on the plans to this volume. If custom tanks are a problem, consider Brodak BH-582 or BH-566.
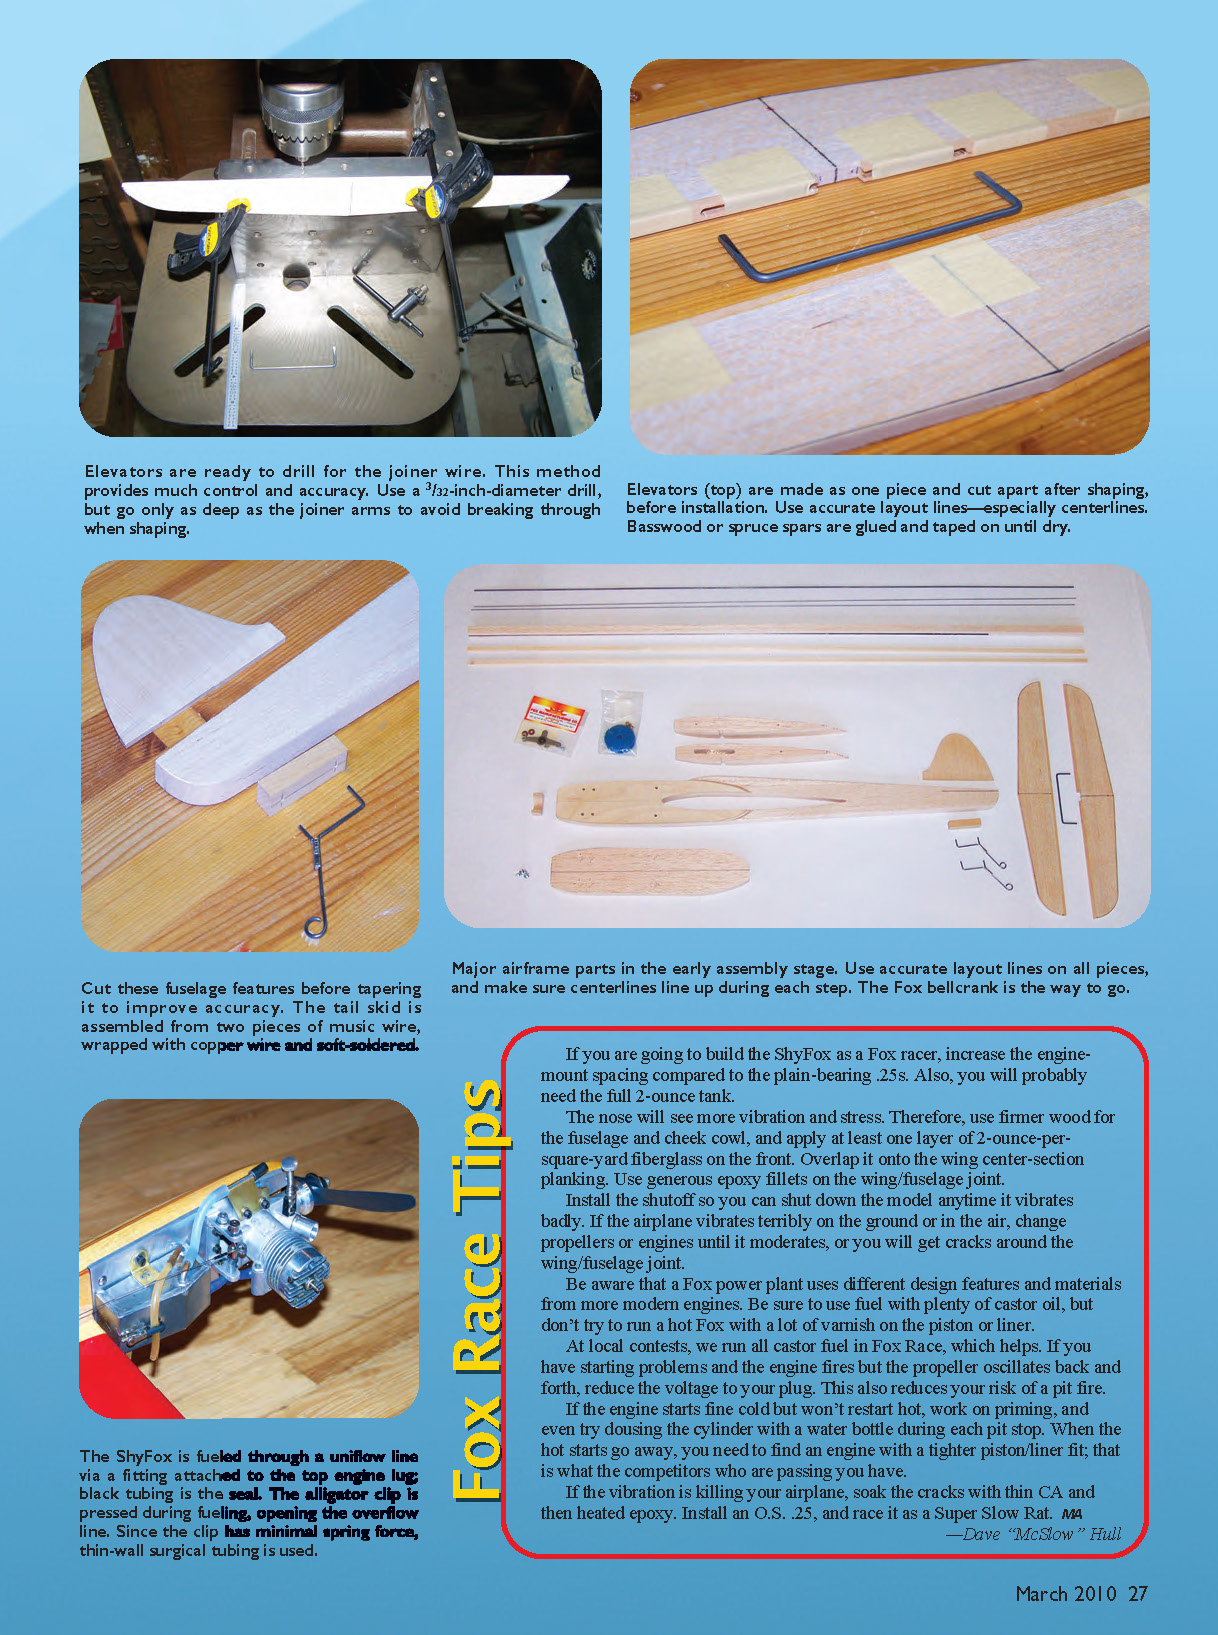
The ShyFox prototype uses a uniflow fill with a fitting attached to the top engine lug; black tubing is the seal. An alligator clip is pressed during fueling to open the overflow line. Because the clip has minimal spring force, thin-wall surgical tubing is used to maintain pressure.
The fuel shutoff is an integral safety item in SSR/Fox (you can't use it during the race). Being able to shut down the model can rescue a pilot from mistakes or rough vibration. My model uses the spring-loaded drawbar-type shutoff (the wire is "J"-shaped) with a pull-to-actuate trip wire—the small size from Dirty Dale Long works well. The shutoff also allows quick needle-adjustment flights immediately before a race.
Starting tips and hot-start guidance:
- If the engine fires but the propeller oscillates back and forth on starting, reduce voltage to the glow plug to reduce risk of pit fire.
- If the engine starts fine cold but won't restart hot, work on priming and try dousing the cylinder with water from a bottle during each pit stop; if hot starts persist you need an engine with a tighter piston/liner fit.
- Run fuel with plenty of castor oil for Fox power plants, and avoid running a hot Fox with heavy varnish on the piston/liner.
- At local contests we run all-castor fuel in Fox Race.
- Keep the engine covered to keep grit out and protect piston/sleeve fit. Ear protectors are a good idea.
If vibration is cracking the airframe, soak cracks with thin CA, then heated epoxy. Consider installing an O.S. .25 and racing SSR if Fox vibration is excessive.
Materials and parts
- Ribs: 3/32-inch (plans) or 1/16-inch with capstrips if you have time.
- Spars and LE: spruce spars with carbon-fiber reinforcement (see below).
- LE lamination: two pieces of 1/4 x 1/2 stock with 0.007 x 1/2 CF in between.
- Spar reinforcement: 0.007 x 1/4-inch CF strip laminated to the inside of each spruce spar; solvent-wipe CF and use epoxy.
- Engine mount: maple or birch engine mounts; use 30-minute epoxy for mounting.
- Gear: aluminum monowheel gear from heat-treated alloy (6061-T6 or 2024-T4); urethane wheel with threaded brass hub recommended.
- Fiberglass: use very lightweight cloth for fuselage and tail—prototype used 0.58-ounce-per-square-yard plain-weave and a low-viscosity epoxy.
Wing
The wing has a constant thickness of 1 inch (minimum) from root to tip and can be built flat on the board. Place a 3/8-inch strip of balsa under the trailing edge and move it fore/aft until its center is exactly 1/2 inch above the building surface along the span. If set correctly you'll have no washin, washout, or warps.
Best way to make ribs:
- Cut aluminum root and tip templates.
- Drill matching holes in templates and in a stack of rectangular balsa blanks.
- Sand each rib starting with 80-grit on one side and then the other; finish with 120-grit.
Spar notches:
- Lay spar stock in place and score notches carefully with a new razor blade for straight, snug fits.
- Cut leadout holes in the inboard ribs using sharpened 1/4-inch brass tubing.
Spars and LE:
- Laminate CF to the spars as noted; ensure spar stock is straight and flat before gluing.
- Add lower TE then upper TE; you may taper TE insides slightly to thin the finished TE.
- Reinforce spars and LE with CF as described; be careful not to cut spar notches too deep or you will reduce the 1-inch thickness required by rules.
Inboard tip:
- The inboard tip is laminated so leadouts pass through a center slot long enough to allow fore/aft movement for trimming. Set the adjustable guide per plans or glue in brass guides and install the bellcrank.
Covering:
- Prototype used MonoKote. Apply to the wing before installation in the fuselage. If covering with four pieces, leave a gap along the middle so you don't peel off covering before attaching the wing. Remember to allow for fillets.
Tail and fuselage
- Use firm to hard balsa for the fuselage and good five-ply birch plywood for doublers.
- Cut the blank for maple (or birch) engine mounts, establishing spacing to fit your engine.
- Taper TE of doublers before installation. Glue engine mounts and inboard doubler with 30-minute epoxy; when cured glue on the inboard doubler with its front edge lined up with the wing front.
- Use the wing rib template to carefully trace and cut the fuselage centerline wing slot. Drill a 3/16-inch hole at the LE and cut with a scroll saw or coping saw for a close, light, strong joint.
- Mark engine bolt pattern using the engine; drill holes and counterbore for Du-Bro blind nuts and press them in.
- Cut a 3/8 x 1/2 balsa nose block to add strength and reduce drag; cut engine-clearance radius before final lengthing.
- Cut the cheek cowling block from medium balsa, relieve over blind nuts, coat with epoxy for fuel-proofing, and install with epoxy or carpenter's glue.
- Glue in the maple tail skid block and make a replaceable wire skid; make a spare—skids wear on asphalt.
Tail specifics:
- Drill the fuselage hole for the elevator joiner and cut the horizontal stabilizer slot. Set tail with zero incidence to the wing; slot the top of the fuselage for the rudder.
- The prototype used a larger-than-planned stabilizer/elevator set from scrap; plans show the original size—pick what suits you.
- Fiberglass the fuselage and tail for strength and durability with an extremely lightweight cloth. Use an epoxy resin system with low viscosity; avoid thinning if possible.
- The rudder protects the shutoff horn if the model flips over (fiberglass or basswood construction). There should be no rudder offset.
Airframe assembly
- Insert wing and horizontal stabilizer into the fuselage. Set assembly on a large, flat surface and clamp fuselage to a 90° block at the nose. Sight along the stabilizer from the rear to ensure parallel to the wing—take your time; trim problems are magnified at speed.
- Seal and fuel-proof the wing/fuselage joint—KlassKote epoxy was used on the prototype. Mask over MonoKote and paint directly over the seam; scuff the covering and wipe with alcohol before painting.
- Hinge elevators with sewn hinges: insert joiner wire, align and tape elevators, and sew with 12-pound-test Spectra fishing line. Stitch a figure-eight through each set of holes with four passes per hole. Snug tight but do not over-tension and risk cutting wood or line.
- Use quality hardware (Sullivan Products Gold-N-Clevises recommended) and install a jam nut against the clevis once elevator neutral is set with bellcrank at midtravel.
- Fit wheel and engine/plate together; upper engine bolts hold the tank vent line and fueling port—assemble these now. Fit tank and shutoff between the wing and engine as far forward as feasible to aid fuel draw. Connect fuel lines and set shutoff trip so full down-elevator trips the shutoff.
- Prototype weight: 27 ounces (fairly heavy but durable). There is a trade-off between weight and durability—don't let a fragile airframe fall apart just when it's trimmed and fast.
Balance and checks:
- Make sure the CG is within 1/8 inch of plans location; trim CG within range to suit skills but a racer should fly level without constant correction.
- Ensure adjustable leadout guide is locked tight. Hang model with leadouts held together; it should hang slightly nose-down.
Test-Flying and Racing
Before flight:
- Connect lines and handle; verify lines are .015-inch stranded steel and between 59 feet, 6 inches and 60 feet, 6 inches long when measured between the handle and the fuselage centerline.
- Confirm up is really up and mark your handle. For the shown control setup, start with a handle spacing of approximately 2 inches.
- Try the shutoff in flight and set sensitivity to suit the pilot. If it's too sensitive the pilot may accidentally trip it during takeoff when applying down to avoid ballooning.
- Set down-control by simulating a takeoff-into-wind scenario; this maneuver is how we set each new model.
Race behavior and fuel:
- The engine should speed up slightly on the last lap, although a well-sized tank may run evenly to the end. The downside is reduced warning for the pit stop, so keep careful lap counts. Passing with a nearly empty tank is risky.
Final advice:
- If vibration is causing damage, change propellers or engines until it moderates. Use generous epoxy fillets on the wing/fuselage joint and overlap fiberglass onto the wing center-section planking if using Fox engines. Use firmer wood for the fuselage and cheek cowl and at least one layer of 2-ounce-per-square-yard fiberglass on the front when running Fox motors. If vibration persists, consider switching to an O.S. .25 and racing as Super Slow Rat.
- For more information on racing, check the National Control Line Racing Association (NCLRA) AMA SIG and its newsletter Torque Roll. One recommended article on learning to race is "The Race … and how to fly it" by John Kilsdonk (May 1977 MA); AMA members can access it via the Academy’s Members Only site.
I hope you enjoy building and racing your ShyFox. If you have the itch and want to learn how to race, NCLRA and the AMA provide excellent resources.
—Dave "McSlow" Hull [email protected]
Sources:
- Brodak Manufacturing — (724) 966-2726, www.brodak.com
- Dale Long (Dirty Dale shutoffs) — (951) 784-4328, [email protected]
- Darrell Albert (racing wheels and specialty items) — (760) 741-2505, [email protected]
- Marc Warwashana — 11577 North Shore Dr., Whitmore Lake MI 48189, [email protected]
- Du-Bro Products, Inc. — (800) 848-9411, www.dubro.com
- KlassKote — (612) 243-1234, www.klasskote.com
- Sullivan Products (control horns item 556) — (410) 732-3500, www.sullivanproducts.com
- National Control Line Racing Association — www.nclra.org
- Fox Manufacturing (stock .35 stunt engine, 2-inch bellcrank, glow plugs) — (479) 646-1656, www.foxmanufacturing.com
- O.S. Engines (stock 25LA CL engine) — (217) 398-8970, www.osengines.com
- MBS Model Supplies (lines, clips, fueling bottles, horns) — Melvin Schuette, (785) 256-2583, www.mbsmodelsupply.com
- K&S Engineering (tin-plated steel, copper tubing, aluminum plate) — (773) 586-8503, www.ksmetals.com
- Aerospace Composite Products (fiberglass cloth, EZ-Lam epoxy) — (925) 443-5900, www.acp-composites.com
- Dave Brown Products, Inc. (carbon-fiber materials) — (513) 738-1576, www.dbproducts.com
- Fourmost Products — (503) 357-2732, www.fourmostproducts.com
- AMA — (765) 287-1256, www.modelaircraft.org
Transcribed from original scans by AI. Minor OCR errors may remain.

