

Small-Field Flying
Paul Bradley 32238 Spinnaker Run, Magnolia, TX 77354 E-mail: [email protected]
In the March 2004 column I mentioned the Fan-Tastic Models AT-6 Texan kit. Because of space limitations, I was not able to give you many details about this model. Let me pick up where I left off.
With so many build-from-parts kits and ARF offerings available to the small-field flier, I thought it would be appropriate to spend a little time looking at a specific model that seems to offer something for almost every small-field flier’s area of interest.
Some of us get a major portion of our model-aviation enjoyment through the process of converting raw materials or a number of individual parts into a great flying machine. Others prefer to focus on the flying portion of the hobby and purchase highly prefabricated models.
From a flying perspective, some people like sedate models that will fly comfortably. Others prefer an airplane that will tax the pilot’s skills through aerobatics or types of flying that require a high level of pilot involvement during the flight, such as pylon racing.
Given the wide range of building and flying interests—especially within the small-field-flying community—kit manufacturers have some interesting decisions to make regarding their offerings.
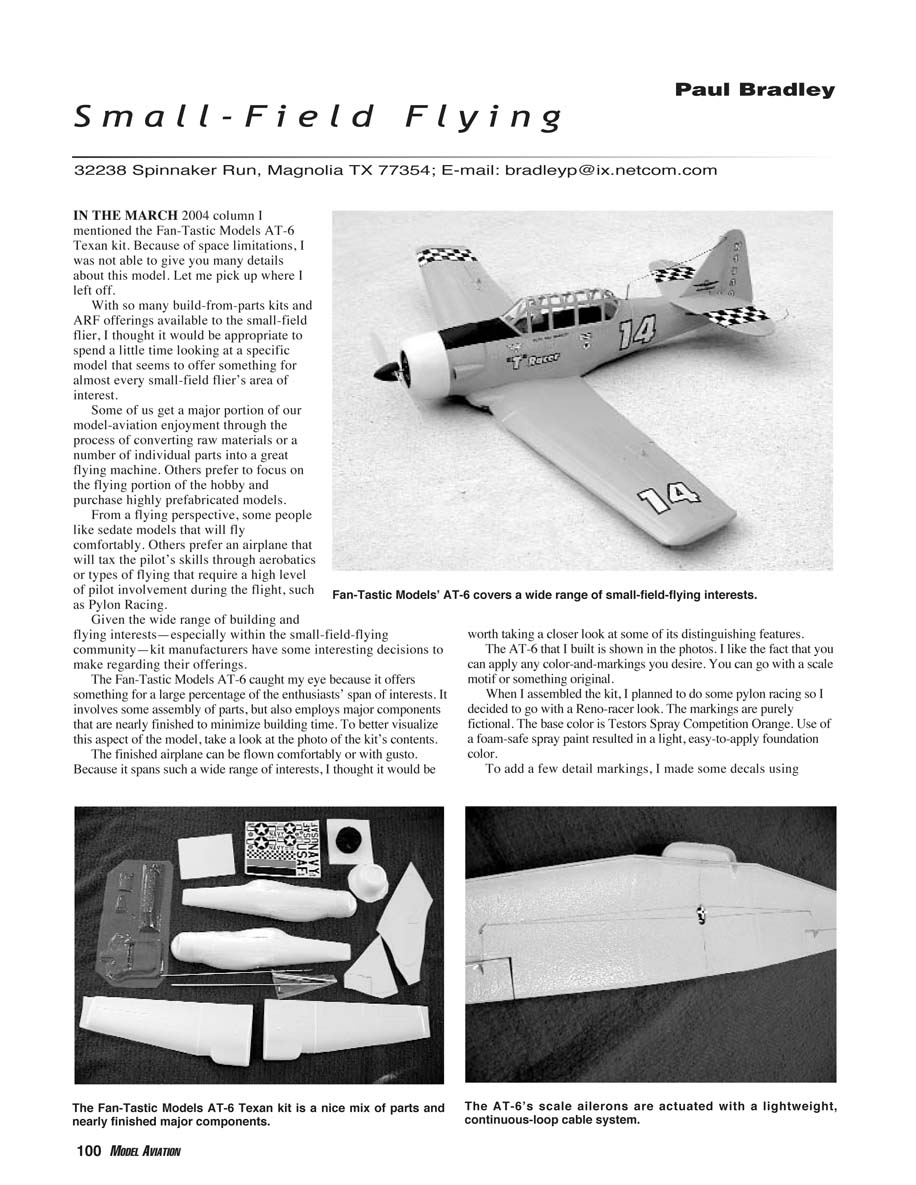
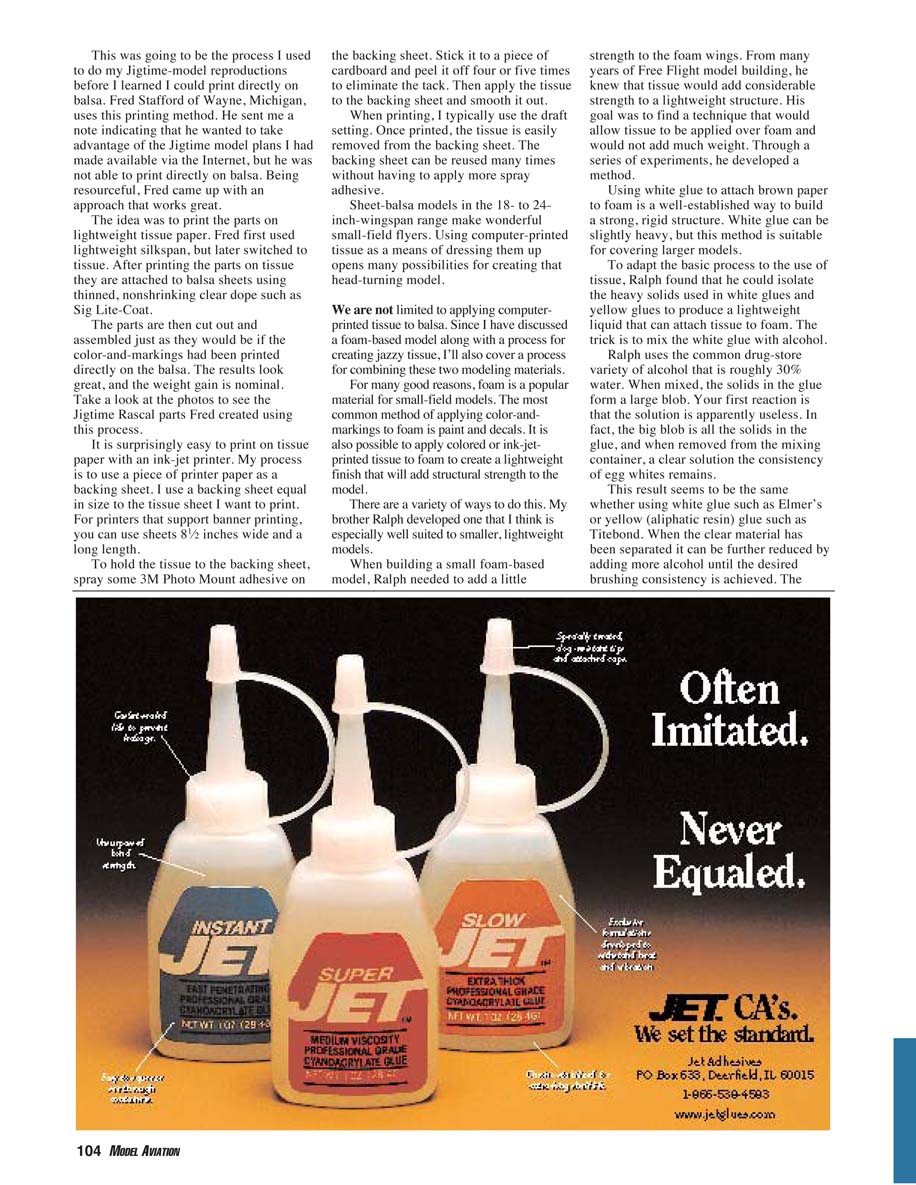
The Fan-Tastic Models AT-6 caught my eye because it offers something for a large percentage of the enthusiasts’ span of interests. It involves some assembly of parts, but also employs major components that are nearly finished to minimize building time. To better visualize this aspect of the model, take a look at the photo of the kit’s contents.
The finished airplane can be flown comfortably or with gusto. Because it spans such a wide range of interests, I thought it would be worth taking a closer look at some of its distinguishing features.
The AT-6 that I built is shown in the photos. I like the fact that you can apply any color and markings you desire. You can go with a scale motif or something original.
When I assembled the kit, I planned to do some pylon racing so I decided to go with a Reno-racer look. The markings are purely fictional. The base color is Testors Spray Competition Orange. Use of a foam-safe spray paint resulted in a light, easy-to-apply foundation color.
To add a few detail markings, I made some decals using special decal stock made for computer ink-jet printers. I used the AT-6 as a trial for this decal process, and I was happy with the results.
As with any technique new to a builder, I have more to learn about homemade ink-jet decals, but I can certainly recommend the process to anyone with a computer and ink-jet printer. My source for the material is given at the end of the column.
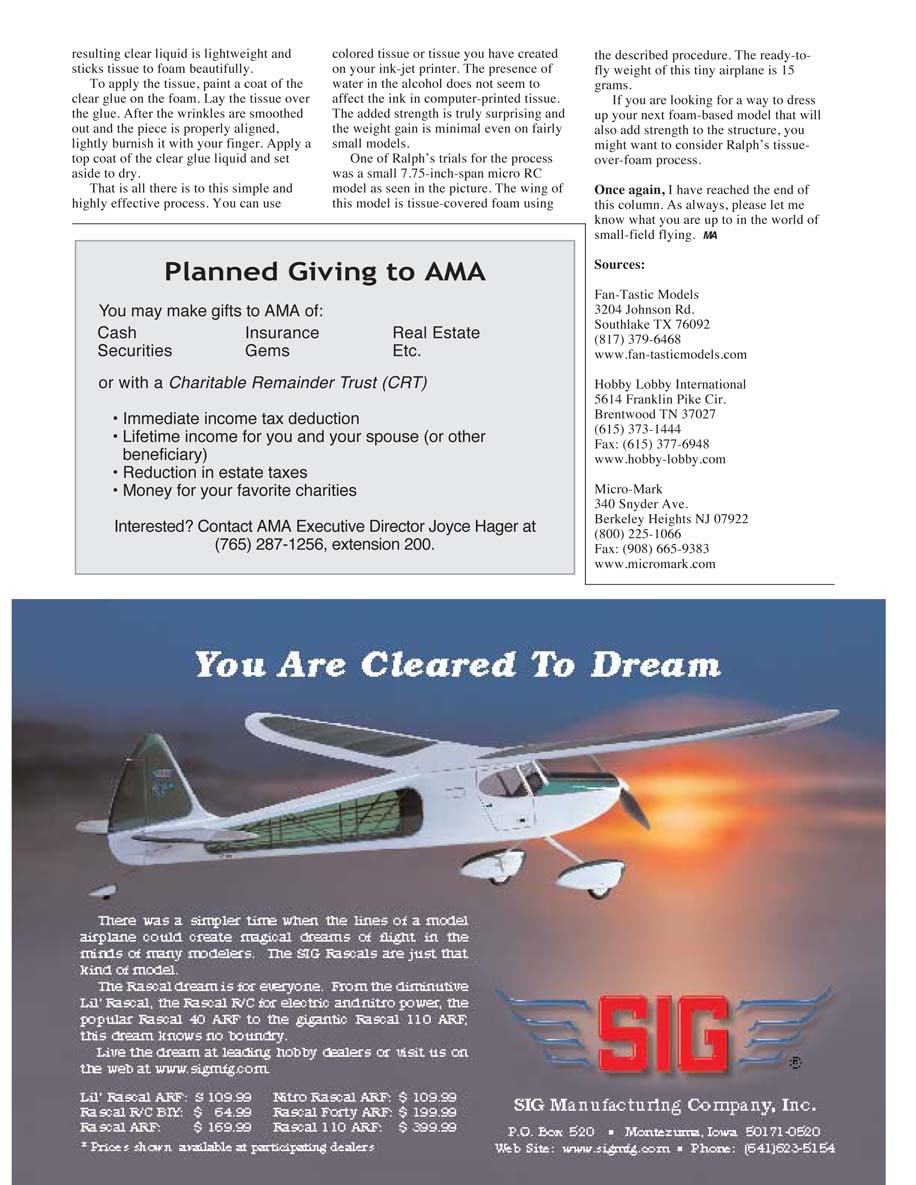
There are several features of this model that are noteworthy. One is the aileron setup. Keeping the model light is always a primary goal. Aileron installations tend to add weight. This is especially true when duplicating scale ailerons.
Fan-Tastic Models designer Jerry Small has overcome that problem with an effective and lightweight cable-linkage installation. A photo has been provided of the aileron cable setup. It is a continuous loop of low-stretch material routed to each aileron with the servo arms in the middle. The system works nicely.
Power for the AT-6 is the now-common, inexpensive Grand Wing Servo (GWS) DX-A electric motor and gear drive. That setup employs a 5.86:1 gearbox and can handle voltages in the seven- and eight-cell battery pack range. That is especially nice for the two-cell Lithium-Polymer cells that are becoming so popular within the electric-power community.
Another unique feature of the AT-6 kit is the motor-mounting arrangement for the GWS package. A strip of styrene plastic is glued to the top of the gearbox. The motor assembly is then slipped into a fabricated foam disk.
With the motor inserted into the disk, the diameter is slightly larger than the inside diameter of the fuselage. The foam is compressed and slid into the fuselage. A clearance is provided around the motor for cooling. Any desired thrust adjustments are simply a matter of moving the motor assembly.
Once in place, a bit of foam-safe cyanoacrylate is applied to the foam disk to hold it to the fuselage shell. The motor can easily be pulled from the disk if needed, but is otherwise fully retained for flying. This nice motor mount is simple, light, and absorbs shock.
In addition to having some interesting design features, the AT-6 is a great small-field flier. I have been flying mine in a confined space with no difficulty. It makes tight pylon turns, so it can be kept inside close spaces—such as an indoor facility—with little difficulty. Although it's not a Pattern aircraft, the AT-6 performs a nice set of aerobatics. You can have fun doing loops, rolls, and simply flying it around.
These are only a few highlights of the Fan-Tastic Models AT-6 Texan. It is a nice kit that can cover a wide range of interests within the small-field-flying community.
PB
Printing on Balsa—an Alternative Approach:
In several past columns I have shared my efforts to reproduce the old Top Flite Jigtime models. These projects have taken advantage of some features of my computer's ink-jet printer that allow the parts of the models to be printed directly on balsa sheets. That is great if you have a printer that permits you to print on balsa, but what if your printer does not support that process? I have another method to share with you that gives the same level of color and marking application with only a slight weight penalty.
This was going to be the process I used to do my Jigtime-model reproductions before I learned I could print directly on balsa. Fred Stafford of Wayne, Michigan, uses this printing method. He sent me a note indicating that he wanted to take advantage of the Jigtime model plans I had made available via the Internet, but he was not able to print directly on balsa. Being resourceful, Fred came up with an approach that works great.
The idea was to print the parts on lightweight tissue paper. Fred first used lightweight silkspan, but later switched to tissue. After printing the parts on tissue they are attached to balsa sheets using thinned, nonshrinking clear dope such as Sig Lite-Coat.
The parts are then cut out and assembled just as they would be if the color and markings had been printed directly on the balsa. The results look great, and the weight gain is nominal. Take a look at the photos to see the Jigtime Rascal parts Fred created using this process.
It is surprisingly easy to print on tissue paper with an ink-jet printer. My process is to use a piece of printer paper as a backing sheet. I use a backing sheet equal in size to the tissue sheet I want to print. For printers that support banner printing, you can use sheets 8.5 inches wide and a long length.
To hold the tissue to the backing sheet, spray some 3M Photo Mount adhesive on the backing sheet. Stick it to a piece of cardboard and peel it off four or five times to eliminate the tack. Then apply the tissue to the backing sheet and smooth it out.
When printing, I typically use the draft setting. Once printed, the tissue is easily removed from the backing sheet. The backing sheet can be reused many times without having to apply more spray adhesive.
Sheet-balsa models in the 18- to 24-inch-wingspan range make wonderful small-field flyers. Using computer-printed tissue as a means of dressing them up opens many possibilities for creating that head-turning model.
We are not limited to applying computer-printed tissue to balsa. Since I have discussed a foam-based model along with a process for creating jazzy tissue, I'll also cover a process for combining these two modeling materials.
For many good reasons, foam is a popular material for small-field models. The most common method of applying color and markings to foam is paint and decals. It is also possible to apply colored or ink-jet-printed tissue to foam to create a lightweight finish that will add structural strength to the model.
There are a variety of ways to do this. My brother Ralph developed one that I think is especially well suited to smaller, lightweight models.
When building a small foam-based model, Ralph needed to add a little strength to the foam wings. From many years of free-flight model building, he knew that tissue would add considerable strength to a lightweight structure. His goal was to find a technique that would allow tissue to be applied over foam and would not add much weight. Through a series of experiments, he developed a method.
Using white glue to attach brown paper to foam is a well-established way to build a strong, rigid structure. White glue can be slightly heavy, but this method is suitable for covering larger models.
To adapt the basic process to the use of tissue, Ralph found that he could isolate the heavy solids used in white glues and yellow glues to become a lightweight liquid that can attach tissue to foam. The trick is to mix the white glue with alcohol.
Ralph uses the common drug-store variety of alcohol that is roughly 30% water. When mixed, the solids in the glue form a large blob. Your first reaction is that the solution is apparently useless. In fact, the big blob is all the solids in the glue, and, when removed from the mixing container, a clear solution the consistency of egg whites remains.
This result seems to be the same whether using white glue such as Elmer's or yellow (aliphatic resin) glue such as Titebond. When the clear material has been separated it can be further reduced by adding more alcohol until the desired brushing consistency is achieved.
The resulting clear liquid is lightweight and sticks tissue to foam beautifully.
To apply the tissue, paint a coat of the clear glue on the foam. Lay the tissue over the glue. After the wrinkles are smoothed out and the piece is properly aligned, lightly burnish it with your finger. Apply a top coat of the clear glue liquid and set aside to dry.
That is all there is to this simple and highly effective process. You can use colored tissue or tissue you have created on your ink-jet printer. The presence of water in the alcohol does not seem to affect the ink in computer-printed tissue. The added strength is truly surprising and the weight gain is minimal even on fairly small models.
One of Ralph’s trials for the process was a small 7.75-inch-span micro RC model. The wing of this model is tissue-covered foam using the described procedure. The ready-to-fly weight of this tiny airplane is 15 grams.
If you are looking for a way to dress up your next foam-based model that will also add strength to the structure, you might want to consider Ralph’s tissue-over-foam process.
Once again, I have reached the end of this column. As always, please let me know what you are up to in the world of small-field flying.
PB
Sources:
- Fan-Tastic Models
3204 Johnson Rd. Southlake, TX 76092 (817) 379-6468 www.fan-tasticmodels.com
- Hobby Lobby International
5614 Franklin Pike Cir. Brentwood, TN 37027 (615) 373-1444 Fax: (615) 377-6948 www.hobby-lobby.com
- Micro-Mark
340 Snyder Ave. Berkeley Heights, NJ 07922 (800) 225-1066 Fax: (908) 665-9383 www.micromark.com
Transcribed from original scans by AI. Minor OCR errors may remain.

