
Small-Field Flying
PASSING THE BATON: In May 2001 Model Aviation began devoting pages to the fast-growing segment of our hobby involving small-field and micro Radio Control (RC) model aircraft.
The foundation of that commitment to covering small- and limited-space flying has been the publication of two columns on an alternating-month basis.
Dave Robelen has been doing a masterful job of looking into the world of micro RC models. Complementing Dave’s work has been the excellent coverage of small-field-venue flying by Larry Marshall.
Larry is unable to continue his bimonthly column, so you will be seeing a new name in the header. Larry has established an excellent foundation, and following in his footsteps is a very tall order.
Many thanks to Larry, and I hope he will be in a position to share his extensive experience and knowledge with us from time to time.
By way of introduction, I have been breathing balsa dust and flying model airplanes for roughly 50 of my 58 years in this world. This obsession—I mean hobby—has covered most aspects of the model-aviation world. That includes Control Line, Free Flight, and Radio Control.
Like so many of us, I have been having more and more difficulty finding the “traditional” flying sites. Urban development and greater restrictions on the use of property have made smaller sites an appealing alternative.
The realities of available flying space combined with the many advances in electric power systems have resulted in my doing most of my flying these days in local parks, vacant lots, and my back yard.
While my personal focus is on electric power, that certainly does not limit the scope of these pages to Electric models.
My goal for this column is to continue what Larry Marshall has started; that is to serve as a conduit for information-sharing. After 50 years of modeling, I have learned one important lesson: the more I learn, the more I realize how much I don’t know.
We can never get too much information in this hobby. As a result, I encourage those of you interested in small-field flying to share your work and projects in these pages.
Small-Field Flying—These Are the Good Old Days: As the availability of wide-open areas in which to fly continues to diminish, the interest in small-field flying is growing at a tremendous pace.
This fact combined with the availability of very good quiet electric-power systems has opened the door to previously off-limits flying sites. These locations are often very close to home, if not, in fact, at home in a front or back yard.
The small-field flier is using school yards, vacant lots, community parks, parking lots, and almost any space large enough to crank and bank.
The very large variety of possible small-field-flying venues creates an interesting problem for the modeler: what model to choose.
Fortunately, we have a large variety of models from which to make our selections. Equally fortunate is that the number of subjects to garner our interest seems to be growing at a nice rate.
I can't think of a time in RC modeling history where so many different options existed to satisfy the small-field flier. Just look at the advertising in the modeling press.
You will see foam-based Almost Ready-to-Fly (ARF) models, built-up balsa ARF models, completely ready-to-fly models, modern kits specifically designed for small-field flying, and a large population of kits that can be converted to small-field RC flyers.
Times are indeed good for finding a suitable small-field flyer.
With the population of potential small-field models so large, how do we make that all-important choice? Certainly there are many factors.
Foremost is the site you will use. Some of the "larger" locations, such as school yards and public parks, offer a little more maneuvering space. At the other end of the size spectrum are vacant lots and residential yards.
When considering the place where you will be flying, a factor high on the model-selection list is the flying speed. Notice that I mentioned flying speed first rather than model size.
I have had great success flying Speed-400 models with wingspans of roughly 46 inches in surprisingly small fields. On the other hand, I had a converted 16-inch Guillows Hellcat that needed lots of room because of its flying speed and wide turning radius.
Okay, flying speed is important. Just how do we estimate a model's speed from a magazine advertisement? Although obtaining a precise figure is not easy, it is possible to develop a good feel for the potential flying speed from the wing loading.
Most manufacturers give the wing dimensions and expected model flying weight. With that information, we can lay down some rules of thumb.
Calculate the total wing area in square feet. Divide the model's flying weight in ounces by the wing area. That will give you the wing loading.
Where low speed is desired, a wing loading in the range of four to six ounces per square foot is a good starting point. A wing loading of six to nine ounces per square foot is a good reference value for medium-speed models.
My limit for small-field models is a wing-loading range of nine to 12 ounces per square foot. Generally, if I'm flying a model in the higher range of values, they tend to be larger. An example would be the 46-inch Speed-400-powered model I mentioned previously.
By no means is wing loading the only factor to consider; the airfoil used for the wing and the model's planform are also important.
Clean designs will move faster, even at light wing loadings. The model's layout will also greatly influence its ability to make controlled tight turns. That can be really important when flying in vacant lots and in back yards.
Unfortunately, when looking at pictures and specifications, it is not so easy to estimate how these parameters will play out. That is where reviews and others' experiences can be most helpful in making a small-field-model choice.
As you gain more experience with different models, your own instincts play a very big part in the decision process.
Last, we can't ignore the coolness factor of a model. In spite of all our experience and calculations, there are those models that just reach out from the magazine pages and say "I'm for you."
Making choices is definitely a personal matter. Armed with a few guidelines, references from others, and our own judgement, we usually end up with a successful and satisfying small-field model.
Both models can use a variety of motors in the Speed-300 class.
I have both airplanes, and they are especially good small-field flyers that are capable of handling windy conditions.
My models are powered by the Dick Miller MC-1 motor, and the gear-drive package is that sold through Penn Valley Hobbies (357 W. Main St., Lansdale PA 19446; Tel: [215] 855-1286, [215] 855-0774; Web site: www.pennvalleyhobbycenter.com).
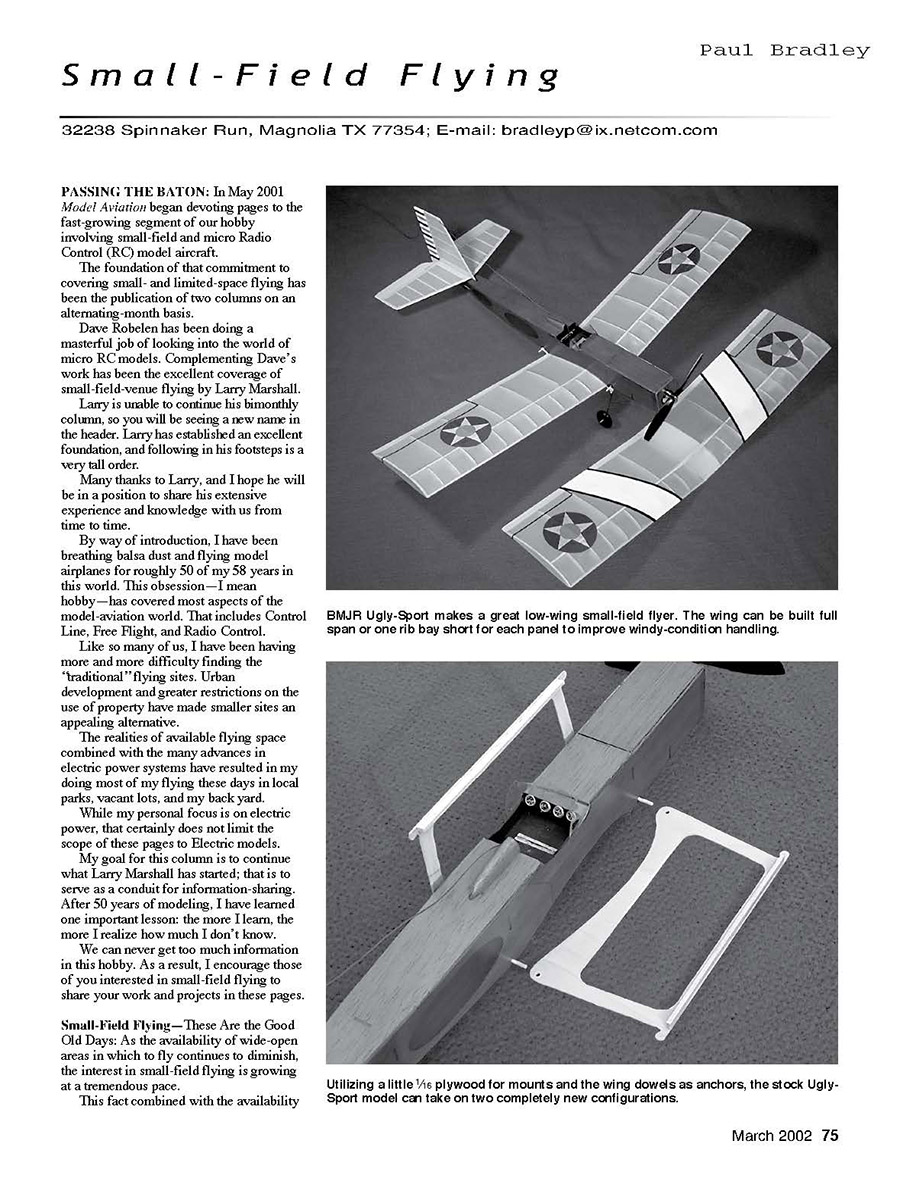
As do most modelers, I like to experiment a bit. As a result, my Ugly Sport became the subject of some “I wonder if this will work?” brainstorming sessions. The Ugly Sport gives the builder the option to build a long or short wing. The long wing is intended for flying in calmer wind conditions, and the short wing is for windy flying days.
Since the wind in Eastern Texas has been known to blow every now and then, I decided to build a long and a short wing. As it turned out, the Ugly Sport does well in the wind with either. Oh well, at least I had a spare.
It is certainly nice to have a wing for any occasion, but something was pulling at me. If one wing is good, aren’t two supposed to be better?
That’s the ticket! Why not fly with both wings at the same time?
It seems that there is a bit of biplane love in all of us, and I’m no exception. Thus I started the thought process of how I could take advantage of both my Ugly Sport wings. The goal was to make a conversion that could be applied when desired as the mood dictated.
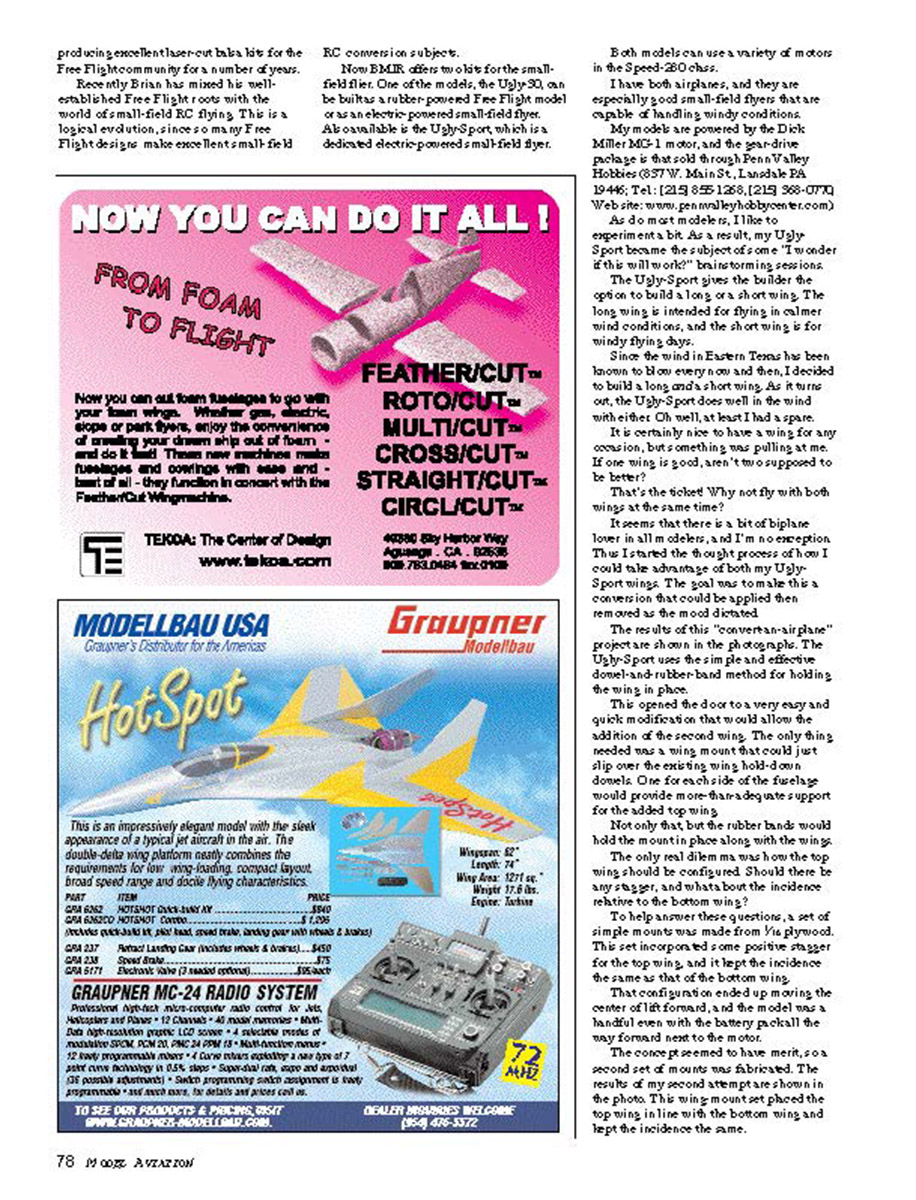
The results of this “conversion-airplane” project are shown in the photograph. The Ugly Sport converts into a simple and effective biplane using a dovetail and rubber-band method for holding the wing in place.
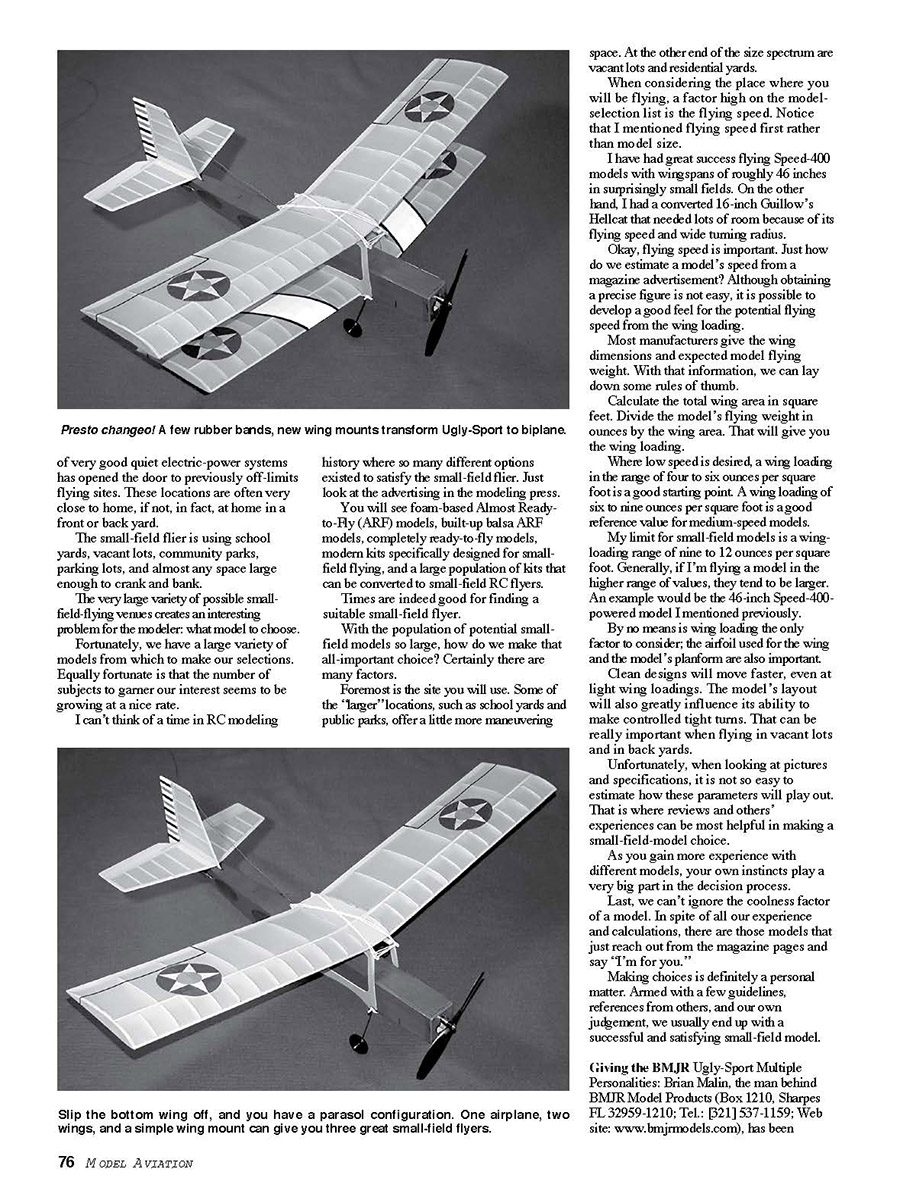
This opened the door to a very easy and quick modification that would allow the addition of the second wing. The only thing needed was a wing strut that could be slipped over the existing wing hold-down dowels. One for each side of the fuselage would provide more than adequate support for the added top wing.
Not only that, but the rubber bands would hold the mount in place along with the wing. The only real dilemma was how the top wing should be configured. Should there be any stagger, and what about the incidence relative to the bottom wing?
To answer these questions, a set of simple mounts was made from 1/16 plywood. The first set incorporated some positive stagger for the top wing, and it kept the incidence the same as that of the bottom wing.
That configuration ended up moving the center of lift forward, and the model was a handful even with the battery pack all the way forward near the motor.
A second set of mounts was fabricated. The results of my second attempt are shown in the photo. This wing mount placed the top wing in line with the bottom wing and kept the incidence the same.
The resulting biplane is a lot of fun to fly. With two wings, the model turns even tighter than its already-tight turning ability. Not only that, but there is the great charisma factor of seeing a biplane in the air.
All this for investing approximately 30 minutes in cutting out two simple plywood wing mounts. Of course, that does not count the time to build the second wing; but hey, that was done before I decided to try a biplane.
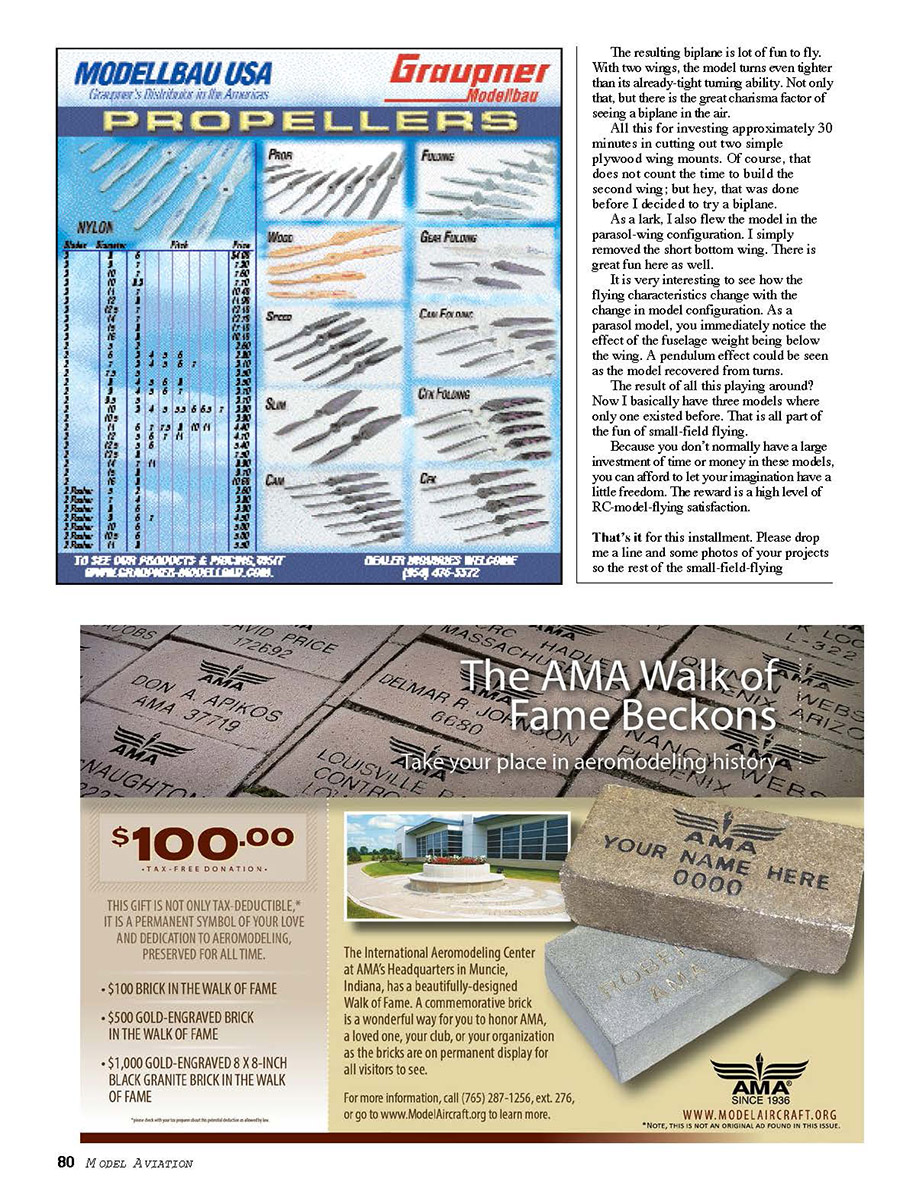
As a lark, I also flew the model in the parasol-wing configuration. I simply removed the short bottom wing. There is great fun here as well.
It is very interesting to see how the flying characteristics change with the change in model configuration. As a parasol model, you immediately notice the effect of the fuselage weight being below the wing. A pendulum effect could be seen as the model recovered from turns.
The result of all this playing around? Now I basically have three models where only one existed before. That is all part of the fun of small-field flying.
Because you don't normally have a large investment of time or money in these models, you can afford to let your imagination have a little freedom. The reward is a high level of RC-model-flying satisfaction.
That's it for this installment. Please drop me a line and some photos of your projects so the rest of the small-field-flying
Transcribed from original scans by AI. Minor OCR errors may remain.

