
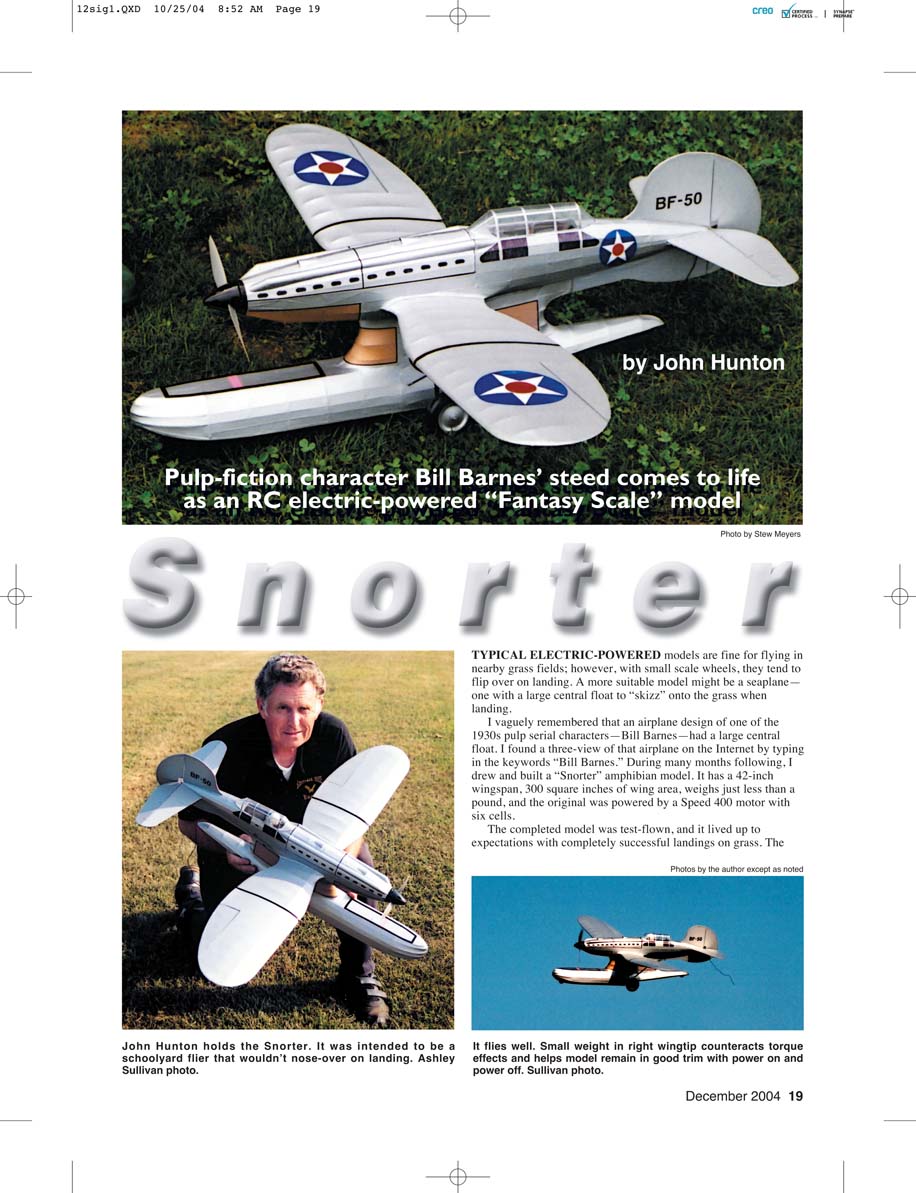
Snorter
by John Hunton
TYPICAL ELECTRIC-POWERED models are fine for flying in nearby grass fields; however, with small-scale wheels they tend to flip over on landing. A more suitable model might be a seaplane—one with a large central float to "skizz" onto the grass when landing.
I vaguely remembered that an airplane design of one of the 1930s pulp serial characters—Bill Barnes—had a large central float. I found a three-view of that airplane on the Internet by typing in the keywords "Bill Barnes." During many months following, I drew and built a Snorter amphibian model. It has a 42-inch wingspan, 300 square inches of wing area, weighs just less than a pound, and the original was powered by a Speed 400 motor with six cells.
The completed model was test-flown, and it lived up to expectations with completely successful landings on grass. The test flights also showed that the Snorter design was exciting to see in the air, with its unusual float, extended cabin, and elliptical wings. It seemed to provide an exciting view from every different angle.
After building a Snorter, I reviewed the Bill Barnes web page again, in much more detail. This is an excellent site maintained by David Dodge. It seems that the Bill Barnes character and his airplane designs came to life during the 1930s in some pulp magazines, later appearing in Air Trails magazine. Then Mr. Barnes drifted off into oblivion in other pulps, leaving only vivid memories of stories and airplane designs in many minds.
The well-organized Bill Barnes pages contain a riveting history of the many authors and designers, information about many other 1930s characters, and great sketches and three-views of the associated airplane designs. After reading all of the Bill Barnes pages, the saga inspired me and I sent Mr. Dodge photos of my Snorter model. I also made up a story in 2002 that Paul Corneliussen edited. Mr. Dodge kindly put this information on his web site. I think you will enjoy reading about Bill Barnes at http://home.att.net/~dannysosaurs/temph.htm.
2002 Bill Barnes saga — "A Special Mission for the Snorter: Bill Barnes Jr. in Action"
"At the request of the President of the United States, Bill Barnes Jr. agreed to use the fabled airplane named the 'Snorter' on an urgent mission that demanded its unique capabilities. The original Snorter had been fully maintained in secret storage since the 1930s, and now it was needed.
"The Snorter could fly very fast and low, barely skimming waves. With its wooden construction and stealthy reflection-shielded engines, it was nearly invisible to radar. Its two special 12-cylinder diesels had an infrared signature that was undetectable with look-down detection systems. It could be refueled at sea, eliminating any telltale aerial refueling.
"The Snorter was the only airplane in the world that could get in undetected and close enough to the movable man-made island (now known as Terror Harbor) to pop up and get a quick glimpse of what the arch villain, Dr. Hisson, was up to now. One photograph of the island, digitally transmitted back to the Homeland Defense Agency, would show what the next dastardly threat to the world might be.
"Bill Barnes Jr. was cruising efficiently at 400 knots now on his mission. The Snorter was flying just over the whitecaps, its large main float wet from ocean spray. When cruising, the Snorter used only one of its diesels to save fuel, but on approaching the island, Bill Jr. fired up the other engine and its contra-rotating propeller.
"Airspeed was climbing well past 500 mph now, this speed achievable because all defensive weaponry had been removed to aid in stealth and speed. A special 'look-up' camera had been installed in the Snorter for the desired overall shot of the island.
"Of course, the diabolical Dr. Hisson had tracked all satellites and he always covered up his operations when they passed overhead. Snorter was going to make its run between satellite passes to catch the island with everything exposed for the camera's eye.
"The island grew large in the windshield and it was time for Bill Jr. and the Snorter to pop up. When Bill Jr. pulled on the yoke, the G-meter read 9. He slammed the stick to the right to start the roll and was immediately inverted over the island. The upward-looking camera, which was now facing downward, was triggered.
"Bill rolled to level again just past the island, at just a few feet over the rolling waves. The invaluable photograph of Dr. Hisson's island was automatically digitized and transmitted home.
"During the quick flash of vision that Bill Jr. had over the island, he realized that the mission had been a success. All manner and kinds of hardware had been exposed on the tarmac. But one thing caught his eye. In that quick glimpse, he had seen an airplane sitting on the tarmac, propellers turning. It was pointed in the direction that Bill Jr. was going. If this was the Hisson Special, it would be the only propeller-driven airplane that could catch the Snorter.
"The Hisson had originally been designed by Bill Jr.'s father as a follow-on to the Snorter, and with design input from Bill Winter, the Hisson was even faster. But the plans had been stolen. Now Bill Jr. knew who had stolen them: the sinister Dr. Hisson.
"As Bill Barnes Jr. sped from the island in the Snorter, he glanced behind briefly. A chill ran down his spine. There was the Hisson Special, in firing position, directly behind him. His mind raced, but what could he do?
"To be continued ..."
Alternate Power Sources and Motors
- The normal "cruising" flight time for the Snorter is roughly seven minutes with the geared Speed 400 can motor and a six-cell Ni-Cd battery.
- If you install a three-cell Li-Poly battery and retain the can motor, flight times will increase to approximately 10 minutes.
- If you install a Dymond PJS 300 external-rotor motor (or equivalent) and use a three-cell Li-Poly battery, flight times will increase to roughly 16 minutes.
Changing to the external-rotor motor will save approximately 1 ounce. Changing from Ni-Cd to a Li-Poly battery will save an additional 2 ounces. Using the external-rotor motor and Li-Poly battery will save a total of approximately 3 ounces, which is a significant weight reduction, and performance will increase proportionately.
However, the Snorter is not an aerobatic model. It is good enough to see this unusual beauty cruise low and graceful in the air and to take joy in admiring its complex shapes as the perspective changes while it passes by. Ben Tinsley's 1930s creation is truly ageless. MA
—John Hunton
Specifications
- Type: RC Electric amphibian
- Wingspan: 42 inches
- Wing area: 300 square inches
- Power: Geared Speed 400 on six or seven cells (prototype); external-rotor outrunner as an upgrade
- Flying weight: 15.5 ounces
- Construction: Balsa and plywood
- Covering/finish: Silk and modeling dope
- See pages 176 and 177 for Snorter plans.
Construction
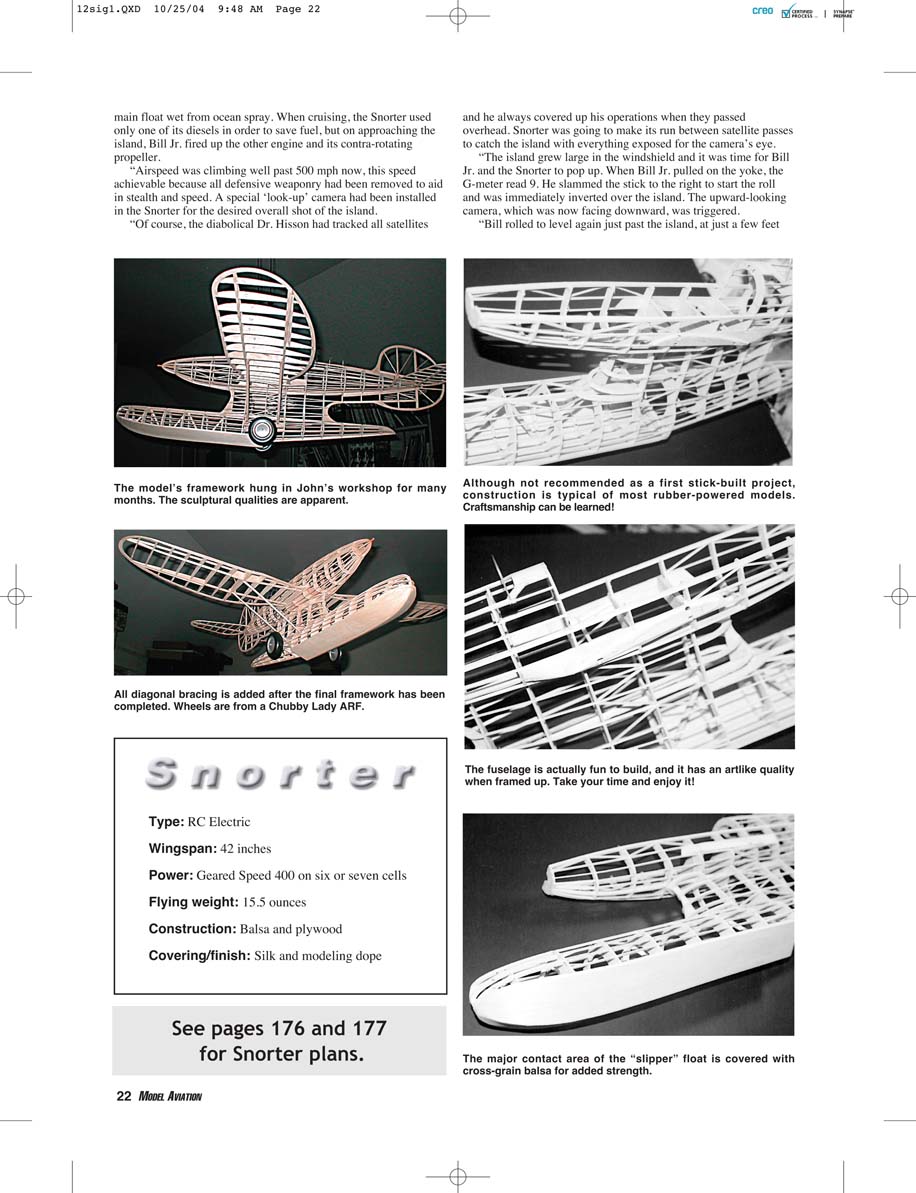
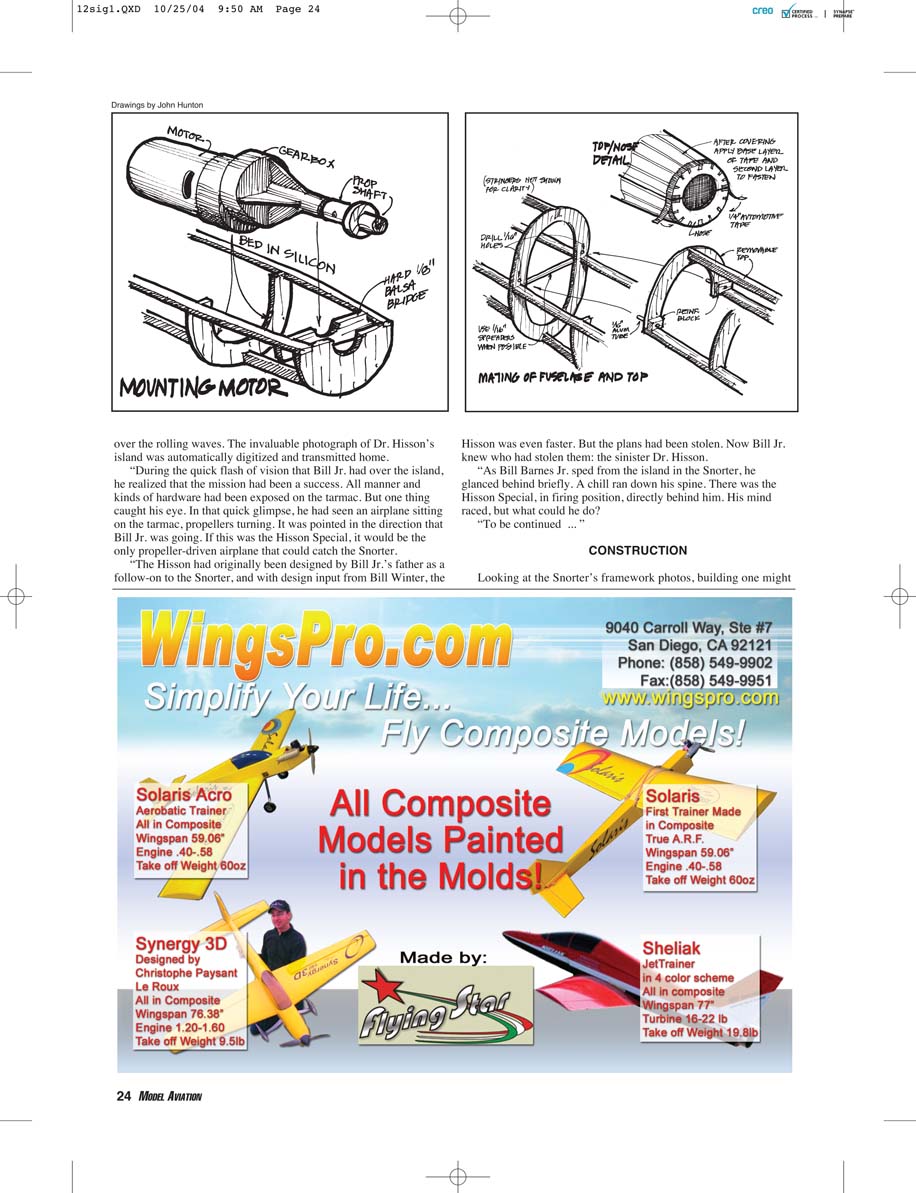
Looking at the Snorter's framework photos, building one might seem daunting. However, it is similar in construction to many rubber-powered model designs and is really not that difficult to build. You can take pride in doing it yourself with this model, and the result is rewarding—especially when it comes to the fuselage. This airplane’s shapes have good sculptural content. From the time you get the fuselage on wheels, you will have something nice to look at.
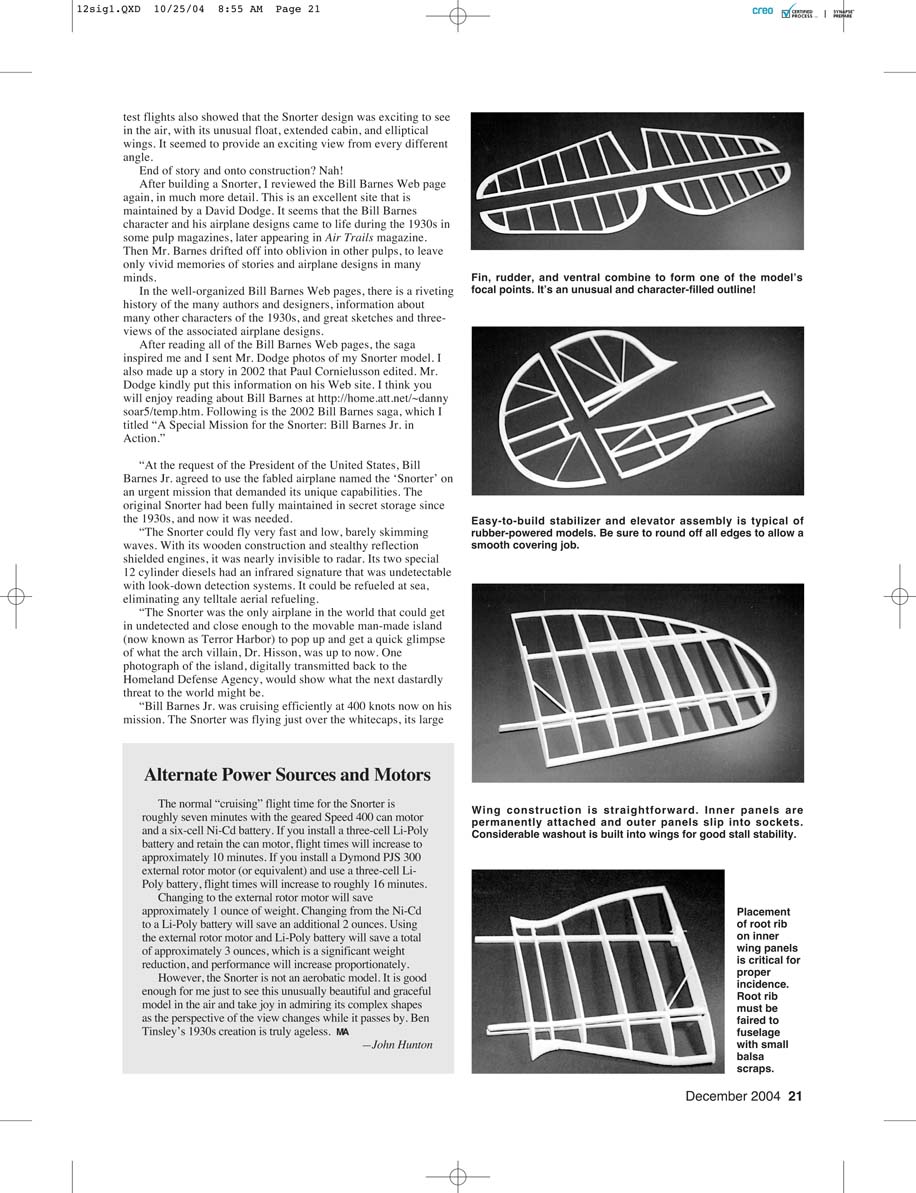
Looking at the photos of the frame, you will see many diagonals in it that are not shown on the plans. These temporary members are inserted to keep the frame stiff during the sanding-and-shaping process. Use them on any “floppy” part, and remove them before covering if you want. Be sure to use these diagonals on the wings and empennage to help when sanding.
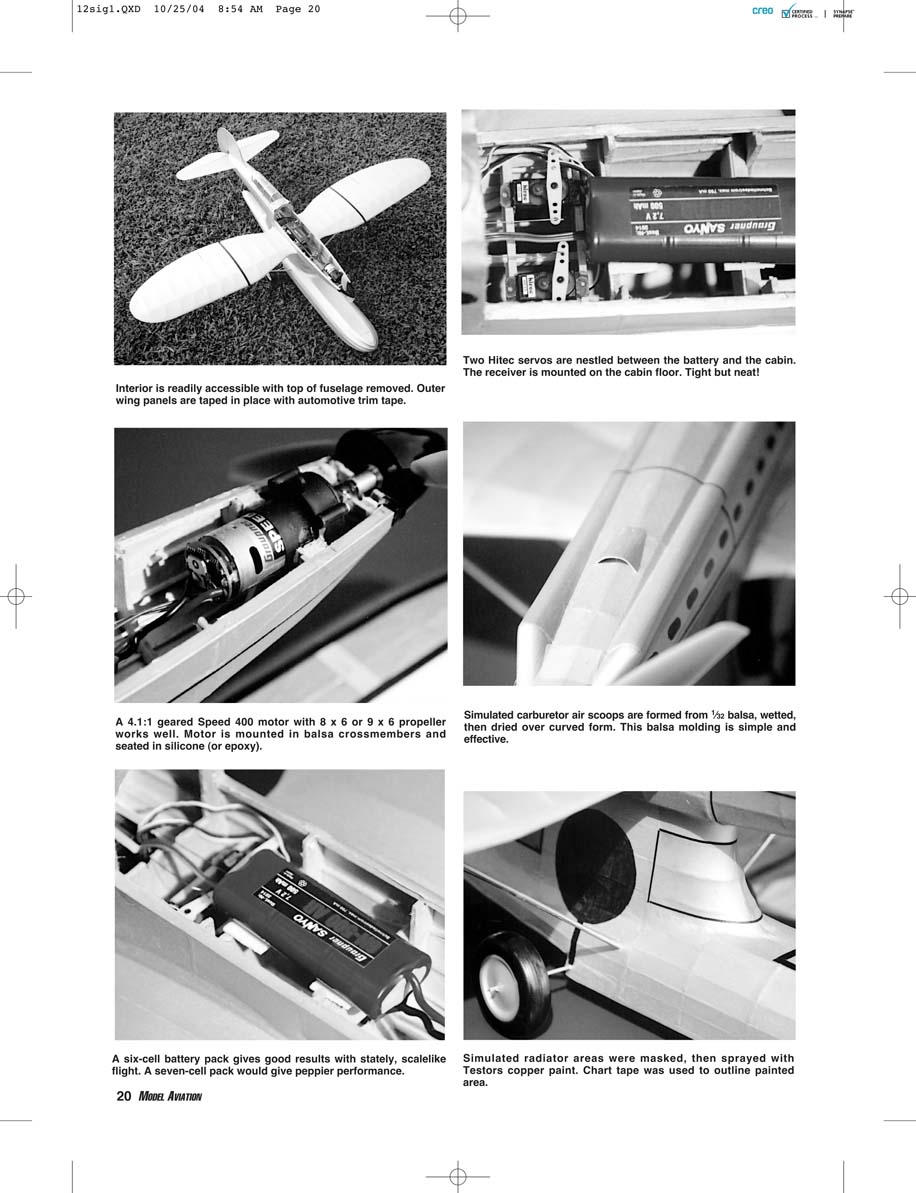
Consider weight when selecting balsa; keep it light. The only parts that require firm wood are the 1/8 x 1/8 balsa fuselage longerons and the main wing spars.
Begin construction by cutting parts with a #11 X-Acto blade. A secret to keeping the blade sharp for long periods is to be conscious of the substrate over which the pieces are being cut. I use foam-core board, which is available in retail department stores.
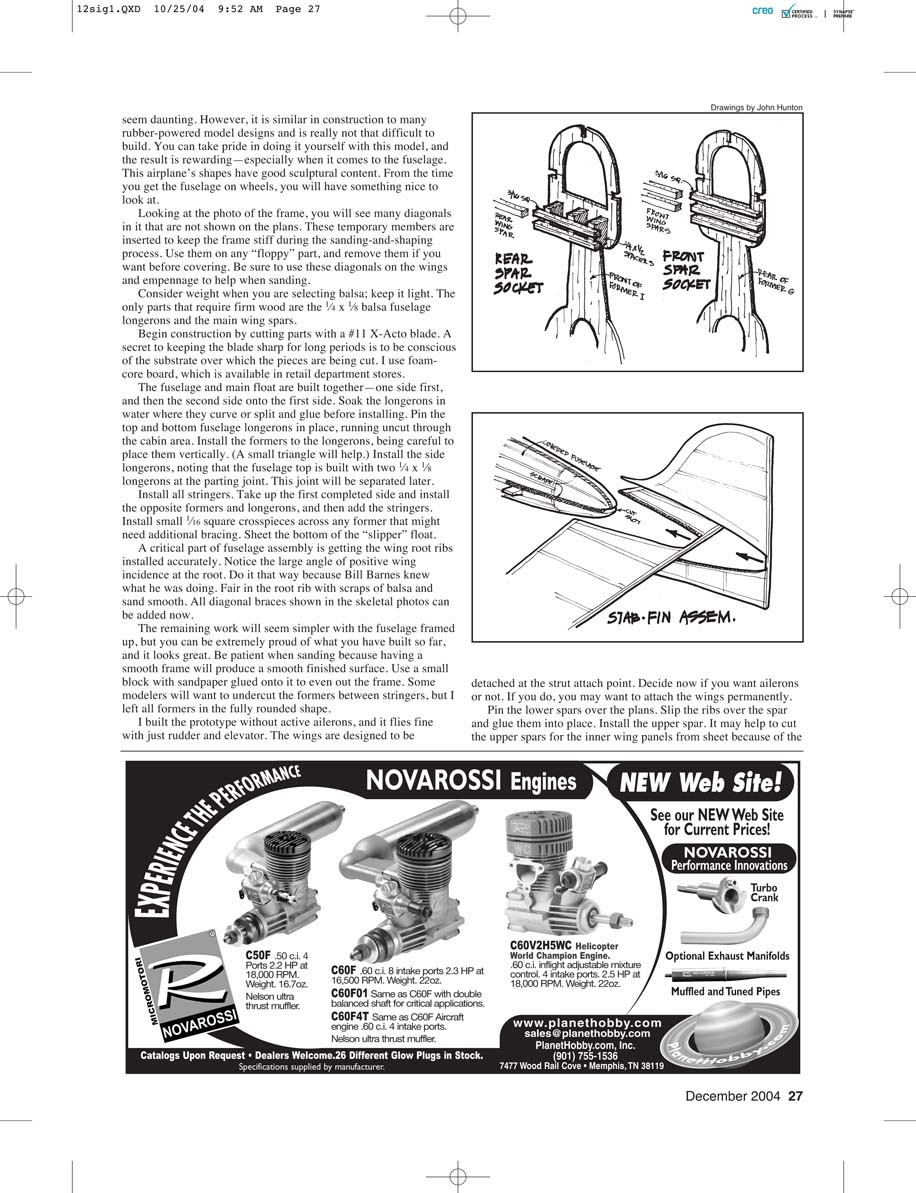
The fuselage and main float are built together—one side first, and then the second side onto the first. Soak the longerons in water where they curve or split and glue before installing. Pin the top and bottom fuselage longerons in place, running uncut through the cabin area. Install the formers to the longerons, being careful to place them vertically (a small triangle spacer helps). Install the side longerons, noting that the fuselage top is built with two 1/4 x 1/8 longerons at the parting joint. This joint will be separated later.
Install all stringers. Take up the first completed side and install the opposite formers and longerons, then add the stringers. Install small 1/16 square crosspieces across any former that might need additional bracing. Sheet the bottom of the "slipper" float.
A critical part of fuselage assembly is getting the wing root ribs installed accurately. Notice the large angle of positive wing incidence at the root—do it that way because Bill Barnes knew what he was doing. Fair in the root rib with scraps of balsa and sand smooth. All diagonal braces shown in the skeletal photos can be added now.
The remaining work will seem simpler with the fuselage framed up. Be patient when sanding because having a smooth frame will produce a smooth finished surface. Use a small block with sandpaper glued onto it to even out the frame. Some modelers will want to undercut the formers between stringers, but I left all formers in the fully rounded shape.
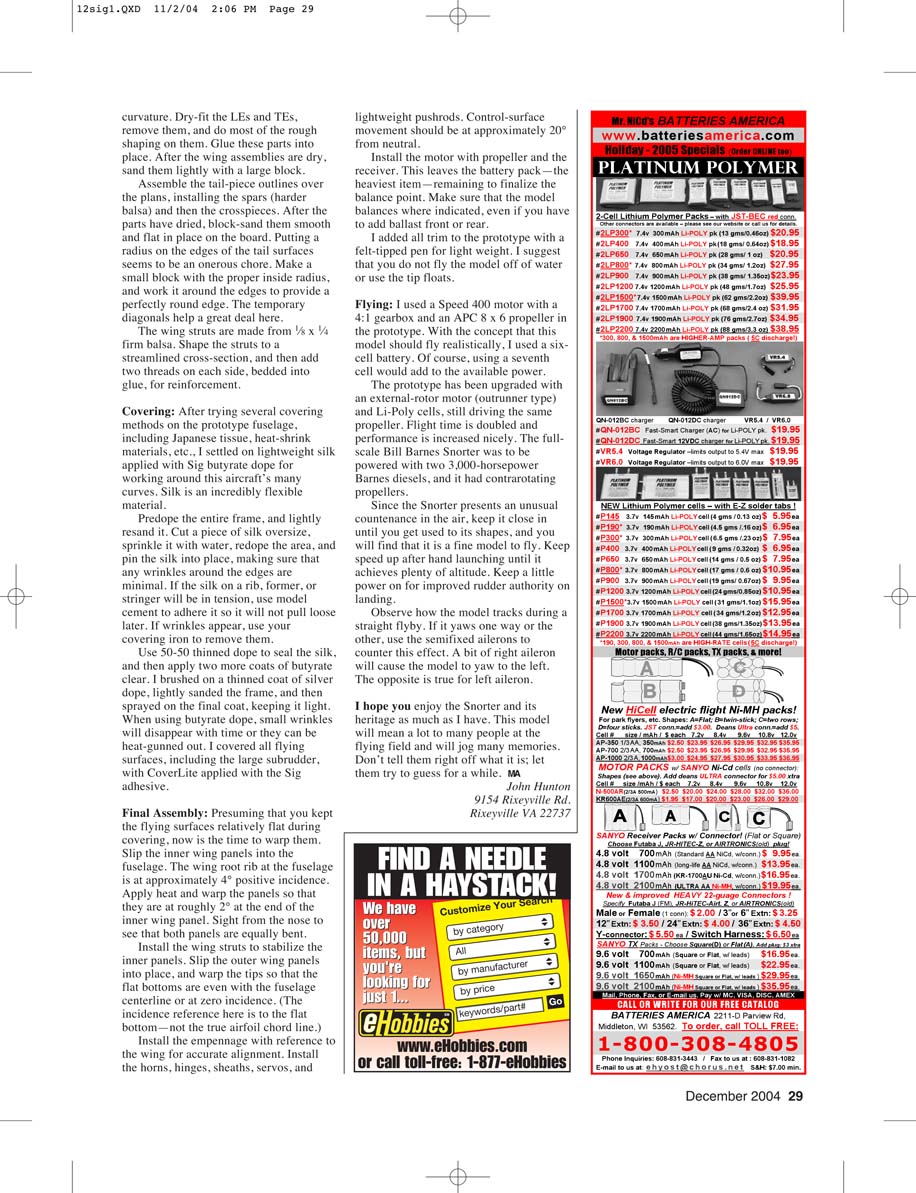
I built the prototype without active ailerons, and it flies fine with just rudder and elevator. The wings are designed to be detached at the strut attach point. Decide now if you want ailerons or not. If you do, you may want to attach the wings permanently.
Pin the lower spars over the plans. Slip the ribs over the spars and glue them into place. Install the upper spar. It may help to cut the upper spars for the inner wing panels from sheet because of the compound curve at the root. Install the ribs for the outer panels, and sand to shape. Considerable washout is built into the wings for good stall stability.
Final Assembly
Presuming that you kept the flying surfaces relatively flat during covering, now is the time to warp them. Slip the inner wing panels into the fuselage. The wing root rib is notched into the fuselage at approximately 3/4° positive incidence. Apply heat and warp the panels so that the trailing edges are at roughly 2° at the ends of the inner wing panel. Sight from the nose to see that both panels are equally bent.
Install the wing struts to stabilize the inner panels. Slip the outer wing panels into place, and warp the tips so that the flat bottoms are even with the fuselage centerline or at zero incidence. (The incidence reference here is to the flat bottom—not the true airfoil chord line.)
Install the empennage with reference to the wing for accurate alignment. Install the horns, hinges, sheaths, servos, and lightweight pushrods. Control-surface movement should be at approximately 20° from neutral.
Install the motor with propeller and the receiver. This leaves the battery pack—the heaviest item—to finalize the balance point. Make sure that the model balances where indicated, even if you have to add ballast front or rear.
I added all trim to the prototype with a felt-tipped pen for light weight. I suggest that you do not fly the model off water or use the tip floats.
Flying
I used a Speed 400 motor with a 4:1 gearbox and an APC 8 x 6 propeller in the prototype. With the concept that this model should fly realistically, I used a six-cell battery. Of course, using a seventh cell would add to the available power.
The prototype has been upgraded with an external-rotor motor (outrunner type) and Li-Poly cells, still driving the same propeller. Flight time is doubled and performance is increased nicely. The full-scale Bill Barnes Snorter was to be powered with two 3,000-horsepower Barnes diesels and had contra-rotating propellers.
Since the Snorter presents an unusual countenance in the air, keep it close in until you get used to its shapes, and you will find that it is a fine model to fly. Keep speed up after hand launching until it achieves plenty of altitude. Keep a little power on for improved rudder authority on landing.
Observe how the model tracks during a straight flyby. If it yaws one way or the other, use the semi-fixed ailerons to counter this effect. A bit of right aileron will cause the model to yaw to the left. The opposite is true for left aileron.
I hope you enjoy the Snorter and its heritage as much as I have. This model will mean a lot to many people at the flying field and will jog many memories. Don't tell them right off what it is; let them try to guess for a while. MA
John Hunton 9154 Rileyville Rd. Rixeyville, VA 22737
Transcribed from original scans by AI. Minor OCR errors may remain.

