
Stringless Wonder Revisited
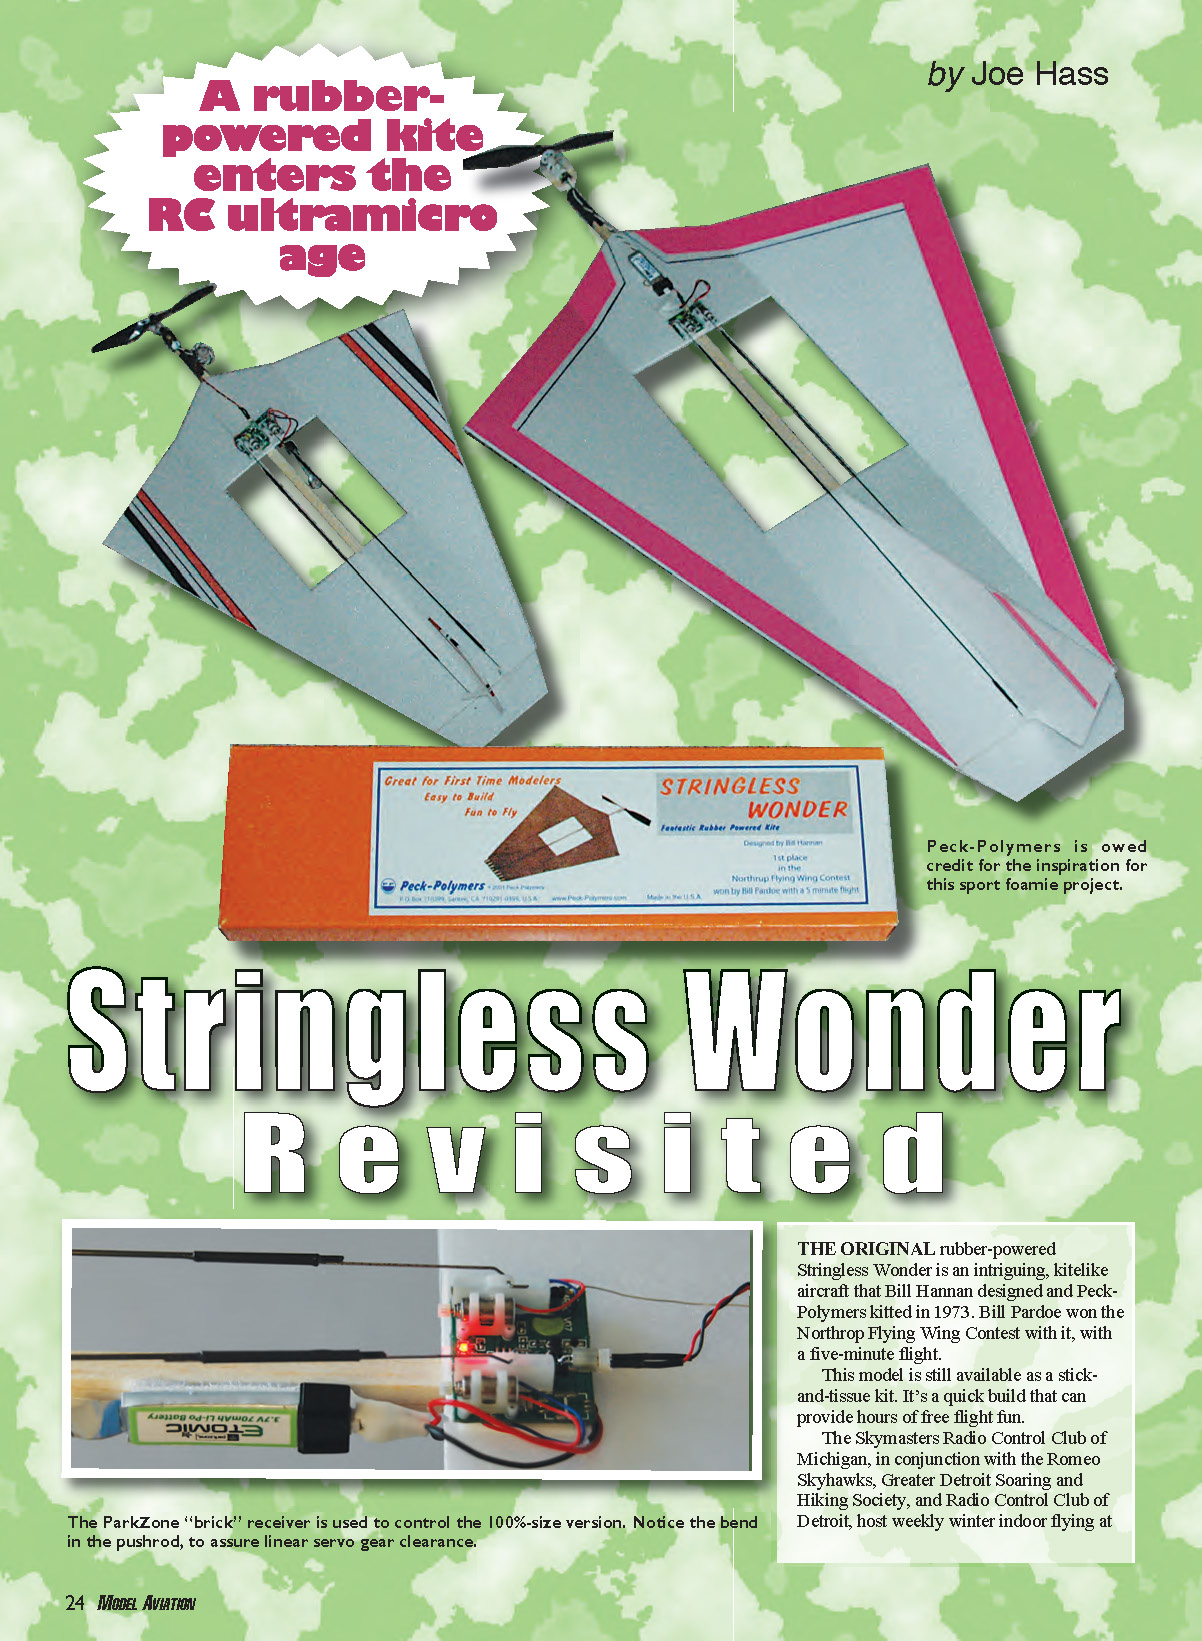
A rubber-powered kite enters the RC ultramicro age
by Joe Hass [email protected]
The original rubber-powered Stringless Wonder is an intriguing, kite-like aircraft that Bill Hannan designed and Peck-Polymers kitted in 1973. Bill Pardoe won the Northrop Flying Wing Contest with it, achieving a five-minute flight. The model is still available as a stick-and-tissue kit. It’s a quick build that can provide hours of free-flight fun.
The Skymasters Radio Control Club of Michigan, in conjunction with the Romeo Skyhawks, Greater Detroit Soaring and Hiking Society, and Radio Control Club of Detroit, host weekly winter indoor flying at Ultimate Soccer Arenas in Pontiac, Michigan. This facility allows us to keep our flying skills up and our creative juices flowing.
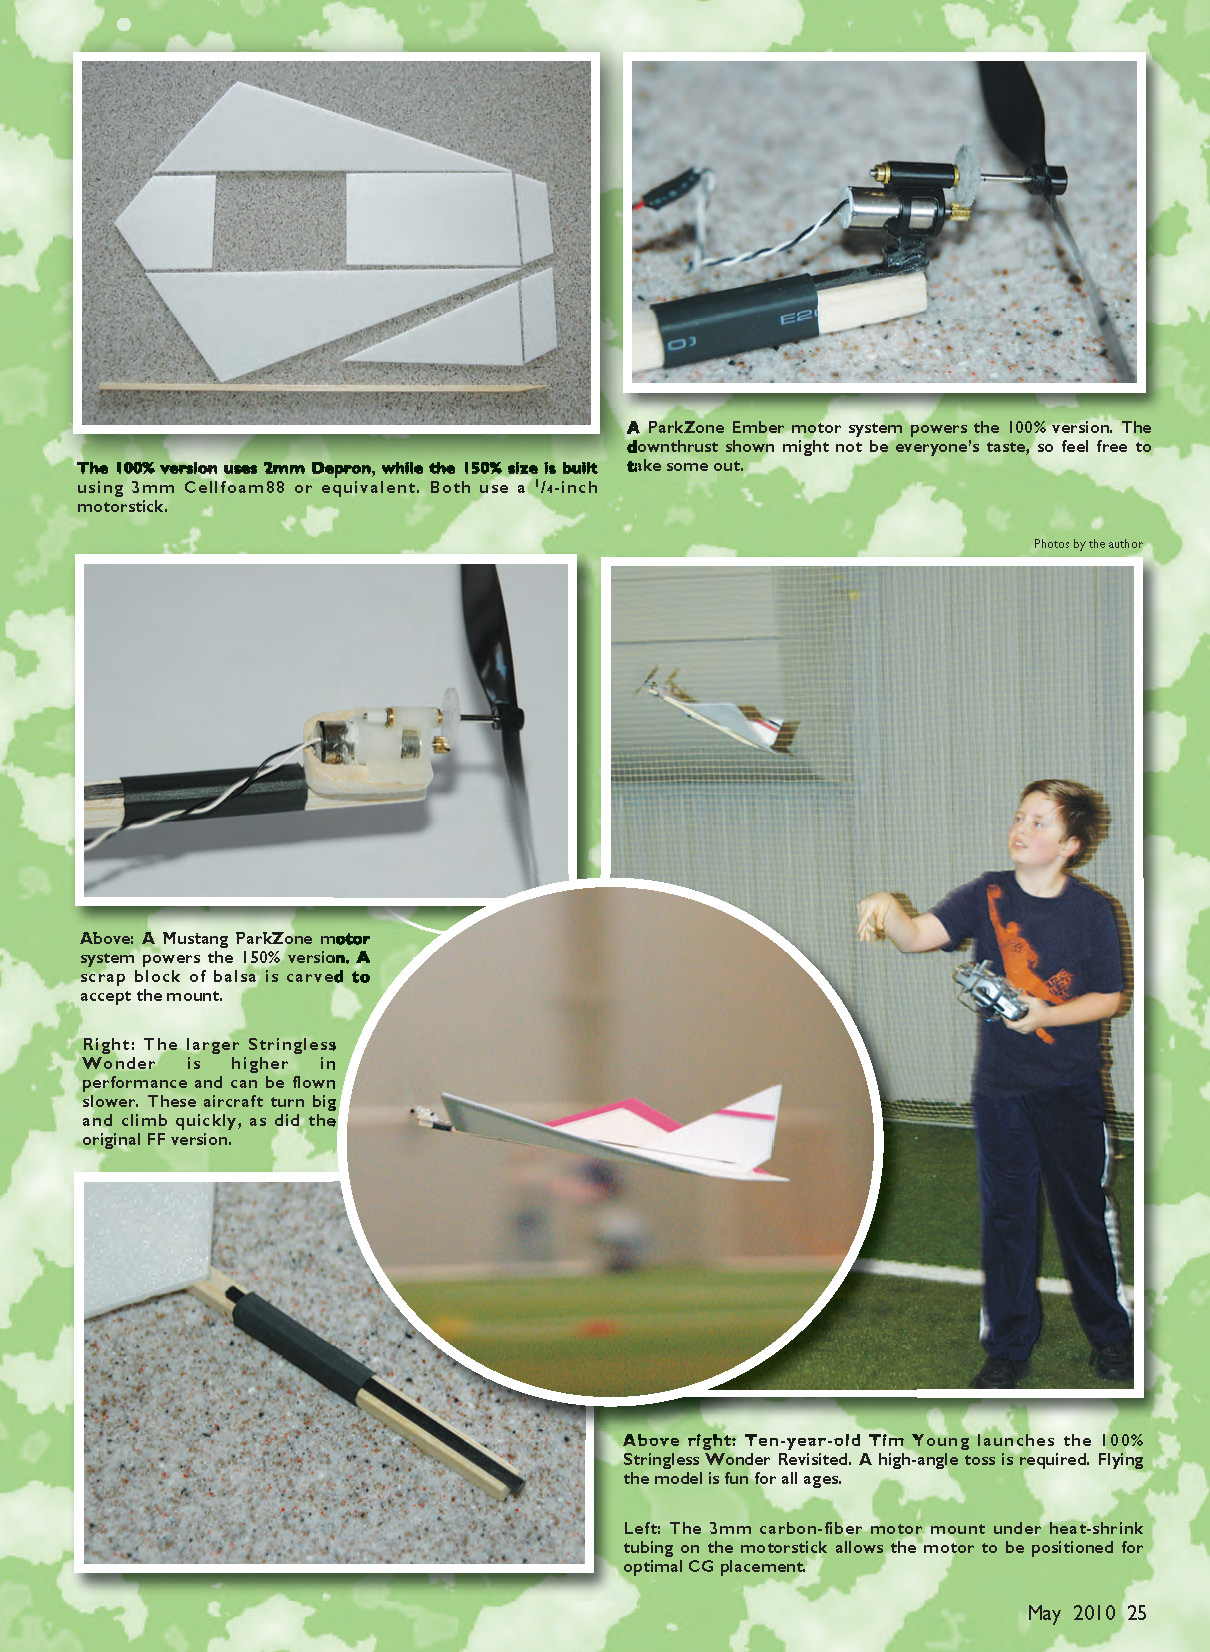
I started this project when I remembered a Stringless Wonder kit on the shelf. Using the original plans as a template, I cut a kit of foam pieces from Depron and planned to use the ParkZone “brick” receiver/ESC/servo module (PKZ3351) and a ParkZone motor/gearbox and prop system. The “motorstick” fuselage was cut from a hard 1/4" square balsa. Rudder and elevator dimensions were carefully measured. There are a few tricks to ease assembly; I’ll cover those below.
Build and Modifications
The first flights with the ParkZone Vapor system produced only a gradual descent. Switching to the stronger ParkZone Ember motor/gearbox (PKZ3228) and PKZ3002 prop made a big difference. I then built a 150%‑scale version using 3mm Depron and the ParkZone Micro Mustang power system (PKZ3624 motor/gearbox and PKZ3601 prop); flight performance was excellent.
A few general assembly suggestions that apply to either size Stringless Wonder:
- Cut out your kit; actual dimensions can vary, so don’t worry about slight differences.
- Bevel the leading edge of the elevator and rudder to allow control-surface movement.
- Hinge both rudder and elevator with hinge tape before assembling the wing.
- Decorate the aircraft before final construction—felt-tip markers, pens, or stickers work well.
- Attach Du-Bro Micro Control Horns (item 848) to the elevator and rudder with gap-filling, foam-safe CA. Attach the rudder horn to the left side of the rudder and the elevator horn to the top of the elevator.
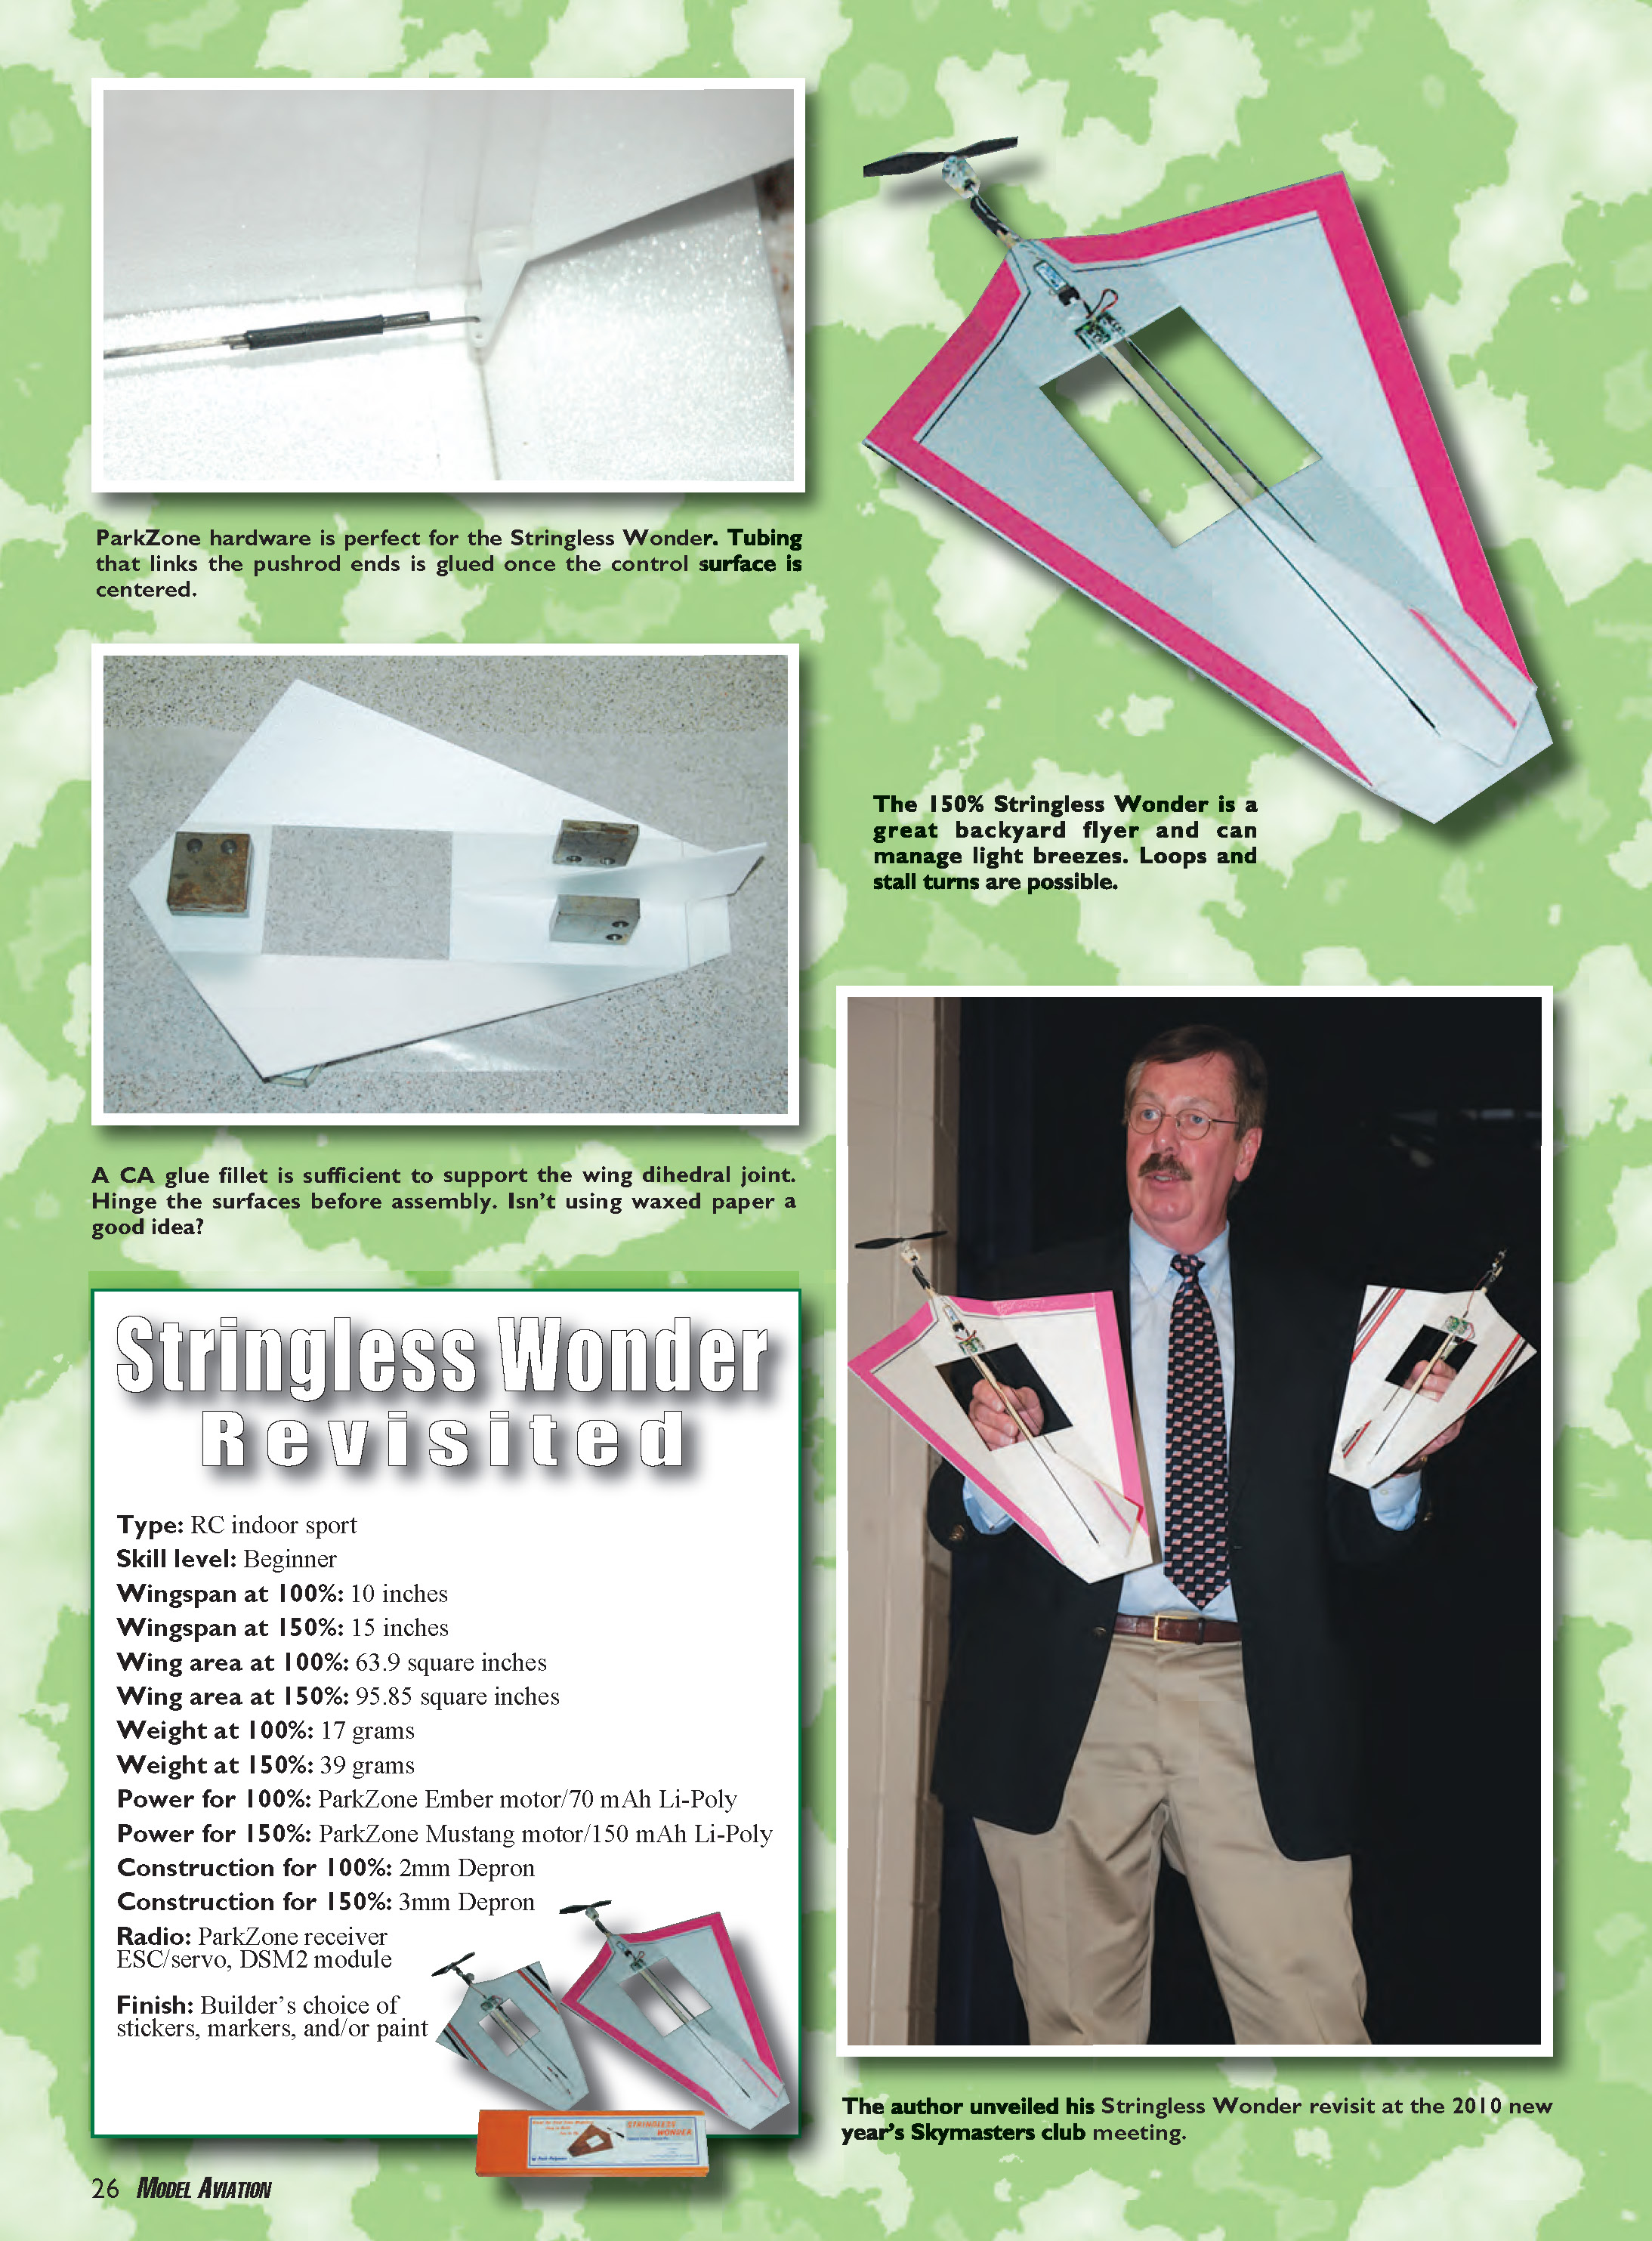
- ParkZone hardware fits the model well. Tubing that links pushrod ends should be glued once the control surface is centered.
Protect your building surface with waxed paper. Attach the vertical stabilizer to the rear wing center section, then position the front wing center section on the building surface. Small weights help hold pieces steady.
Attach each outer wing panel to the center section. Approximately 1-1/4" of dihedral on each wingtip is necessary. A few drops of gap-filling, foam-safe CA will tack the outer panels to the center section; after the CA sets, flip the wing and fill the joint with a bead of gap-filling CA. The 1/4" square fuselage is attached to the bottom of the wing with gap-filling, foam-safe CA.
Control Linkage and Radio Installation
- Attach the receiver/ESC/servo module with double-stick foam tape.
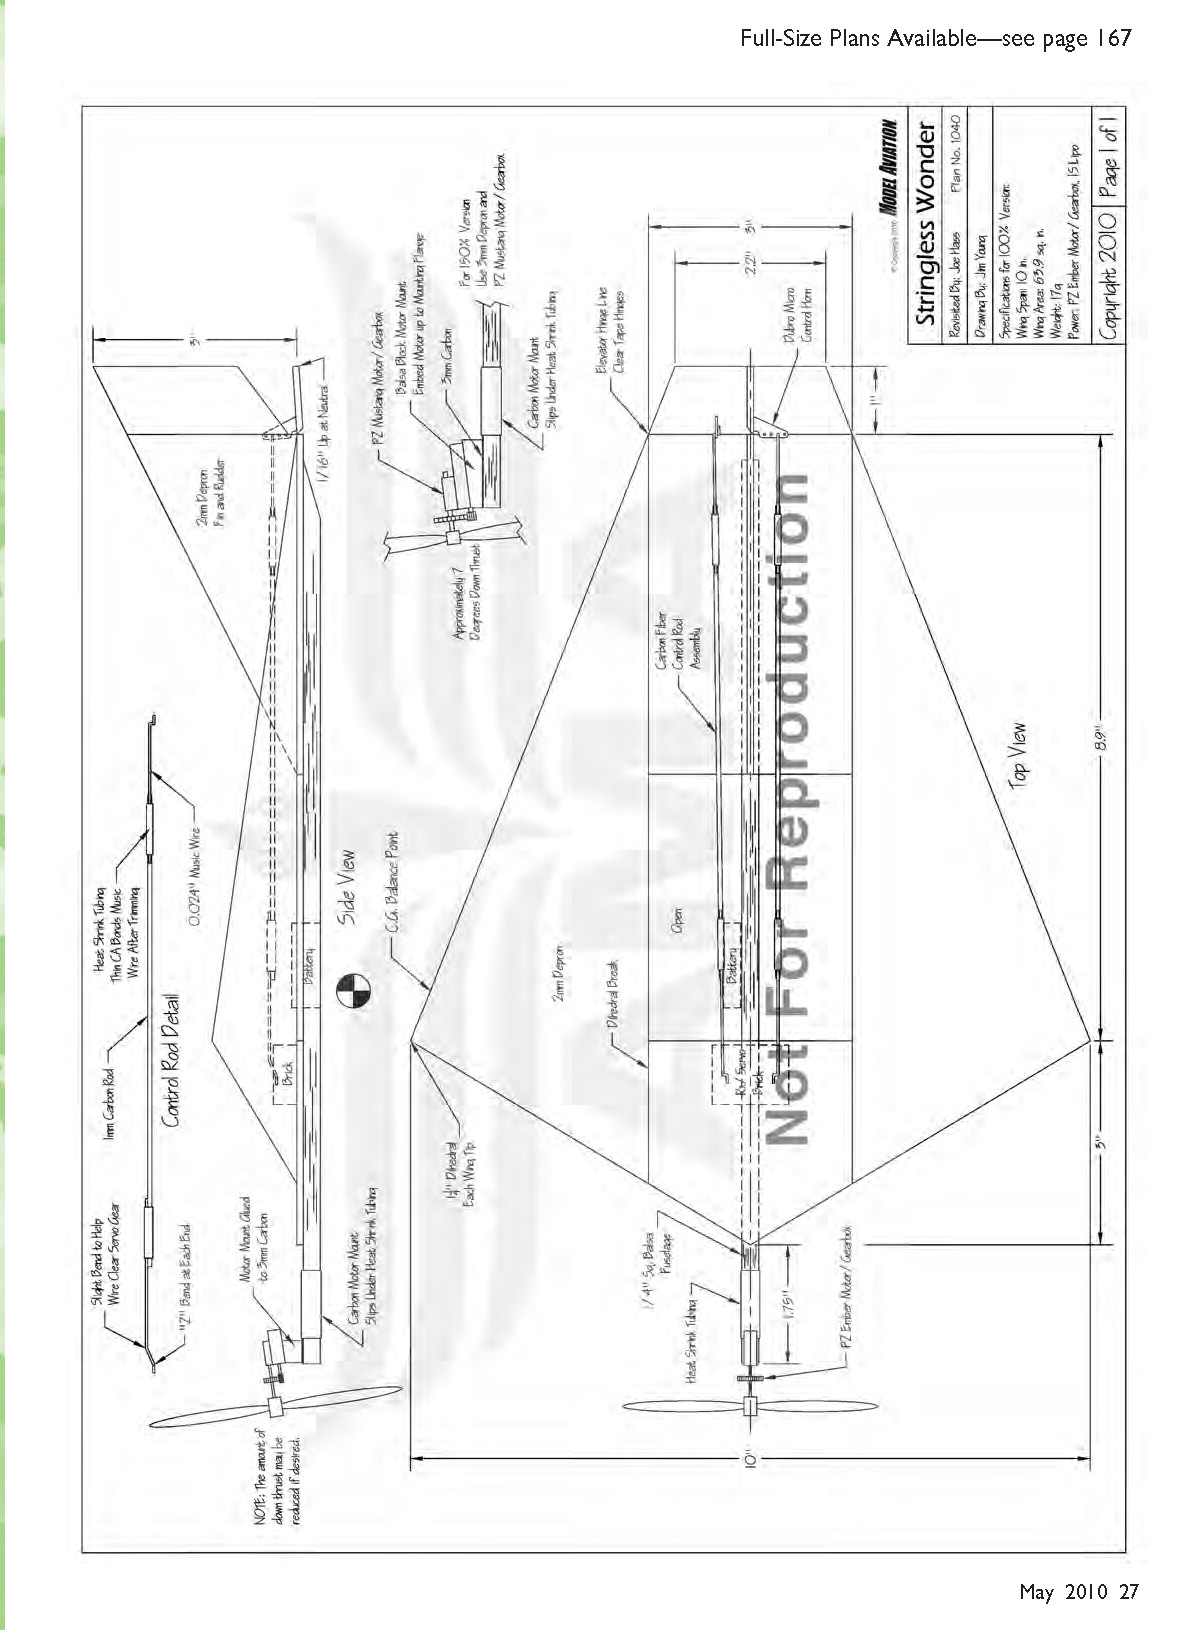
- Make pushrods from 1mm carbon-fiber rod and 0.024" music wire; form Z-bends with small needle-nose pliers.
- Angle the music wire that attaches to the servo down to clear the gears. Position the wire on the carbon-fiber rod, slide heat-shrink tubing over the wire, and shrink it (do not apply thin CA yet).
- Remove the music wire from the servo side of the pushrod. Slide the other Z-bend into the flight-surface control horn. Using the forward hole on the servo (larger opening), slide the Z-bend into the servo. Slide the wire into the pre-shrunk heat-shrink tubing on the pushrod. The fit is tight enough for adjustment during test flights.
- After successful test flights, a drop of thin CA will secure the wire and carbon-fiber pushrod. Aim for roughly 1/16" of up-elevator at neutral.
Motor Mounting and Battery
The motor gearbox is adhered with CA to a piece of 3mm-wide flat carbon-fiber. To allow easy repositioning and some shock absorption, shrink a piece of heat-shrink tubing around the front of the 1/4" square motorstick and slide the 3mm carbon flat stock underneath it. This also allows experimentation to find the best motor position.
On the original 100% version, the ParkZone single-cell 70 mAh Li‑Poly battery (PKZ3001) is attached to the side of the fuselage with hook-and-loop fasteners in the wing opening. The CG is close to 3/4" behind the wingtip. The original flew well with the indicated downthrust, but flight performance improved after reducing excessive downthrust. Sanding the bottom of the gearbox to change the angle and then gluing the gearbox to the 3mm flat stock helps tune thrust line. The original 100% model weighed 17 grams (about 1/2 ounce).
On the 150% version, I fashioned a motor mount from a small balsa block with approximately 7° of downthrust. The motor/gearbox is attached to the wood block with CA. Use a ParkZone 150 mAh Li‑Poly battery (EFLB1501S) for longer flights; on the 150% model the Li‑Poly is attached to the wing center section in front of the receiver module. The 150% iteration weighs about 39 grams (slightly more than 1 ounce).
Flying Characteristics and Tips
- It’s easier to have someone else launch the aircraft on the first flights. A light toss with the nose pointing up about 20° reduces altitude loss on launch.
- Adjust battery, motor, and elevator position to achieve desired flight characteristics. The model will usually need right rudder trim unless the motor is set with roughly 1° of offset.
- The RC Stringless Wonder is easy to fly. It climbs easily and tends to fly with a nose-up attitude in cruise.
- Plan ahead for turns—there isn’t much elevator authority for tight-turning. To make a compact turn, initiate the turn and add full up-elevator while applying extra power to keep the nose up.
- The Stringless Wonder will not stall. With sufficient power it can climb for up to eight minutes, although looping is challenging on the 100% version. The 150% model is much better at aerobatics; after a dive to build speed I have performed loops, Immelmanns, and Chandelles with the 150% version.
Construction Notes and Recommendations
- Hinge the surfaces before final assembly; it makes the build easier and more reliable.
- A CA glue fillet is sufficient to support the wing dihedral joint.
- For pushrod attachment, the fit between music wire and pre-shrunk heat-shrink tubing should be tight enough for flight adjustment; secure with thin CA only after successful test flights.
- Experiment with CG, motor placement, and downthrust to refine performance. On the 100% model, removing excessive downthrust improved flight.
- If ordering plans (set 1040) from the AMA Plans Service, request an extra copy at 150% of the original; it may be available at half price for a limited time.
Specifications
- Type: RC indoor sport
- Skill level: Beginner
- Wingspan (100%): 10 in
- Wingspan (150%): 15 in
- Wing area (100%): 63.9 sq in
- Wing area (150%): 95.85 sq in
- Weight (100%): 17 g
- Weight (150%): 39 g
- Power (100%): ParkZone Ember motor / 70 mAh Li‑Poly
- Power (150%): ParkZone Mustang motor / 150 mAh Li‑Poly
- Construction (100%): 2mm Depron
- Construction (150%): 3mm Depron
- Radio: ParkZone receiver/ESC/servo brick, DSM2 module
- Finish: Builder’s choice of stickers, markers, and/or paint
Sources
- Skymasters Radio Control Club — www.skymasters.org
- Peck-Polymers / A2Z Corp — (877) 754-7465, www.a2zcorp.us/store
- ParkZone — (800) 338-4639, www.parkzone.com
- Spektrum RC — (800) 338-4639, www.spektrumrc.com
Have fun!
Transcribed from original scans by AI. Minor OCR errors may remain.

