
Swashplate: Gazaur Poseidon 480
Shawn Rubush
HAVING THE OPPORTUNITY to build and fly something different is a challenge I'm ready to take on. Sometime ago I was introduced to the wonderful world of helicopters, and I've been hooked ever since. I attended the 2009 IRCHA (International Radio Controlled Helicopter Association) Jamboree in Muncie, Indiana. Nothing short of "shock and awe" comes to mind. I spent a good portion of the day checking out all the products the vendors had to offer.
It quickly became apparent that the helicopter market was exploding with a multitude of new machines and parts. There are many different types and sizes of helicopters on the market, and the Gazaur Poseidon definitely qualifies as new and different.
Until that day, I had never heard of that manufacturer. My curiosity led me to do some research, and what I found was a surprise: Gazaur has actually been around for many years.
Gazaur—Generation of Advanced and Zenful Atypical Unique Rotormachine—was 17 years in the making. It was established in 2005, with goals to present innovative ideas to the remote-control industry and become a world-class company.
Gazaur currently sells two 480-size helicopters with multiple options. The Mars is intended to be a 3-D performer. The Poseidon is laid out to appeal to the more precision aerobatic types, so it's labeled an "FAI" machine.
These models are available with either Silver Surface Graphite (SSG) or carbon-fiber frames and in packages with a variety of combination systems. I opted for the SSG frame and Lingo motor package.
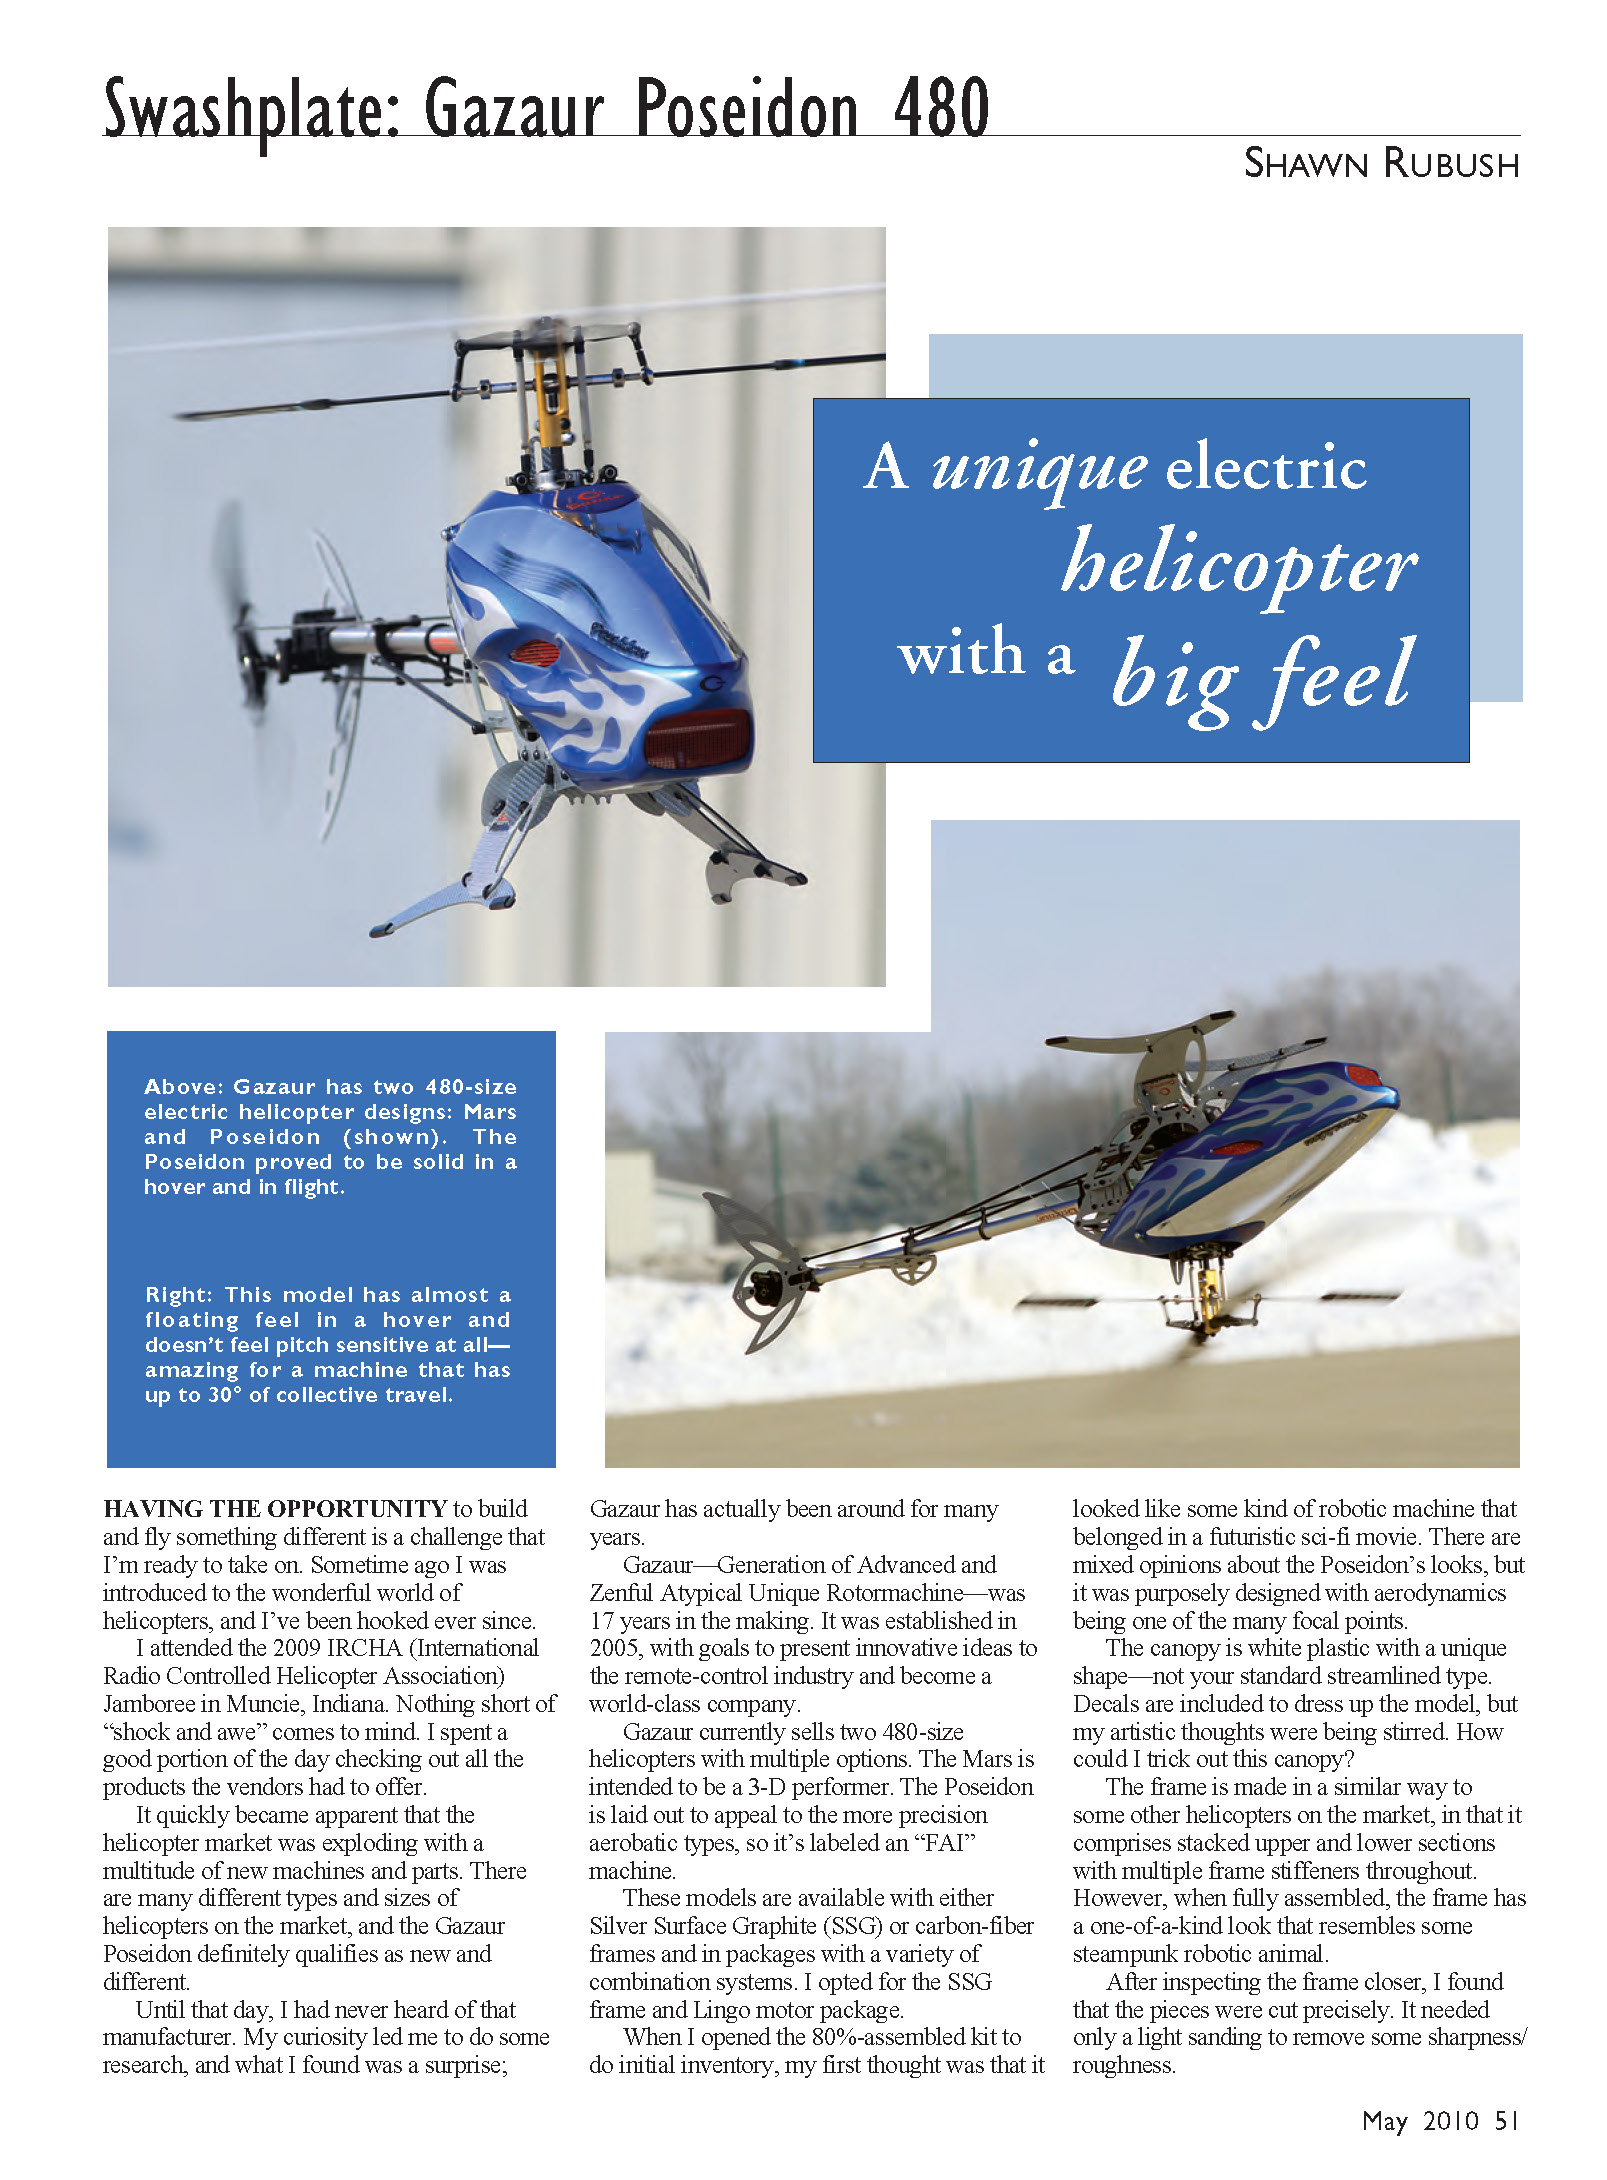
When I opened the 80%-assembled kit to do initial inventory, my first thought was that it looked like some kind of robotic machine that belonged in a futuristic sci-fi movie. There are mixed opinions about the Poseidon's looks, but it was purposely designed with aerodynamics as one of the focal points.
The canopy is white plastic with a unique shape—not your standard streamlined type. Decals are included to dress up the model, but my artistic thoughts were being stirred. How could I trick out this canopy?
The frame is made in a similar way to some other helicopters on the market, in that it comprises stacked upper and lower sections with multiple frame stiffeners throughout. However, when fully assembled the frame has a one-of-a-kind look that resembles some steampunk robotic animal.
After inspecting the frame closely, I found that the pieces were cut precisely. It needed only a light sanding to remove some sharpness and roughness.
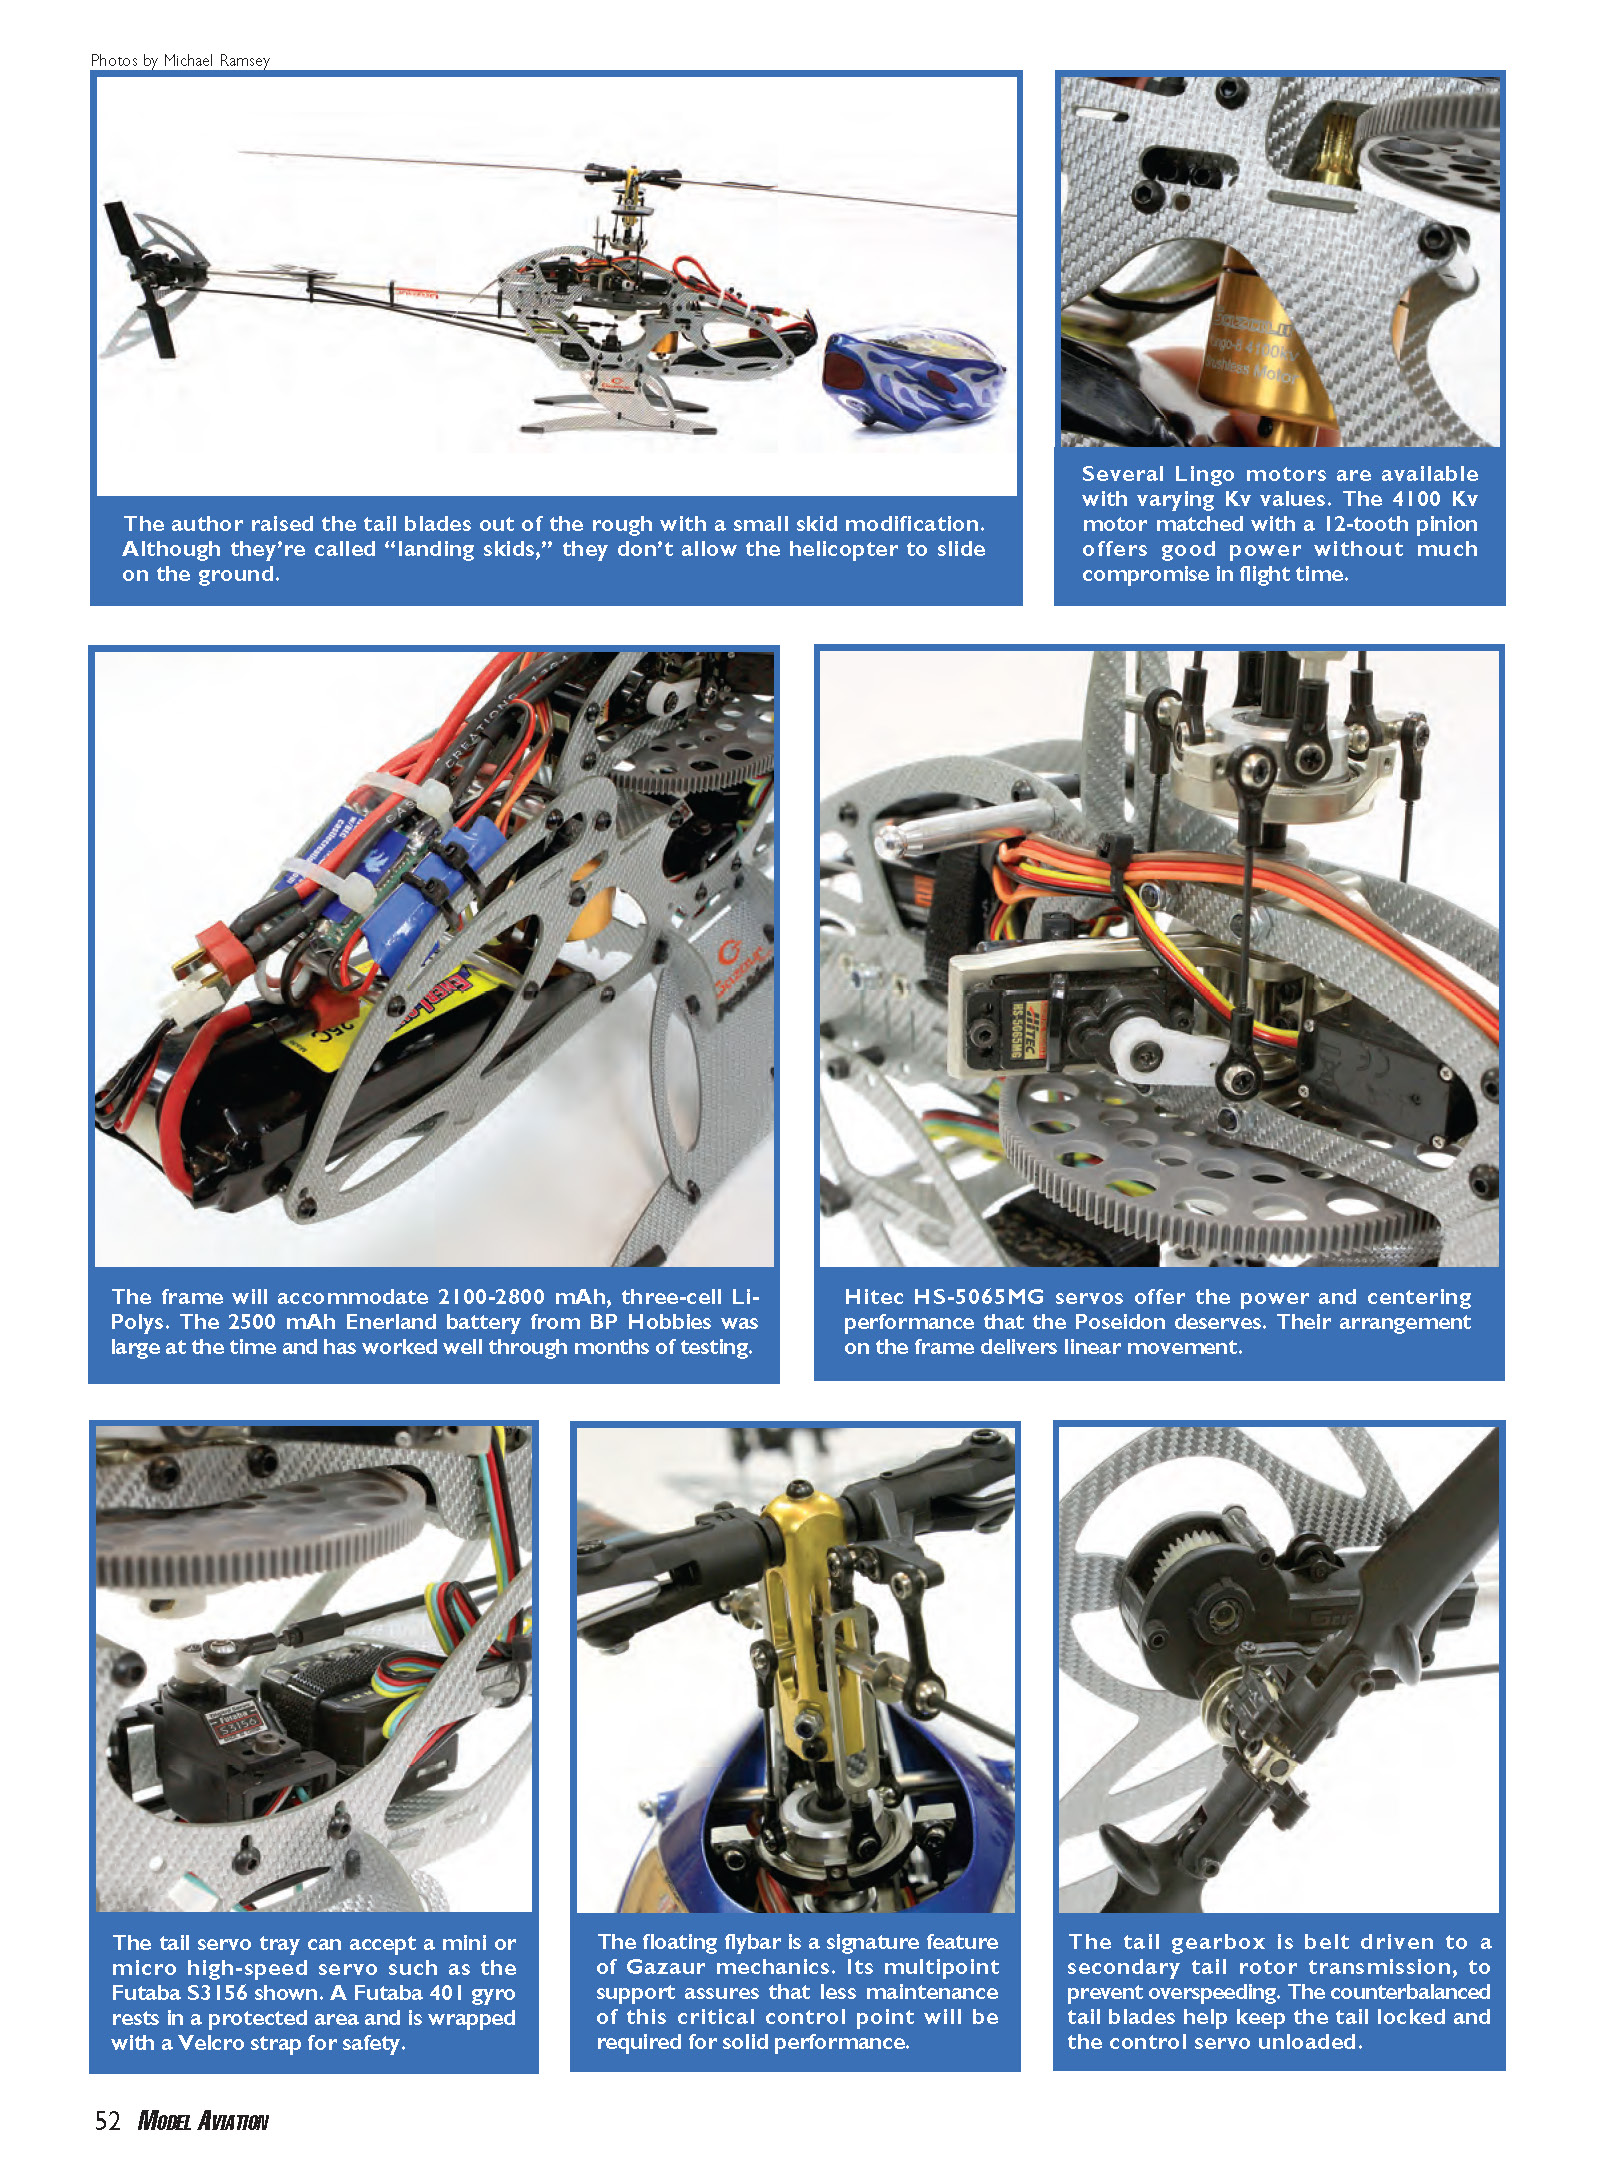
I raised the tail blades out of the rough with a small skid modification. Although they're called "landing skids," they don't allow the helicopter to slide on the ground.
Several Lingo motors are available with varying Kv values. The 4100 Kv motor matched with a 12-tooth pinion offers good power without much compromise in flight time.
The frame will accommodate 2100–2800 mAh, three-cell Li-Polys. The 2500 mAh Enerland battery from BP Hobbies was large at the time and has worked well through months of testing.
Hitec HS-5065MG servos offer the power and centering performance that the Poseidon deserves. Their arrangement on the frame delivers linear movement.
The tail servo tray can accept a mini or micro high-speed servo such as the Futaba S3156 shown. A Futaba 401 gyro rests in a protected area and is wrapped with a Velcro strap for safety.
The floating flybar is a signature feature of Gazaur mechanics. Its multipoint support assures that less maintenance of this critical control point will be required for solid performance.
The tail gearbox is belt driven to a secondary tail-rotor transmission to prevent overspeeding. The counterbalanced tail blades help keep the tail locked and the control servo unloaded.
I think the designers had pilots such as me in mind when they designed the landing skids, which are made from the same material as the frame. The skids are attached using a slotted fit that interlocks and is held in place using one of two materials: silicone tubing or foam.
In the event that the Poseidon encounters a rapid loss of ground clearance, the skids are designed to absorb a majority of the impact and break away from the frame. It is hoped that this feature preserves all of the vital electronics onboard, similar to an automobile "crumple zone."
Unfortunately, because of some initial electronic issues I was not able to fully test the design idea. The gear does work as intended; there was no damage to the frame or skid pieces.
Initially I used the foam tubing to lock the landing gear in place. But when you spool up the head, the gyroscopic effect causes the Poseidon to torque in unwanted directions, giving a different liftoff every time unless you "pop" it up.
Using silicone tubing gave the skids a more rigid feel, greatly reducing the torque effect. The only downside of the landing-gear design is that the skids have a good grip on soft ground. Only when the machine begins to lift and break ground contact do you have indication of rudder offset trim, which is an issue solely during the initial setup process.
Also, the stock gear arrangement places the tail and tail blades close to the ground. The landing skids can be attached to raise the tail so that the helicopter will rest on the skids with forward tilt, known as "California Rake" in the auto world.
Continuing the inventory, several unique items jumped out at me. The programmable head assembly came almost completely assembled, with all metal components except the main blade grips and mixing arms (both available as metal upgrades).
The main blade grips are designed with thrust bearings and multiple types of spacers to take on the centrifugal load generated when using the recommended power system. The thrust-bearing design helps cyclic inputs remain smooth and responsive without exerting too much demand on the servos.
The "floating flybar" is designed to maintain linear head movement to improve stability and cyclic responsiveness while keeping moving parts to a minimum. Routine inspection and maintenance of the head assembly are reduced compared with some designs on other helicopters.
The servo-mounting platform is configured to keep the servos positioned close to the swashplate, which allows the equal-length aileron, elevator, and pitch control rods to remain virtually parallel to the main shaft throughout the range of movement. This symmetrical setup helps improve the mechanical advantage of the servos and allows the user to program a large amount of throw.
The tail rotor is belt driven—again, not in the standard setup. The tail assembly is a gearbox design using three gear sizes that allow the belt to run at a slower speed. That reduces the amount of friction and static electricity generated while maintaining tail rotor speed and authority.
The tail rotor blades are also one of a kind. Besides the fact that they are made to rotate clockwise, unlike on most helicopters, they have an additional section at the root of the leading edge that is similar to the bow of a large ship hull.
The intention of this tail-blade design eluded me until I caught a thread on the RunRyder forum. The idea is similar to the modification some pilots call "Chinese weight." It improves the balance of the blade and achieves a better center of gravity.
The effort reduces the tail servo loading and pushes the blade into proper position better than the traditional-design rotor blade. Efficiency is also improved. Whatever the reason, the blades work well.
Construction
After going through all the parts and verifying that everything was present, it was time to start the build. Opening the instruction manual to the first page (A1), I saw a breakdown of how to read and understand the instructions. Nothing is left for the builder to guess.
Each step includes a position number to match the corresponding assembly picture and the quantity of that specific part needed to complete the step. In the lower right corner of the quantity box is a part number. The hardware is separated by type and size into heat-sealed sections with a part-number label on each.
There is a picture of how a finished component should look. In addition, every step includes items that might need specific tools or adhesives by putting an icon beside a given sequence number, caution notices, assembly tips, and specific sizes and measurements.
During the building process, the only step I deviated from was mounting the servos to the mounting platform. The manual instructs you to use servo grommets.
After mounting the servos as instructed, I had reservations about servo movement, especially in hard 3-D maneuvers. With that in mind, I decided to solid-mount the servos to prevent unwanted movement.
The head and tail gear assemblies are provided almost completely put together, which makes the construction process quicker. But to familiarize myself with the working mechanics and to verify that all parts were as they should have been, I thoroughly went over both sections to ensure that no unforeseen problems would arise. The use of thread lock was verified.
After doing the initial programming, a quick check to ensure that the swashplate and flybar were centered and level with the servos at 90° made it apparent that a small adjustment was needed to bring the floating flybar down to achieve zero pitch on the main blades. With a few tweaks, the Poseidon was ready to go.
Pluses and Minuses
- Unique rotor head with "floating flybar" design has fewer moving parts to wear out.
- Easy to maintain.
- Mechanics operate smoothly, delivering crisp yet stable responsiveness.
- Easy parts identification during assembly.
- Landing gear designed with a "crumple zone" preserves frame and electronics in hard landings.
- Speed-up tail-rotor gearbox design allows the drive belt to run slower, reducing static electricity (a known source of EMI) while maintaining tail-rotor authority.
- Tail-rotor blade-to-ground clearance is short (but an easy fix is noted).
- Midframe tail servo mount makes rudder fine-tuning awkward.
- Wooden blades included, but this machine deserves better.
Flying
The initial few flights required fine-tuning here and there to achieve proper blade tracking. The mechanics have a massive amount of collective pitch travel available.
Using a pitch gauge, make sure that the maximum limits do not exceed 14° in positive or negative travel. Program the head mechanics so that the travel limit in the radio remains near 100%; otherwise, there will be a reduction in control resolution.
Comparing this helicopter to one that is a similar size (450 class), I was surprised by how quiet the Poseidon was. It almost gave me a false sense of head speed.
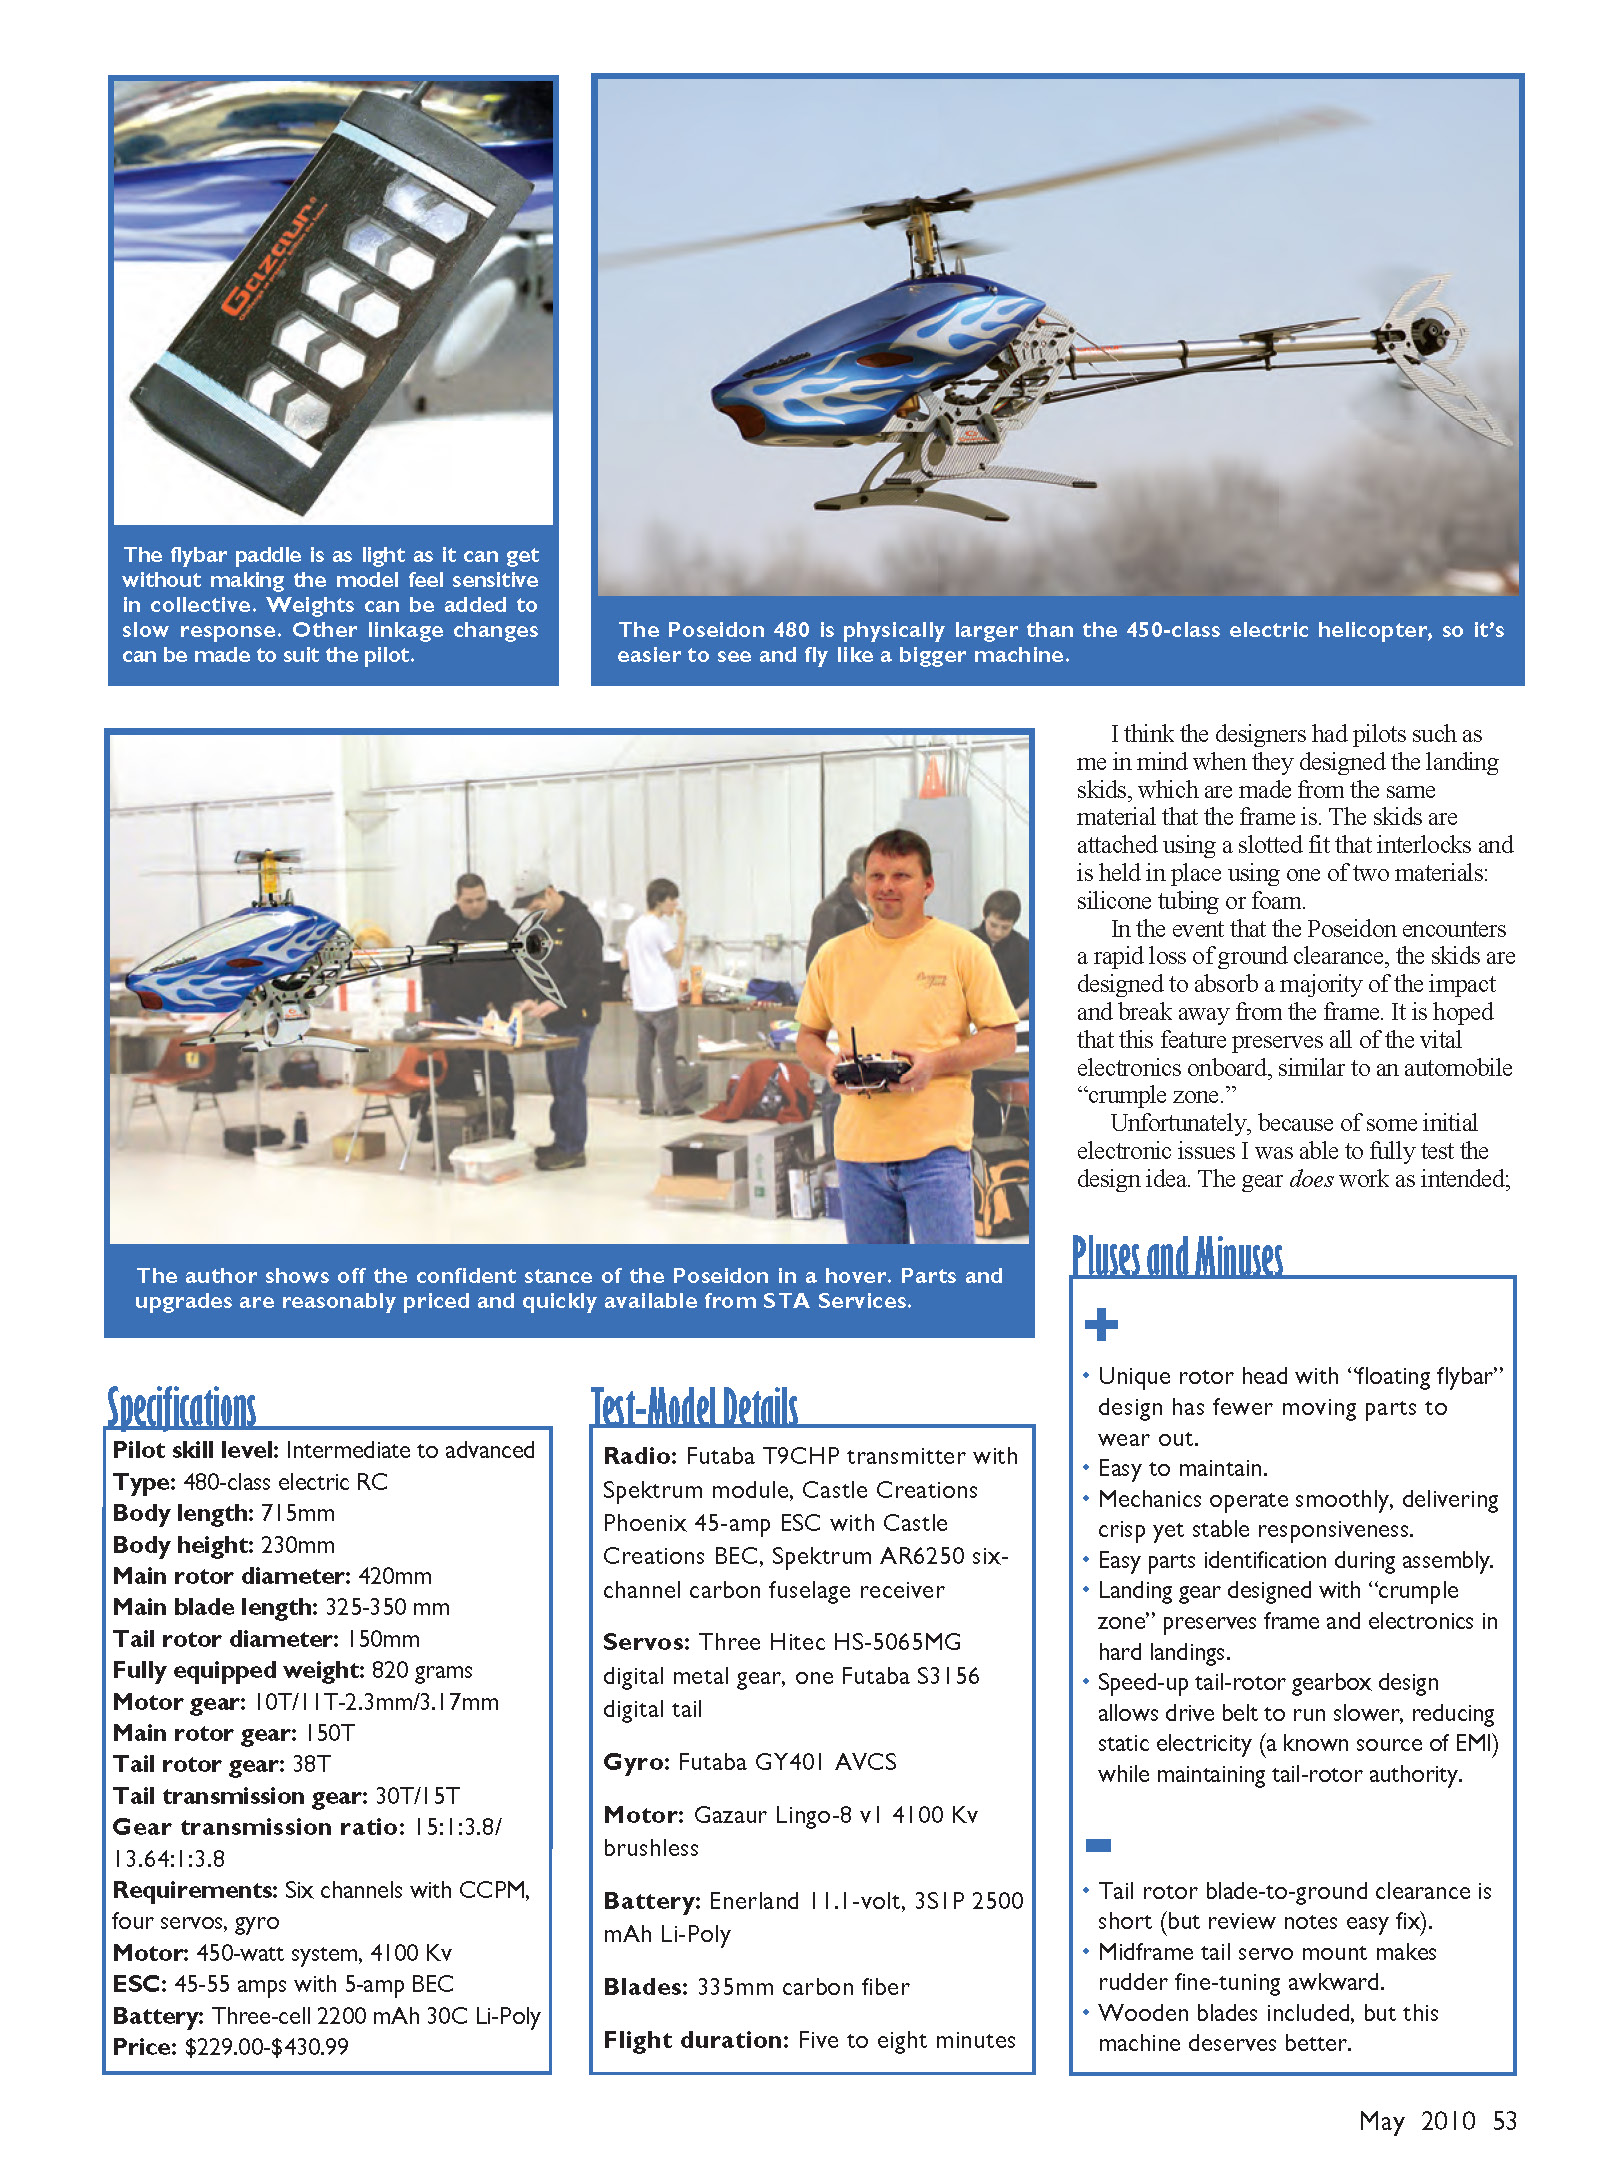
At midstick, the Poseidon maintained a nearly perfect hover with little to no correction needed. This model has a big feel; it's more like a 30- or 50-class machine.
Upright or inverted hovering is a solid experience, which is probably because of a combination of mechanics, power system, and blade size. All I know is that I'm flying the machine so often that I can't keep the batteries charged.
As the photos show, I gave the canopy a retro flame paint scheme and added color contrast by filling the vent holes with a screen-painted red. The chrome trim on the canopy ties the whole look together, but most important, the dark base color helps with orientation. Since you're left to finish the Poseidon's canopy, carefully consider a scheme that will help you see the helicopter.
The Futaba servos and gyro system provided solid performance. To assure that the right amount of power was given to the system, I wired the Castle Creations CC BEC to the Phoenix-45 ESC for good measure.
I mentioned the fantastic hover performance, and part of that is the 30% exponential added to the rates at the low setting. I know that this is supposed to be an FAI machine, and it is exactly that on low rates; using the high rates is an amazing 3-D experience. It's hard to believe that Gazaur made a different helicopter for such a thing.
I'm thrilled with the Poseidon's aerobatic performance on low rates, because it's easy to do my FAI stuff. In forward flight the machine tracks well with good vertical balance. Tracking through loops and flips is consistent.
Rolls have a tendency to pitch the nose up, which is typical but perhaps more pronounced because of the tail-high frame arrangement. It's nothing that input corrections and perhaps mixing can't fix.
Pirouette rates are equal and strong in both directions. Tail-hold ability in backward or sideways flight is strong as well. Maybe that's why those tail-blade counterbalances are present?
What I like most about the Gazaur Poseidon is that it likes to fly, which satisfies my enjoyment for both helicopters and airplanes.
Shawn Rubush [email protected]
Manufacturer/Distributor
STA Services, LLC 10624 S. Eastern Ave. Suite A-729 Henderson, NV 89052 (702) 966-8051 www.stasvc.com
Sources
- Hitec RCD — (858) 748-6948 — www.hitecrcd.com
- Futaba — (217) 398-3630 — www.futaba-rc.com
- Spektrum RC — (800) 338-4639 — www.spektrumrc.com
- Castle Creations — (913) 390-6939 — www.castlecreations.com
Chinese weight design: http://rc.runryder.com/helicopter/t388772p1
Transcribed from original scans by AI. Minor OCR errors may remain.

