
The Swinger
Fran H. Scott
THE MOST distinguishing feature of any aircraft is its shape. The world of aircraft is a realm of shapes. Each airplane is contoured so as to achieve certain desired flying qualities. In this, however, compromises must be made, for unfortunately, a form giving good high-speed characteristics will usually be a poor performer at low speeds, and fine slow-flying airplanes just won't go fast at all.
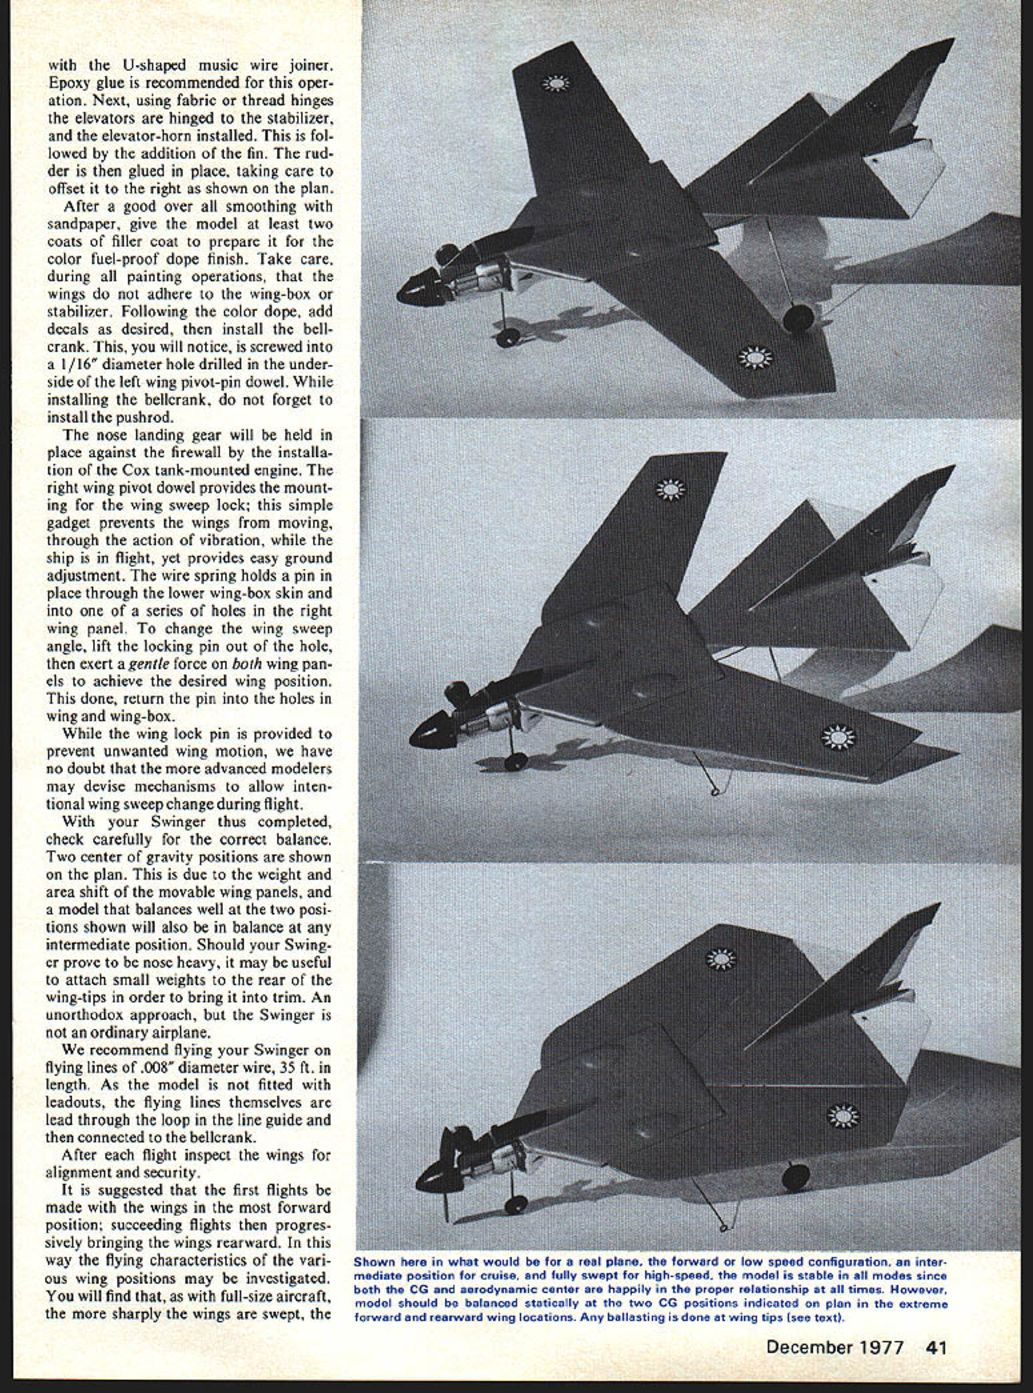
Slots, flaps, and various leading-edge devices are commonly used to alleviate the problem, but the most spectacular solution to the dilemma of optimum aerodynamic form is to actually change the airplane's shape while in flight. To pivot the wings on a hinge really achieves dramatic results. For example: extending the wings of a variable-geometry airplane enables it to take off and land on short runways, to fly slowly, and to remain airborne for great distances. Sweeping the wings fully back, on the other hand, will permit the highest speeds to be attained. Of course, intermediate wing positions may be selected on these remarkable planes to achieve whatever performance qualities may be desired to accomplish the mission.
The controversial F-111, successful in all areas except political, is the first U.S. combat machine to utilize swing wings. The B-1 bomber is a swing-wing aircraft that was intended to replace the elderly B-52s now in service. Abroad, the French Dassault Mirage G.8, Soviet MiG-23 Flogger, and the Multinational MRCA are all provided with variable-geometry wings. Thus it is, at least until another aerodynamic breakthrough occurs, we will be seeing more and more of this swing-wing concept in aircraft.
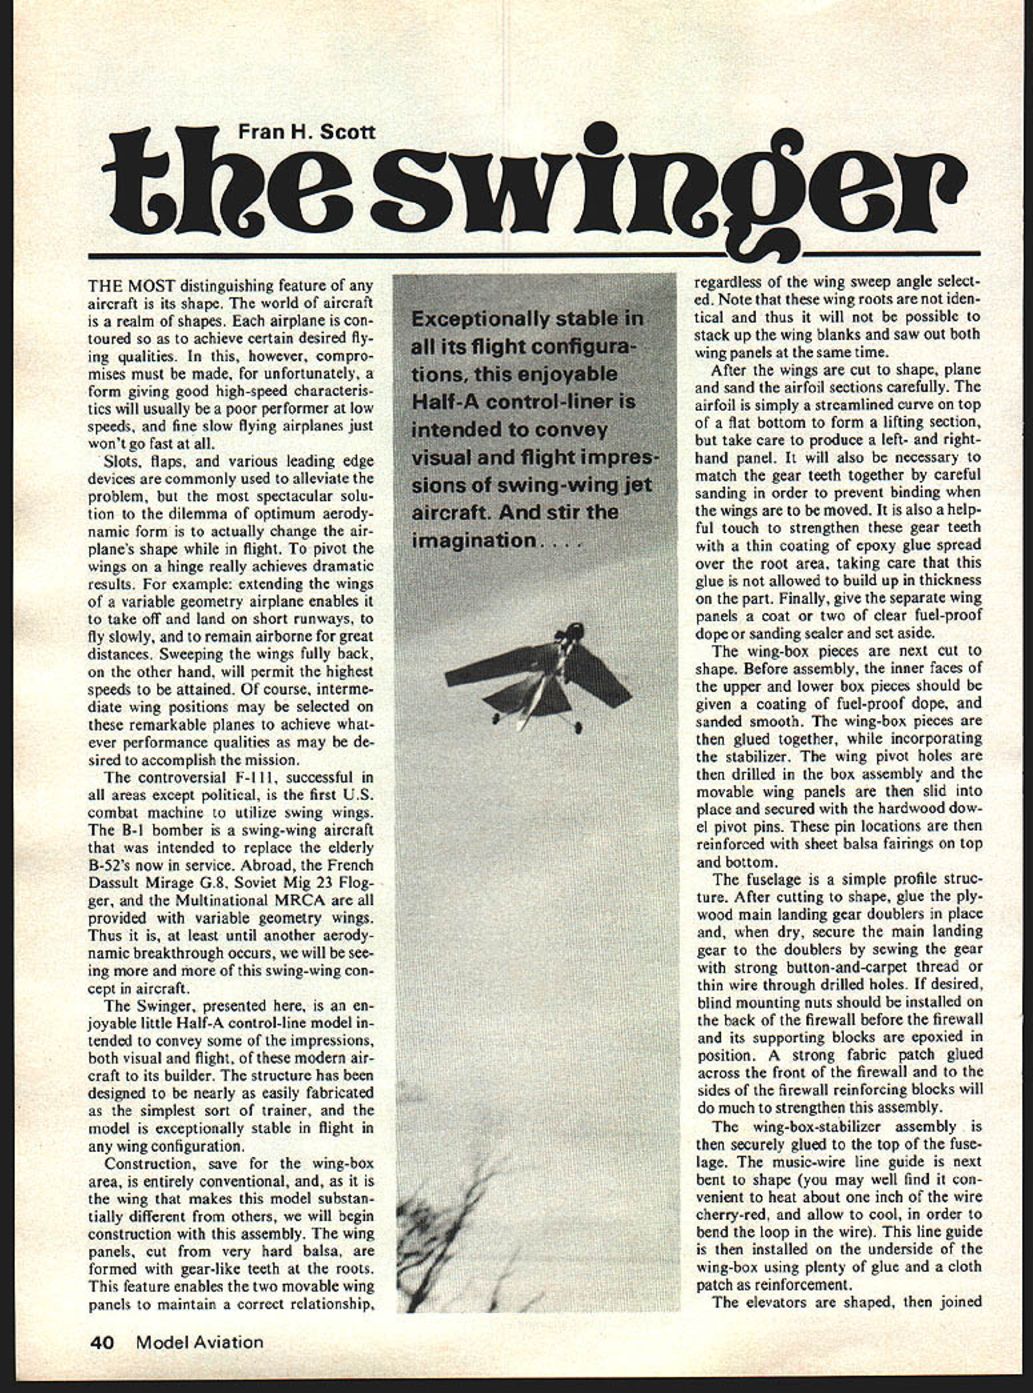
The Swinger, presented here, is an enjoyable little Half-A control-line model intended to convey some of the impressions, both visual and flight, of these modern aircraft to its builder. The structure has been designed to be nearly as easily fabricated as the simplest sort of trainer, and the model is exceptionally stable in flight in any wing configuration.
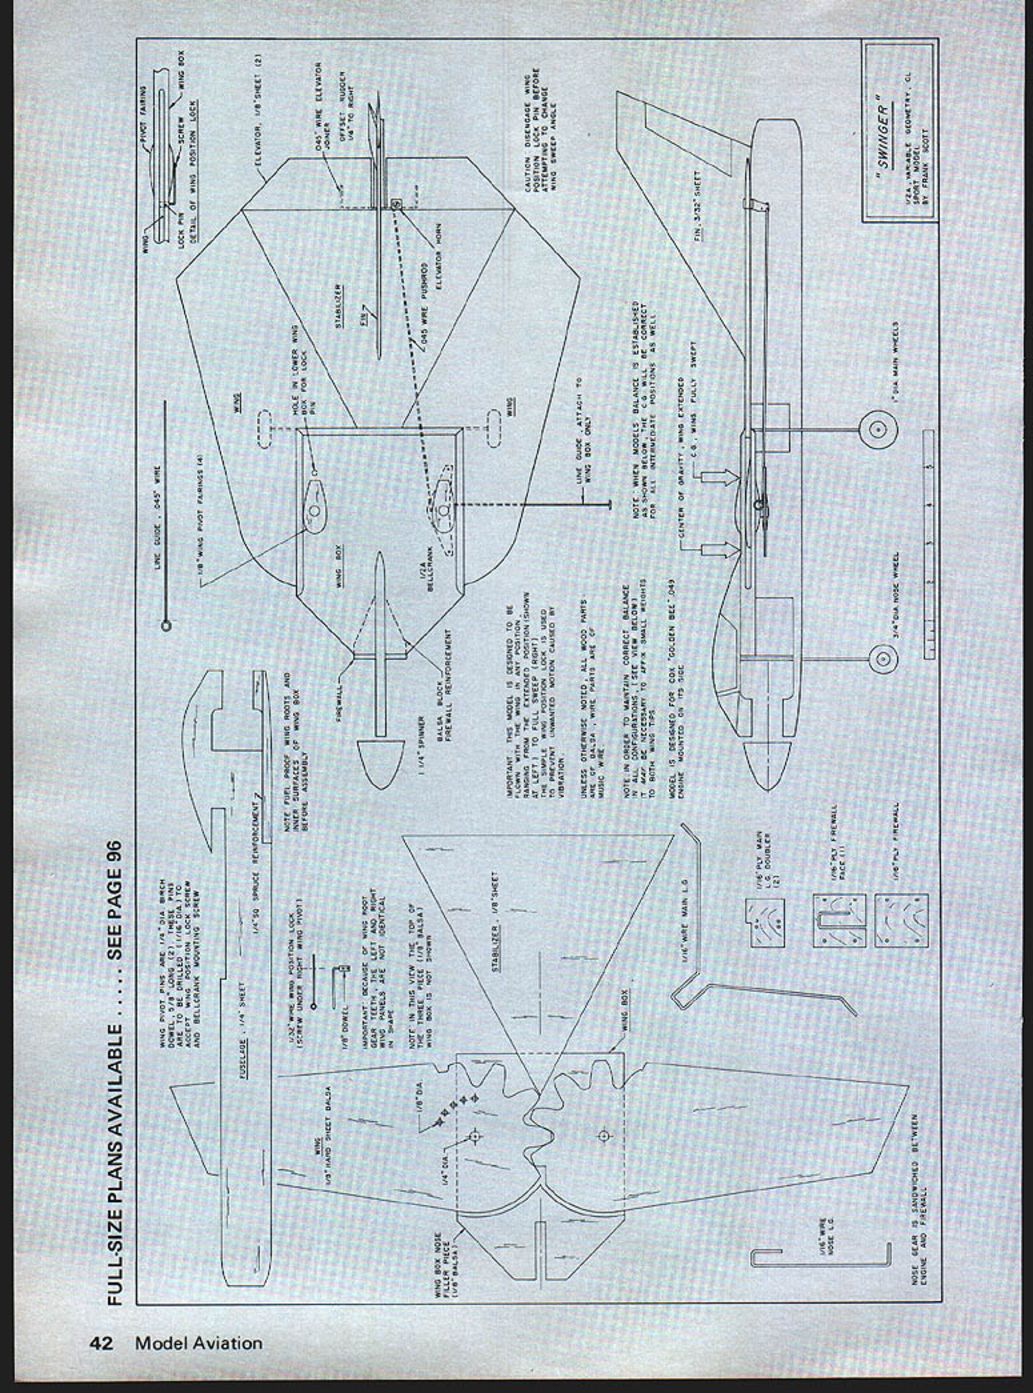
Construction, save for the wing-box area, is entirely conventional, and, as it is the wing that makes this model substantially different from others, we will begin construction with this assembly. The wing panels, cut from very hard balsa, are formed with gear-like teeth at the roots. This feature enables the two movable wing panels to maintain a correct relationship, regardless of the wing sweep angle selected. Note that these wing roots are not identical and thus it will not be possible to stack up the wing blanks and saw out both wing panels at the same time.
After the wings are cut to shape, plane and sand the airfoil sections carefully. The airfoil is simply a streamlined curve on top of a flat bottom to form a lifting section, but take care to produce a left- and right-hand panel. It will also be necessary to match the gear teeth together by careful sanding in order to prevent binding when the wings are to be moved. It is also a helpful touch to strengthen these gear teeth with a thin coating of epoxy glue spread over the root area, taking care that this glue is not allowed to build up in thickness on the part. Finally, give the separate wing panels a coat or two of clear fuel-proof dope or sanding sealer and set aside.
The wing-box pieces are next cut to shape. Before assembly, the inner faces of the upper and lower box pieces should be given a coating of fuel-proof dope, and sanded smooth. The wing-box pieces are then glued together, while incorporating the stabilizer. The wing pivot holes are then drilled in the box assembly and the movable wing panels are then slid into place and secured with the hardwood dowel pivot pins. These pin locations are then reinforced with sheet balsa fairings on top and bottom.
The fuselage is a simple profile structure. After cutting to shape, glue the plywood main landing gear doublers in place and, when dry, secure the main landing gear to the doublers by sewing the gear with strong button-and-carpet thread or with the U-shaped music wire joiner. Epoxy glue is recommended for this operation. Next, using fabric or thread hinges the elevators are hinged to the stabilizer, and the elevator horn installed. This is followed by the addition of the fin. The rudder is then glued in place, taking care to offset it to the right as shown on the plan.
After a good overall smoothing with sandpaper, give the model at least two coats of filler coat to prepare it for the color fuel-proof dope finish. Take care, during all painting operations, that the wings do not adhere to the wing-box or stabilizer. Following the color dope, add decals as desired, then install the bellcrank. This, you will notice, is screwed into a 1/16" diameter hole drilled in the underside of the left wing pivot-pin dowel. While installing the bellcrank, do not forget to install the pushrod.
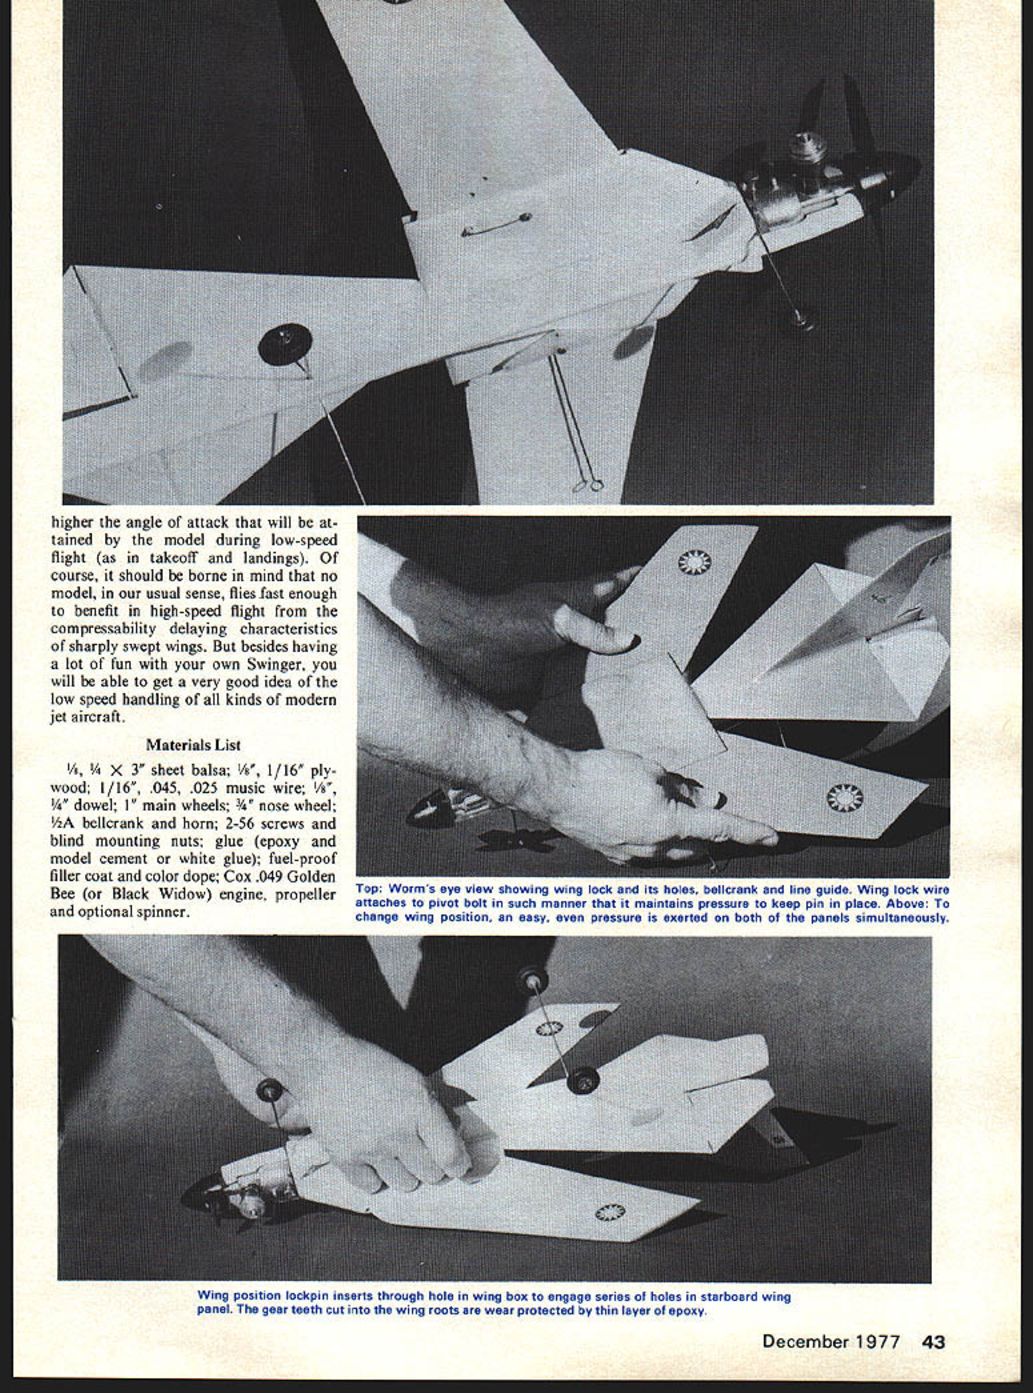
The nose landing gear will be held in place against the firewall by the installation of the Cox tank-mounted engine. The right wing pivot dowel provides the mounting for the wing sweep lock; this simple gadget prevents the wings from moving, through the action of vibration, while the ship is in flight, yet provides easy ground adjustment. The wire spring holds a pin in place through the lower wing-box skin and into one of a series of holes in the right wing panel. To change the wing sweep angle, lift the locking pin out of the hole, then exert a gentle force on both wing panels to achieve the desired wing position. This done, return the pin into the holes in wing and wing-box.
While the wing lock pin is provided to prevent unwanted wing motion, we have no doubt that the more advanced modelers may devise mechanisms to allow intentional wing sweep change during flight.
With your Swinger thus completed, check carefully for the correct balance. Two center-of-gravity positions are shown on the plan. This is due to the weight and area shift of the movable wing panels, and a model that balances well at the two positions shown will also be in balance at any intermediate position. Should your Swinger prove to be nose heavy, it may be useful to attach small weights to the rear of the wingtips in order to bring it into trim. An unorthodox approach, but the Swinger is not an ordinary airplane.
We recommend flying your Swinger on flying lines of .008" diameter wire, 35 ft. in length. As the model is not fitted with leadouts, the flying lines themselves are lead through the loop in the line guide and then connected to the bellcrank.
After each flight inspect the wings for alignment and security.
It is suggested that the first flights be made with the wings in the most forward position; succeeding flights then progressively bringing the wings rearward. In this way the flying characteristics of the various wing positions may be investigated. You will find that, as with full-size aircraft, the more sharply the wings are swept, the higher the angle of attack that will be attained by the model during low-speed flight (as in takeoff and landings). Of course, it should be borne in mind that no model, in our usual sense, flies fast enough to benefit in high-speed flight from the compressibility-delaying characteristics of sharply swept wings. But besides having a lot of fun with your own Swinger, you will be able to get a very good idea of the low-speed handling of all kinds of modern jet aircraft.
Materials List
- 1/8, 1/4 x 3" sheet balsa
- 1/8, 1/16" plywood
- 1/16", .045, .025 music wire
- 1/8", 1/4" dowel
- 1" main wheels
- 3/16" nose wheel
- 1/2A bellcrank and horn
- 2-56 screws and blind mounting nuts
- Glue (epoxy and model cement or white glue)
- Fuel-proof filler coat and color dope
- Cox .049 Golden Bee (or Black Widow) engine, propeller and optional spinner
Transcribed from original scans by AI. Minor OCR errors may remain.

