


TIN WINGS
by Lawrence Klingberg
Full-scale construction techniques pay off
When scratch-building large-scale models, especially of World War I through Golden Age of Aviation subjects, the wings can be problematic. One of the main concerns is fabricating the leading edges (LEs); you can’t go to the hobby store and buy balsa stock large enough for the job. Most of my airplanes have wing chords of 16 to 25 inches, making the airfoil huge by today’s standards.
Aeromodelers have used several techniques through the years to solve this dilemma, including sheeting the LE with thin balsa or plywood, or cutting foam pieces with a hot-wire and gluing them onto the spars. I have used these approaches, and I recently learned the best one for my models: the method EAA (Experimental Aircraft Association) builders have used for years on ultralight aircraft. That construction uses aluminum sheeting over formers to create a light, smooth surface for the covering. The only restriction is that the wing LE airfoil must be straight the whole length of the wing. Most WW I and all civilian airplanes of the 1920s and 1930s fit that category (for example, the Fokker D.VII and Dr.I triplane, Curtiss Robin, Bellanca, Boeing 80, Sikorsky, and Curtiss Condor). These models can incorporate the aluminum-wing technique—a great way to build bigger and better scale airplanes.
I have constructed giant radio-controlled aircraft for more than 30 years, many built from scratch. Most are historical subjects, ranging from 1910 through the Golden Age of the late 1930s. My projects range in size from 1/6 to 1/2-scale.
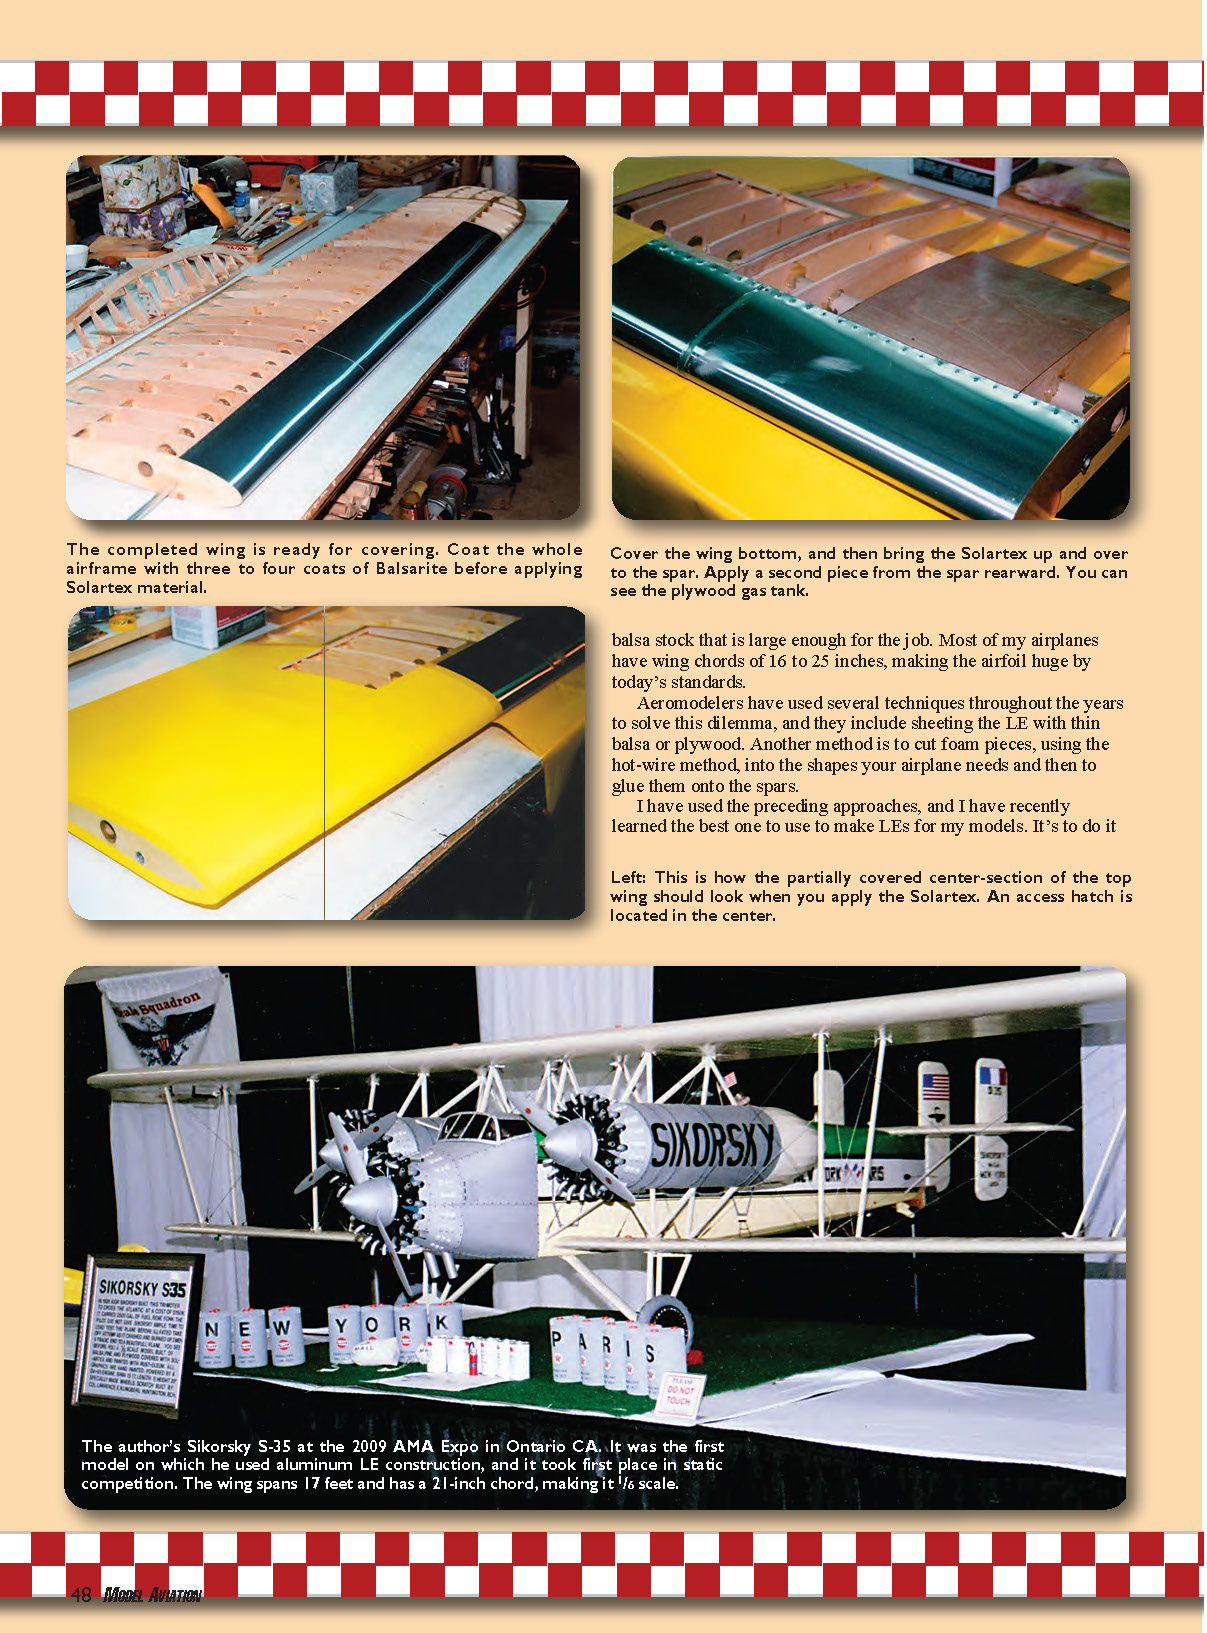
In the last couple of years I ran into the problem of how to make LEs for a 17-foot-span Sikorsky S-35 and a 15-foot-span Curtiss Condor. The wings had identical chords, at 21 inches, with a maximum thickness of 3 inches. I didn't want to use foam for the LEs as I had done in the past, so the idea of aluminum LEs was born. This method has worked out very well for me and may interest others who build similar-size models.
One word of caution: do not try this method on small wings. Aluminum doesn't like to bend sharply around small LEs, making the technique much more difficult.
Materials and basic construction
The aluminum I have been using is 0.010 inch thick and is available from most Home Depot stores. It comes in 20-inch widths and is approximately 25 feet long. Originally intended for roof valleys, this material is reasonably priced and easy to purchase.
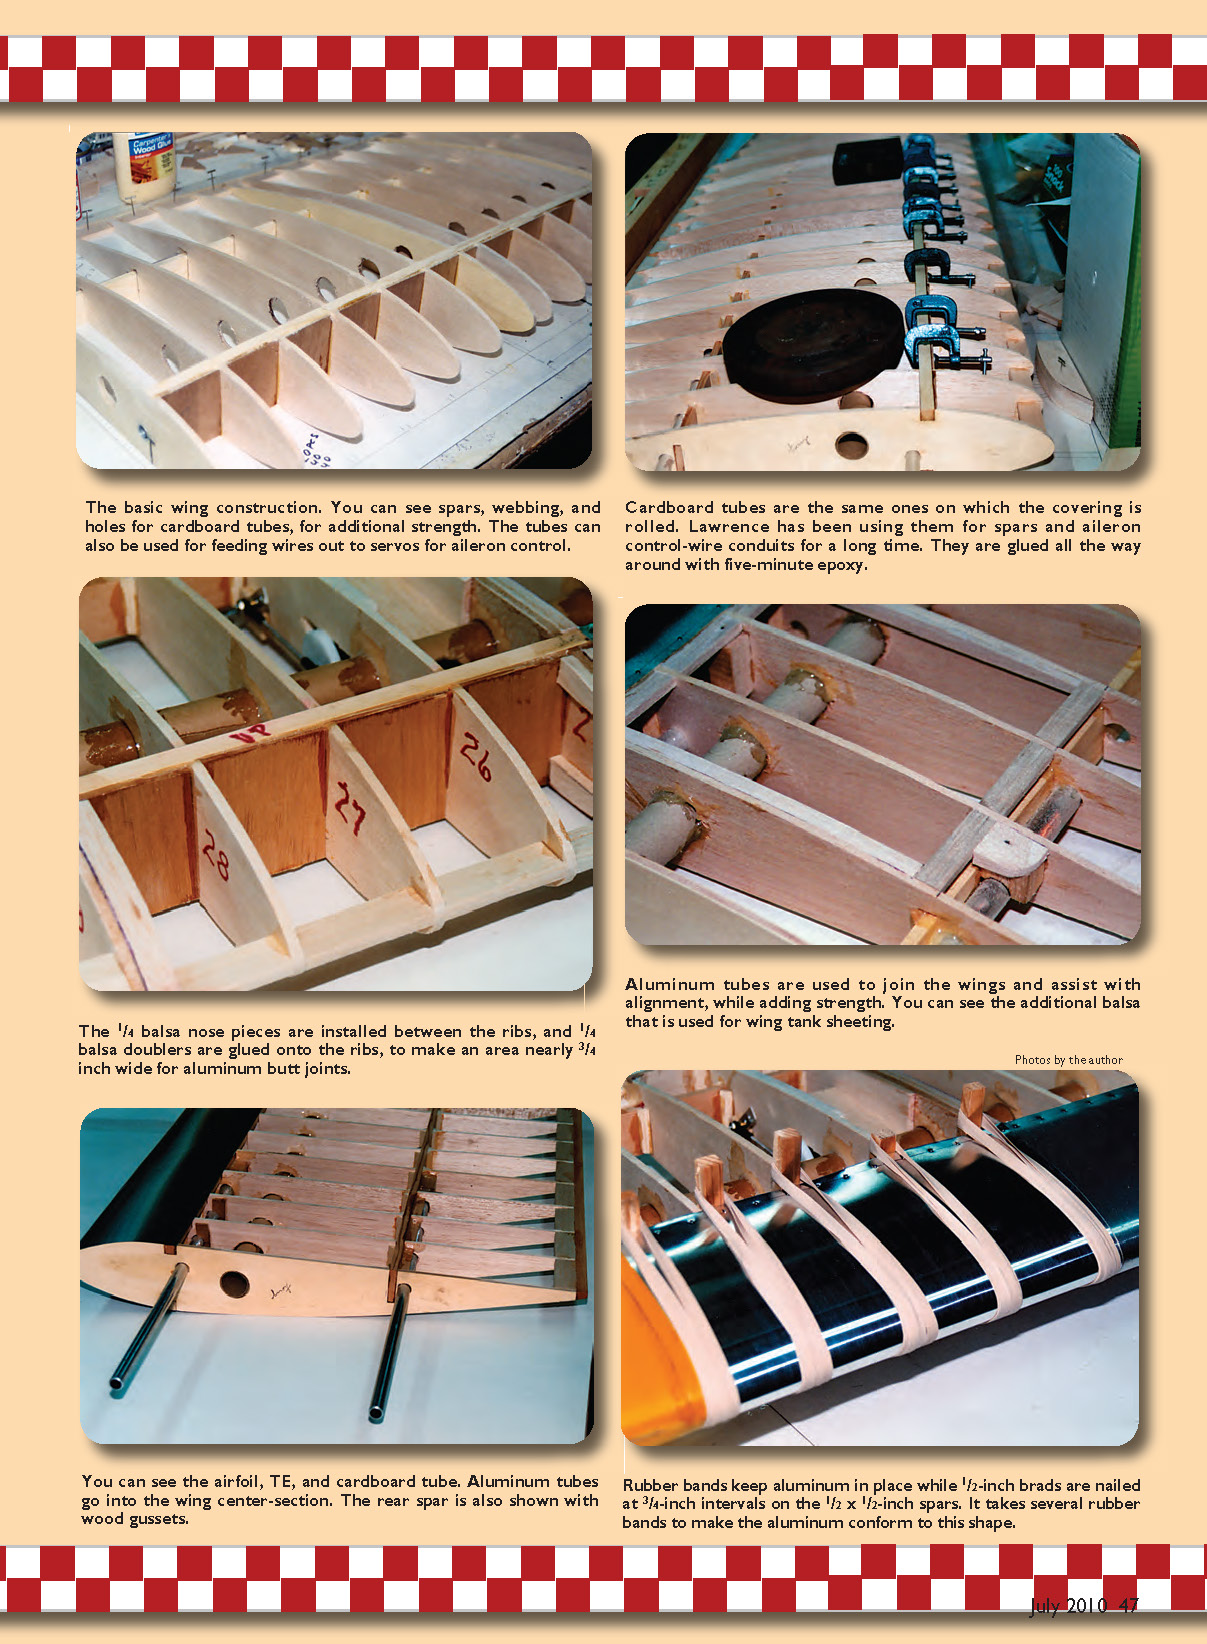
The wings are constructed with LE skinning in mind. All ribs are cut from 3/16-inch balsa and must be made accurately; the sheet aluminum is not very forgiving as it is formed around the nose of the ribs. Ribs are spaced at 2-inch intervals (which equals 1 foot when building to 1/6 scale). Shear webs of 1/8-inch plywood are glued between the ribs, against the two spars.
Wherever there will be a joint in the LE, glue 1/4-inch pieces of balsa onto the ribs to provide extra support for the aluminum. The width of the joint will be roughly 3/4 inch. These additional doublers are necessary because when aluminum is pulled around the nose it will buckle from the pressure that rubber bands put on it while the sheet is formed and nailed onto the spars. Then glue 1/4-inch balsa pieces between the nose ribs and sand to shape.
Attaching the aluminum
- After constructing the wings and preparing the LE, measure the front-to-rear dimension and cut the sheet approximately 10 x 20 inches. Cut the sheet so it will naturally bend the way it comes off the roll.
- Use a fine marking pen to draw a line 1/4 inch in from the edge, along the length of the sheet. Mark this line in 3/4-inch intervals so you can use an automatic center punch to dimple the aluminum before drilling the holes where marked.
- Use a #60 drill to punch all the holes along the edge.
- Nail the sheet onto the 1/2 x 1/2-inch top spar using 1/2-inch brads. Hold the brads with long-nose pliers to start them before tacking with a hammer. It's best to put the wing on a solid surface, such as a piece of steel, when tacking.
- Cut several 3/8 x 3/8-inch square white-pine posts about 6 inches long to use as anchors around which to put the rubber bands. These bands put pressure on the aluminum as it is formed around the nose ribs.
- Place the rubber bands around the LE at 2-inch intervals (over each rib). If they are not positioned over the ribs, they can easily cause a buckle in the LE. Use large #84 rubber bands that are 1/2 x 3-1/2 inches in size.
- After putting on two or three bands and pulling down the LE to conform to the rib shape, turn the wing over. Make a line directly over the bottom 1/2 x 1/2-inch spar and mark it off in 3/4-inch increments as on the top. Center-punch the marks and drill the holes for the brads to be nailed through onto the spar.
- Carefully remove all rubber bands and posts. You are left with the completed LE. It usually takes me close to an hour to do a 20-inch section of wing. Line up the next piece of aluminum and continue until the wing is finished.
Be extremely careful when putting on or removing the rubber bands and posts; the wooden posts can be sent flying if not removed cautiously. Experience is a great teacher.
Covering the wing
I have used Solartex to cover my models for more than 30 years and consider it the best material for the job. Start by covering the nose section from spar to spar, then cover from the spar rearward on both the top and bottom of the wing.
After securing the material on the wing, apply Stits pinking tape, 1/2 inch wide, over the seams and the wing ribs. Use 4-inch pinking tape to go the full length of the wing over both the top and bottom spars. The finishing touch is to put elongated glue dots on the ribs that have the pinking tape, spaced 3/4 inch apart, to simulate the rib stitching on a full-scale airplane.
At this point I spray the Solartex with Rust-Oleum gray automotive primer and then apply at least three or four coats of the chosen color (I use Rust-Oleum spray cans from Home Depot). It has lasted for more than 20 years and holds up well, even on my seaplanes.
Good luck with your airplane. Build them big, because they fly better!
Lawrence Klingberg 8111 Dartmoor Dr. Huntington Beach, CA 92646
Sources:
- Solartex — www.solarfilm.co.uk
- Rust-Oleum — (800) 323-3584, www.rustoleum.com
Transcribed from original scans by AI. Minor OCR errors may remain.

