
VariEze
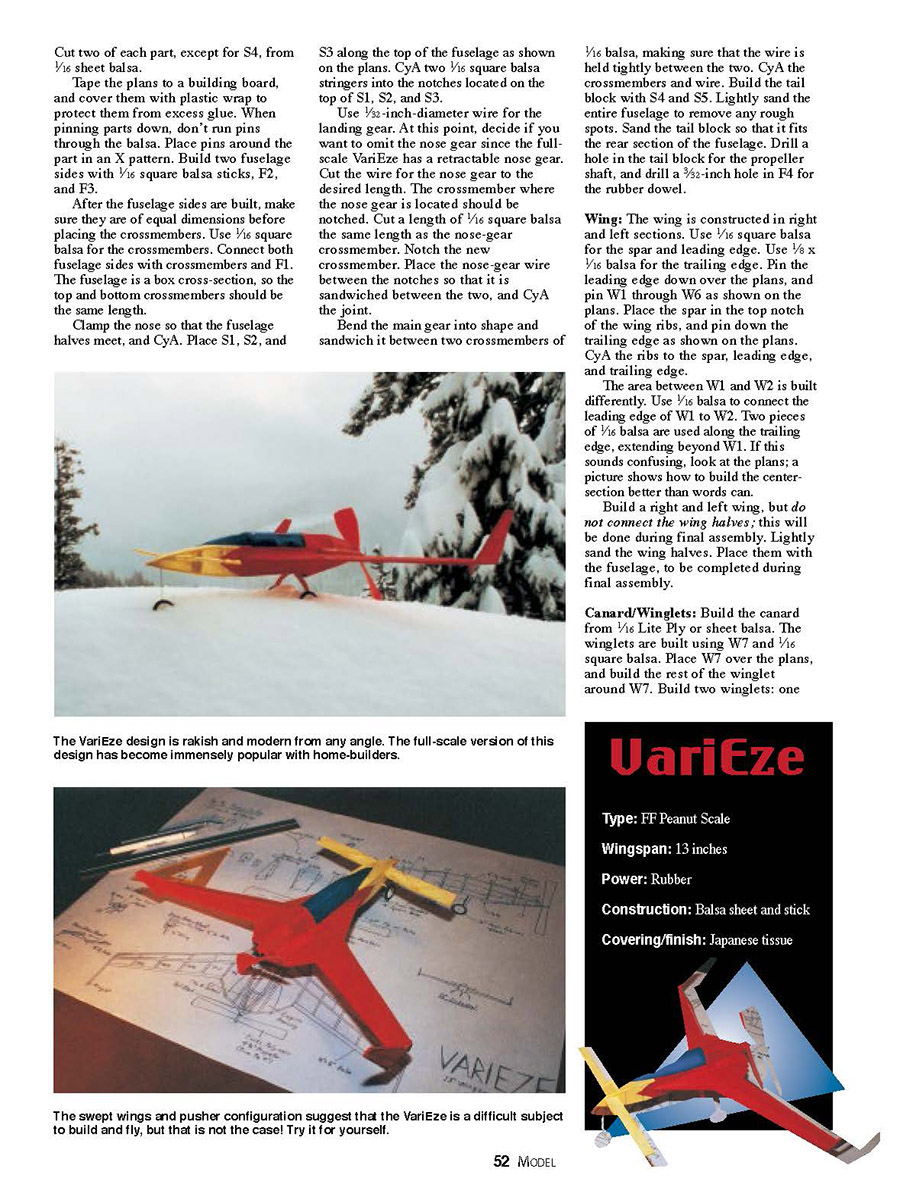
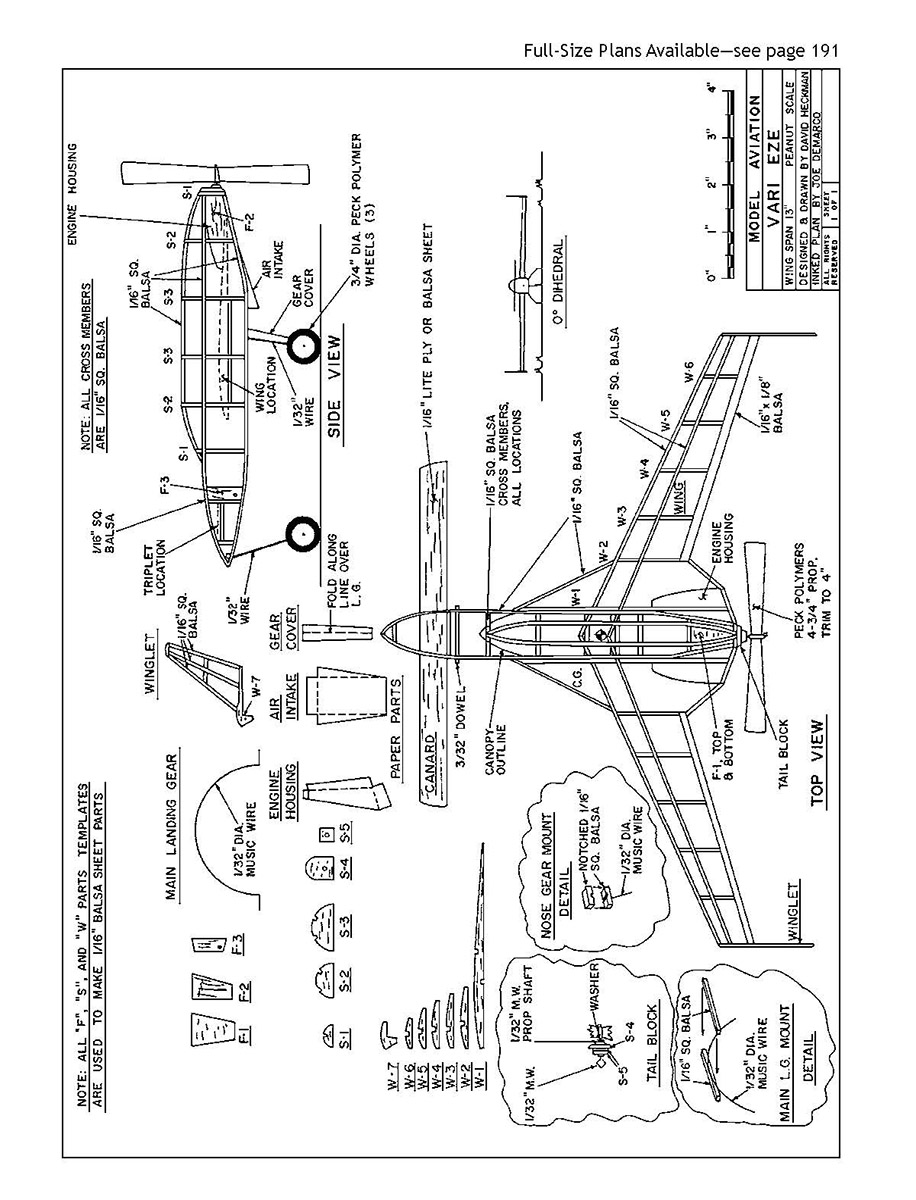
THE VARIEZE is one of the most popular home-built airplanes. It was designed by Burt Rutan, who also designed the Voyager that flew around the world nonstop. I had just started to build and fly rubber-powered Free Flight airplanes and had flown Radio Control models for eight years, and I wanted to try something different. I wanted to scratch-build my third Free Flight airplane. The VariEze seemed to be the perfect subject because it has basically a box fuselage with swept wings that eliminate the need for dihedral. I would not suggest the VariEze as a beginner's model.
I learned a couple of things from the first model. The first is to build the canard from 1/16 sheet balsa or plywood. The canard tends to take a beating, and balsa sticks tend to break easily.
Second, the propeller, which must be installed to run in reverse, needs to be a maximum diameter of approximately four inches. If it is any larger, the resulting torque will make the VariEze do a few great barrel rolls before hitting the ground.
I made my engine housings and intake from paper to keep the weight down. If you can make plastic parts, I suggest making a plastic canopy, engine housings, and intake. Cyanoacrylate glue (CyA) was used throughout construction.
CONSTRUCTION
Fuselage
The easiest way to construct the VariEze is to make a kit. Cut out the parts template with an X-Acto® knife. Rubber-cement the templates to heavy paper material, such as a manila folder. These templates will last a long time. Cut two of each part, except for S4, from 1/16 sheet balsa.
Tape the plans to a building board, and cover them with plastic wrap to protect them from excess glue. When pinning parts down, don't run pins through the balsa. Place pins around the part in an X pattern. Build two fuselage sides with 1/16 square balsa sticks, F2, and F3.
After the fuselage sides are built, make sure they are of equal dimensions before placing the crossmembers. Use 1/16 square balsa for the crossmembers. Connect both fuselage sides with crossmembers and F1. The fuselage is a box cross-section, so the top and bottom crossmembers should be the same length.
Clamp the nose so that the fuselage halves meet, and CyA. Place S1, S2, and S3 along the top of the fuselage as shown on the plans. CyA two 1/16 square balsa stringers into the notches located on the top of S1, S2, and S3.
Use 1/32-inch-diameter wire for the landing gear. At this point, decide if you want to omit the nose gear since the full-scale VariEze has a retractable nose gear. Cut the wire for the nose-gear to the desired length. The crossmember where the nose gear is located should be notched. Cut a length of 1/16 square balsa the same length as the nose-gear crossmember. Notch the new crossmember. Place the nose-gear wire between the notches so that it is sandwiched between the two, and CyA the joint.
Bend the main gear into shape and sandwich it between two crossmembers of 1/16 balsa, making sure that the wire is held tightly between the two. CyA the crossmembers and wire. Build the tail block with S4 and S5. Lightly sand the entire fuselage to remove any rough spots. Sand the tail block so that it fits the rear section of the fuselage. Drill a hole in the tail block for the propeller shaft, and drill a 3/32-inch hole in F4 for the rubber dowel.
Wing
The wing is constructed in right and left sections. Use 1/16 square balsa for the spar and leading edge. Use 1/8 x 1/16 balsa for the trailing edge. Pin the leading edge down over the plans, and pin W1 through W6 as shown on the plans. Place the spar in the top notch of the wing ribs, and pin down the trailing edge as shown on the plans. CyA the ribs to the spar, leading edge, and trailing edge.
The area between W1 and W2 is built differently. Use 1/16 balsa to connect the leading edge of W1 to W2. Two pieces of 1/16 balsa are used along the trailing edge, extending beyond W1. If this sounds confusing, look at the plans; a picture shows how to build the center section better than words can.
Build a right and left wing, but do not connect the wing halves; this will be done during final assembly. Lightly sand the wing halves. Place them with the fuselage, to be completed during final assembly.
Canard/Winglets
Build the canard from 1/16 Lite Ply or sheet balsa. The winglets are built using W7 and 1/16 square balsa. Place W7 over the plans, and build the rest of the winglet around W7. Build two winglets: one for each wingtip. Lightly sand the canard and the winglets. I suggest covering the canard and winglet at this point; it's easier now than after final assembly.
Final Assembly
Place the fuselage on a table, and slide the canard into the forward slot so that both sides of the canard extend equal lengths from the fuselage. Sand the slot until the canard is parallel with the table. Measure the distance from the back of the fuselage to the tips of the canard, making sure that the distances are the same on the right and left, to ensure that the canard is straight.
CyA the canard to the fuselage. The canard incidence should be positive; by positive, I mean that it should be at a higher angle of attack than the wing. The amount of incidence required depends on the center of gravity (CG) location, so some adjustment in canard incidence may be needed after flight-testing.
Slide the wing halves into the fuselage. Shim the wing/fuselage joint until the wing halves are parallel with the table. No dihedral is needed for the VariEze because of the wing sweep. Glue the wing halves to the fuselage, and CyA both leading edges and spar center-sections together.
Before installing the winglets, make sure that the wingtips are parallel to the fuselage by sanding the wingtips until the winglets rest parallel to the body and perpendicular to the table. CyA the winglets to the wingtips.
Covering
Cover the VariEze however you like. I made my engine covers and air intake from paper and painted them, instead of making them from balsa, to save weight. I cover the main landing-gear wire with paper for the same reason. I cover with tissue and attach the tissue to the structure with thinned white glue. No dope was used to save weight, and I see no reason to use it since I've not yet been to a contest.
Leave the front fuselage bottom panel open to add ballast as needed. Check the wing and canard for warps. Place the engine covers, air intake, rubber, rubber dowel, and tail block with propeller on the VariEze, and check the CG. Add ballast until the CG is correct.
Your VariEze is ready for test-flying. Launching is fairly normal despite the fact that the model is a pusher.
I hope that anyone who tries to build the VariEze enjoys it as much as I have, and I would enjoy receiving any comments on modifications made to the construction. Please write to me. Good luck! MA
David Heckman 728 Magnolia San Bruno CA 94066
Transcribed from original scans by AI. Minor OCR errors may remain.

