
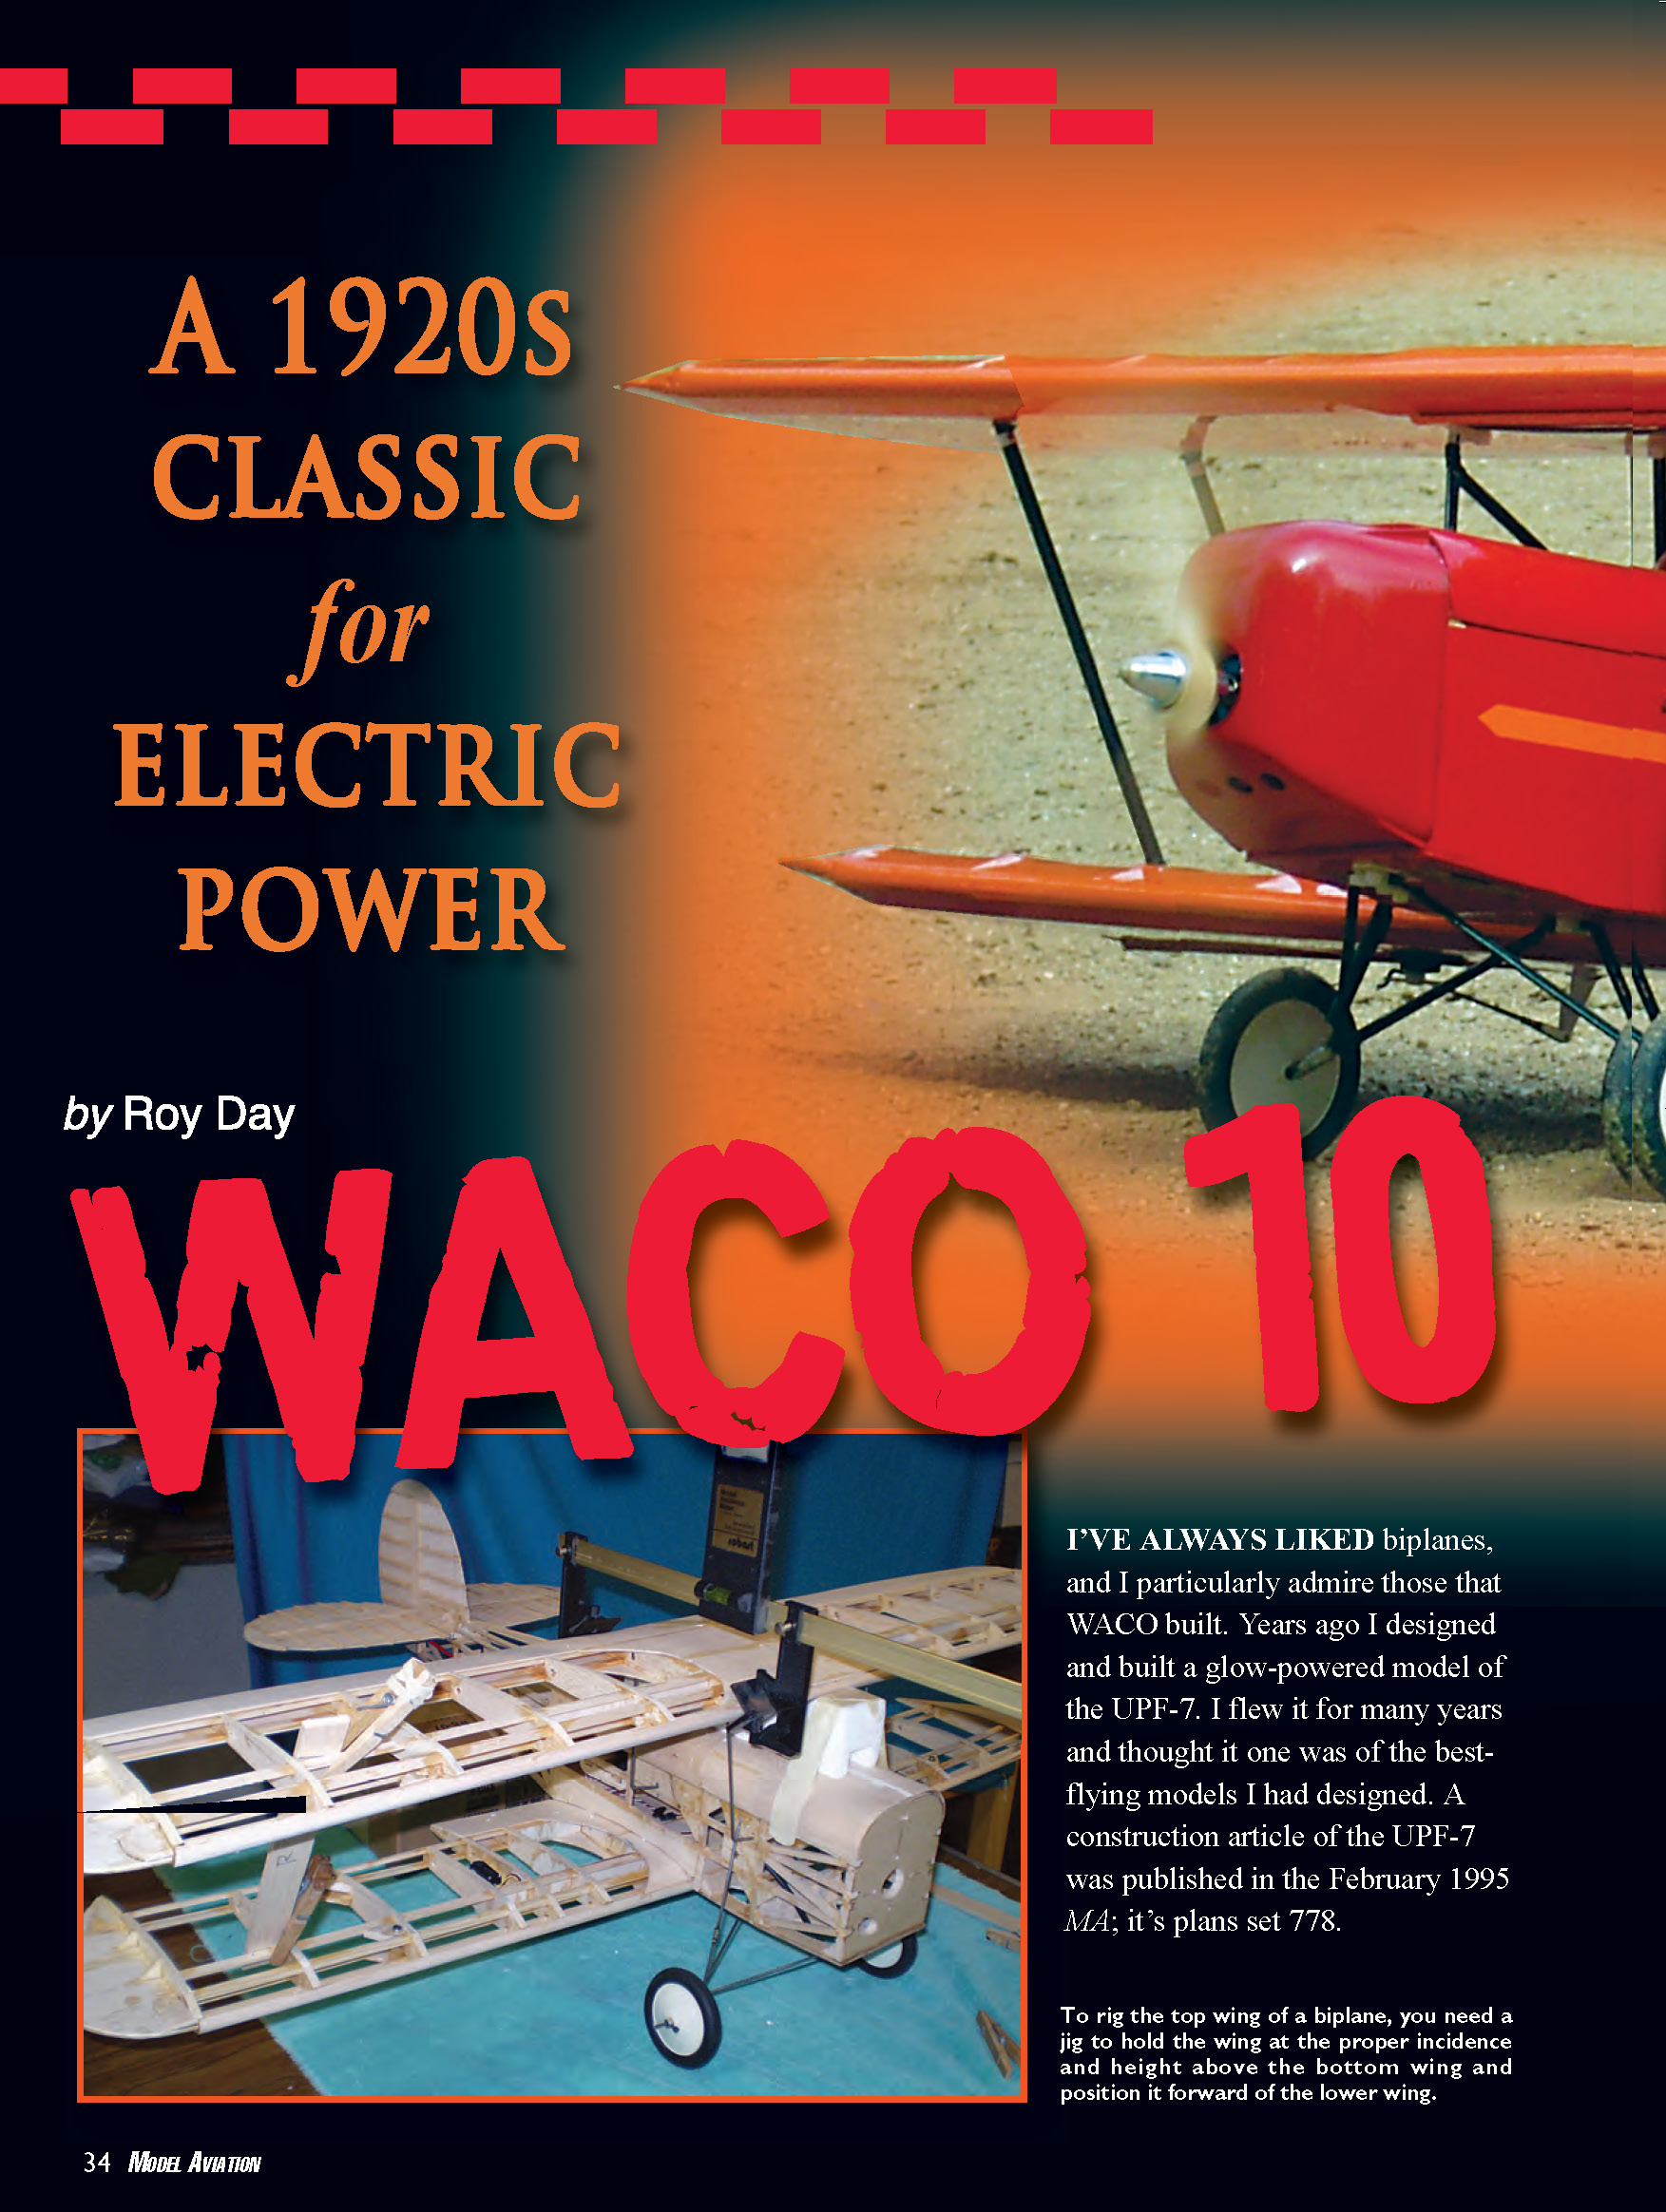
WACO 10
by Roy Day
A 1920s Classic for Electric Power
I've always liked biplanes, and I particularly admire those that WACO built. Years ago I designed and built a glow-powered model of the UPF-7. I flew it for many years and thought it was one of the best-flying models I had designed. A construction article of the UPF-7 was published in the February 1995 MA; its plans set 778.
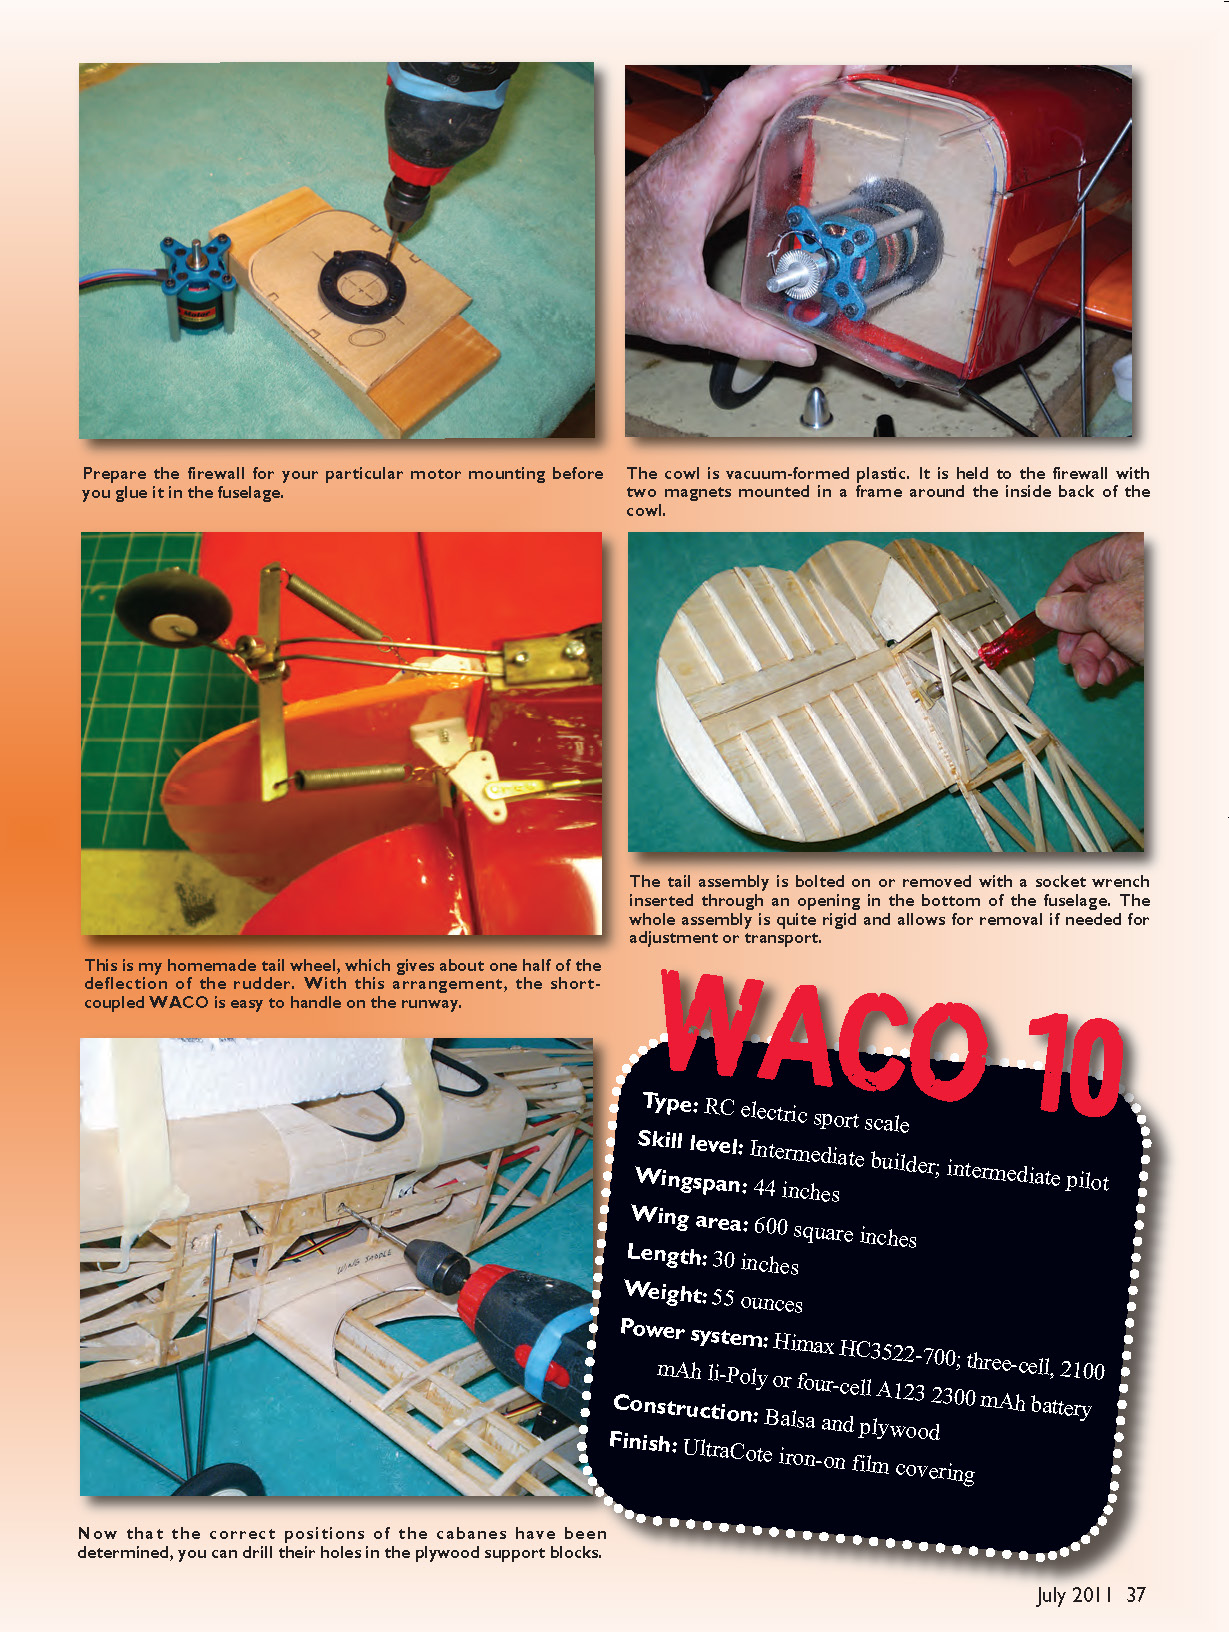
To rig the top wing of a biplane you need a jig to hold the wing at the proper incidence and height above the bottom wing and to position it fore of the lower wing. Prepare the firewall for your particular motor mounting before you glue it in the fuselage. The cowl is vacuum-formed plastic; it is held to the firewall with two magnets mounted in a frame around the inside back of the cowl.
This is my homemade tail wheel, which gives about one half of the deflection of the rudder. With this arrangement, the short-coupled WACO is easy to handle on the runway. The tail assembly is bolted on or removed with a socket wrench inserted through an opening in the bottom of the fuselage. The whole assembly is quite rigid and allows for removal if needed for adjustment or transport.
Now that the correct positions of the cabanes have been determined, you can drill their holes in the plywood support blocks.
- Type: RC electric sport scale
- Skill level: Intermediate builder; intermediate pilot
- Wingspan: 44 inches
- Wing area: 600 square inches
- Length: 30 inches
- Weight: 55 ounces
- Power system: Himax HC3522-0700 outrunner brushless motor; three-cell, 2100 mAh Li-Poly or four-cell A123 2300 mAh battery
- Construction: Balsa and plywood
- Finish: UltraCote iron-on film covering
WACO 10 Biplane
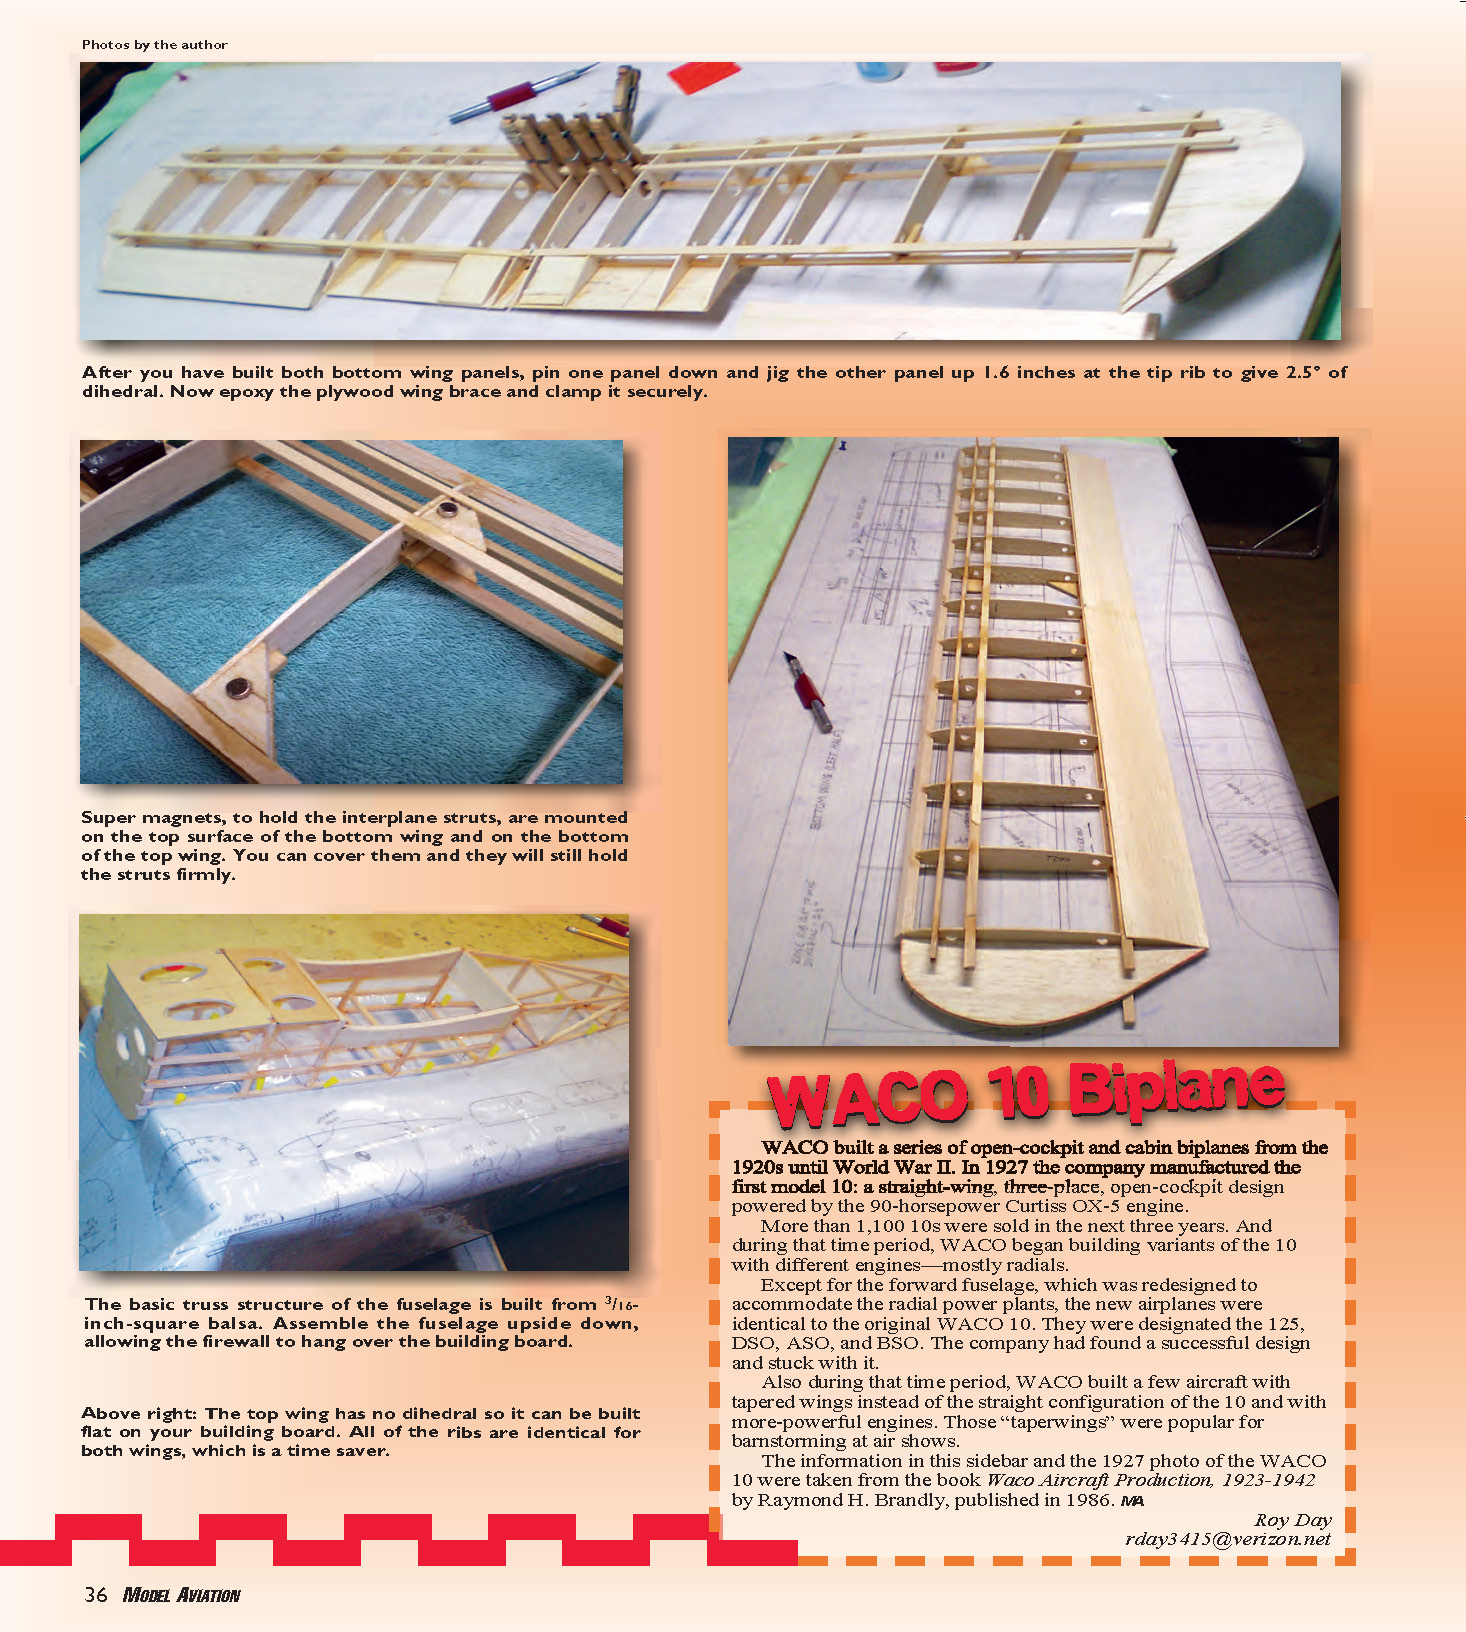
WACO built a series of open-cockpit and cabin biplanes from the 1920s until World War II. In 1927 the company manufactured the first Model 10: a straight-wing, three-place, open-cockpit design powered by the 90-horsepower Curtiss OX-5 engine.
More than 1,100 Model 10s were sold in the next three years. During that time WACO began building variants of the 10 with different engines—mostly radials. Except for the forward fuselage, which was redesigned to accommodate the radial power plants, the new airplanes were identical to the original WACO 10. They were designated the 125, DSO, ASO, and BSO. The company had found a successful design and stuck with it.
Also during that time WACO built a few aircraft with tapered wings instead of the straight configuration of the 10 and with more-powerful engines. Those "taperwings" were popular for barnstorming at air shows.
The information in this sidebar and the 1927 photo of the WACO 10 were taken from the book Waco Aircraft Production, 1923–1942 by Raymond H. Brandly, published in 1986. MA
Roy Day [email protected]
The WACO 10 is somewhat simpler in design, with nearly identical straight wings and a truss-design fuselage. This electric-powered version also flies well and is relatively easy to build.
CONSTRUCTION
Wings
The top and bottom wings are nearly identical; they have the same ribs, spars, center sheeting, and wingtips. However, the span of the bottom wing is slightly shorter than that of the top; the bottom has 2½° of dihedral and ailerons; the top wing has no dihedral.
- Begin by making the 28 ribs. Use templates of 1/8-inch plywood with blanks of 1/16-inch balsa sheet for the ribs. Rough-shape the ribs with a band saw, hand-sand them to final form, and cut notches for the spar caps.
- Start with either the right or left panel of the bottom wing. Lay the forward and aft bottom basswood spar caps and the trailing-edge (TE) sheet. Glue the ribs in position.
- Adhere the top basswood spar caps and the TE. Cut the aileron bottom sheet with the three ribs and add end rib tips.
- Add a plywood block for the aileron horn before sheeting the top of the aileron. Face the aileron leading edge (LE) and ends with 1/16-inch balsa sheet. Glue a balsa fill block for the wing hold-down bolts before sheeting the top TE.
- Add the wing-strut attachment blocks (for magnets) on the top side of the bottom wing, even with the top surface. The interplane wing struts are not functional; they are held in with magnets.
- Glue on the laminated wingtip. Epoxy the plywood dihedral brace for this panel. For a stronger and faster build, use one-piece spar caps (long enough for both panels) and bend them at the center as required.
- Remove the panel from the building board and add the top and bottom 1/8 x 1/4 subspars. Block up the completed wing panel 1.6 inches at the tip rib (to give the required dihedral), and fasten the bottom spar caps of the other panel to your building board.
- Build the second panel of the bottom wing exactly as you did the first. Epoxy the plywood dihedral brace to the spar of the second panel.
- Before proceeding further, build the aileron servo supports and string the servo leads through holes in the ribs to the wing center. Apply the center sheeting, along with the rib cap strips, the shear webbing, and the wingtip. After sanding, the bottom wing is complete.
The top wing is easier to construct than the bottom wing. There is no dihedral, so you can lay the entire wing flat on your building board. With the center sheeting, top and bottom, it is strong enough without a plywood dihedral brace.
- Glue in the ribs on the bottom spar caps. Add the LE, top spar caps, and subspars.
- Sheet the TE, both top and bottom, and add the wingtips.
- Don't forget to put in plywood attachment blocks for the cabanes on the bottom of the wing, as shown on the plans. Also add balsa attachment blocks for the magnets that hold the interplane struts on the bottom side of the wing.
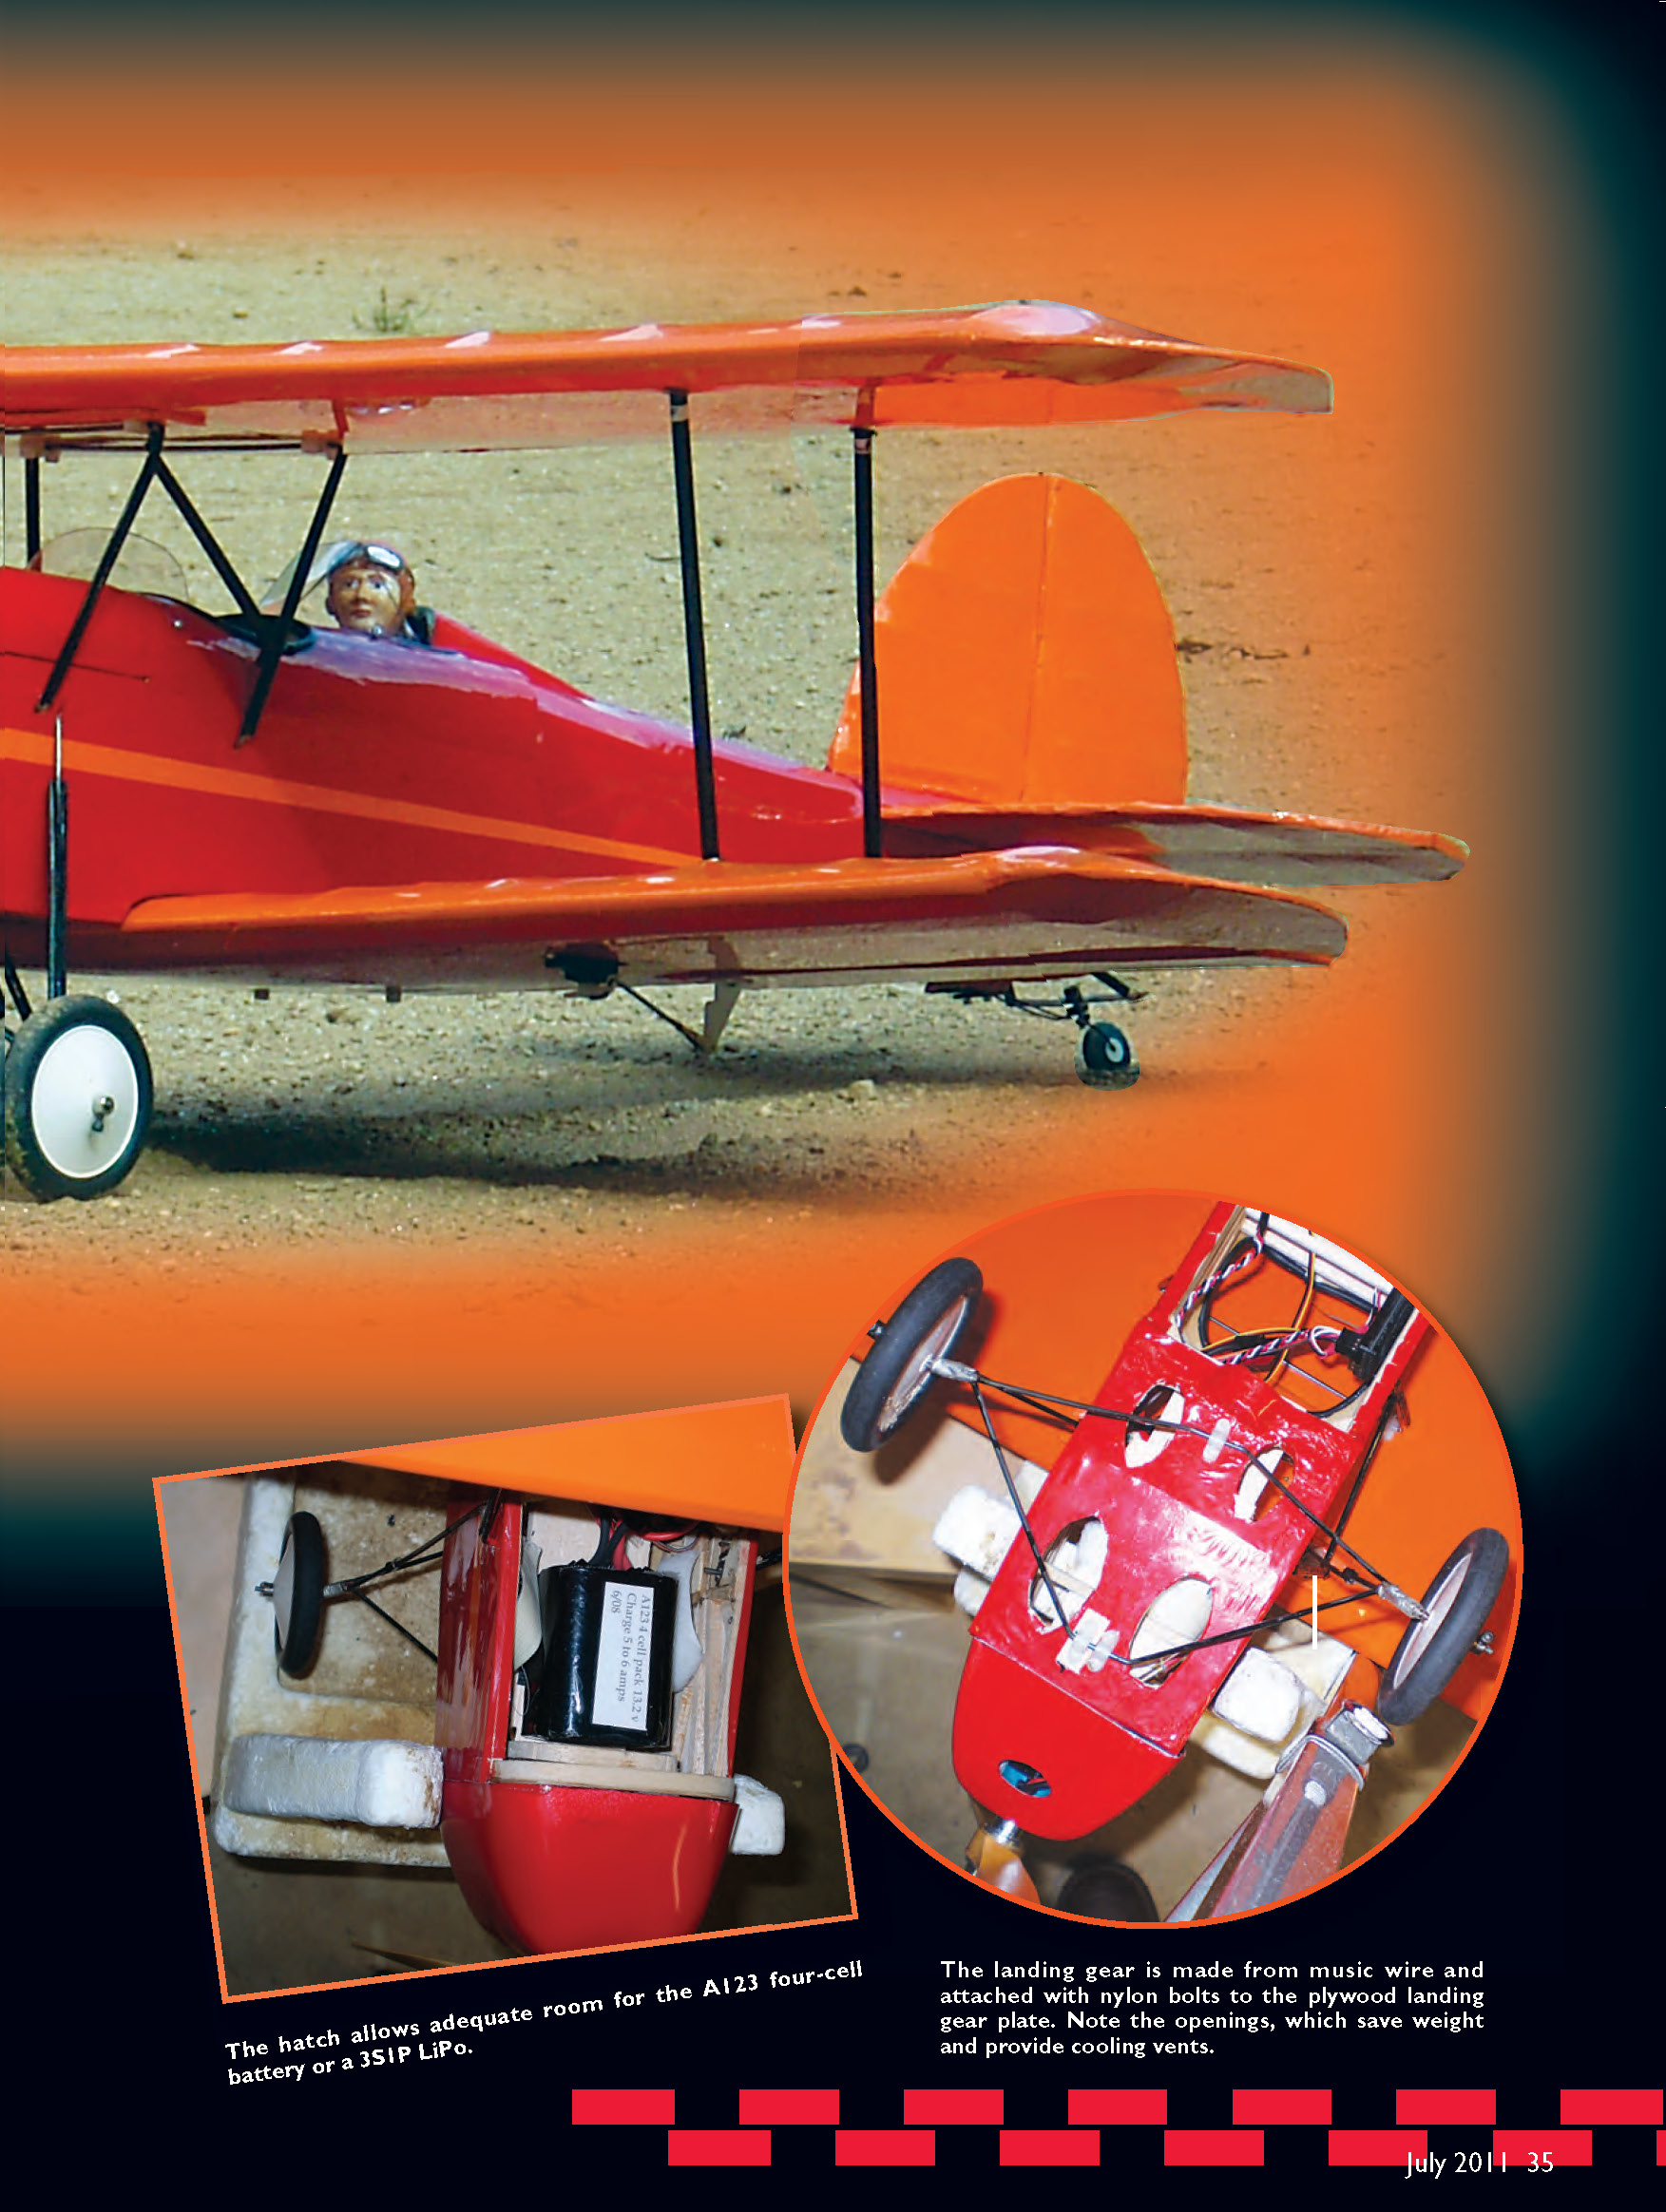
Magnets: throughout the design I used 1/4-inch-diameter, 1/4-inch-long rare-earth neodymium magnets (from Amazing Magnets). For the interplane struts I drilled a 1/4-inch hole in the balsa support blocks and glued in the magnets with CA. It is unnecessary to have magnets on the ends of the struts; simply glue on a small steel washer to interface with the magnet (do not use aluminum washers).
These magnets are also used to hold on the cowl and the hatch. They have been satisfactory and are inexpensive. You can apply the wing covering directly over the magnets; they are strong enough to snap the struts in place even with the covering installed.
Fuselage
The basic truss structure is built using 3/16-inch square balsa. Construct the sides directly over the plans, but leave out the diagonals until assembly; it's easier to bend the sides without them.
The only use of plywood in the fuselage is for the landing-gear plate, the wing hold-down, a lamination on the firewall, and the hard points for the cabane supports.
Assemble the fuselage structure upside-down on your building board, allowing the firewall to hang over the edge. Cover the cockpit area with 1/16-inch sheet, and make the cutouts using templates from the plans.
The WACO 10 is a three-place airplane, which explains why the forward cockpit is larger than the aft. I used 1/8-inch-diameter rubber tubing from an auto-parts store for the cockpit coaming.
Build the hatch in place and make provisions for a forward peg and magnets on the rear corners. Glue in the plywood supports for the cabanes, but don't drill the holes at this time.
Landing Gear
The basic landing gear is not difficult to fashion using a wire bender. However, the strut extending up to the cabane support blocks is slightly more difficult to solder at the right angle and proper length.
Tip: don't make the slot for the strut or drill the holes for the cabanes until you have made those items. That will ensure an accurate fit. In the case of the cabane holes, wait until you rig the top wing.
The WACO 10 is relatively short-coupled, so it is best to have a tail wheel assembly that is not directly coupled to the rudder; if it is, the model will be difficult to steer on takeoff. I designed the tail wheel assembly using springs, brass strap, and music wire. It gives the tail wheel deflection approximately half that of the rudder. Ground handling is excellent. You can also use a commercial tail wheel assembly, such as those Du-Bro sells.
Cowl
The cowl is vacuum-formed plastic; I have used both PETG (clear) and ABS. The plastic is formed over a balsa pattern called a plug. I reinforced the back edge of the finished cowl with a balsa frame where I glued two of the same magnets used elsewhere. You can obtain cowls from me.
Tail Surfaces
Most builders know the importance of fabricating lightweight tail surfaces. For many years I have used a technique that employs a sheet center core, false ribs, and doublers. It's easy to build any shape of tail.
I attach the vertical and horizontal tails with a single nylon bolt, which allows them to be removed for transport or adjustments to the tail (e.g., a change to the stabilizer incidence). The vertical and horizontal tails are aligned with pegs and held firmly in place by a 10-32 nylon bolt inserted through the bottom of the fuselage and threaded into the base of the vertical fin.
Rigging the Top Wing
The cabanes are made from music wire and attached to the top wing with landing-gear straps and nylon bolts. I have had the best results with both wings set at 0° incidence.
Make a fixture from wood or foam that rests on the top of the fuselage to position the top wing at the correct height, angle, and forward position relative to the bottom wing. Check this with an incidence meter to ensure that the top and bottom wings match. Mark where the cabane ends touch the support plywood blocks and drill holes there.
Remove the fixture supporting the top wing, and check the incidence one more time to be sure it matches the bottom wing. If they are within 1/2° of each other, you are finished.
Final Touches
I like to include a pilot figure; I hate to see a scale model fly without one. You can dress up the cockpit with a photograph of an instrument panel. Scan a picture of one into your computer and size it to fit. You can find some pictures of instrument panels on the Internet.
Add 1/8-inch fairings to the cabanes and landing-gear struts to improve their appearance. Paint them your favorite color.
Power System
I chose a 400-watt Himax HC3522-0700 outrunner brushless motor (purchased from Maxx Products International). A 300-watt power plant would have been quite adequate; I wanted the power loading to be 70–75 watts per pound. The Himax is satisfactory power for leisure flight and some aerobatics, as borne out by flight tests.
I could have used a battery of three A123 cells, saving 3 ounces, with a larger propeller, but the model had insufficient ground clearance. To use a three-cell A123 pack I would choose a motor with roughly 1,000 kV instead of the 700 kV motor I used.
Using a three-cell Li-Poly battery would produce essentially the same power as the four-cell A123 battery that I employed and save close to 6 ounces in weight. However, that would likely produce a balance problem, which would require adding several ounces of lead to the firewall.
I have flown using A123 battery packs for more than a year and prefer them to Li-Poly, except for extraordinarily light aircraft. There are smaller A123 cells (1100 mAh), which are lighter; I have yet to try them. A123 cells with their metal cases are rugged, charge faster than Li-Poly counterparts, have no safety issues, have more charge cycles, and cost nearly the same or less than Li-Polys.
Flight Tests
Before the first flight I had a few last-minute checks to make in the shop. The balance was correct with the four-cell A123 battery pack forward against the firewall; no lead was needed.
An incidence check of right and left top wing panels showed the right top panel to have a tad greater incidence (less than 1°) than the left. That would mean a tendency to turn left, so I set a bit of right trim.
I checked the control surfaces for correct direction and the amplitude looked right.
My son, Michael, was visiting at the time, and I asked him to make the maiden flight. Beforehand we conducted a range test and determined that we had no interference. Michael did some taxi tests on the runway, and we adjusted the tail wheel to give a straight run. The 2:1 gearing of the rudder-to-tail-wheel deflection made for an easy takeoff run. The WACO climbed out with authority and required only minor trim adjustments for straight-and-level flight.
Loops and rolls were easy and stalls were straight ahead with no wing drop. After a flight of approximately five minutes, Michael brought the airplane in for a smooth landing; I was incredibly pleased with its performance.
If you like biplanes, the WACO 10 will give you many pleasurable flights. MA
Roy Day [email protected]
Sources:
- Amazing Magnets — (888) 727-3327 — www.amazingmagnets.com
- Maxx Products International — (800) 416-6299 — www.maxxprod.com
- Du-Bro — (800) 848-9411 — www.dubro.com
Transcribed from original scans by AI. Minor OCR errors may remain.

