
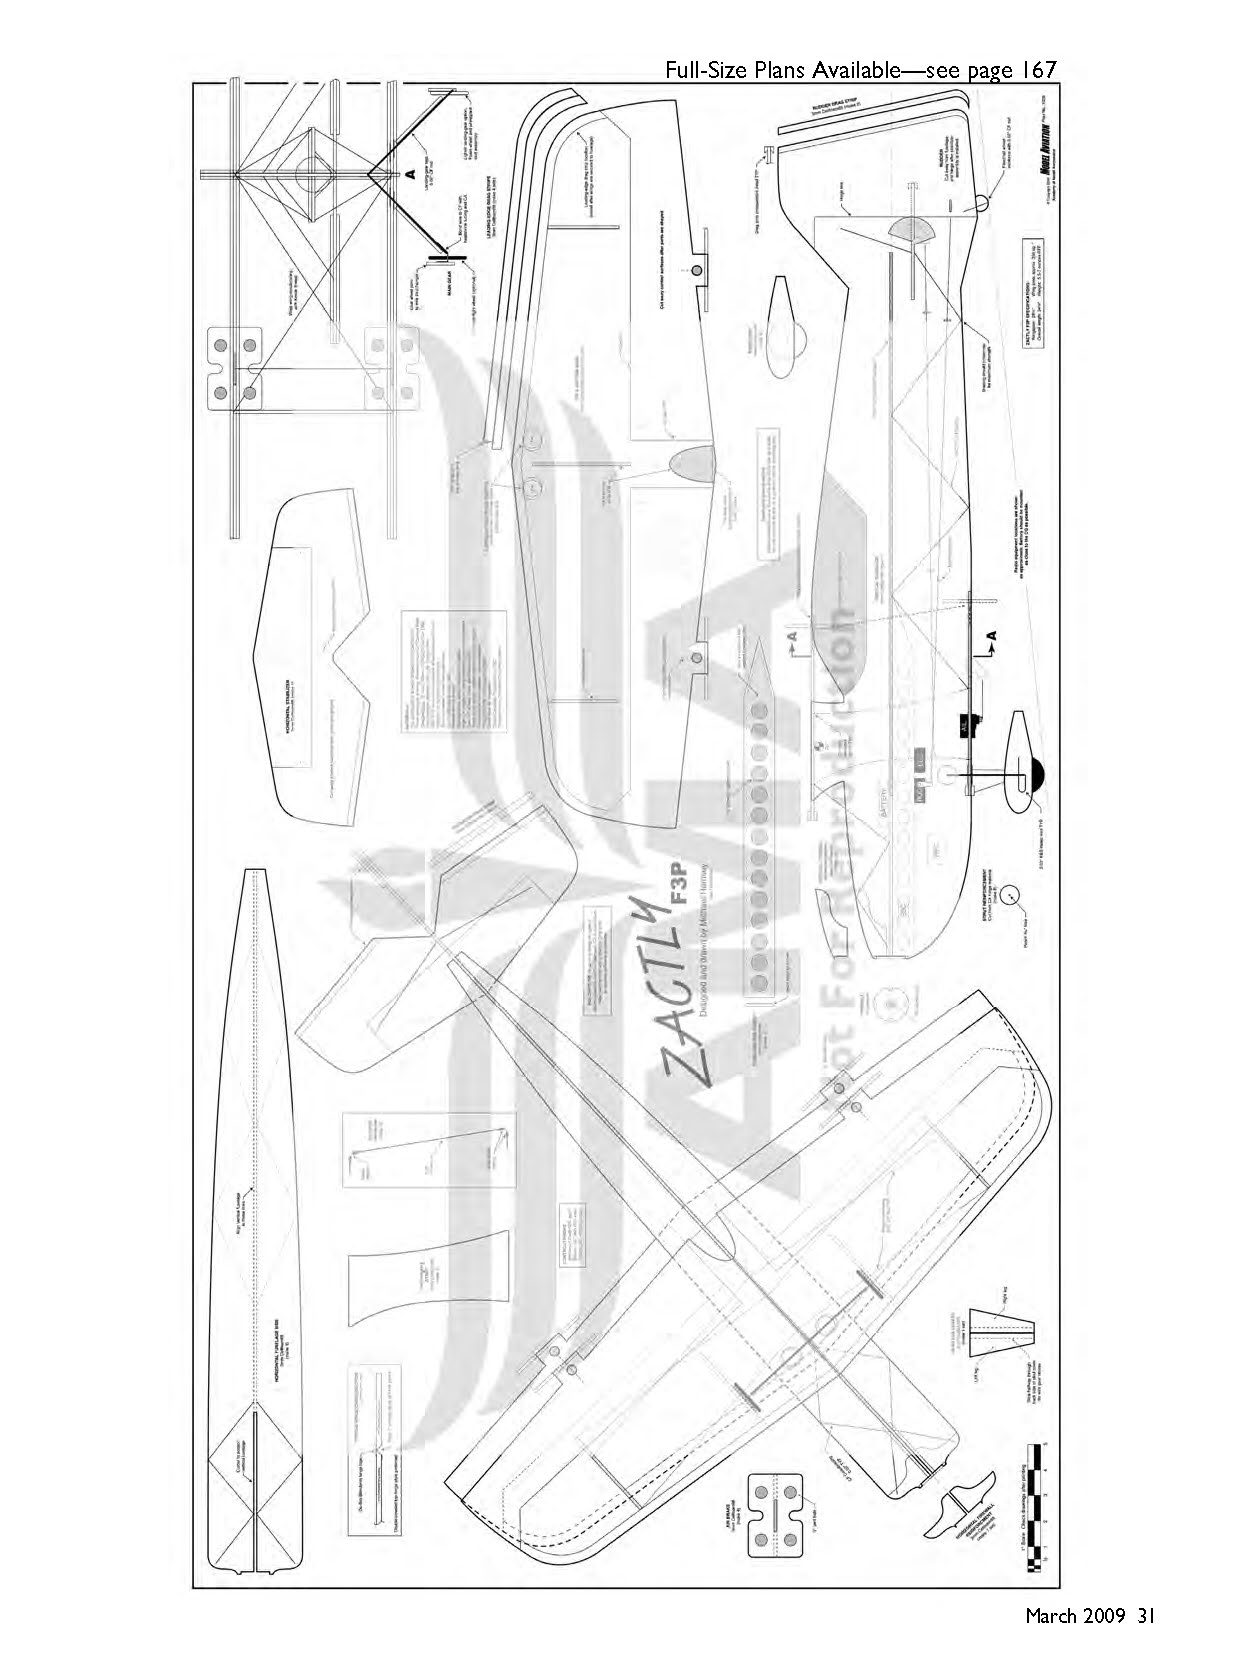

ZACTLY F3P
by Michael Ramsey
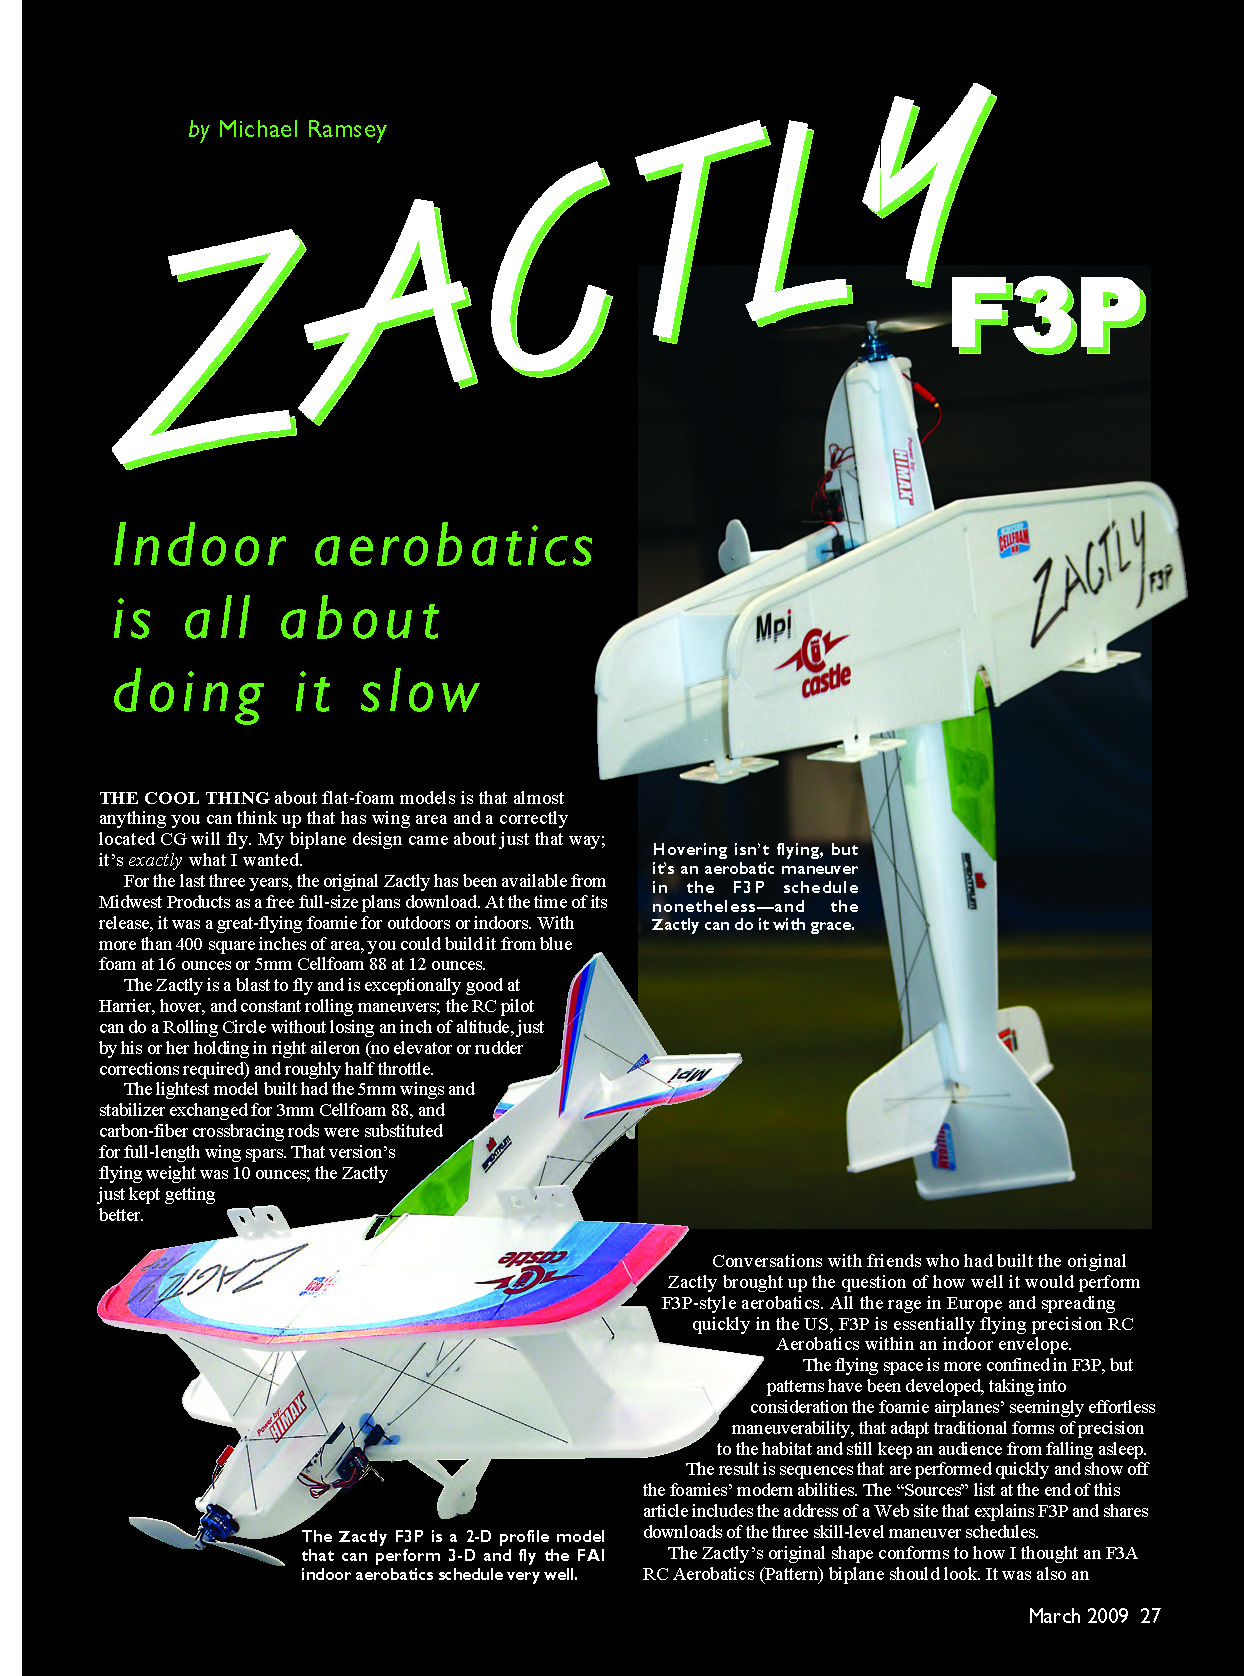
Indoor aerobatics is all about doing it slow.
The cool thing about flat-foam models is that almost anything with wing area and a correctly located CG will fly. My biplane design came about just that way; it's exactly what I wanted.
For the last three years, the original Zactly has been available from Midwest Products as a free full-size plans download. At the time of its release it was a great-flying foamie for outdoors or indoors. With more than 400 square inches of area, you could build it from blue foam at 16 ounces or 5mm Cellfoam 88 at 12 ounces.
The Zactly is a blast to fly and is exceptionally good at Harrier, hover, and constant rolling maneuvers; the RC pilot can do a Rolling Circle without losing an inch of altitude by holding in right aileron (no elevator or rudder corrections required) and roughly half throttle.
The lightest original builds substituted 3mm Cellfoam 88 for the 5mm wings and stabilizer and used carbon-fiber crossbracing rods instead of full-length wing spars. One such version had a flying weight of 10 ounces; the Zactly just kept getting better.
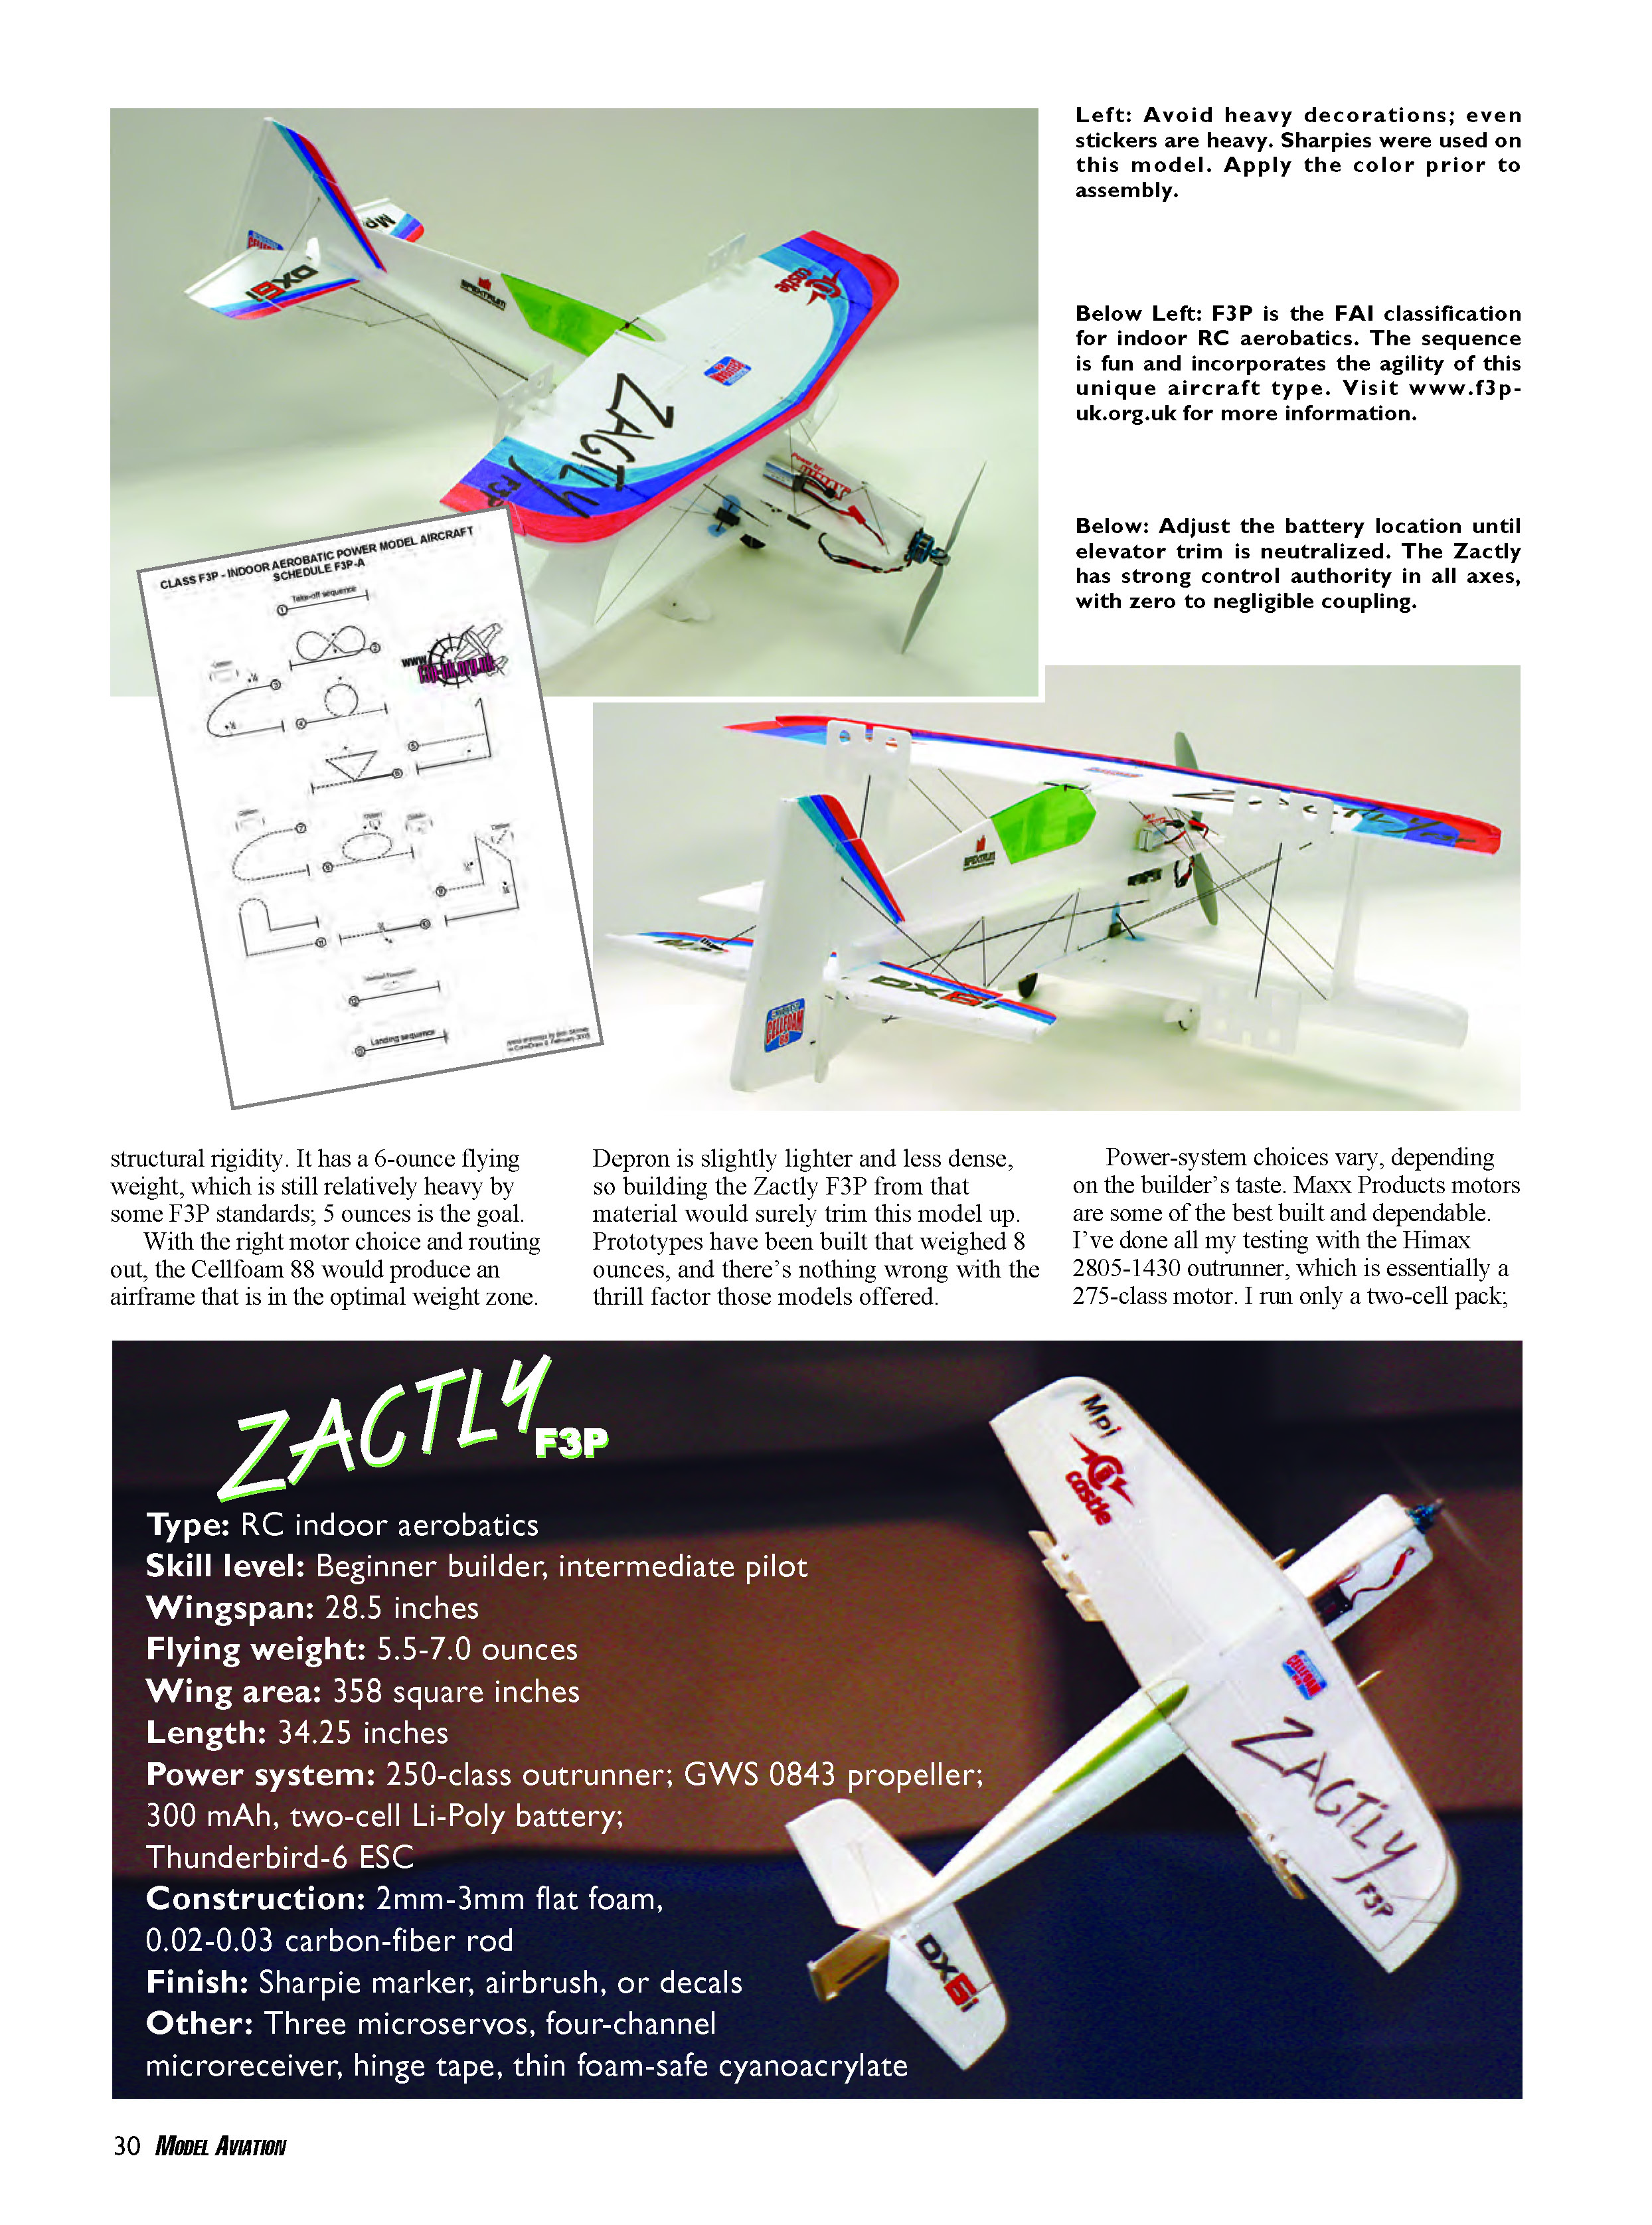
Conversations with friends who had built the original Zactly led me to explore how it would perform F3P-style aerobatics. F3P — all the rage in Europe and spreading in the U.S. — is essentially precision RC aerobatics inside an indoor envelope. The flying space is more confined in F3P, so patterns were adapted to show off foamies' effortless maneuverability while keeping the sequences fast and exciting. See the Sources list for a site that explains F3P and offers maneuver schedules.
Design evolution and F3P changes
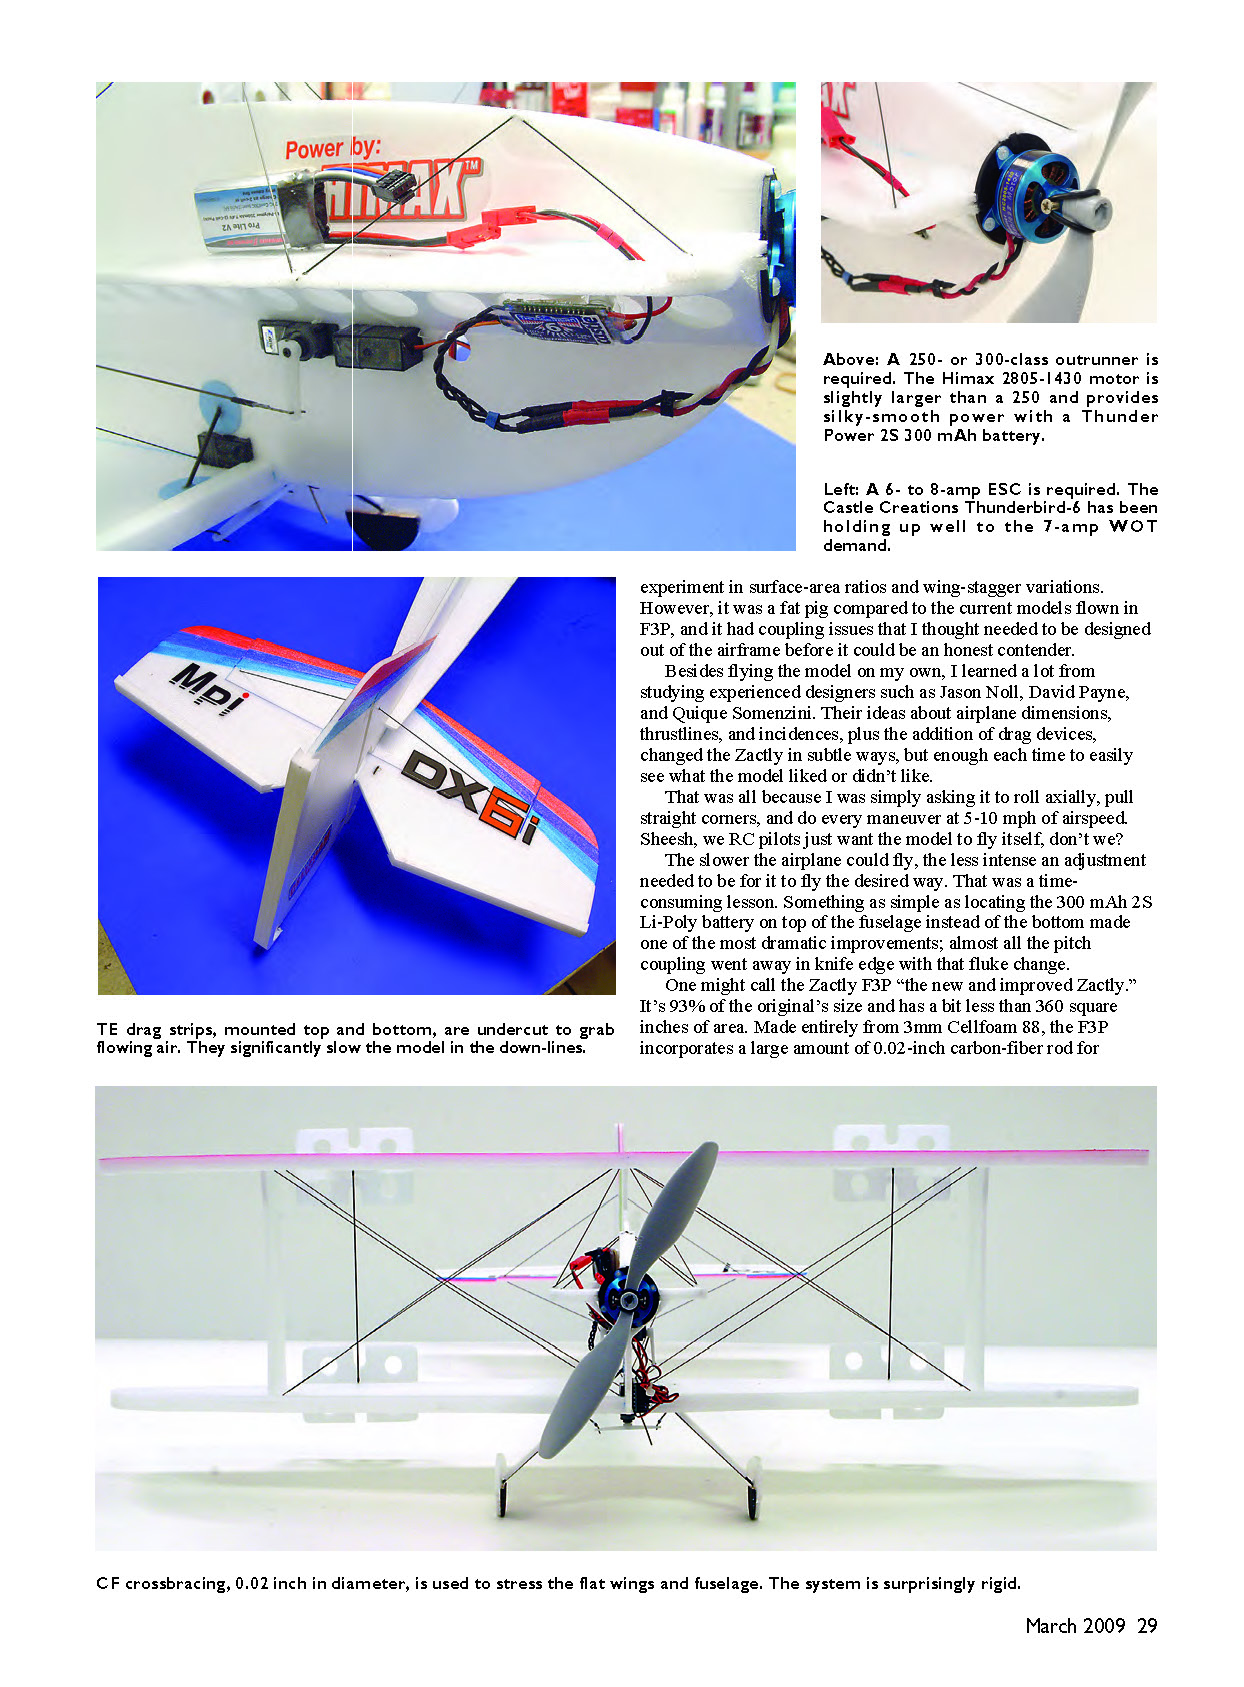
The original Zactly's shape conformed to how I thought an F3A pattern biplane should look and was an experiment in surface-area ratios and wing-stagger variations. Compared to current F3P models it was a "fat pig" and had coupling issues that needed to be designed out of the airframe.
Studying designers such as Jason Noll, David Payne, and Quique Somenzini helped refine dimensions, thrustlines, incidences, and the addition of drag devices. I tested changes by asking the model to roll axially, pull straight corners, and do every maneuver at 5–10 mph of airspeed. The slower the airplane could fly, the less intense adjustments needed to achieve the desired behavior.
One small but dramatic change was locating the 300 mAh 2S Li-Po battery on top of the fuselage instead of the bottom. That nearly eliminated pitch coupling in knife edge.
The Zactly F3P is essentially the "new and improved Zactly." It is 93% of the original's size with just under 360 square inches of area. Built entirely from 3mm Cellfoam 88 and reinforced with 0.02–0.03-inch carbon-fiber rod, the F3P has a flying weight around 6 ounces. Some builders have achieved 5 ounces (the goal) or lighter by using Depron or more aggressive routing.
Power-system choices vary with builder taste. Maxx Products motors are well made and dependable. I tested using the Himax 2805-1430 outrunner (a 275-class motor) on a two-cell pack. The Thunder Power V2 300 mAh packs have spoiled me. The Castle Creations Thunderbird-6 ESC has worked best for me; I discard the motor connectors and solder the motor wires directly to the ESC board to save grams (this voids the warranty). Any micro radio system will work for sport flying, but micro digital servos such as the Futaba S3153 (and newer) or JR DS185 are optimal for F3P. Choose a receiver that weighs 3–5 grams.
Full-Size Plans Available — see page 167.
Specifications
- Type: RC indoor aerobatics
- Skill level: Beginner builder, intermediate pilot
- Wingspan: 28.5 inches
- Flying weight: 5.5–7.0 ounces (goal ~5 oz)
- Wing area: 358 square inches
- Length: 34.25 inches
- Power system: 250-class outrunner; GWS 0843 propeller; 300 mAh, two-cell Li-Po battery; Thunderbird-6 ESC
- Construction: 2–3 mm flat foam, 0.02–0.03-inch carbon-fiber rod
- Finish: Sharpie marker, airbrush, or decals
- Other: Three microservos, four-channel microreceiver, hinge tape, thin foam-safe cyanoacrylate
Construction
Templates and cutting
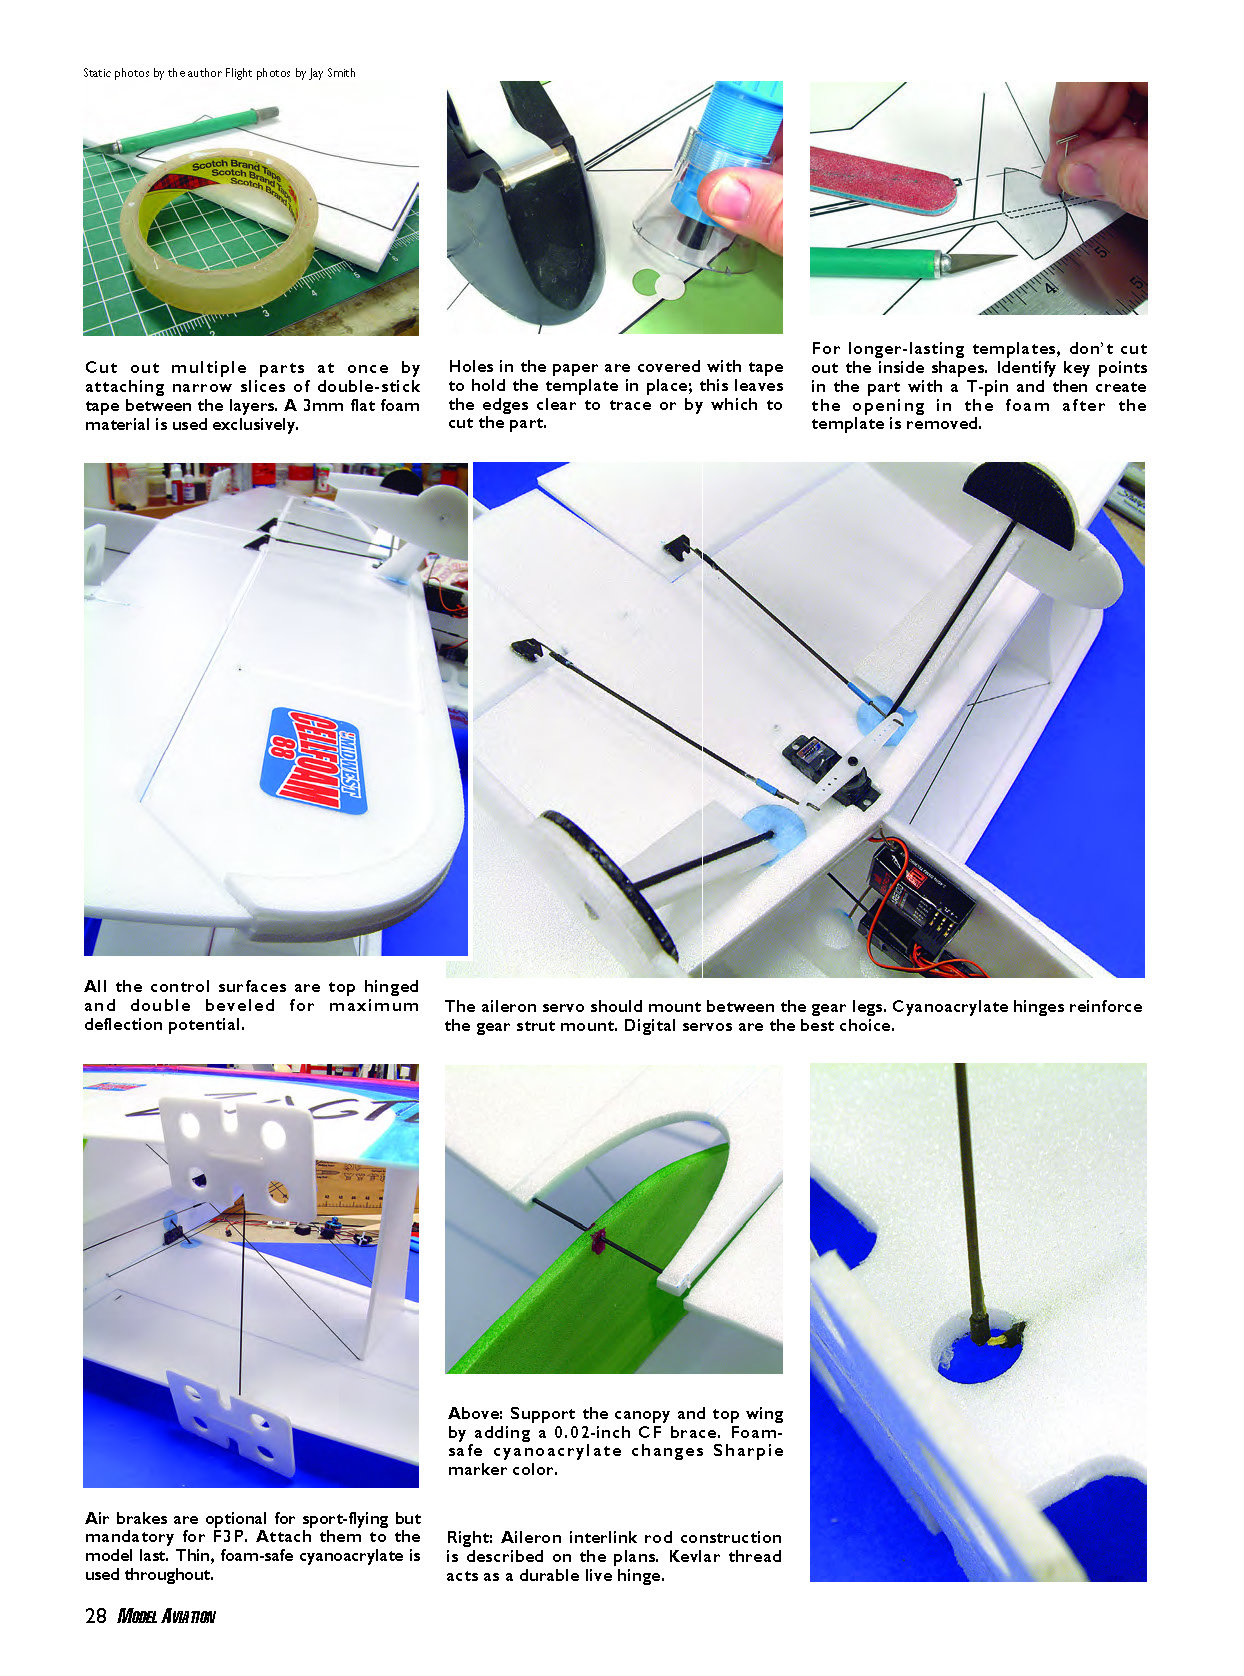
- Follow the plans' templates. I like to cut slightly outside the heavy outline for safety.
- For cutouts (horizontal fuselage, wing slots, stabilizer), cut on the hairline or just inside for a tight fit; material is easier to remove than to add.
- Make tape holes in templates at key points rather than taping around the edges. Use a sharpened brass tube or a FoamWerks drill tool to make pin locations, then cover the holes with tape to hold the template.
- Stack foam sheets and cut multiples at once by attaching narrow strips of double-stick tape between layers. This ensures identical parts (strut locations, etc.) and saves time.
- Use multiple shallow passes with a sharp X-Acto knife for accuracy.
- Mark reference points, hinge lines, and cutouts with a fine-point marker before removing templates.
- Decorate parts (Sharpies add no weight; light spray or airbrush is also fine) before cutting away control surfaces.
Assembly
- All control surfaces are top-hinged and double-beveled for maximum deflection.
- Assemble the fuselage by slipping the horizontal fuselage into the vertical fuselage and glue the seams with thin, foam-safe cyanoacrylate. Add gussets to the bottom and side of the fuselage front assembly for stiffness.
- Tack-glue the horizontal stabilizer, align, then hinge the rudder last.
- Lay the lower wing face-up, position the fuselage on it, add struts, then the top wing. Dry-fit everything until square.
- When alignment is correct, squeeze thin cyanoacrylate into joints and wipe excess off with a Q-tip before spraying accelerator. Accelerator (kicker) is optional until final alignment is confirmed.
- Reinforce strut pass-through points with cyanoacrylate hinge material cut into 3/4-inch disks; save two for wheel pants.
- The plans include options for conventional wheels or landing skids; the tail wheel is basically a skid.
Carbon-fiber stiffening
- Install 0.02–0.03-inch carbon-fiber rods for structural rigidity. Crisscross bracing greatly increases integrity.
- Sharpen rod ends to a point for easier mounting. Tack pieces as you go and confirm alignment; untack if necessary.
- Wing and fuselage stiffeners work together so the finished airframe is stiff and snaps well without excessive wiggle.
Hardware and control linkages
- The aileron servo should mount between the gear legs. Use cyanoacrylate hinges to reinforce the gear strut mount. Digital servos are preferred.
- The aileron interlink shown on the plans uses 0.03-inch carbon-fiber rod, Kevlar thread, and heat-shrink tubing — a very light and durable setup for F3P and midair recovery.
- Pull-pull control systems for rudder and elevator are light, but carbon-fiber pushrods offer ease and durability. I use a mix of homemade hardware and Du-Bro components.
- The 1/16" plywood firewall is sized for the Himax but suits all 250-size outrunners; butt-glue it to the nose and key it into the fuselage notches. Add reinforcements to the nose after mounting the firewall.
Air brakes and drag devices
- Air brakes are optional for sport flying but mandatory for F3P sequences. Attach them last.
- Add rudder drag strips first, observe speed change, then add to elevator and wing leading edge as needed. Tripling horizontal and vertical cross-sections (where applicable) can significantly slow the model. Small changes have big effects.
- If unsure about air brakes while building, finish the model and fly it without them, then add as you observe flight behavior.
Tips and photo notes
- Cut template holes and use a T-pin to mark interior key points so templates last longer.
- For longer-lasting templates, do not cut out inside shapes; mark key points and create openings in foam after removing the template.
- Use thin, foam-safe cyanoacrylate throughout. Wipe excess glue with a Q-tip before applying accelerator.
- Consider binding the propeller with fishing line instead of a rubber O-ring to prevent flex and bounce on the motor hub.
Flying / Flight characteristics
- Set control throws as noted on the plans. Use dual rates for F3P schedules — roughly half of full deflection and half the recommended exponential.
- Fully loaded with drag devices, the Zactly F3P should cruise with no trim adjustments at about 60% throttle. If elevator trim is required, move the battery to minimize trim tab usage.
- The Zactly is kite-like and comfortable for sport flying in tight areas (school gyms, airplane hangars). Cruise speed is close to a fast walk.
- The model is pitch-neutral inverted or upright if CG is correct — a pleasing trait so you don't need up-elevator when inverted.
- Leading-edge drag strips make the foam wings behave like airfoils; the model should need no obscure mixes for up- and down-lines and will fly straight up and down.
- Throttle timing takes practice: add power before pull/push to level because air brakes rapidly reduce speed at dive recovery bottoms. Include a bit of extra throttle during rolls, snaps, or other maneuvers to maintain airspeed for clean exits.
- A 2S 300 mAh battery provides roughly three minutes of flying — adequate for F3P or Artistic Aerobatics routines (about two minutes).
- Prop choice: I use a GWS 0843 propeller; APC props are heavier. Consider binding the propeller with fishing line to prevent flex on the hub.
- The Zactly F3P performs Rolling Circles well, with roll speed dependent on entry speed and throttle. It is also capable of 3-D moves: excellent Harrier behavior, near-natural hover, tight outside waterfalls, and generally low wag through maneuvers.
Have fun!
Michael Ramsey [email protected]
Sources
- Midwest Products — (800) 348-3497 — www.midwestproducts.com
- Maxx Products International — (800) 416-6299 — www.maxxprod.com
- Castle Creations — (913) 390-6939 — www.castlecreations.com
- Du-Bro — (800) 848-9411 — www.dubro.com
- F3P Aerobatics — www.f3p-uk.org.uk
Transcribed from original scans by AI. Minor OCR errors may remain.

