
Small changes can lead to major improvements
Dean Pappas
HI GANG. In Through the Looking-Glass, and What Alice Found There, Lewis Carroll wrote,
“One two! One two! And through and through “The vorpal blade went snicker-snack! “He left it dead, and with its head “He went galumphing back.”
That onomatopoetic “snicker-snack” described a precise and deadly change in direction of the vorpal sword. Yes, precise control is what killed the dreaded Jabberwock!
Back when I was a kid, a thermal ate my Jabberwock. That one was not a monster, but a rubber-powered FF model. It was a fine flying design, and I understand that reproduction kits are now available from Radical RC.
If you have even the slightest hankering to build and fly a high-performance rubber job for the first time, then let me suggest the Jabberwock or its shoulder-winged near twin, the Gollywock. Now, back to business.
Here we go with the third and final part of our aerodynamic sword-sharpening. Like any fine weapon, a well-set-up airplane is properly sharpened and balanced, making he who wields it a better warrior. Our discussion is of the big five—the places where most often small changes can lead to major improvements in the fly-ability of your airplane.
The big five are:
1) Control surface hinge-line gaps 2) Heavy wingtip or lateral misbalance 3) Balance point, usually referred to as CG 4) Engine thrust, both down-thrust and right-thrust 5) Aileron differential and adverse yaw
I discussed items #1 and #2 in the first part of this series in June of this year. It might be useful to reread it because this month’s discussion builds on the earlier one.
With that in mind, let us assume that the airplane has tight hinge-line gaps and is balanced laterally. Any remaining directional control problems are likely to be caused by adverse yaw.
Adverse yaw is fundamental; it is inherent in the physics of flight. As with many trim issues, the problem gets worse at low speed and at high angles of attack (AoA). Suppose you want to roll in order to turn away from the runway after takeoff. The right aileron is raised, and the left one is lowered.
The desired result will be to lift the left wing and lower the right. The last time I looked, lifting is work. Wingtips may not be very heavy, but they still count. So we are asking the left wing to do more work than the right.
The energy needed for this work comes through the creation of drag. What this means is that the wingtip that is being raised has more drag than the wing that is being lowered. This drag imbalance yaws the airplane in the direction opposite the desired roll.
Allow me to describe a commonly encountered flight scenario. Immediately after takeoff the natural tendency for a propeller-driven airplane is to turn left because of “torque effects.” We’ll leave it at that—torque effects. If necessary to avoid the pit area, that first right turn will require good authoritative roll control. Even the slightest adverse yaw will make that right-turn entry very sluggish.
Here’s another common scenario. You throttle back and initiate the turn to the runway heading for a landing. As the airplane decelerates and turns, you are using a noticeable amount of up-elevator, flying with quite a bit of angle of attack.
As the aircraft lines up with the runway, you apply opposite aileron to level off and stop the turn, but the nose keeps coming around for a fraction of a second longer, and the airplane does not roll to level immediately. There is a time lag, and when the airplane does respond, it wallows slightly. It’s our old nemesis: adverse yaw.
The goal is to achieve predictable aileron response at all speeds, especially at high AoA. This last condition describes the steep climb right after takeoff, and the low-speed turns used to line up with the runway for landing. In order to do this we must deal, one way or another, with adverse yaw.
The three common approaches to the problem are 1) piloting technique; 2) coupled aileron-into-rudder or CAR; and 3) aileron differential.
Coordinated aileron and rudder use is what the full-scale pilots do—they use rudder together with ailerons all the time. It’s a basic flying skill. It ought to be so with models, as well.
When flying a full-scale Piper Cub, the pilot needs to apply the rudder slightly before the ailerons are moved.
That’s because the airplane has more inertia in yaw than in roll. That’s the reason why Pattern aircraft these days have long tails.
Because those airplanes are required to roll cleanly over a wide range of airspeeds, the best way to keep them from yawing is to give the fin and rudder a long moment arm to help keep things straight. Most RC pilots would do well to develop the skill of flying coordinated aileron and rudder, but this would be asking too much of a student RC pilot.
The second thing we can do is couple the ailerons into the rudder. When you apply right aileron, right rudder is also applied. This can be done mechanically, or with a programmable transmitter. Your radio may or may not have this feature, although many medium-priced radios from six channels and up do.
If you are a Scale fan, you will probably want to make sure that your next purchase has this feature. If this is not an option, there are aftermarket electronic control mixers available for a moderate price. Typically full aileron throw requires less than roughly one-quarter rudder throw. Rather than settle for “roughly,” we can adjust the coupling ratio using the Dutch Roll method.
The third, and typically preferred method, is aileron differential. Some coordinated rudder may still be necessary during the steepest climbs or during sudden maneuvers at low airspeed, but it is fairly easy to find a differential setting that is good for the entire flight.
Aileron differential is simple to describe, but requires some effort in the workshop. The simple description of it is that when you move the aileron stick, the aileron that goes up must travel farther in degrees than the one that goes down. This is true, both left and right.
The trick is to do it by offsetting the linkages in clever ways. It is similar to Ackerman geometry in the steering system of a car. Modern radios also allow for this to be done with programming, provided you use a separate servo for each aileron. We will discuss how to adjust aileron differential later, but for now, let’s go flying to see if and how much adverse yaw we have.
The preferred test method for airplanes that spend most of their flight time upright is the Dutch Roll test. A modicum of effort is required to perform this test: it’s a bit of a flying exercise.
You fly a straight line away from yourself, at a low but safe altitude. Then you smoothly, but quickly, rock the aileron stick back and forth, so that the airplane banks 45° one way and then the other way. You want to use as much aileron throw as you can while comfortably keeping up with the airplane. Ideally, the rhythm will be roughly 1/2 second in one direction, and the same back in the other direction. One of three things will happen.
Axial Rolling
In the first case, the airplane will roll back and forth, and the tail will point straight at you and not wiggle at all. The airplane will appear to roll on a fixed axis, as if it was riding on a wire. That means the differential is perfect for level flight.
Adverse Yaw
The second case is the typical one. The airplane “duck-walks.” As the aircraft rolls right, the tail wiggles right; as it rolls left, the tail wiggles left. That would mean that the nose is going in the direction opposite the roll — and that’s the wrong way! You need more differential or more aileron-into-rudder coupling. This condition is called adverse yaw.
Proverse Yaw
The third case is where the nose wiggles the same way as the bank. This is called proverse yaw. You don’t see it often! You’ll see the nose swing into the turn, even before the airplane banks in the same direction.
If you are interested in aerobatics this is not desirable, but for training it is perfectly acceptable. It actually makes the airplane more controllable. A moderate amount of proverse yaw actually helps to initiate the turn. If you decide to fix it, do so by reducing the differential, or reducing the aileron-into-rudder coupling.
The Dutch Roll test becomes a more sensitive tool if performed in a climb rather than in level flight. Again this is because adverse yaw is worsened by slow flight at high angles of attack. The climb-out angle on takeoff would be a good choice.
Each time an adjustment is made, whether to the CAR ratio or the differential, the test needs to be performed again.
Assuming you are flying a typical sport model or a high-performance airplane, you will probably want to use differential aileron throw. The adjustment process is trivial with a computer radio and dual aileron servos.
If you have a radio that allows you to electronically adjust the differential, then you might skip the next couple of paragraphs, but for the rest of us, the differential crank is our weapon of choice.
The differential crank is an ancient mechanical device. Clever, those ancients! It’s so clever that many people, upon first seeing it, figure that I must be describing this backward, but read on.
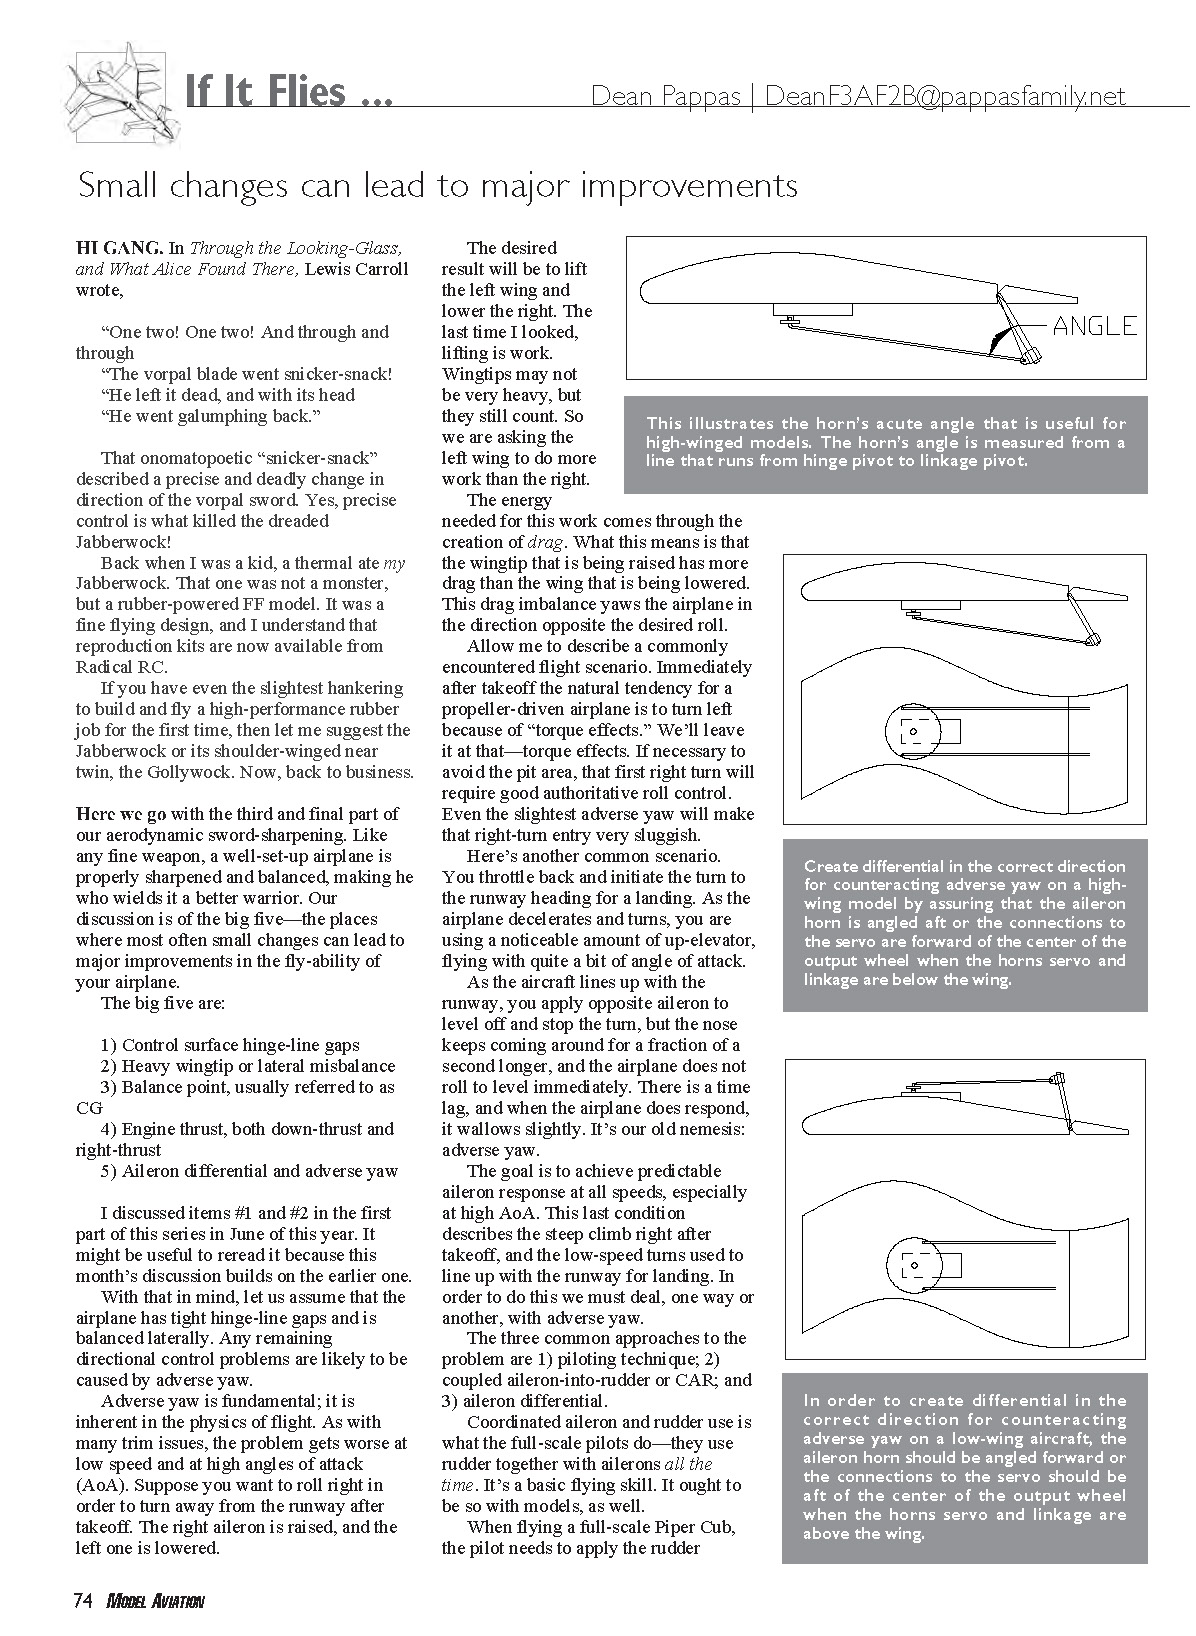
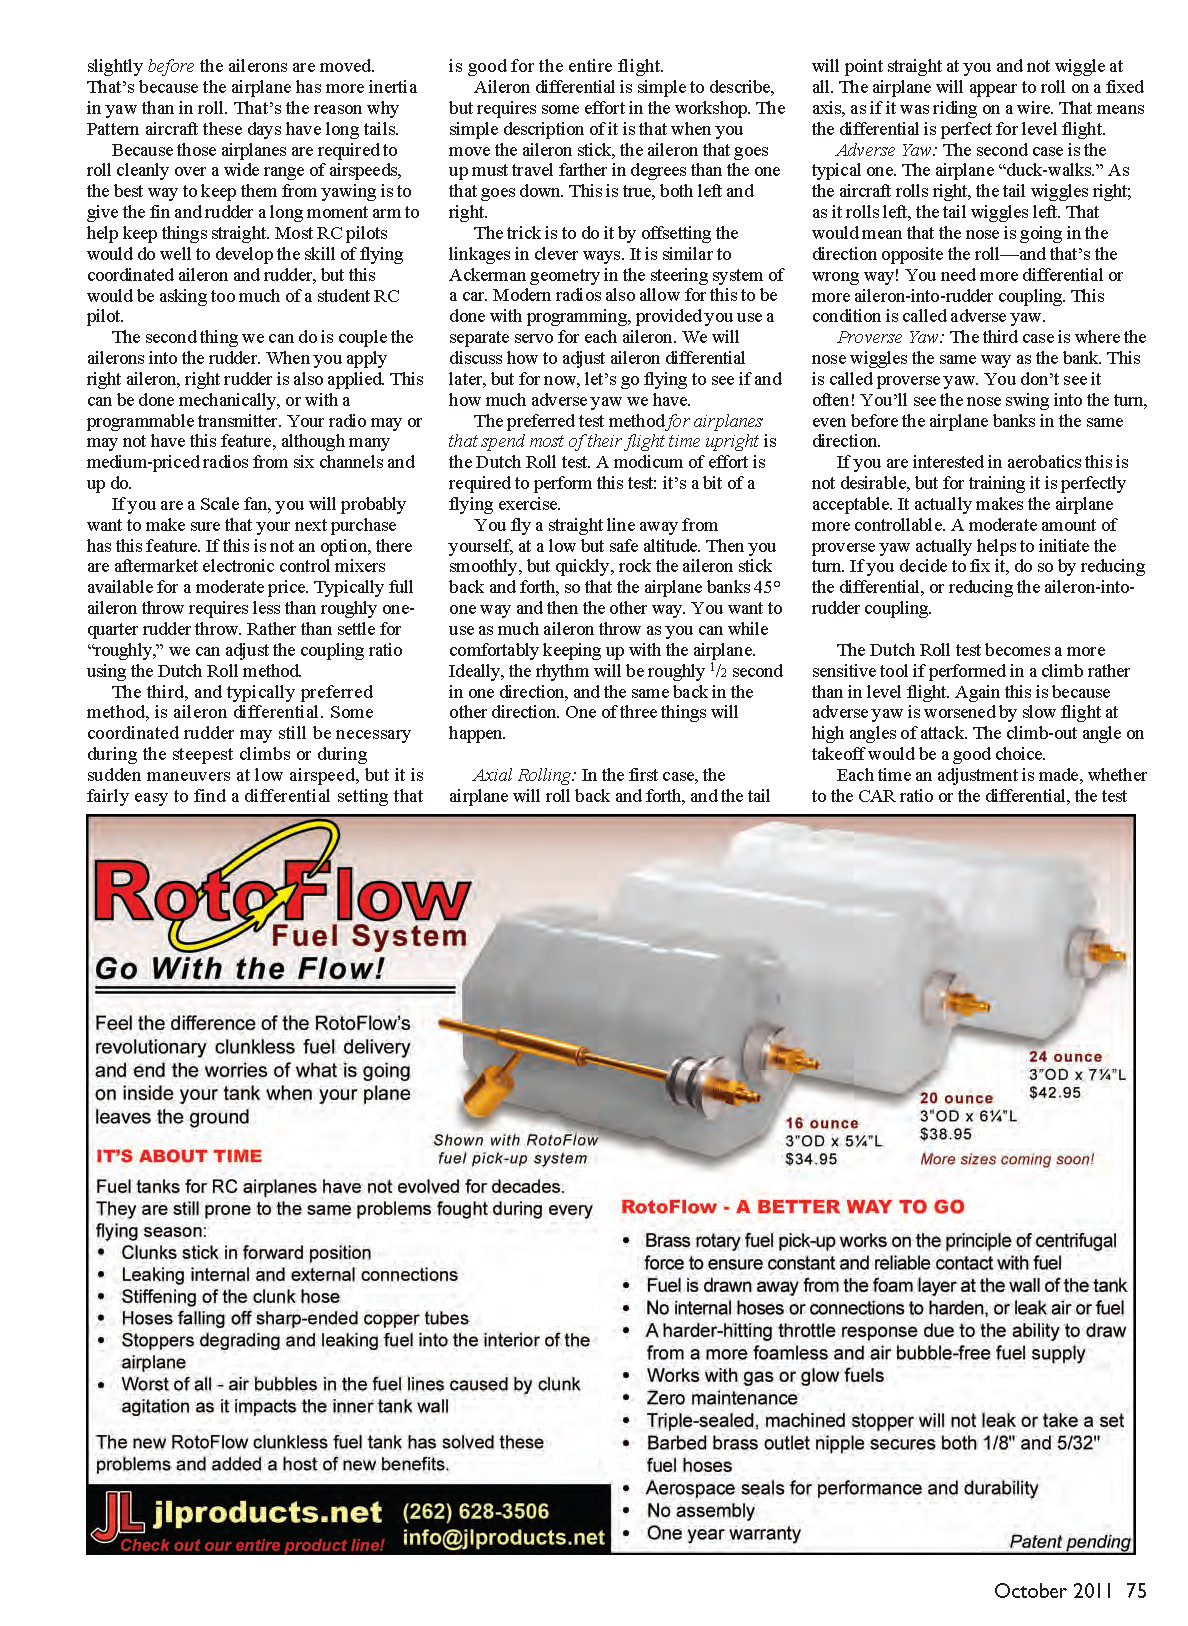
If your airplane has the servo(s) and control horns on the bottom of the wing, then the proper differential happens if the aileron horns are behind the hinge line or if the connections to the servo wheel are in front of the center of the wheel. This is typically the situation on a high-wing airplane, or a two-servo low-winger.
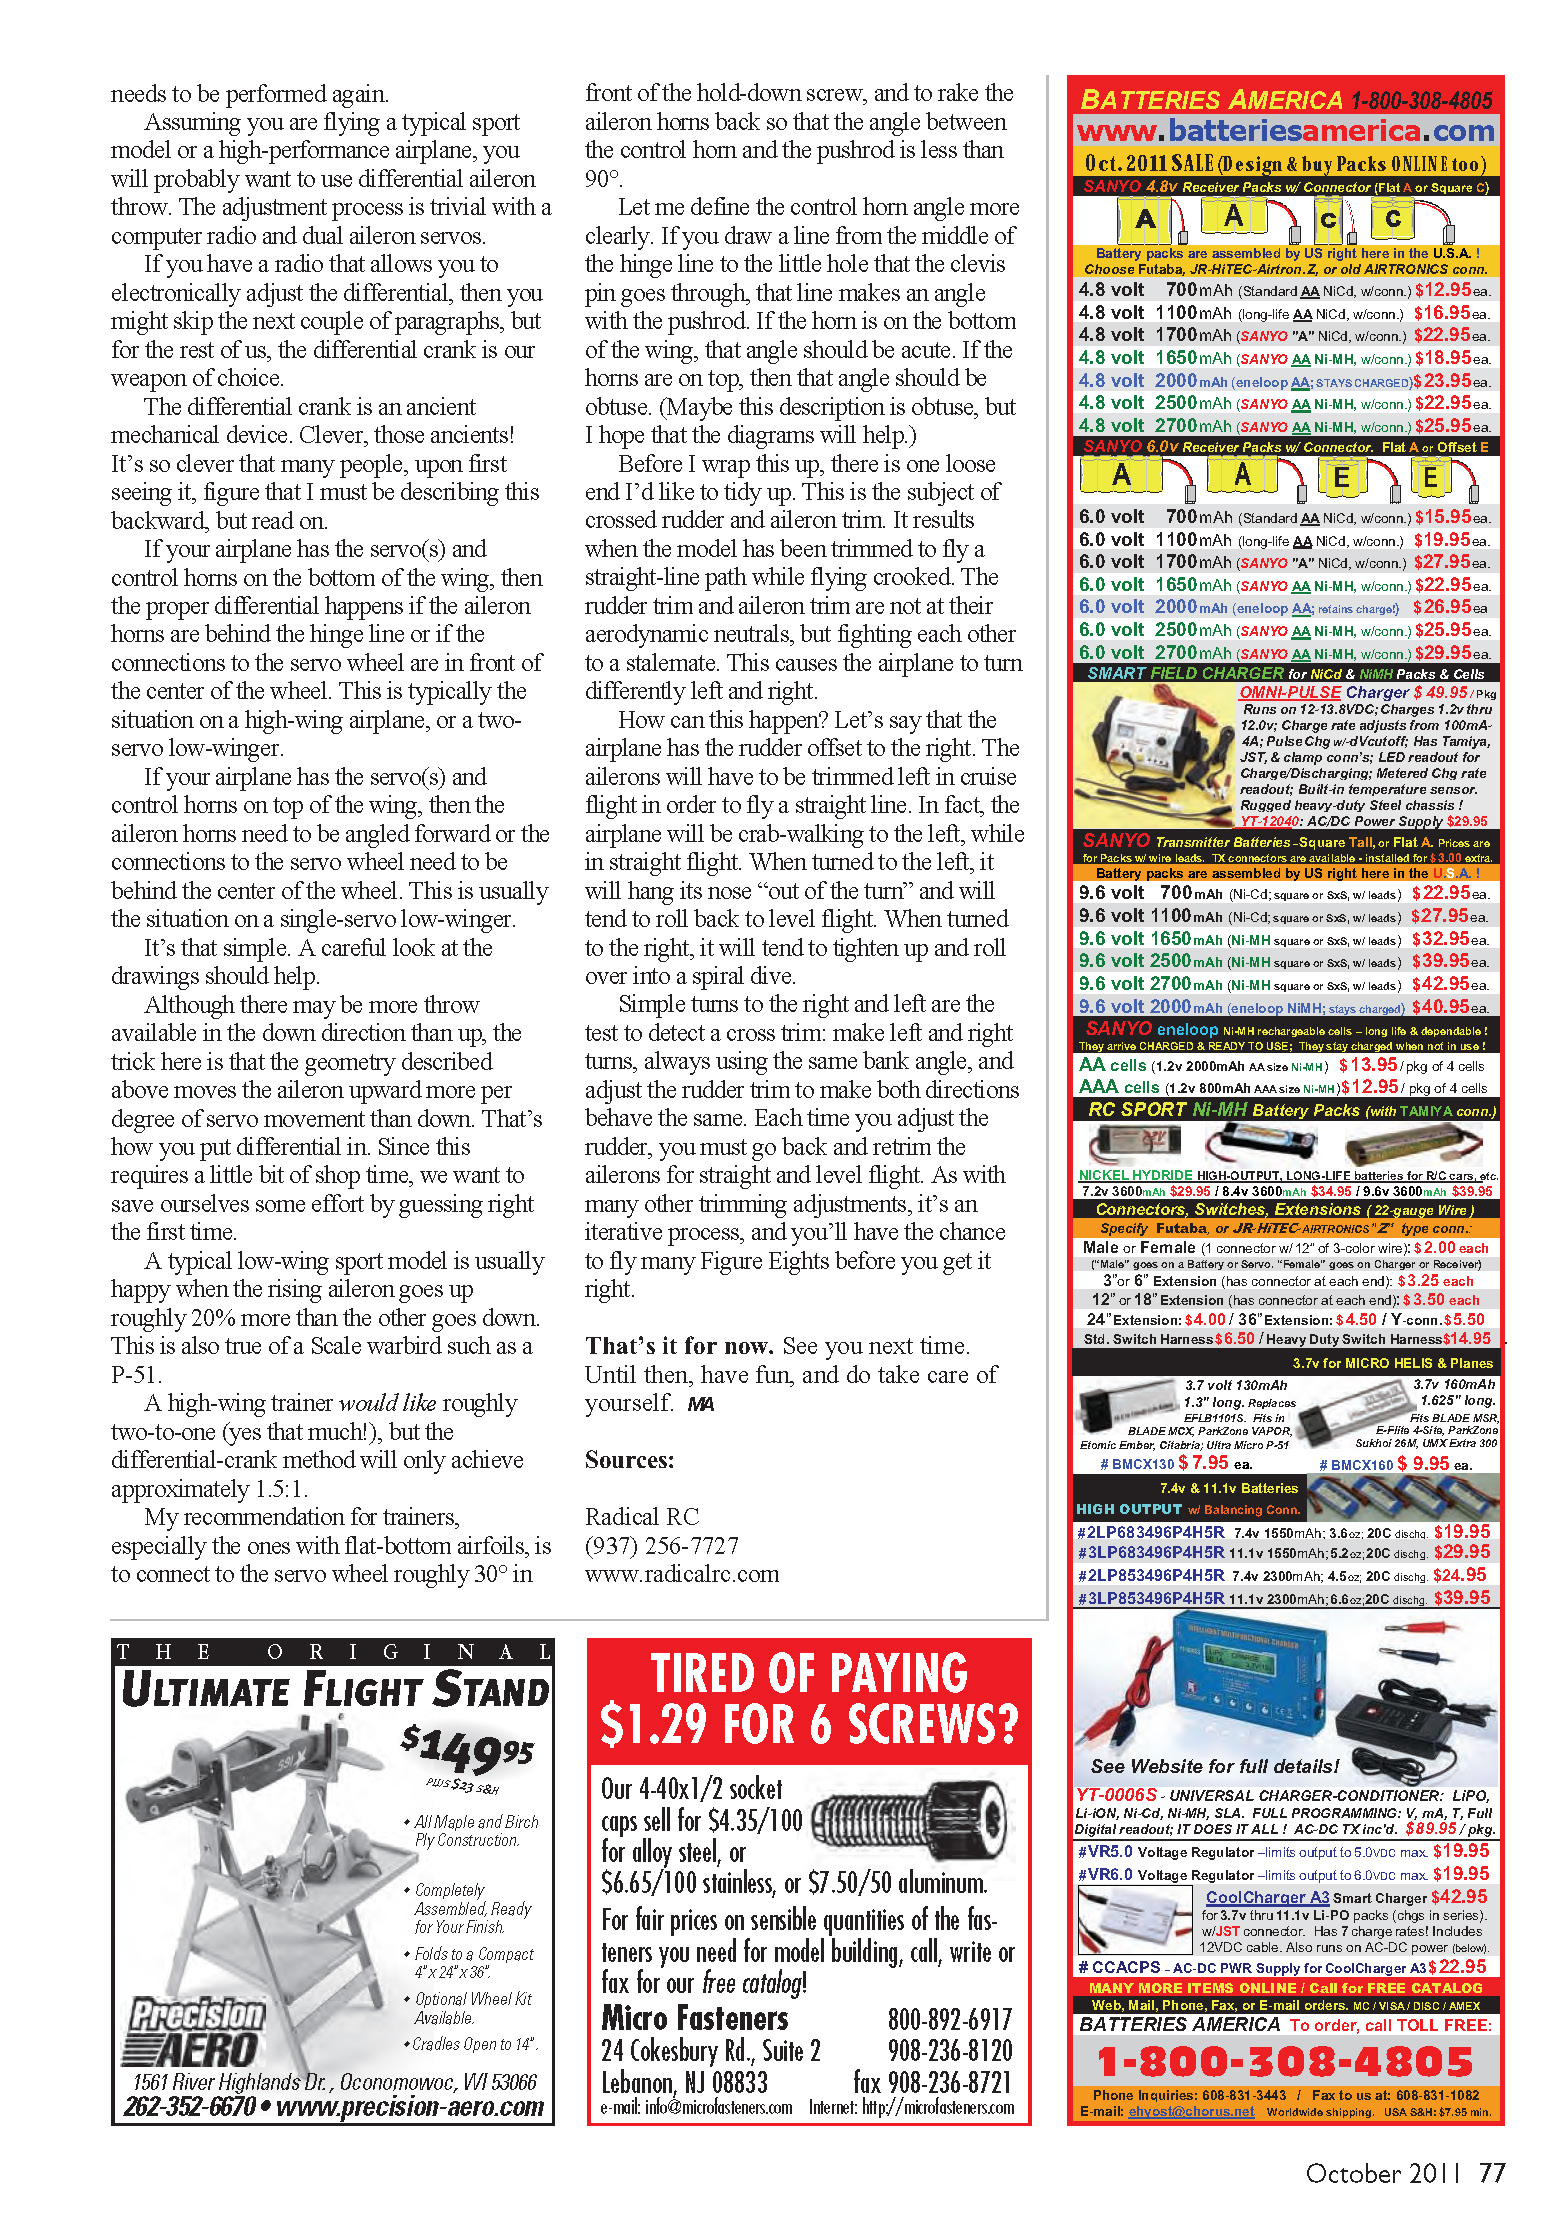
If your airplane has the servo(s) and control horns on top of the wing, then the aileron horns need to be angled forward or the connections to the servo wheel need to be behind the center of the wheel. This is usually the situation on a single-servo low-winger.
It’s that simple. A careful look at the drawings should help.
Although there may be more throw available in the down direction than up, the trick here is that the geometry described above moves the aileron upward more per degree of servo movement than down. That’s how you put differential in. Since this requires a little bit of shop time, we want to save ourselves some effort by guessing right the first time.
A typical low-wing sport model is usually happy when the rising aileron goes up roughly 20% more than the other goes down. This is also true of a Scale warbird such as a P-51.
A high-wing trainer would like roughly two-to-one (yes that much!), but the differential-crank method will only achieve approximately 1.5:1.
My recommendation for trainers, especially the ones with flat-bottom airfoils, is to connect to the servo wheel roughly 30° in front of the hold-down screw, and to rake the aileron horns back so that the angle between the control horn and the pushrod is less than 90°.
Let me define the control horn angle more clearly. If you draw a line from the middle of the hinge line to the little hole that the clevis pin goes through, that line makes an angle with the pushrod. If the horn is on the bottom of the wing, that angle should be acute. If the horns are on top, then that angle should be obtuse. (Maybe this description is obtuse, but I hope that the diagrams will help.)
Before I wrap this up, there is one loose end I’d like to tidy up. This is the subject of crossed rudder and aileron trim. It results when the model has been trimmed to fly a straight-line path while flying crooked. The rudder trim and aileron trim are not at their aerodynamic neutrals, but fighting each other to a stalemate. This causes the airplane to turn differently left and right.
How can this happen? Let’s say that the airplane has the rudder offset to the right. The ailerons will have to be trimmed left in cruise flight in order to fly a straight line. In fact, the airplane will be crab-walking to the left, while in straight flight. When turned to the left, it will hang its nose “out of the turn” and will tend to roll back to level flight. When turned to the right, it will tend to tighten up and roll over into a spiral dive.
Simple turns to the right and left are the test to detect a cross trim: make left and right turns, always using the same bank angle, and adjust the rudder trim to make both directions behave the same. Each time you adjust the rudder, you must go back and retrim the ailerons for straight and level flight. As with many other trimming adjustments, it’s an iterative process, and you’ll have the chance to fly many Figure Eights before you get it right.
That’s it for now. See you next time. Until then, have fun, and do take care of yourself. MA
Sources:
Radical RC (937) 256-7727 www.radicalrc.com
Transcribed from original scans by AI. Minor OCR errors may remain.

